Creative Photoshop CS4 Digital Illustration and Art Techniques - phần 7 pdf
Bạn đang xem bản rút gọn của tài liệu. Xem và tải ngay bản đầy đủ của tài liệu tại đây (7.13 MB, 44 trang )
252
Part Three: Real World Photoshop
14
10 Select the contents of the sky file by typing Control(PC)/Command(Mac)-A and
copy by typing Control(PC)/Command(Mac)-C. Return to your working file and, with
the selection still active, paste into the active selection by typing Control(PC)/
Command(Mac)-Shift-V. This pastes your copied art into the working file as a
masked layer. Use the Move tool to move the layer contents to the upper right within
the mask. Ensure that the layer is targeted in the Layers palette and not the mask or
you will accidentally move the mask instead.
11 Change the blending mode of the layer to luminosity and reduce the opacity to
71% in the Layers palette. Duplicate the layer by dragging it onto the Create a New
Layer button at the bottom of the Layers palette. Return the opacity of the duplicate
layer to 100% and then change its blending mode to hard light. Now hold down the
Shift key and click on the original layer in the Layers palette. This will select both
layers. Add both of these layers to a group by typing Control(PC)/Command(Mac)-G.
Click the Add Layer Mask button at the bottom of the Layers palette to add a mask
to the group. Select the Gradient tool.
253
14
Chapter 14: Real World Collage
12 In the Tool Options bar, select the radial gradient method and the Foreground to
Transparent preset. Set the foreground color to black. A quick way to do this when
a mask is targeted is to first hit the “ d ” key to set the foreground and background
colors to white and black, respectively. Then, press the “ x ” key to invert them,
setting the foreground color to black. Now, with the group’s mask targeted, create
a series of small, black to transparent gradients with the mask to reveal subtle
blends of imagery on the underlying layers.
13 Open up the tree.jpg file. Select the entire image and copy it. Then return to
your working file. As you’ve done previously, use the Magic Wand to select the black
areas of the image and then invert the selection. Paste the copied tree image into
the selection as a new layer and move it to the left within the mask. This is exactly
the same procedure, using the same keyboard shortcuts, that you used to paste the
sky into a masked layer moments ago. Duplicate the layer and change the blending
mode to overlay.
Foreground to transparent
You’ll notice throughout this tutorial
that in every instance where a gradient
is used to edit a layer mask, the same
Gradient preset is used. Foreground to
transparent is the Gradient preset of
choice because it doesn’t fill the entire
area surrounding your gradient with
color, allowing you to create multiple
gradients within your mask. Be very
careful to ensure that you are not
using the Foreground to Background
preset. Many people make this mistake
because it is the default preset. Using
Foreground to Background will always
fill the entire area; so if there is an
existing gradient within a mask, it will
be replaced each time you create a
new gradient.
254
Part Three: Real World Photoshop
14
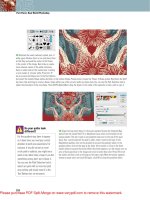
14 Shift-click on the original tree layer, below the currently targeted duplicate layer in the Layers palette, so that both the tree layers
are selected and then group them. Add a mask to the new group. Target the mask and again use the same radial gradient methods that
you used previously with the sky group to mask areas of the tree group, blending it into the background. Ensure that you are using the
Foreground to Transparent preset and a black foreground color as you create gradients within the mask.
PART FOUR: Create the body of the figure
15 Open up the suit.psd file. Select the contents of the image layer in that file by typing Control(PC)/Command(Mac)-A. Then paste it
into your working file as a new layer by typing Control(PC)/Command(Mac)-V. Use the Move tool to position it over the black area that
defines the figure’s body at the left. Reduce the opacity of the layer to 33%. Duplicate the layer and change the layer blending of the
new duplicate layer mode to overlay.
255
14
Chapter 14: Real World Collage
16 Open up the arm1.jpg file. Use the Polygonal Lasso tool to draw a rough
selection border that contains the arm and a bit of the shoulder of the wooden
figure; it is f
ine to have some black within the rough selection. Copy the selected
contents. Paste the copied arm into the working file as a new layer. Use Edit Ͼ Free-
Transform to resize it. Simply drag a corner handle of the bounding box while
holding down the Shift key to scale it proportionately. Then press Enter to apply the
transformation. Change the blending mode to lighten, then place it over the black
area where it belongs. Add a mask to the layer and create black to transparent,
radial gradients within the mask to blend it into the background.
17 Duplicate the arm layer and change the blending mode to overlay. Then
duplicate the newly duplicated layer as well. The result of building up layers like
this is a colorful and intense image component. Now open up the arm2.jpg file.
Again, use the Polygonal Lasso tool to draw a very rough, polygonal selection
around the arm and copy it. Again, black within the selection area is fine.
256
Part Three: Real World Photoshop
14
18 Paste the copied arm into your working file as a new layer. Resize with Free-
Transform and reposition the arm to the other side of the suit. Add a mask to the
layer and then, while the layer mask is targeted, draw a rough polygonal selection
around the forearm and hand. Fill the current selection within the layer mask with
black to hide it. Deactivate the selection by typing Control(PC)/Command(Mac)-D.
Create radial, black to transparent gradients within the mask to gently mask the
shoulder. Duplicate the layer and change the blending mode to overlay.
Adding hands
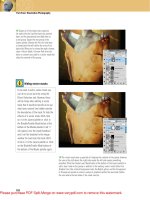
Use what are now becoming familiar methods to add some disproportionate hands to the ends of your mannequin arms.
1 Open up the hand1.jpg file. Select
all and copy. Then paste the copied
image into your working file as a new
layer. Use Free-Transform to rotate,
size, and position it. Change the layer
blending mode to lighten and add a
layer mask.
2 Create gradients within the mask
to hide the v
isible sharp edges that
remain. Duplicate the layer and
change the blending mode of the
duplicate layer to soft light. Now open
up the hand2.jpg file. Again, copy the
image and paste it into the working
file as a new layer.
3 Use the Move tool to position it at
the end of his other arm.
Change the
blending mode to lighten. Duplicate
the layer and change the blending
mode to overlay. There is no need to
mask these layers, the subtle hard
edges add to the choppy feel of the
composition.
257
14
Chapter 14: Real World Collage
PART FIVE: Create the main facial components
19 Open up the mask1.jpg file. Select all and then copy. Return to your working file
and paste the copied mask into it as a new layer. Use the Move tool to position it
over the black area that defines the region for the figure’s head. Change the layer
blending mode to lighten so that any dark areas that overlap the painted sky will
disappear. Use the Pen tool to carefully draw a closed path around the mask.
20 When you have finished drawing the path, load the path as a selection by Control(PC)/Command(Mac)-clicking on the path thumbnail
in the Paths palette. With the new selection active, choose Layer Ͼ New Ͼ Layer Via Copy from the menu to create a new layer containing
only the selection contents. Add a mask to the layer and create gradients within the mask to softly mask areas, like the bridge of the
nose. While editing the mask, remember to use the radial gradient method, a black foreground color, and the Foreground to Transparent
Gradient preset. Basically, you’re just repeating the methods you used previously to edit other masks. Reduce the layer opacity to 41% and
then duplicate it. Change the blending mode of the duplicate layer to soft light and increase this layer’s opacity to 100%.
258
Part Three: Real World Photoshop
14
21 Open up the face.psd file. Select the contents
of the file and copy. Return to your working file
and paste the copied contents into your file
as a new layer. Use the Move tool to position it
in the face area on the canvas and then drag
it beneath all of the mask layers in the Layers
palette. Duplicate the layer and change the
blending mode to hard light. Now duplicate the
newly duplicate layer and change the blending
mode to soft light. Add a mask to each layer,
one at a time, and edit each mask independently.
Use the Gradient tool with the same method,
foreground color, and preset to replicate the
same soft layer blending effect you’ve achieved
previously with other components.
PART SIX: Place strange items in the figure’s hands
22 Open up the mask2.psd file. Arrange your open
files in your workspace so that you can clearly see
both of the open image windows. In the mask2.psd
file, click on the group in the Layers palette and
then drag it into the working file’s image window.
This drag-and-drop approach allows you to quickly
move a group from one file to another and you can
also use this method to expedite the process of
cutting and pasting. Use the Move tool to position
the masks group at the end of the outstretched
arm on the working file’s canvas. This group contains a shadow layer, a mask layer,
and a layer to enhance the mask’s colors. The group, when you drag it into the file,
will be placed directly above the currently targeted layer in the Layers palette. This
will vary depending upon which layer mask you edit before you drag, but the exact
positioning of the group within the stack is not crucial.
Floating windows
In Photoshop CS4, by default, new files
are opened as tabbed image files within
your currently active window. This makes
for a well-organized workspace, but it
makes dragging and dropping between
files difficult. If you want to have two
files open in separate image windows
at the same time, you’ll need to direct
your attention to the Application bar or
the Window menu. In the Application bar,
there is an Arrange Documents pull-
down menu. Simply choose the Float All
in Windows option from this menu to
give each open file a window of its own.
In the Window menu, navigate to the
Arrange submenu and then choose the
Float All in Windows option.
259
14
Chapter 14: Real World Collage
23 Open up the framed.psd file. You can either copy the contents of the image and paste them into the working file as a new layer or
drag and drop from f
ile to file via the Move tool as described on the previous page. Once the new layer is in the working file, use the
Move tool to position the layer content so that it overlaps the stomach area of the figure at the left. When you are satisfied with the
position, change the blending mode of the layer to screen.
24 Add a layer mask to the layer and select the Gradient tool. Create a series of radial, black to transparent gradients within the layer
mask to gently blend the layer contents into the background and reveal parts of the image on the underlying layers. By now, you’re
certainly getting the hang of editing masks using this method. Also, note that if you accidentally mask something that you want to
reveal, you can gently reintroduce it by using the same method. Simply change the foreground color to white and then create white to
transparent gradients within the mask over areas that you wish to softly reveal again. When editing the mask, bear in mind that we want
to reveal the fingers on the wooden hand. Duplicate the layer and change the blending mode to hard light.
260
Part Three: Real World Photoshop
14
25 Open up the eye.psd file. Drag it into the working file as a new layer or copy and paste it into the working file as a new layer. Use the
Move tool to position it over the eye-shaped hole at the right of the mask in the figure’s hand. Choose Edit Ͼ Free-Transform from the
menu. When the bounding box appears, Shift-click on a corner point of the bounding box to proportionately resize the contents. Click and
drag just outside of the bounding box to rotate the contents. When you are happy with the size and rotation of the eye, press the Return or
Enter key to apply the transformation. For the sake of establishing a hint of order in the Layers palette, let’s place this layer into the mask
group. Expand the group so that you can see the layers within and drag the current eye layer into the group, above the other layers within.
26 Change the blending mode of the layer to luminosity. Add a mask to the layer
and add a series of black to transparent radial gradients into the mask, blending
the hard edges into the imagery on the layers below. Duplicate the layer and
change the blending mode of the duplicate layer back to normal. Target the mask
of the duplicate layer and add more black to transparent radial gradients around
the perimeter, masking almost all of the skin on this layer.
261
14
Chapter 14: Real World Collage
PART SEVEN: Take a moment to organize your layers
27 You’ll notice that the Layers palette is quickly filling up with
layers and duplicates and because you’re working at different
places within the hierarchy when adding layers, new layers aren’t
always added at the top either. Obviously, this can cause confusion.
Things can get a little chaotic; so let’s take a moment to establish
some order here. Select layers that go together logically and add
them to groups. For instance, click on one of the torn face layers,
and then Control(PC)/Command(Mac)-click on the others so that
all three are selected. Then, with all of the layers selected, type
Control(PC)/Command(Mac)-g to group them. To name the group,
double-click on the name to highlight the text. When the text is
highlighted, enter a new and relevant name for the group.
28 Repeat this process to group all clusters of layers that belong together, and
name the gr
oups appropriately.
Immediately after you do this, the Layers palette will
make more sense at a glance. However, you will notice that you cannot add an actual
background layer to a group. To remedy this, you can quickly convert the background
layer to a normal layer by double-clicking it in the Layers palette. When the New
Layer options appear, all that you need to do is click OK to complete the conversion.
Once the layer is converted, it can then be grouped in the same manner as the rest.
Also, you will have some unnamed groups that were created previously; go ahead
and name them now. Taking a few moments to do this will make it much easier for
you to make sense of your file if you decide to perform alterations at a later date.
262
Part Three: Real World Photoshop
14
PART EIGHT: Add some painted surface texture
29 Open up the painting.psd file. This is a photograph of the original color painting before it was torn and cut up. A hue adjustment
was applied to the original image, altering the overall color. Choose Select Ͼ Color Range from the menu. Color Range allows you to
target a range of color from within the painting. When the Color Range dialog box opens, simply click on a color in the image window
that you wish to isolate. The black-and-white preview will show you, in white, how the selected areas will be generated. You can add other
ranges of color to your selected regions by Shift-clicking on them. Alternatively, you can remove ranges of color from the selected area
by Alt(PC)/Option(Mac)-clicking on them. The fuzziness slider allows you to quickly control how particular the Color Range function is
when selecting regions of color. When you’re satisfied with the preview of the selected regions, click OK to generate a selectio n .
30 With the new selection active, choose Edit Ͼ Copy from the menu. Return to your working file and paste the copied selection into it as
a new layer. Drag the layer to the top of the stack in the Layers palette if necessary. Position the layer so that it overlaps the image in a
pleasing manner. Now, just because we copied a specific range of color, it doesn’t mean we can’t alter the color now in our working file.
In the Layers palette, enable the transparency lock for this new layer. Choose Edit Ͼ Fill from the menu. In the Fill dialog box, select the
Color option from the Contents menu to open the picker. Select a new color from the picker and click OK. In the Blending options, leave
the blending mode set to normal and the opacity set to 100%. Click OK to fill the layer with your new color. Use Free-Transform to resize
and position the layer further if you like.
263
14
Chapter 14: Real World Collage
31 Return to the painting.psd file and select another range of color with the Color
Range command. Again, copy the selected region and paste it into the wor
king
file as a new layer. Feel free to enable the transparency lock of this layer and fill
it with a different color. Use Free-Transform to alter the size and positioning as
required. Repeat this process over and over again to build up a number of different
layers that add painted and tactile feeling to the surface of your image. Feel free
to duplicate the layers and resize or reposition them as well, varying layer opacity
and blending modes along the way. When you’re satisfied with the results, add these
new textural layers to a named group.
32 The results of this textured stage of the project will vary greatly from individual to individual. However, if you feel that the surface
texture is too strong in any specific area, you can remedy this by adding a mask to the group. Simply target your new group in the
Layers palette and click on the Add Layer Mask button at the bottom of the palette. Target the mask and select the Gradient tool. Specify
a black foreground color and set up the Gradient tool like you’ve been doing all along. Introduce some radial gradients into the mask in
areas that you wish to fade. This is the same process that you’ve been using all along and even at this final stage, it proves quite useful.
264
Part Three: Real World Photoshop
14
Practical applications of this technique
This compositing style can be used in moderation as well. It doesn’t always need to dominate the composition. In this instance,
it was used to create just the background of the illustration. Something as subtle as a tactile background can alter the feeling
of the illustration, making it a little more human feeling when the majority of the composition is so obviously digital.
265
14
Chapter 14: Real World Collage
Matching subject matter with style
This method of working really lends itself to expressing something ominous. The torn painting can contribute to an
unsettled feeling, which is only helped by a large, black, primary image component like the ravens shown here. These
illustrations, which accompanied an article about Internet-pedophiles stalking children, were an ideal subject for this
very expressive style.
15
In and Out
of Photoshop
S
ometimes we get locked into routines that keep us complacent and uninspired. To
break free of visual monotony, try breaking free from your computer for a while. By
beginning with photos in Photoshop, we can manipulate them to lend themselves
to tracing. After printing them out, we can use traditional drawing techniques to
create natural, personalized art. This artw
ork is then sc
anned back in and used alongside other
elements as the basis for a stunning and original composition. Working this way is a breath of
fresh air and provides a nice break from the usual routine.
Traditional thinkers are often under the misconception that the incorporation of tactile
elements into digital art means they’ll be using scanned textures as backgrounds, or creating
distressed, scratchy effects. This chapter will get you thinking beyond that. There’s so much
more you can do when you incorporate the tactile into the middle of the w
orkflow. A willingne
ss
to go in and out of the digital realm is required. And I think you’ll agree that not only is the
process interesting, but also the results are a unique combination of both worlds, blurring the
lines of distinction in-between.
Chapter 15
You’ll need to have a bit of experience with shape layers and paths to
make your way through the chapter with ease. All is explained, but a little
know-how will make things less confusing. It is also benefi cial to know
your way around the Layers palette, the Tool Options bar, and understand
how black and white is used within layer masks.
267
268
Part Three: Real World Photoshop
15
What you’ll learn in this chapter
Stripping things down
In addition to preparing images for tracing purposes, you’ll also learn to perform drastic
adjustments to strip images down to the core, or essence, of the image. The result of this is a
stark, black-and-white version of the photograph that clearly divides positive and negative space,
removing anything in-between.
Analysis and adjustment
You’ll learn to analyze images and adjust them in order to enhance the details. Your analysis will
deviate from the analysis of photography in the classic sense. You are not concerned with the end
product of each photographic image. The initial photography is merely seen as a means to an end.
You will look for regions of detail that you can enhance via Adjustment tools and regardless of the
color balance and tonal perfection of the final image, you’ll concentrate on creating something that
you can use for the specific task of tracing traditionally.
Creative Techniques and Working Methods
Photoshop Tools, Features, and Functions
Solid color layer masks
Many people work with solid color layers, but rarely do I see people editing the masks to realize their
vision. In this chapter, editing the masks of solid color layers is the key to creating the main components
within the image shown here.
Smart objects
Groups of layers will be stored within smart objects further along in the chapter. Because
numerous instances of these objects are scattered around, the timesaving benefit of editing all
instances of an object at once becomes invaluable.
Quick targeting
It may seem like a small thing, but the method of targeting layers by Control-clicking with the
Move tool will help you navigate the clutter of the Layers palette with ease.
269
Chapter 15: In and Out of Photoshop
15
PART ONE: Start with photographs
1 When capturing the visual components of the illustration, there is no need for
perfect lighting, focus, or exposure. The resulting images are for tracing purposes
only, so your photography doesn’t need to be technically perfect. This skull was
quickly photographed outdoors on an overcast day, which provided nice,
even lighting.
All of the files needed to follow
along with this chapter and create
the featured image are available for
download on the accompanying Web
site in the project files section. Visit
www.creativephotoshopthebook.com .
Project files
The first two parts of this chapter
describe the process of preparing and
creating art before entering Photoshop.
If you aren’t interested in this aspect
and just want to get busy creating the
featured image, go ahead and skip
forward to Part Three of this chapter.
Skipping ahead
2 The octopus and flower were photographed outdoors
on the same day. The background of the image isn’t a
concern at all because we’ll be tracing the subject only.
The tree and hydro tower images will be incorporated
as manipulated photos, not hand-drawn reproductions.
Shooting these against a clear sky makes it easier to
isolate them later on.
270
Part Three: Real World Photoshop
15
PART TWO: Adjust, print, trace, and scan
3 The next step, after
photographing the image
components, is to drastically
alter the images that we’ll
be tracing by hand. Open
up the skull.jpg file. Choose
Image Ͼ AdjustmentsϾ Black and
White from the menu. The goal
now is to enhance contrast while
preserving detail. Choose the High
Contrast Blue Filter preset from the
Preset menu.
4 Open up the flower.jpg. Again, use the black-and-white adjustment from
the Image Ͼ Adjustments menu. This time, select the darker preset to begin
with. Then, you’ll need to tweak individual sliders to enhance the contrast
while preserving the detail. Repeat this process with the octopus.jpg image
as well. The Blue Contrast preset does a sufficient job of converting the
image to high contrast black and white, while preserving the necessary
details.
271
Chapter 15: In and Out of Photoshop
15
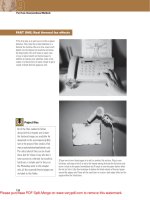
5 Print each image as large as you can on a single sheet of paper. A black-and-
white printout on cheap paper is fine. There is no need to waste color toner or
inks on this part of the process. Take each printout and tape a translucent sheet
on top of it. Something like tracing paper, onionskin paper, or drafting vellum will
suffice. You may wish to use two or three sheets if the underlying image on the
printout appears too prominent. It should serve as a guide, not a distraction as
you draw.
6 Use a black marker or felt-tipped pen to trace the photograph. The goal when
tracing is to create solid areas of black, alongside thick and thin line work, to
represent the shading in the image. Keep in mind that although you are tracing, the
way in which you approach the shading and create your line work will express your
personal style.
272
Part Three: Real World Photoshop
15
7 Continue on in this manner until you’ve traced each printout. You may wish to use a combination of markers and felt-tipped pens to
introduce lines of varying thickness. Take your time and ensure that you don’t overdo it when it comes to creating shaded areas. Areas
of negative space must be present in your drawing to represent highlights.
8 Peel each sheet away from the printout it is taped to, and then carefully remove the tape. Scan each drawing at a resolution of at least
300 ppi in grayscale mode. Perform any tonal adjustments necessary to brighten the whites to 0% and darken the blacks to 100% gray.
Use Levels, Curves, Brightness/Contrast, or whatever feature you’re most comfortable with. Make sure that you have the Info palette visible.
If it isn’t visible, choose Window Ͼ Info from the menu. Ensure that you check the density of the blacks and whites with the Eyedropper and
pay attention to the readouts that appear in the info window. As shown here, my dark areas are 100% black.
273
Chapter 15: In and Out of Photoshop
15
PART THREE: Prepare the photographs
9 Open up the hydro.jpg file. Type Control(PC)/
Command(Mac)-L to open up levels. We are
going to use levels to begin stripping midtones
out of the image. Drag the left input levels
sliders toward the center to darken the shadows.
Next, drag the right input levels slider toward the
middle to lighten the highlights. By increasing
the range consumed by highlights and shadows,
you are reducing the range of midtones, thereby
effectively increasing the contrast.
Using selective color
Stripping color out of separate ranges selectively allows us to enhance the effect.
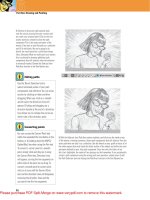
1 Choose Image Ͼ Adjustments Ͼ Select-
ive Color from the menu. Choose cyans
from the Colors menu and then strip all
of the color out of the cyans by pulling
all of the sliders to the far left. You’ll
immediately notice the whitening of cyan
areas in the image.
2 You’ll notice, however, that areas of
darker blue in the image are unaffected.
To remedy this, select blues from the
Colors menu. Perform the same operation
of dragging all of the sliders to the left.
This will remove much of the lingering
darker blue colors from the image.
3 Now choose the Neutrals option from
the Colors menu. Go ahead and strip
all of the cyan, magenta, and yellow out
of the neutral areas using the same
method. In the end, you’ll be left with
what looks like black hydro towers set
against a white sky. Click OK and leave
the file open for the time being.
274
Part Three: Real World Photoshop
15
10 Open up the tree.jpg file and repeat the same procedure you used to strip color
out of the hydro.jpg image. First use levels to increase the contrast, and then use
selective color to strip color out of the sky so that all that remains is a black tree
and horizon set against a white sky. Click OK and leave this file open as well.
11 Now open up the tree2.jpg file. Again, perform a levels adjustment first.
Because of the exposure of this image, you won’t need to darken the shadows as
much as you’ll need to increase the range of highlights. After applying the levels
adjustment, launch selective color. Depending upon how you adjusted the levels, it
is likely that with selective color you’ll need to concentrate on whites and neutrals
only, stripping cyan, magenta, and yellow out of each. Click OK and leave this file
open as well.
Because we’re relying on an intuitive
approach to performing levels
adjustments, the results of these
conversions will vary from person
to person. What you do in the Levels
dialog box will directly affect how
selective color adjustments will be
made. If you find that areas that should
be dark are being stripped away
when you perform selective color
adjustments, use the History palette to
go back to the state previous to your
levels adjustment. Perform the levels
adjustment again, but concentrate on
creating darker shadows this time.
Then perform your selective color
adjustment and you’ll likely notice an
improvement.
Varying results
275
Chapter 15: In and Out of Photoshop
15
PART FOUR: Incorporating the altered photographs
12 Create a new file in Photoshop that is approximately 7.5 inches wide and 9.5
inches high, in CMYK mode, with a resolution of 300 ppi. This will act as your
working file for the rest of the chapter. Click on the Foreground Color swatch in
the toolbar to access the picker. Select a cool gray color from the picker and fill
the background layer with it by typing Alt(PC)/Option(Mac)-Delete on the keyboard.
Create a new solid color layer from the Create New Fill or Adjustment Layer menu
at the bottom of the Layers palette. When the picker appears, select a darker gray
color and click OK.
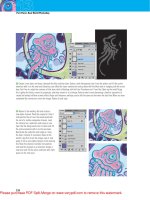
13 Return to the newly converted hydro.jpg file. Type Control(PC)/
Command(Mac)-A to select all. Then type Control(PC)/Command(Mac)-C
to copy the selected image. Return to the working file. In the Layers
palette, Alt(PC)/Option(Mac)-click on the solid color’s mask. This not
only targets the mask in the Layers palette but also makes the contents
visible. Right now, because no areas of the layer are masked, the
contents of the mask are pure white. Type Control(PC)/Command(Mac)-V
to paste the copied hydro image into the visible mask.
276
Part Three: Real World Photoshop
15
14 Type Control(PC)/Command(Mac)-T to
access Free-Transform. When the bounding
box appears around your selection, Shift-drag
a corner point outward to increase the size
proportionately. Drag within the box to reposition
the art on the canvas. When you’re happy with
the new size and position, press the Enter key to
apply the transformation. Alt(PC)/Option(Mac)-
click on the layer mask in the Layers palette to
hide it. Now you can see the effect of editing
the solid color layer’s mask. However, what
we’re after is the inverse of what you see here.
To invert the mask, simply ensure that it is
targeted in the Layers palette (it doesn’t need
to be visible, just targeted). You can either click
the Invert button in the Masks palette or opt for
the keyboard shortcut, which is Control(PC)/
Command(Mac)-I.
15 Now, duplicate the layer by dragging it onto
the Create a New Layer button at the bottom of
the Layers palette. With the duplicate layer’s
mask targeted, type Control(PC)/Command(Mac)-
T to access Free-Transform again. When the
bounding box surrounds the image, right-
click(PC)/Control-click(Mac) inside of it. A
pop-up menu will appear. Choose flip horizontal
from the pop-up menu. After the flip is complete,
press Enter to apply the transformation.
