creative photoshop digital illustration and art techniques - Phần 5 ppt
Bạn đang xem bản rút gọn của tài liệu. Xem và tải ngay bản đầy đủ của tài liệu tại đây (14.03 MB, 38 trang )
Ch10-K52046.indd 136Ch10-K52046.indd 136 6/21/07 6:37:17 PM6/21/07 6:37:17 PM
Chapter 10
Photocopier
Meets Photoshop
P
hotoshop, to many, represents perfection. But while we strive to
achieve perfection, let us not overlook the beauty of imperfection. If
you’re an urban dweller, pay attention to what is surrounding you as
you wander the streets. You’ll notice photocopied flyers and posters
plastered all over the place. You’d be hard pressed to find a better example of
imperfect, yet beautiful, artwork. This is the art of the underground scene. Local
bands and underground artists do what they can with what they have. There is an
evident do-it-yourself esthetic inherent in the majority of urban poster art.
This low fidelity appearance is more a result of available tools and monetary
resources rather than a conscious attempt at style. Regardless of intent, a certain
style prevails. Poor registration, inferior image quality, and cut-and-paste
typography all contribute to the urban underground look. However, the most
prominent element is the look achieved by using a poor quality photocopier to put
it all together. Generally these collages are photocopied on machines in desperate
need of servicing or even dangerously low on toner. Not the sort of thing found
at a professional copy shop, but rather like something you’ll find in a local
convenience store.
Remember, just because Photoshop has an arsenal of tools that lend
themselves to achieving perfection, it doesn’t mean that you cannot turn the
tables and create convincing imperfection. The limit to what you can achieve with
Photoshop’s tools and functions is dictated by your own willingness to explore
less-than-obvious methods.
To create tactile and distressed underground poster art effects, all you need is
access to a good old-fashioned photocopier, an enthusiasm for Photoshop, and
a willingness to experiment.
Ch10-K52046.indd 137Ch10-K52046.indd 137 6/21/07 6:37:27 PM6/21/07 6:37:27 PM
138
Creative Photoshop
Part 2: Unconventional Methods
1 I Open up the neinphoto.jpg file. This is a press photo used by an American band known as
The Nein. The Nein will act as the subject for the urban poster art you’ll be creating here. To
simulate the appearance of cutting with scissors, use the polygonal lasso tool to draw a very
rough polygonal selection around the outside of a single band member in the image. Now,
create a new file. Specify a white background and grayscale color mode. Set the canvas size
to something that is similar in size to the paper you’ll be printing everything out on.
2 I Return to the neinphoto.jpg file. Hold down
the Control(PC)/Command(Mac) key. Click inside
the selection border and drag the contents of the selection into your new grayscale file as a new layer. Continue to hold down the
Control(PC)/Command(Mac) key and position the layer on the canvas to allow space for the band members. Use this method to add
each band member to the grayscale file. To fit them on the canvas, you’ll likely have to rotate one band member. To do so, target the
appropriate layer in the layers palette and then choose a 90Њ rotation option from the EditϾTransform menu.
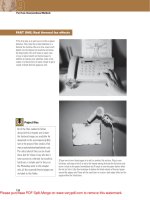
Project files
All of the files needed to follow along with this
chapter and create the featured image are
available on the accompanying CD. Files for
this chapter can be found in the folder entitled:
chapter_10. You can follow along from the
beginning, creating and printing out your own
grayscale files. Or, if you don’t want to seek out
a photocopier on your own, you can access the
already photocopied and scanned files in the same
folder. These supplied files will be referred to by
name throughout the tutorial. Feel free to use them
or substitute files of your own as you work.
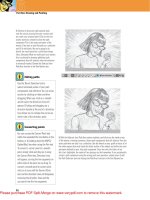
Editing text
When you have a type layer targeted in the layers
palette and the type tool selected, you can edit any
of the type options in the tool options bar. This will
affect the entire contents of the type layer. However,
if you click on an area of type on the canvas, which
activates the type layer, it becomes necessary to
select type in order to edit it. Either click and drag to
select a portion of the text, or double-click to select
it. Once your text is selected, it can then be edited.
Nein press photo courtesy of Casey Burns/The Nein
Ch10-K52046.indd 138Ch10-K52046.indd 138 6/21/07 6:37:34 PM6/21/07 6:37:34 PM
139
Photocopier Meets Photoshop
Chapter 10
3 I Next, choose LayerϾFlatten Image from the menu to flatten
the layers. Choose ImageϾAdjustmentsϾBrightness/Contrast
from the menu. Enable the use legacy option offered in the
brightness/contrast dialog box so that you are removing shadow
and highlight detail when adjusting. Adjust the brightness and
contrast sliders to increase the contrast and decrease the
range of grays within the image. This is the first step in image
deterioration that is necessary to produce a convincing effect.
When you’ve completed the adjustment, print the image in black
and white on an ink jet or laser printer.
1 I Create a new grayscale file
identical to your pr
evious file. Select
the horizontal type tool. Click on the
canvas to add a type insertion point.
Enter some text and press the Enter
key to create a new, editable type layer.
2 I While the type tool is selected, you
can alter the f
ont, size, color, and other
attributes of your type layer in the tool
options bar. Choose an appropriate font
like American typewriter. Now, create
another type insertion point and add
some different text using a different font.
3 I Target your background layer and
use the r
ectangular marquee to create
a selection beneath a line of type. Use
EditϾFill from the menu to fill the
selection. Then target the overlaying
type layer, ensure that you’ve selected
the type tool and change the color of
the type to white.
Creating text
Very simple typography set against black, white, or gray backgrounds will help to lend a sense of authenticity to your design.
Ch10-K52046.indd 139Ch10-K52046.indd 139 6/21/07 6:37:40 PM6/21/07 6:37:40 PM
140
Creative Photoshop
Part 2: Unconventional Methods
4 I Use the aforementioned techniques to add
all of the necessary text to your page on a series
of layers. Try different shades of gray, as well
as black, behind white text. Try duplicating type
layers by dragging them onto the create new
layer button at the bottom of the layers palette.
Move the duplicated type around the canvas with
the move tool. In addition to experimenting with
different grays in the background, try changing
some of your black type to gray as well. Fill your
page with options until you’re satisfied, and then
flatten the image. Print this page in black and
white as well.
Create some basic shapes
Again, simplicity is the key to a design like this, especially when creating backgrounds and borders.
1 I Create another new grayscale
f
ile. Select the rectangular marquee
tool. Hold down the shift key while
clicking and dragging to draw a
square selection. Press ‘d’ to set the
foreground color to black, and type
alt(PC)/option(Mac)-delete to fill the
selection with it.
2 I Click inside the selection border
with the mar
quee tool and drag the
active selection border down on the
canvas beneath the square. Choose
EditϾStroke from the menu. Select
inside as the location and black as
the color. Enter a width value and
click OK.
3 I Use the polygonal lasso tool to
cr
eate a primitive starburst shaped
selection on an empty area of the
canvas. Use the same methods you
used previously with the first
square to fill your starburst with
black. Print this file in black and
white as well.
Ch10-K52046.indd 140Ch10-K52046.indd 140 6/21/07 6:37:47 PM6/21/07 6:37:47 PM
141
Photocopier Meets Photoshop
Chapter 10
5 I Open up the computers.jpg file from the CD. This grayscale file has already
had the computer images placed in it and has been flattened. All that you need to
do here is snap up the contrast a little. Choose ImageϾAdjustmentsϾBrightness/
contrast from the menu. Again, enable the legacy option to deteriorate the image
and adjust the sliders to increase the contrast overall. Print this final file in black
and white and then gather up all of your printouts
Making copies
The best way to get that rough, photocopied look, is to gather up your printouts and find a neglected copier.
1 I Convenience stores are the best
places to f
ind copiers that are rarely
maintained. The lack of maintenance
often results in a grittier result, which
is exactly what we’re after. Get out
your printouts and make at least one
photocopy of each.
2 I Try copying the copies a few
times
. With each generation, the
quality deteriorates and the signature
look of the copier becomes more
apparent. Crumple some copies, flatten
them, and then copy them again.
Incorporating this crumple technique
will distress your copies even more.
3 I When you’re finished, gather up the
copies and head home
. There is a good
chance that you’ll have a lot to choose
from. Lay everything out on the floor to
have a good look. Choose the best of
the bunch and scan them.
Ch10-K52046.indd 141Ch10-K52046.indd 141 6/21/07 6:37:52 PM6/21/07 6:37:52 PM
142
Creative Photoshop
Part 2: Unconventional Methods
6 I Again, all of the photocopied and scanned files that were used to create
this poster are included on the CD. They will be referred to by name for the
rest of this chapter. However, feel free to substitute photocopies of your own
if you like. To begin creating the poster, open up the paper.jpg file from the
CD. This desktop scan of a folded piece of paper will act as the background
in the multi-layered file you’ll create. Something as simple as starting with
an authentic background can be very powerful in helping to achieve a
convincing result. Every little bit helps.
7 I Choose LayerϾNew Fill LayerϾSolid Color from the menu. When the
New Layer dialog box opens, set the blending mode to multiply and click
OK. When the picker opens, choose a dark pink color and click OK to create
your new solid pink layer. Next, click on the create a new layer button at the
bottom of the layers palette. With the new layer targeted, use the rectangular
marquee tool to draw a square selection. Press the ‘d’ key to set the current
background color to white. Type Control(PC)/Command(Mac)-delete on the
keyboard to fill the new selection with white.
Choosing fonts
For your poster art to look authentic it
should definitely look like a computer was
not involved in its creation whatsoever.
This especially rings true when it comes
to choosing fonts. American Typewriter and
Stencil are both fonts that are available
when typesetting with traditional tools. As
a result of this, it is entirely believable that
the typesetting on the poster could’ve been
accomplished by traditional means. Adding
the photocopied look to a slick modern
font will display the technique we’re
describing, but at the same time it will ruin
the authenticity of the final poster design
by displaying something that is clearly
impossible.
Ch10-K52046.indd 142Ch10-K52046.indd 142 6/21/07 6:37:57 PM6/21/07 6:37:57 PM
143
Photocopier Meets Photoshop
Chapter 10
8 I Type Control(PC)/Command(Mac)-d on the
keyboard to deactivate the current selection.
Open up the shapes.jpg file and use the
rectangular marquee tool to draw a selection
around the square that has the stroke around
it. Hold down the Control(PC)/Command(Mac)
key, click inside the selection border and,
while holding the mouse button down, drag the
contents of the selection into your working
file as a new layer. Change the layer blending
mode to multiply and then choose EditϾFree
Transform from the menu. Hold down the shift
key while dragging a corner handle outwards to
increase the size proportionately.
9 I Click and drag within the bounding box to position the layer contents. When it frames the white box
on the layer below, press the enter key to apply the transformation. Return to the shapes.jpg file and
deactivate the selection. Choose ImageϾAdjustmentsϾInvert from the menu to invert the color of the
shapes image. Now, use the rectangular marquee tool to draw a selection around the inverted square
shape. Choose EditϾCopy from the menu. Return to your working file. In the channels palette, click on
the create new channel button at the bottom of the palette to create a new alpha channel.
Lighten then darken
Almost every photocopier has a setting that
allows you to lighten or darken the copied
image. When you’re copying the original,
try using a very light setting so that a lot of
the detail and tonal range disappear. Then,
try copying this initial copy with a darker
setting, enhancing the contrast while
copying the image of reduced detail and
tonal range.
Ch10-K52046.indd 143Ch10-K52046.indd 143 6/21/07 6:38:02 PM6/21/07 6:38:02 PM
144
Creative Photoshop
Part 2: Unconventional Methods
10 I Click in the column to the left of the CMYK
composite channel in the channels palette to
make it visible at the same time as your alpha
channel. Your alpha channel will preview against
the background as a red overlay. Ensure that
the alpha channel is targeted in the channels
palette and then choose EditϾPaste from
the menu to paste the copied rectangle into the
channel. Use Free-Transform to increase the
size and position the square so that it overlaps
the large white square, exactly like you did
with the outlined square earlier. Press Enter to
apply the transformation.
11 I Control(PC)/Command(Mac)-click on the alpha channel thumbnail to generate a selection from its contents. In the layers palette
,
with the current selection active, click the create a new layer button. Target your new layer at the top of the layers palette and select
the gradient tool. In the tool options bar, choose the linear gradient method and then click on the gradient preset thumbnail to edit the
gradient. Choose any two-color gradient preset as a starting point, then click on the color stop at the left, below the gradient. Click on
the color swatch to launch the picker and select a light blue color.
The Nein
I often listen to music when I spend
countless hours in my studio and every
once in a while I come across a band like
The Nein that sparks an idea. I thought
this band was the ideal subject to display
such an anti-technology technique. They
hail from the USA and their album ‘wrath of
circuits’ has an inherent fear of technology
about it. They are currently signed to Sonic
Unyon Records in Canada. If you’d like
to hear their music you can find audio
samples at:
Ch10-K52046.indd 144Ch10-K52046.indd 144 6/21/07 6:38:07 PM6/21/07 6:38:07 PM
145
Photocopier Meets Photoshop
Chapter 10
12 I Use this same method to change
the color stop beneath the gradient
at the right to a different, darker blue.
Drag the gradient midpoint to the right
slightly and click OK. Your new gradient
will be selected as the preset when
you exit the gradient editor. Click and
drag, from the bottom up, within the
current selection on your new layer.
This will add your new gradient into the
selection. Deactivate the selection and
change the blending mode of the layer
to multiply.
Adding a figure
Follow this process to create a figure, complete with a giant laptop on his head.
1 I Open up the band.jpg file and
use the polygonal lasso tool to dr
aw
a polygonal selection around one
of the band members. Control(PC)/
Command(Mac)-click inside the
selection and drag the contents into
your working file as a new layer.
2 I With the new layer targeted,
choose EditϾF
ree-Transform from
the menu. To rotate, move the mouse
pointer outside the bounding box,
then click and drag. Shift-drag the
corner of the box to increase the size
proportionately. Press the enter key to
apply the transformation.
3 I Open the computers.jpg file. Select
a laptop with the polygonal lasso and
dr
ag it into your working file as a new
layer. Use the free-transform function
to rotate, resize, and position the
laptop so that it overlaps the figure’s
head.
Ch10-K52046.indd 145Ch10-K52046.indd 145 6/21/07 6:38:12 PM6/21/07 6:38:12 PM
146
Creative Photoshop
Part 2: Unconventional Methods
13 I Use the polygonal lasso tool to draw a selection that surrounds only the screen of the
laptop in your working file. Open the eyes.jpg file. In the eyes.jpg file, draw a polygonal
selection around one of the eyes in the image. Copy the selected area and return to your
working file. With your current selection active, choose EditϾPaste Into from the menu
to paste the eye into the image as a masked layer. Target the new layer thumbnail in the
layers palette (not the mask) and use free-transform to resize and position the eye.
14 I Click in the area between your new layer thumbnail and the mask thumbnail in
the layers palette to link them. Now, target the current layer and then Control(PC)/
Command(Mac)-click on the laptop layer and the figure layer in the layers palette so that
all three layers are targeted. Choose LayerϾNewϾGroup From Layers from the menu
to add these layers to a group. Now, repeat this procedure three times to add the three
remaining figures, add laptops on their heads, put eyes on the laptop screens, link any
unlinked masks, resize and rotate as required, and then add each set of layers to a group
until you have a separate group for each figure.
Linking the unlinked
When you have a selection active and
you choose the Paste Into option from the
Edit menu, your copied artwork is pasted
into the file as a new layer. This layer
is automatically masked and the active
selection determines which areas of the
new layer will remain visible. When you
create a masked layer this way, the mask
and the layer are not linked in the layers
palette. If you want to move both the layer
and mask together it is necessary to link
them by clicking in the space between the
two thumbnails in the layers palette. You’ll
see a link icon appear in this area. Masks
are linked to layers here because if the
groups containing the layers are moved,
we want the masks to move with them.
Ch10-K52046.indd 146Ch10-K52046.indd 146 6/21/07 6:38:17 PM6/21/07 6:38:17 PM
147
Photocopier Meets Photoshop
Chapter 10
15 I Return to your shapes.jpg file. If you left the file open, chances are it is
still inverted. Choose FileϾRevert from the menu to revert it back to the original
positive state. If it isn’t currently open, reopen the shapes.jpg file. Use the
polygonal lasso tool to draw a selection border around the starburst shape. Hold
down the Control(PC)/Command(Mac) key, then click inside the selection border
and drag it into your working file as a new layer. Use Free-Transform to increase
the size and position the layer on the canvas as shown here.
16 I Drag your starburst layer onto the create
a new layer button at the bottom of the layers
palette to duplicate it. Use the move tool to drag
it over to the left and then down slightly on the
canvas. Duplicate this layer too, and then move
it to the right. Open the logos.jpg file. Click and
drag with the elliptical marquee tool to select
the logo at the upper right. Hold down the shift
key to create a circular selection as you drag.
Control(PC)/Command(Mac)-drag the selected
logo into the working file as a new layer. Use
free-transform to adjust the size and position.
Another duplication method
When you are using the polygonal lasso
tool, try right-clicking(PC)/control-
clicking(Mac) on the contents of your layer
on the canvas. You will see a pop-up menu
appear offering you several functions to
choose from. Included on the list is the
option to duplicate the layer. Try using this
method, you may find it even quicker than
dragging layers onto the create new layer
button at the bottom of the layers palette.
This method works with any selection tool.
Ch10-K52046.indd 147Ch10-K52046.indd 147 6/21/07 6:38:23 PM6/21/07 6:38:23 PM
148
Creative Photoshop
Part 2: Unconventional Methods
17 I Return to your logo.jpg file. This time use
the elliptical marquee tool to draw a selection
around the black logo at the lower right of the
canvas. Copy it and return to your working file.
Click on the create new channel button at the
bottom of the channels palette to create an alpha
channel. Double click the new channel thumbnail
and when the Channel Options appear choose
selected areas in the Color Indicates options
and click OK. Paste the copied art into your
new channel and then enable the visibility of
the CMYK composite channel by clicking in the
column to the left of it in the channels palette.
Constrained rotations
When you are rotating the contents of a
layer or selection with free-transform, try
holding down the shift key while you click
and drag outside of the bounding box.
When you do this, your rotations will be
constrained to 45Њ increments.
18 I Use free-transform to increase the size of your pasted selection
and position it within the channel so that it overlaps the logo in the
composite channel. Press Enter to apply the transformation and then
open up the type.jpg file. Use the polygonal lasso tool to draw a
selection around the ‘sonic unyon presents’ that is set against a dark
background. Copy it and return to your working file. Paste it into your
targeted alpha channel and then use free-transform to adjust the size
and position it at the upper left within the channel. Load the channel as
a selection.
Ch10-K52046.indd 148Ch10-K52046.indd 148 6/21/07 6:38:29 PM6/21/07 6:38:29 PM
149
Photocopier Meets Photoshop
Chapter 10
19 I With the new channel-based selection
active, return to the layers palette and create a
new layer. Click on the foreground color swatch
to choose a light green foreground color from
the picker. Type alt(PC)/option(Mac)-delete to fill
the active selection with the foreground color on
the new layer and then deselect. Set the blending
mode of the layer to multiply in the layers palette
and select the polygonal lasso tool. Use the
polygonal lasso to draw selections that cover
each large eye. Then fill these selections with
the same color on the current layer. Deselect.
20 I Create a new layer and drag it below the top layer in the layers palette. Use the polygonal lasso to
draw a shape that roughly surrounds the ‘sonic unyon presents’ box on the top layer. Ensure that the new
layer is targeted and then press ‘d’ on the keyboard to set the background color to white. Type Control(PC)/
Command(Mac)-delete to fill the selection with the background color and then deselect. Return to the type.
jpg file, reopen it if necessary.
Lighten via blending
If you double-click a layer thumbnail in the
layers palette you will access the Layer
Style box which, in addition to a plethora
of other options, allows you to control the
blending of the layer. In this case, simply
direct your attention to the top slider in
the ‘blend if’ section. Drag the left slider
underneath the ‘this layer’ bar to the
right. This will lighten all of the shadow
areas on the layer. This is a handy way to
lighten all of the black components of your
photocopied art on a layer. The advantage
of doing this versus a color adjustment is
that you can always go back to this dialog
box and edit or reset your adjustment.
Ch10-K52046.indd 149Ch10-K52046.indd 149 6/21/07 6:38:35 PM6/21/07 6:38:35 PM
150
Creative Photoshop
Part 2: Unconventional Methods
21 I Use the rectangular marquee to draw a
selection around the black against white ‘sonic
unyon presents’ type. Copy it, return to your
working file, and paste it in as a new layer.
Drag the layer to the top of the layers palette
and change the blending mode to multiply. Use
free transform to adjust the size and angle of
the layer contents as well as position it over
the other ‘sonic unyon presents’ artwork on the
canvas. Repeat this method to add the ‘live at
the horseshoe’ text on a new layer. Drag the new
layer beneath the figure groups in the layers
palette.
22 I Now, return to the type.jpg file. Use the
polygonal lasso to select a section of type, copy
it and then paste it into the working file as a
new layer. Use free-transform to size, rotate, and
position it. Repeat this method over and over
again until you’ve added all of the necessary
text elements to the poster. Leave the blending
modes for all of these new layers set to normal
as you add them. Move the layers up and down
within the palette as you see fit.
Distorting
Each piece of photocopied text that is
brought into this image as a new layer is
resized and rotated by using the free-
transform function. However, if you look
at the word ‘live’ you’ll notice that it has
been distorted. To distort, rather than scale,
while using free-transform, hold down the
Control(PC)/Command(Mac) key while you
drag a corner handle of the bounding box.
Ch10-K52046.indd 150Ch10-K52046.indd 150 6/21/07 6:38:41 PM6/21/07 6:38:41 PM
151
Photocopier Meets Photoshop
Chapter 10
23 I The poster design is complete, but it doesn’t look
weathered or distressed enough on the surface. To
remedy this, we’ll incorporate a photo of the real thing.
Open up the texture.jpg file. This is a photo of extremely
weather-beaten poster art. Select all and copy. Paste it
into your working file as a new layer and drag the new
layer to the top of the stack in the layers palette. Change
the blending mode of the layer to hard light and reduce
the opacity to 26%. Save and close your poster file with
all of the channels and layers intact.
Put your poster up on the wall
Add your poster to a background image as an editable smart object, carefully tracing it with the pen tool.
1 I Open up the wall.jpg file. Then, choose FileϾPlace fr
om the menu.
Navigate to your layered poster file on your hard drive and open it. This
will place your poster file into the wall image file as a smart object.
2 I The smart object is placed into your file surrounded by a free-transform
bounding box.
Resize and rotate the smart object while placing it to the left
of the canvas. Press the enter key to commit the transformation.
3 I Use the pen tool to draw a closed path around the pink edge of the rotated poster.
T
he smart object’s black background should lie outside of your finished path. Ensure
that the pen tool is set to create paths and the add to path area option is enabled.
Ch10-K52046.indd 151Ch10-K52046.indd 151 6/21/07 6:38:46 PM6/21/07 6:38:46 PM
152
Creative Photoshop
Part 2: Unconventional Methods
24 I With your new path selected and your smart
object targeted in the layers palette, choose
LayerϾVector maskϾCurrent Path from the
menu to clip your smart object with the path.
You will see a vector mask added to your smart
object in the layers palette. If you wish to edit
your poster at any point, all that you need to
do is double-click on the smart object in the
layers palette. This will open a new document
containing a layered version of the poster. You
can make any changes you like to the poster
file. Once you save the changes the smart
object will automatically update within this file,
reflecting the changes you made.
Examining the poster you’ve created
A successful urban poster art effect is the culmination of a number of essential ingredients.
a I Converting your images to grayscale and then enhancing
the contr
ast is an excellent way to get started. It allows you
to create simple, high contrast images that lend themselves
nicely to real-world photocopier degradation without losing
any essential detail.
b I Scanning the photocopied results and then using the
polygonal lasso tool allows you to cr
eate an imperfect and
choppy composition. Because most real-world underground
posters are put together by manually cutting and pasting, a
choppy Photoshop selection technique is necessary to ensure
an authentic look.
c I Creating areas of color that overlap the imagery on a
la
yer with a multiply blending mode simulates authentic
silkscreen printing effects. Usually, urban posters that are silk-screened are hastily created with poor registration and as a
result, colors overlap and tend to look sloppy.
d I Now, even though we started with a folded piece of paper in the background, the results were still a little too crisp looking.
Adding a photo of actual torn up posters on the top layer helps to provide a gritty, textured effect.
a
d
c
b
Ch10-K52046.indd 152Ch10-K52046.indd 152 6/21/07 6:38:55 PM6/21/07 6:38:55 PM
153
Photocopier Meets Photoshop
Chapter 10
Because this style of urban artwork is comprised of flat, solid colors, it lends itself nicely to hue/saturation adjustments.
As is evident in these poster designs for The Weekend, a hue adjustment, after all is said and done, can open the door
to a plethora of new color combinations. Sometimes you’ll be taken by surprise to see how well a color combination that
you’d never think to try will work out.
Original Weekend press photo courtesy of Teenage USA Recordings.
Ch10-K52046.indd 153Ch10-K52046.indd 153 6/21/07 6:39:03 PM6/21/07 6:39:03 PM
Ch11-K52046.indd 154Ch11-K52046.indd 154 6/21/07 7:54:25 PM6/21/07 7:54:25 PM
Chapter 11
Urban
Lowbrow Art
T
here is evidence of a reckless approach inherent in the majority
of urban art. This, along with pop-culture subject matter, is what
some argue sets it apart from the world of mainstream art, giving
it the derogatory sounding tag of being ‘lowbrow’. However,
with a lack of mainstream acceptance comes a sense of freedom. Not only
is no subject too taboo, but the techniques of execution are less limited than
within mainstream art. Paint is thrown around with abandon, new elements
are added on top of old, and the visual result has an incredibly loose feel to
it. This is something that is rarely achieved or even addressed in the world
of digital art. Things are often very contrived and the feeling of abandon is
rarely even attempted. The recklessness and abandon that the paint slingers
take for granted is something that we Photoshop artists must carefully plan
and calculate. In order to achieve similar results, it is up to the digital artist to
devise a process that mimics the techniques of the real world approach. That
process is outlined step-by-step within this chapter.
As you work your way through the following pages, you’ll notice the
inclusion of many real world resources. When a dripping paint effect is
required, I’ll opt for an actual photo of just the thing. An appropriate paper
scan is used to create an authentic unbleached parchment background, and
all of the primary elements are converted drawings or photos. The results
are helped by the fact that no single element is entirely computer generated,
however, it is the conversion process used here that gives the finished image
its signature appearance.
All of the main elements in this composition are converted to high
contrast, black and white imagery, before becoming part of the composition.
Using bitmap mode is very effective because, as you’ll discover shortly.
When you choose the threshold method, a pixel can either be black, or it can
be white. There are no shades in-between. Another method for achieving
high contrast is to use a couple of native filters that reside within Photoshop.
The stamp and photocopy sketch filters can prove very useful when it comes
to converting color and grayscale images, and will help preserve a little detail
where the bitmap conversion method will not.
When it comes to adding black and white components to the composition,
we’d be nowhere if it weren’t for alpha channels. They provide unparalleled
control and flexibility when it comes to creating custom selections from black
and white data, as you’ll see for yourself soon enough. So lower you chair,
lean back, and let’s create an urban lowbrow masterpiece.
155
Ch11-K52046.indd 155Ch11-K52046.indd 155 6/21/07 7:54:32 PM6/21/07 7:54:32 PM
156
Creative Photoshop
Part 2: Unconventional Methods
1 I To get started, open up the bkd.jpg file
from the CD. This will act as the background
layer in our new working file. Next, open
up the black and white heart.jpg file. Type
Control(PC)/Command(Mac)-a to select all of
the image contents and then type Control(PC)/
Command(Mac)-c to copy the contents of
the selection. In the bkd.jpg file, click on the
Create New Channel button at the bottom of the
Channels palette. With your new alpha channel
targeted, type Control(PC)/Command(Mac)-v to
paste the copied black and white image into your
alpha channel. Click on the Load Channel as a
Selection button at the bottom of the palette.
2
I Return to the Layers palette and click on the Create a New Layer button at the
bottom of the palette. Target your new layer and click on the foreground color
swatch in the toolbar to access the picker. Choose a color similar to red brick and
click OK. Type alt(PC)/option(Mac)-delete to fill the active selection with the new
foreground color. Leave the selection active and open up the redpaint.jpg file.
Select the contents of the redpaint file and copy. Return to the working file with the
active selection and choose Edit>Paste Into from the menu.
CD files
The files needed to follow along with this
chapter and create the featured illustration
are available on the accompanying CD.
These files can be found in the folder
entitled: chapter_11. However, do not
feel restricted to using these files only.
Feel free to follow along and incorporate
background imagery and textures of your
own as you work through the chapter. Also,
rather than using the supplied outline art
files, you can create your own outline art
using the methods described earlier in
either Chapter 5 or Chapter 6.
Ch11-K52046.indd 156Ch11-K52046.indd 156 6/21/07 7:54:35 PM6/21/07 7:54:35 PM
157
Urban Lowbrow Art
Chapter 11
3 I Use the move tool to drag the layer up to the top of
the canvas area within the mask. Because the mask isn’t
linked, it will remain in position as you move the layer
contents. Change the layer blending mode to hard light
and then duplicate the layer by dragging it onto the Create
a New Layer button. Change the blending mode of your
duplicate layer to soft light. With your current layer targeted,
shift click on the layer directly above the background
layer, targeting the top three layers. Type Control(PC)/
Command(Mac)-g to add the targeted layers to a new group.
Mask your group
Punch a hole in your paint effects by using the contents of a new channel as the basis for a mask.
1
I Open up the ace.jpg file. Select
the contents of the file and copy them.
Return to your working file and create
a new alpha channel in the channels
palette. With your new channel targeted,
paste the copied contents from the
other file.
2
I Click in the column to the left of the
CMYK composite channel to enable its
visibility. You will now see your alpha
channel appear as a red overlay on
top of the image. This will aid you in
repositioning your pasted art.
3
I Position the pasted art within
the paint area to the right. Load the
channel as a selection and then
target your group in the layers palette.
Choose Layer>Layer Mask>Hide
Selection from the menu to mask this
area of the entire group.
Ch11-K52046.indd 157Ch11-K52046.indd 157 6/21/07 7:54:39 PM6/21/07 7:54:39 PM
158
Creative Photoshop
Part 2: Unconventional Methods
4 I Open up the dice.jpg file. We’re going to use the
photocopy filter here as it will produce a high contrast
result with a halo around the perimeter of the dice.
The Photocopy filter uses the current foreground and
background colors to produce its results, so in order
to create a black and white effect, we need to set the
foreground and background colors to their default
black and white state. Press the ‘d’ key on the keyboard
to set the foreground and background colors to their
default state. Choose FilterϾSketchϾPhotocopy from
the menu. Adjust the detail and darkness settings until
your dice look something like this. Apply the filter.
Incorporate the dice
Place your converted dice into another channel and use the resulting selection to punch another hole in the paint.
1 I Choose ImageϾModeϾGrayscale from
the menu. Then, choose ImageϾModeϾ
Bitmap to access the bitmap conversion
options. Choose 50% threshold as the
method and leave the output set at the
current resolution. This will vary depending
upon the resolution you’re working at.
2
I Click OK to convert your image. Then select the
contents of the image and copy them. Return to your
working file, create a new alpha channel and invert it by
Typing Control(PC)/Command(Mac)-i. Paste your copied
dice into the new, inverted channel.
3
I Enable the visibility of the composite
channel. Position your selection contents
to the left and then load the channel as
a selection. Invert the selection by typing
Control(PC)/Command(Mac)-shift-i.
Target the group’s mask in the Layers
palette and fill the selection with black.
Ch11-K52046.indd 158Ch11-K52046.indd 158 6/21/07 7:54:44 PM6/21/07 7:54:44 PM
159
Urban Lowbrow Art
Chapter 11
5 I Deactivate the dice selection.
Open up the bluepaint.jpg file and
use the magic wand to select a
range of blue color from within the
image. Hold down the Control(PC)/
Command(Mac) key and drag the
selected paint into the working
file as a new layer. Choose EditϾ
Free-Transform from the menu.
Click and drag within the center
of the bounding box to reposition the contents, then shift-click and
drag a corner point to resize the contents of the bounding box
proportionately. Press the Enter key to apply the transformation.
Reduce the opacity of the layer and change the blending mode to
luminosity.
Finish the blue paint effect
Repeat the process of dragging selected regions of blue into the image and then add a solid blue background on an
underlying layer.
1 I Return to the bluepaint.jpg file and
use the magic wand to select another,
different range of color. Again, hold
down the Control(PC)/Command(Mac)
key and drag it into the working file. Use
Free-Transform to resize and position it,
change the mode to luminosity and reduce
the opacity.
2
I Use this method to add a couple more layers
from the same bluepaint.jpg file. Control(PC)/
Command(Mac)-click on the thumbnail of one
of these layers to generate a selection from
the contents. Then Control(PC)/Command(Mac)-
shift click on the remaining blue paint layer
thumbnails to add them to the selection.
3
I Create a new layer and drag it below
all of these new layers in the layers palette.
Choose a light blue foreground color
from the picker and use it to fill the active
selection on your new layer. Deactivate the
selection.
Ch11-K52046.indd 159Ch11-K52046.indd 159 6/21/07 7:54:49 PM6/21/07 7:54:49 PM
160
Creative Photoshop
Part 2: Unconventional Methods
6 I Target all of the blue paint layers and group
them in the Layers palette. Open up the figure.
jpg file. This file, like the original heart.jpg file,
has been prepared ahead of time. Both images
were converted to grayscale and then converted
to bitmap mode, as you did previously to convert
the dice after the photocopy filter was applied.
Use the move tool to click anywhere on the
image and drag it into the working file as a new
layer. Reposition the layer contents toward the
upper left of the canvas. Drag the new layer to
the top of the stack in the Layers palette.
7
I Now open up the edges.jpg file. This is
another prepared image that was created by
converting poor quality scans of photocopied
pages to bitmap mode. If you like this sort
of look, be sure to read Chapter 10 where
photocopy effects are explained in greater detail. Use the move tool to drag the edges.jpg image into the working file as a new layer.
Position the layer so that it touches the top of the canvas and change the blending mode to multiply. Open up the car.psd file and drag it
into the working file as a new layer too. Position the car layer at the bottom of the canvas.
The conversion process
In order to convert an image to bitmap
mode, it must be converted to grayscale
first. After you convert your image to
grayscale, it is a good idea to examine the
overall contrast within the image. Perform
any tonal adjustments you think will be
necessary for a successful conversion
while you’re working in grayscale. Once
you’ve got things looking the way you want
them, then go ahead and convert the image
to bitmap mode. Once the image is in
bitmap mode you cannot perform any tonal
adjustments, so you must remember to make
any adjustments while you are in grayscale
mode.
Ch11-K52046.indd 160Ch11-K52046.indd 160 6/21/07 7:54:55 PM6/21/07 7:54:55 PM
