css web sites with dreamweaver mx 2004 - Phần 9 pdf
Bạn đang xem bản rút gọn của tài liệu. Xem và tải ngay bản đầy đủ của tài liệu tại đây (2.48 MB, 22 trang )
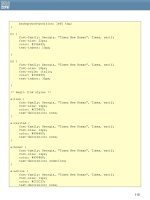
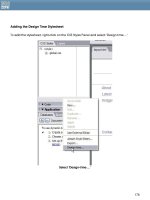
Adding the Design Time Stylesheet
To add the stylesheet, right-click on the CSS Styles Panel and select 'Design time …'
Select 'Design-time …'
176
In the dialog that opens, click the cross above 'Show only at design time' and select your
print stylesheet.
Repeat the process for 'Hide at design time' and select the real main stylesheet 'global.css'
(in my case).
Design Time Style Sheets
Click OK and Dreamweaver should now be previewing using your print.css stylesheet – if
you want to be sure then turn the background in print.css some putrid color; if you see the
nasty color, then it has worked.:
What a lovely pink …
177
Printing only relevant areas of the page
The first step in creating our print stylesheet is to remove any page elements that aren't
necessary in the printed document. In our case this is the navigation. The navigation in my
layout is already contained within a div named 'navigation' however, if the page element
that you want to hide for print doesn't already have an id, give it one. Even if your layout is
tables based rather than all CSS, you can give a table or even a table cell an id, in order
to hide it.
My navigation div in Code View
If you already have a named div for the area that you want to hide, edit that style in the
print.css stylesheet in Dreamweaver.
178
In the Block category set the dropdown next to 'display' to 'none'.
Set Display: none
If you wrapped your area in a new div then create a New CSS Class using that name, and
then set Display to none just as we did when editing the CSS Style above.Click OK and the
area should disappear from the page in Design View.
The navigation is now hidden
179
Making content stretch to fill the page
Now that we have hidden our navigation we have a gap where it once sat on the left
hand side of the page. If we have large gaps on the page then the printed content could
run onto more sheets of paper than it would do if it ran nicely up to close to the edges of
the paper.
To eliminate the gap we need to make the content stretch into that space. If you are
using a tables layout, depending on how you have structured the tables this may have
happened anyway (as a result of the display:none) otherwise, if you have set the widths of
the cells with CSS, the following method for CSS layouts will work just as well. If you have set
the widths of cells using html attributes of the td tag you will need to convert these to CSS
before this method will work.
In my layout I need to edit the id 'content'.
In the Box category I have set a left margin of 200 pixels, which is what creates the gap. By
changing that to 30 pixels I can effectively remove that gap.
Editing the content div
180
Click OK to see the content resize to fill the page area.
The layout with the navigation space removed
Using a different font style for print
Serif font styles, such as Time New Roman are easier to be read in print than sans-serif styles
such as Verdana or Arial, which were designed to be read on the screen. You can
change your font by editing it in the print.css stylesheet.
181
I have defined my fonts for the body tag and so edit the CSS Styles for body in
Dreamweaver:
Changing the font style in the print stylesheet
Currently my font size is set in ems which are great for screen, but a better font sizing for
print is points, which have a real world sizing – there are 72 points in an inch. So by setting
your font in points you can know exactly how it will print out for the user. Points should not
be used for screen stylesheets as the onscreen rendering of points is erratic between
browsers and operating systems.
182
I have changed my font sizes to 12 points with the line-height set to 20 points. Don't forget
to change your headings, and any other text elements too.
The layout after changing the font size and style
Converting to grayscale
Many users will only have a black and white printer, and if they just want the text, will
probably prefer to print out in black and white. Coloured ink is expensive, too! If your site
uses colored text, or light text on a dark background then you should change this in your
stylesheet for maximum readability and ease of printing (your dark blue background with
white text may look lovely online but no-one wants to print out pages and pages of deep
blue!)
Simply change the color values in the print stylesheet to standard black on white; for some
variation you could use shades of grey for headings or other elements as long as they are
not too light.
183
Converting colored elements to grayscale
Display page information on printed versions
As well as hiding elements, you can display additional elements using the print stylesheet –
a boxout containing the page's URL might be of use if someone is taking a copy for
research purposes or to pass onto someone else.
When adding information we will display and format this information using the print
stylesheet and hide the information using the site's main stylesheet (global.css).
In your document add a div with an id of 'printinfo' containing the URL of this page.
<div id="printinfo">
<p>Printed from:
</div>
184
The div 'printinfo' in Code View
You can then style this div any way you wish by adding a CSS Style for #printinfo into
print.css
Adding styles to print.css for printinfo
Now add styles for #printinfo to global.css (the main stylesheet for the site). We want to
hide this area when the page is viewed in a web browser. To do so set display: none. As
global.css is currently hidden at Design Time, Dreamweaver won't let you edit it through
the panel – the quickest thing to do is to add the code directly to the stylesheet.
185
Open up global.css in Dreamweaver and add:
#printinfo {
display: none;
}
to the bottom of the stylesheet.
Attach the stylesheet to the document
Now that you have created your stylesheet you simply need to link it to your document in
such a way that it understands that this stylesheet is only for print. After your existing link to
your main stylesheet add the following:
<link rel="stylesheet" type="text/css" media="print" href="print.css" />
This is just a normal link to a stylesheet file with one important addition, the media attribute
which tells the browser that this stylesheet is only for use when the document is printed.
There are other media attributes – to link stylesheets for a range of media including Braille
devices, speaking browsers and PDAs, however support for these other media types is
limited. The print media type is well supported across current browsers.
After adding this line and saving the document you can now preview in a web browser.
The layout should look exactly the same when viewed in this way.
The layout in a web browser
186
To view the document as printed you can obviously print it out, but to save paper you can
also view it in print preview, which will show the document as it will look using the print
stylesheet.
The layout in print preview
You can edit your stylesheet and tweak the print layout until you feel that your document
is printing out in an attractive and user friendly manner, presenting a good image of the
company or organization who is providing this information. You can take this technique
further and even display special 'printer friendly' versions of logos and other graphics
(ready optimized for grayscale) by inserting these images as background images using
CSS and then displaying the print version when the page is printed. For web sites that do
provide a lot of information then spending some time creating an attractive stylesheet for
print can be a real enhancement to the site, and something that people will find very
useful.
A good example of a well implemented print stylesheet can be found at A List Apart, have
a look at the following URL in Print Preview and you can see many of the techniques that
we have discussed in use. (
Summary
In this chapter we have learned how to create a print stylesheet for a web site. Even on an
existing site this is a simple way to add practical and useful functionality, and the creation
of a print stylesheet is not a time consuming job. There are more options for arranging the
187
page when using a CSS layout, however most of the techniques described here will work
well on a well constructed tables site, where CSS has been used for as much of the
formatting as is possible.
188
189
Appendix A: CSS and Old Browsers
If you have been designing for the web for any length of time you are probably well used
to testing your work in a variety of different browsers and understand the need to make
your sure that your site doesn't crash or render in an unreadable manner in any of the
browsers in use. You may also have been put off using anything more than the most basic
of CSS because of potential problems in older browsers, and when we talk about old
browsers we usually mean the browser we all love to hate, Netscape 4.*.
The debate about whether one should care about Netscape 4 at all continues to rage, it
does depend on your target audience – I have sites that never see a version 4 browsers
and yet other people quote figures as high as 10%. It's a question of looking at your server
logs.
When I talk about accessibility I don't simply mean that visually impaired users can use the
site, I mean that ALL users can use the site easily and that includes those who can't or
won't upgrade their browser. Browsers older than version 4, or any other browser that
doesn't have support for CSS are not going to be a problem to us – they will ignore the
CSS, so if you have structured your content logically they will display the content without
any problems. Netscape 4 is a problem because it has some support of CSS, and some
very bad support of certain CSS that can cause the browser to crash completely or render
sections of your page unusable or unreadable.
If you need to test for Netscape 4, you can download it from
Stress relievers can be found here or
here.
Hiding styles from Netscape 4
The easiest and most graceful way to give Netscape 4.* something it can cope with whilst
still being able to use CSS fully in your designs is to use a method that 'hides' the newer
styles from it. This method does not require JavaScript to be enabled in your browsers –
although Netscape 4 actually requires JavaScript to display CSS. Anyone who uses
Netscape 4.* with JavaScript turned off will be the same experience as your users who
have text-only browsers or devices, as long as your page is structured logically.
The way that Dreamweaver attaches your style sheet by default is to use the link tag.
<link href="global.css" rel="stylesheet" type="text/css" />
The <link> tag is the most used method of attaching external stylesheets, as it is supported
by all CSS supporting browsers. However, there is another method of attaching a
stylesheet that is not recognized by version Netscape 4 browsers, and we can use this lack
190
of support to our advantage. This method uses @import to attach the style sheet to the
page.
To attach a style sheet using @import in Dreamweaver MX, select link style sheet from the
CSS Panel and in the dialogue that follows browse for your style sheet as usual but select
the import radio button instead of using the default link radio button.
Adding an external style sheet using @import
Attaching your style sheet using this method will give you the following mark-up in the
head of your document.
<style type="text/css">
<!
@import url("global.css");
>
</style>
To test this out, set a very silly background color for the body in the CSS file – I find #FF33CC
to be a marvellous color for testing things, you won't miss it! When you preview the page in
an up to date browser such as IE6 or Netscape 7, and also in Netscape 4.* you should see
your background color display in all its garish glory in the newer browsers but the
background should remain as default in Netscape 4. This is because Netscape 4.* doesn't
support this method of attaching a style sheet and so doesn’t see the style that you have
defined.
If you know that you have a very low proportion of Netscape 4 users and just want to
ensure that your site doesn't crash the browser of those rare individuals, you can leave it
at that, - attach your style sheets using @import and as long as your content is structured
sensibly your Netscape 4 users will be able to read it in the same way that anyone using a
text only browser can.
However, if you want to give your Netscape 4 users a little more than a default blank page
you can use a linked style sheet for them and your imported one for the newer browsers,
here is how to do that.
Staying with your test page select New CSS Style in Dreamweaver, in the dialogue select
to redefine the Body tag but instead of selecting your existing (imported) style sheet to
191
create the style in, select New Style Sheet File.
Redefining the body tag of our new style sheet
Click Ok and save this new style sheet as old.css, then set the background-color of the
body tag a different garish color to that which is set in the other style sheet – I recommend
#666633. Click OK. Switch into Code View, you should find that Dreamweaver has used
the link method to attach old.css but has put it after the imported style sheet.
<style type="text/css">
<!
@import url("global.css");
>
</style>
<link href="old.css" rel="stylesheet" type="text/css" />
Where we want the link is before that import section, so cut and paste it to there:
<link href="old.css" rel="stylesheet" type="text/css" />
<style type="text/css">
<!
@import url("global.css");
>
</style>
The reason we need them in this order is because what we are doing with the imported
style sheet is overwriting the values in the linked style sheet. Newer browsers see both
methods, so they will first come to the linked sheet and take notice of what is set there and
then see the imported sheet. If there are the same classes and tags in the imported sheet
they will take precedence as they come nearer to the content in the document – in the
same way that if you have an external style sheet and inline styles the inline styles will take
precedence.
192
If you save your page and preview in Netscape 4 you should see the background color
set in the old.css style sheet as shown below.
The background from the linked style sheet displays in NS4.*
Previewing in a newer browser you will see the background color from the imported style
sheet.
Beautiful Pink won't work in Netscape 4.
193
which will not work in Netscape 4.*. This browser does support some positioning, and so if
you are careful you can lay out your page in an acceptable manner for Netscape 4 even
if it does not have all of the style of your layout for more capable browsers.
I have created a simple layout that uses positioning that Netscape 4.* has no ability to
render – using absolute positioning from the right of the document in order to create a
liquid layout with a right hand menu. The mark-up for this layout looks like this:
<!DOCTYPE html PUBLIC "-//W3C//DTD XHTML 1.0 Transitional//EN"
"
<html xmlns="
<head>
<title>CSS and Old Browsers - layout</title>
<meta http-equiv="Content-Type" content="text/html; charset=iso-8859-1"
/>
<link href="global.css" rel="stylesheet" type="text/css" />
</head>
<body>
<div id="nav">
<ul>
<li><a href="#">link one</a></li>
<li><a href="#">link two</a></li>
<li><a href="#">link three</a></li>
<li><a href="#">link four</a></li>
</ul>
</div>
<div id="content"><p>Lorem ipsum dolor sit amet, consectetuer adipiscing
elit. Fusce
id magna et purus placerat malesuada. Aliquam a felis sed magna mollis
tincidunt.
Nam malesuada iaculis nisl. Integer nunc. Nullam rhoncus scelerisque
magna.
Nulla feugiat. Etiam mi felis, egestas nec, gravida sit amet, rutrum
non, mi.
Integer sodales vehicula risus. Nam tellus nunc, condimentum ac, semper
pharetra,
fringilla eu, massa. Morbi egestas, eros eget dapibus dictum, nulla
eros luctus
ligula, et commodo neque libero in orci. Donec et est non magna
convallis porttitor.
Sed at nisl. Praesent ac risus. Aliquam erat volutpat.</p>
<p>Maecenas nulla risus, tempor non, ullamcorper id, semper non, velit.
Maecenas
194
elit sapien, gravida vitae, porta nec, pharetra sit amet, nibh.
Aenean semper.
Nunc in lectus. Proin fringilla turpis ut lacus. Aliquam erat
volutpat. Ut
cursus auctor lectus. Suspendisse ultrices ultrices purus. Morbi non
nulla
et libero mollis ultricies. Suspendisse mattis.</p>
</div>
</body>
</html>
And here is the CSS - which I have saved in an external style sheet and attached to the
age by the link method. p
body {
background-color: #B7D0E7;
color: #000000;
padding-top: 0px;
margin-top: 20px;
}
p, td, li {
font: 0.8em/2em Verdana, Geneva, Arial, Helvetica, sans-serif;
}
#content {
margin-right: 220px;
margin-left: 40px;
background-color: #E6EEF6;
color: #29547D;
padding: 6px;
border: 1px solid #29547D;
}
#nav {
position: absolute;
top: 20px;
right: 20px;
width: 180px;
background-color: #ffffff;
color: #000000;
border: 1px solid #E6EEF6;
}
#nav li {
list-style-type: none;
}
195
#nav ul {
padding-left: 6px;
margin-left: 0px;
}
#nav a:link, a:visited, a:active {
background-color: transparent;
color: #FF7844;
text-decoration: none;
}
#nav a:hover {
background-color: transparent;
color: #191970;
}
Our document displayed in IE6 and other up to date browsers
196
Our document as displayed in Netscape 4.75
As you can see Netscape 4.75 doesn't do too bad a job of rendering this layout, but
because it doesn't support the right positioning it will dump the menu on top of the
content.
We can use our @import method to fix this problem without having to rethink the layout for
users of those browsers that support it.
First, open up your style sheet and save it as 'old.css'.
Switch to Code View and change the link to the style sheet to link to old.css as opposed to
global.css.
Now reattach global.css using the @import method as we did earlier. You should end up
with this in the head of your document – be sure that the import section comes after the
link:
<link href="old.css" rel="stylesheet" type="text/css" />
<style type="text/css">
<!
@import url("global.css");
>
</style>
197