css web sites with dreamweaver mx 2004 - Phần 10 ppsx
Bạn đang xem bản rút gọn của tài liệu. Xem và tải ngay bản đầy đủ của tài liệu tại đây (685.9 KB, 14 trang )
Now open up your old.css in the Code View of Dreamweaver MX.
There are two ways in which I have dealt with this situation in the past – one is to make the
layout fixed width for Netscape 4 as then we can make the content block a set width and
position the navigation using absolute positioning from the left, the other (and this is how I
will approach it here) is to swap the menu over, so that it appears on the left of the
content for Netscape 4 users.
To swap the menu to the left of the content, edit the section (in old.css) for #content. Set
margin-right to 40px and margin-left to 220px.
#content {
margin-right: 40px;
margin-left: 220px;
background-color: #E6EEF6;
color: #29547D;
padding: 6px;
border: 1px solid #29547D;
}
Now edit the section for #nav changing right: 20px to left: 20px.
#nav {
position: absolute;
top: 20px;
left: 20px;
width: 180px;
background-color: #ffffff;
color: #000000;
border: 1px solid #E6EEF6;
}
198
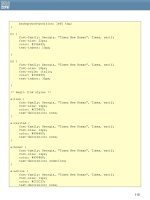
Now preview your document in Netscape 4.*
Our document in Netscape 4.75 after changing old.css
If you have previewed the document in a newer browser already, you will be muttering
about how I don't know what I'm talking about as it will appear broken, with the menu
jumping over to the left. There is a reason for this. If you remember when we did our test
page earlier, I explained that what we are doing is over writing the values set in the linked
style sheet with different values for those browsers that see the imported style sheet. This
means that any value in the linked style sheet must have another value over writing it in
the imported sheet – and we have just added a left positioning value to our linked style
sheet that does not appear in the imported one.
All you need to do to fix that is to open up global.css, and in the section for #nav add the
following line - left: auto; making the section look like so:
#nav {
position: absolute;
left: auto;
top: 20px;
right: 20px;
width: 180px;
background-color: #ffffff;
color: #000000;
199
border: 1px solid #E6EEF6;
}
Preview your page now and it should have returned to its prior state.
You can continue to tweak the values in the old.css style sheet to make the viewing
experience of the Netscape 4.* user better – how much you feel you need to do this really
depends on how likely you are to get users using this browser. As you can see from this
example, however, it really isn't difficult to provide them with something that will be usable
and even relatively attractive and so even if you expect to get very few users you may as
well provide something – even if it is just neatly laid out text on a plain background.
The 'Netscape Resize Fix'
Netscape 4 has a bug that causes all of your areas positioned with CSS to pile on top of
each other or totally disappear when the browser window is resized. You can try this with
our layout by loading it in Netscape 4 and resizing the window. Dreamweaver MX has a fix
for this – if you have ever worked with Dreamweaver 'layers' you will have noticed that it
adds a block of JavaScript into the head of the document when you add a layer – if you
are using an external style sheet then you will need to add this yourself.
You can add this within Dreamweaver by selecting 'Add Netscape Resize Fix' from the
commands menu. If you are going to be creating many pages then it makes sense to put
this command into an external JavaScript file to save it being on every page. After adding
this, try resizing your window and you will see the page reload and the elements return to
where they should be.
Even if you are not using CSS positioning, the technique we have looked at today can be
very useful – Netscape 4.* has well documented problems with styles on form elements,
adding borders and background colors to form elements can at best leave your form
looking peculiar and at worst make it totally unusable. Importing the styles for your form will
ensure that all users can complete your forms. Netscape 4 also renders font sixes differently
in comparison to newer browsers, so a comfortable text size in IE6 might look strange in
Netscape 4 – again, using the import method you can tweak your sizing separately for
each browser, giving a good experience for all of your users.
200
201
Appendix B: DOCTYPE switching in Dreamweaver MX,
and the Box Model
About DTDs and DOCTYPEs
A Document Type Definition or “DTD” is a definition for the language and language
version in use. I like to think of a DTD as a long laundry list of elements, attributes, and other
syntax and structure rules inherent to the particular language version that the DTD helps to
describe.
General features of a DTD include:
• A DTD is machine-readable for parsing
• A DTD is also human-readable and understandable
• A DTD is an ASCII (text) document
• DTDs express syntax and structure
• A DTD is declared with the DOCTYPE declaration
DTDs have been the means by which all HTML and XHTML languages and versions have
been defined. If you’d like to scare yourself and see what a DTD looks like, visit the
following link for the HTML 4.01 Strict DTD:
/>
A DOCTYPE declaration declares the language version for the document it represents.
DOCTYPE declarations don’t quite look like any other HTML you use that’s because
they’re not HTML. Rather, DOCTYPE declarations use SGML syntax. You may know that
SGML is the parent language to HTML which is where this bit of formality came from.
The sophisticated web author will adhere to the rules of a given DTD, and declare that
adherence by including a DOCTYPE declaration at the top of a web document. Similarly,
authoring tools will often insert a DOCTYPE declaration automatically onto a page.
If you use Dreamweaver or Homesite regularly for HTML, the following will look very familiar:
<!DOCTYPE HTML PUBLIC "-//W3C//DTD HTML 4.01 Transitional//EN">
This DOCTYPE declaration is, by default, inserted automatically by Dreamweaver into all
documents generated by clicking on File > New > Basic HTML page.
Note: If you’re using a lot of presentational markup and not using CSS or CSS positioning,
this default DOCTYPE is a good choice. However, if you are using CSS and want more
control, read on!
202
So, in the case of the default DOCTYPE, we can, just by looking at it, determine that the
document in question:
• is an HTML document
• is available to the public
• resides at the W3C
• follows the HTML 4.01 STRICTDTD
• is in English
“Great!” you’re no doubt thinking. “So my document is identified big deal. Does this stuff
do anything?”
Days of DOCTYPEs Past
Aside from declaring the document type to the author, in the past the DOCTYPE
declaration was passive in terms of a web browser. No action was taken by a browser
based on the existence or lack of of a DOCTYPE declaration in a document.
However, there is significant value to a DOCTYPE declaration in addition to simply
declaring the document’s type and this is when validating a document. Validation tools
take the document being validated and compare it to the DTD using the information
declared within the DOCTYPE.
Since validation has been very low on the priority list over the past years, not many people
paid attention to DOCTYPEs, DTDs, or even to validation tools for that matter. But this has
changed significantly in recent times, for numerous reasons. One is general awareness that
adhering to web standards and languages makes for more consistent workflow and
results. Another, equally important but lesser known reason is that the DOCTYPE
declaration is no longer a passive portion of your document.
In fact, how a DOCTYPE is formed, and that it even exists in your document now plays a
very significant part in helping you gain that elusive control over your designs.
The Box Model Nightmare
Browsers use visual models in order to flow and format content. Aspects of presentational
markup and CSS (especially positioning) rely on these models to produce a given display
within a browser. Within browsers, most elements generate a box, and this is referred to as
the “Box Model.”
But the visual modeling technologies in browsers are different. Most frustrating to today’s
contemporary designer, the Box Model is significantly misinterpreted by Internet Explorer,
which is by far the most common browser in use.
203
The Box Model problem is a perfect example of why designers need to know about the
issues raised in this chapter. But this problem is only one of many issues caused by
inconsistent browser technologies, but it’s a big one and totally affects the way you gain
or lose control over positioning consistently when using CSS.
The Box Model issue has been described very well by Tantek Çelik, the lead developer for
Microsoft’s Macintosh IE. I’ll paraphrase from Çelik’s explanation as to the box model
problem, which has to do with the differences in the way user agents calculate borders
and padding. Consider the following CSS:
#box1 {
border: 10px solid red;
padding: 20px;
background: blue;
width: 300px;
}
This CSS would create a box that has a 10-pixel border to each four sides, padding around
the entire box to a measurement of 20 pixels, and a set width of 300 pixels. If you’re
calculating the box model properly, you would add border and padding measurements
to the 300-pixel content area, not subtract from them, making the content area small.
To properly calculate the total width, including content, border, and padding:
10 pixels left border +
20 pixels left padding +
300 pixels content area +
20 pixels right padding +
10 pixels right border =
The box should be a total of 360 pixels wide. But misinterpretations of the box model place
the border and padding inside the defined content width. So, if you define a box to have
300 pixels and then any borders and padding are subtracted from your content area, that
area is unfairly minimized. A browser that improperly manages this will calculate the box as
follows:
300 pixels content area –
20 pixels left padding –
10 pixels left border –
20 pixels right padding –
10 pixels right border =
The content area of the box is now 240 pixels wide, and the total width of the box is 300
pixels. This means you as a designer are now totally frustrated in trying to position and
204
present a given element consistently, and to do so you’re going to likely have to rely on a
complicated hack known as (of course) “The Box Model Hack.”
Here’s where deep breaths and repetitions of “OM” come in. Put the Xanax DOWN!
The Hopeful Solution
Çelik, studying the problem, recognized that no browser could afford to move ahead with
more compliant and consistent technologies without allowing for reasonable backward
compatibility.
The solution Çelik devised was to split the browser’s capabilities into two modes: Quirks
mode and Compliance (or “standards”) mode. Quirks mode is the implementation of
rendering engines in use that manage non-standard markup essentially the same
forgiving rendering that we’ve relied upon for years forgiving of our trespasses as well as
those of our tools, but of course incredibly inconsistent as a result.
Compliance mode, on the other hand, is a streamlined standards-compliant rendering
engine, allowing for faster, more accurate, and more controlled rendering of your designs.
In fact, you can overcome the entire Box Model fiasco by switching IE 6 into Compliance
mode, which repairs the box model problems of days past.
So how do you tell a browser which mode to use?
By incorporating the correct DOCTYPE into your document, of course!
Not So Fast
Now you see the reasons as to why having two modes and using DOCTYPE Switching (the
name of this interesting technology) makes sense to those designers seeking control and
calm. And who doesn’t seek control and calm? But there’s another problem, and that’s
that browsers with DOCTYPE Switching technology rely on specifically formed DOCTYPE
declarations in order for proper switching to occur.
DOCTYPE declarations can be written in any number of ways. The default DOCTYPE that
Dreamweaver MX uses is okay (and MX 2004 is a whole lot better). There’s nothing wrong
with it in any technical sense - but there is something wrong with it when it comes to
DOCTYPE Switching technology. There are some very specific DOCTYPEs that you must use
in order to kick the browser in question into Compliance mode, and I’ve provided a link in
the RESOURCES sidebar to help you define which ones should be used.
The mechanism of DOCTYPE switching is, at its core, fairly sensible and straightforward:
• Documents with older or Transitional DOCTYPEs, poorly formed DOCTYPES, or no
DOCTYPE at all are displayed using Quirks mode, and will be interpreted with the
legacy bugs and behaviors of version 4 browsers
205
• Documents with properly formed HTML Strict or XHTML DOCTYPEs are displayed using
Compliance mode. This mode follows W3C specifications for HTML, CSS, and other
layout languages as closely as possible
Of course, Netscape Navigator 4.x came long before DOCTYPE switching was even
conceived, so it should be assumed to always be in quirks mode (and a buggy form of it
at that). Opera 6 and earlier does not bother with DOCTYPE switching, and should be
assumed to be in standards mode since Opera has been purposely developed with
standards in mind. Note that it may still have bugs, but Opera’s behavior is very close to
the standards modes of other browsers.
Modifying DOCTYPEs in Dreamweaver MX
There are some very easy ways to modify DOCTYPEs in Dreamweaver MX. I describe two of
them here.
The first is using a Macromedia Exchange Tool called Insert HTML Doctypes, V2.0.6. and
was authored by Jerry Baker. Once installed, simply select Modify > Document DTD
within Dreamweaver MX, and then select the DTD you’d like to modify the current DTD to.
The DTDs within this tool are accurate.
If you’d like to have your default Dreamweaver MX HTML page be HTML 4.01 strict (rather
than the transitional default), with a correct DOCTYPE for DOCTYPE Switching, you can
make the change directly by modifying the Basic template.
Note: you do not need to modify any Dreamweaver MX XHTML DOCTYPEs as they all
appear to be in order.
To make the change:
1. Select File > Open.
2. Locate the Macromedia Dreamweaver folder on your hard drive. You should see
a subfolder titled Configuration.
3. Open the Configuration folder, and look for another subfolder titled
DocumentTypes. Open this folder.
4. Look for another subfolder called NewDocuments. Open this folder. Look for the
file default.html.
5. Open default.html. In Code view, highlight this line:
<!DOCTYPE HTML PUBLIC "-//W3C//DTD HTML 4.01 Transitional//EN">
206
6. Replace it with this DOCTYPE :
<!DOCTYPE HTML PUBLIC "-//W3C//DTD HTML 4.01//EN"
"
7. Select File > Save.
The default HTML page is now properly marked up, and you won’t need to make this
change again.
Making the Switch
While incredibly useful for authors, DOCTYPE switching might have remained no more than
a curiosity had it only been implemented in IE5 for the Macintosh. Happily, it has since
been adopted by a slew of contemporary browsers including all recent versions of Opera,
Netscape, and the seemingly ubiquitous IE.
RESOURCES
About the Box Model
Box Lessons: CSS Workarounds for Browser deficiencies by Owen Briggs defines the
problems and provides excellent resources,
/>
About DOCTYPE Switching
Doctype switching and standards compliance: An overview by Matthias Gutfeldt. Provides
technical details and resources about the switching technologies discussed in this chapter,
/>
Doctypes and their respective layout mode, by Matthias Gutfeldt. This table shows a
variety of DOCTYPEs and which layout mode they’ll invoke in a range of browsers,
/>
Validators
Go to and see how well your pages validate!
Macromedia Exchange
For extended features on the Macromedia Exchange, including the Insert HTML Doctypes
tool, see />207
Where Now?
Now you’ve learned the foundations of CSS. You can
• Give legacy sites a hybrid layout by preserving tables, but use CSS for all other styles
• Strip away tables to get maximum separation of style and content.
• Make 2 column and 3 column sites using only CSS.
• Offer alternate stylesheets for aesthetic choices, or for accessibility reasons
• Deal successfully with dinosaur browsers, so that at least users receive all your
content
So where now? The best thing to do is experiment. Experiment with the layouts used in the
chapters. There are plenty of resources on the web offering free Style Sheets. Some of
them are
•
•
“boxes” by Owen Briggs
•
“layouts” by Eric Costello
• much inspiration, and a great way to see what does what at the
CSS Zen Garden
As you’ll have realised by now – and will soon be cursing about - unfortunately not all
browsers implement the whole CSS spec (or, not as you’d expect it). Here’s some browser
compatibility charts:
• Peter Paul Koch’s
Quirksmode
•
Codebitch charts
•
There’s times when you just can’t get a regular CSS file to render properly across all your
target browsers, and might need to turn a browser’s bugs to your advantage with a CSS
“hack”. Here’s a great compendium of CSS filters and hacks:
As CSS is becoming primetime, tips and cool stuff is still being developed. At the time of
writing, there are a number of great sites that look at new ways to use CSS. We suggest, for
starters,
•
A List Apart
•
Zeldman.com
•
StopDesign by Doug Bowman (who designed www.wired.com)
The “
Accessibility Toolbar” is a plug-in for IE/ Win that shows structure of the web site you’re
visiting. There’s a
free tutorial on using it on DMXzone. Please note, that when looking at
208
other people’s css, it’s not legal to copy it and use it unless comments in the file specifically
allow it.
In short: experiment and learn!
209
About DMXzone
History of DMXzone
DMXzone was founded in Feb 2001 by George Petrov. It was then
called UDzone after the Macromedia product UltraDev that
preceded Dreamweaver MX. By April 2001 we’d already been
asked by Macromedia to speak at the Macromedia UCON 2001
conference in New York. Since then, we’ve grown to over 150,000
registered members of all levels and locations, who come together to share knowledge
and learn from each other. We are an independent community and are in no way
connected with Macromedia, the makers of Dreamweaver MX.
In May 2003, we launched our very successful Premium Tutorials track, publishing
professionally written tutorials by a team of authors for an affordable price every day, as
we ourselves were tired of shelling out lots of money for computer books full of
redundancy and newbie’s explanation. This premium track runs alongside the free content
submitted by members.
What do we do
Membership of the community is free. You can view most content on the site without
registering, but when you become a member you can add your own articles, tutorials,
news items, extensions, opinion polls and participate in the forums. To purchase extensions
or download free extensions, you need to become a member.
The DMXzone Team and Manager Team consists of professionals and volunteers who work
hard to bring you the extensions that you are asking for, give you the support that you
need when you have questions and to bring you the latest information pertaining to web
development. We like to encourage our visitors to actively participate, that is why we
organize competitions, run opinion polls, let you rate articles, extensions and tutorials and
let you add your own articles.
210