Beginning Databases with Postgre SQL phần 6 pps
Bạn đang xem bản rút gọn của tài liệu. Xem và tải ngay bản đầy đủ của tài liệu tại đây (2.3 MB, 66 trang )
CHAPTER 10 ■ FUNCTIONS, STORED PROCEDURES, AND TRIGGERS
307
Summary
In this chapter, we looked at ways in which we can extend the functionality of PostgreSQL
queries. We have seen that PostgreSQL provides many operators and functions that we can use
to refine queries and extract information.
The procedural languages supported by PostgreSQL allow us to develop quite sophisticated
server-side processing by writing procedures in PL/pgSQL, SQL, and other languages. This
provides the opportunity for the database server to implement complex application function-
ality independently of the client.
Stored procedures are stored in the database itself and may be called by the application or,
in the form of triggers, called automatically when changes are made to database tables. This
gives us another means of enforcing referential integrity.
For simple referential integrity, it’s generally best to stick to constraints, as they are more
straightforward, efficient, and less error-prone. The power of triggers and stored procedures
comes when your declarative constraints become very complex, or you wish to implement a
constraint that is too complex for the declarative form.
Now that we have covered some advanced PostgreSQL techniques, in the next chapter,
we will move on to the topic of how to care for a PostgreSQL database.
MatthewStones_4789C10.fm Page 307 Wednesday, February 23, 2005 6:47 AM
MatthewStones_4789C10.fm Page 308 Wednesday, February 23, 2005 6:47 AM
309
■ ■ ■
CHAPTER 11
PostgreSQL Administration
In this chapter, we will look at how to care for a PostgreSQL database. This covers items ranging
from configuring access to the system through managing the placement of database files,
maintaining performance, and, crucially, backing up your system.
As we progress through this chapter, we will cover the following topics:
• System-level configuration of a PostgreSQL installation
• Database initialization
• Server startup and shutdown
• User and group management
• Tablespace management
• Database and schema management
• Backup and recovery
• Ongoing maintenance of a PostgreSQL server
While learning and experimenting with these administrative tasks, you will want to use a
test PostgreSQL system that doesn’t contain any information you particularly care about. Making
experimental system-wide changes or testing backup and restore procedures on a PostgreSQL
database that contains live data is not a good idea.
System Configuration
We saw in Chapter 3 how to install PostgreSQL, but we didn’t really look in any depth at the
resulting directory structure and files. Now we will explore the PostgreSQL file system and
main system configuration options.
The PostgreSQL file system layout is essentially the same on Windows and Linux platforms.
On a Linux system, the base directory of the installation will vary slightly, depending on which
installation method you used: installing from prepackaged executables, such as binary RPMs,
or compiling it yourself from source code. There may also be fewer or more directories, depending
on which options you installed.
MatthewStones_4789C11.fm Page 309 Wednesday, February 23, 2005 6:48 AM
310
CHAPTER 11
■ POSTGRESQL ADMINISTRATION
On a Windows system, by default, your installation base directory will be something like
C:\Program Files\PostgreSQL\8.0.0, under which you will find several subdirectories. On Linux,
the base directory for a source code installation will generally be /usr/local/pgsql. For a prebuilt
binary installation, the location will vary. A common location is /var/lib/pgsql, but you may
find that some of the binary files have been put in directories already in the search path, such
as /usr/bin, to make accessing them more convenient.
Under the PostgreSQL base installation directory, you will normally find around seven
subdirectories, depending on your options and operating system:
• bin
• data
• doc
• include
• lib
• man
• share
On Windows, the man subdirectory will be omitted, but probably at least one additional
subdirectory, pgAdmin III, will be present. You will find additional directories, such and jdbc
and odbc, if you installed some of the optional components.
In this section, we will take a brief tour of the seven subdirectories, and along the way look
at the more important configuration files and the significant options in them that we might
wish to change.
The bin Directory
The bin directory contains a large number of executable files. Table 11-1 lists the principal files
in this directory.
Table 11-1. Principal Files in the bin Directory
Program Description
postgres Database back-end server
postmaster Database listener process (the same executable as postgres)
psql Command-line tool for PostgreSQL
initdb Utility to initialize the database system
pg_ctl PostgreSQL control—start, stop, and restart the server
createuser Utility to create a database user
dropuser Utility to delete a database user
createdb Utility to create a database
dropdb Utility to delete a database
MatthewStones_4789C11.fm Page 310 Wednesday, February 23, 2005 6:48 AM
CHAPTER 11 ■ POSTGRESQL ADMINISTRATION
311
The data Directory
The data directory contains subdirectories with data files for the base installation, and also the
log files that PostgreSQL uses internally. Normally, you never need to know about the subdirec-
tories of the data directory.
Also in this directory are several configuration files, which contain important configuration
settings you may wish, or need, to change. Table 11-2 lists the user-accessible files in the data
subdirectory.
The pg_hba.conf File
The hba (host based authentication) file tells the PostgreSQL server how to authenticate users,
based on a combination of their location, type of authentication, and the database they wish
to access.
pg_dump Utility to back up a database
pg_dumpall Utility to back up all databases in an installation
pg_restore Utility to restore a database from backup data
vacuumdb Utility to help optimize the database
ipcclean Utility to delete shared memory segments after a crash (Linux only)
pg_config Utility to report PostgreSQL configuration
createlang Utility to add support for language extensions (see Chapter 10)
droplang Utility to delete language support
ecpg Embedded SQL compiler (optional, see Chapter 14)
Table 11-2. User-Accessible Files in the data Subdirectory
Program Description
pg_hba.conf Configures client authentication options
pg_ident.conf Configures operating system to PostgreSQL authentication name
mapping when using ident-based authentication
PG_VERSION Contains the version number of the installation, for example 8.0
postgresql.conf Main configuration file for the PostgreSQL installation
postmaster.opts Gives the default command-line options to the postmaster program
postmaster.pid Contains the process ID of the postmaster process and an identification
of the main data directory (this file is generally present only when the
database is running)
Table 11-1. Principal Files in the bin Directory (Continued)
Program Description
MatthewStones_4789C11.fm Page 311 Wednesday, February 23, 2005 6:48 AM
312
CHAPTER 11
■ POSTGRESQL ADMINISTRATION
A common requirement is to add configuration lines to allow access to some, or all, data-
bases from remote machines. At the time of writing, the default configuration is quite secure,
preventing access to any database from any remote machine. (See the “Client Authentication”
section in the PostgreSQL documentation for full details.)
Each line in the pg_hba.conf file corresponds to a single allow or deny rule. Rules are processed
in the order in which they appear in the file, so deny rules should generally precede allow rules.
In PostgreSQL release 8.0, each line has the following five items:
• TYPE: This column is usually local or host for local machines or remote hosts over TCP/IP,
respectively.
• DATABASE: This column provides a comma-separated list of the databases for which this
rule applies, or the special name all, if the rule applies for all databases.
• USER: This column provides a comma-separated list of users for which the rule applies:
all for all users or +groupname for users belonging to a specific group. (Groups are covered in
the “Group Configuration” section later in this chapter.)
• CIDR-ADDRESS: CIDR stands for Classless Inter-Domain Routing. This column lists the
addresses for which the rule applies, often with a bit mask. For example, the entry
192.168.0.0/8 means the rule applies for all hosts in the 192 subnetwork.
• METHOD: This column specifies how users matching the previous conditions are to be
authenticated. There is a wide range of choices. Table 11-3 lists the common options.
A standard default configuration line would be something similar to this:
TYPE DATABASE USER CIDR-ADDRESS METHOD
local all all 127.0.0.1/32 md5
Table 11-3. Common Authentication Methods
Method Description
trust The user is allowed, with no need to enter any further passwords. Generally, you
will not want to use this option except on experimental PostgreSQL systems,
although it is a reasonable choice where security isn’t an issue.
reject The user is rejected. This can be useful for preventing access from a range of
machines, because the rules in the file are processed in order. For example, you
could reject all users from 192.168.0.4, but later in the file, accept connection
from other machines in the 192.168.0.0/8 subnet.
md5 The user must provide an MD5-encrypted password. This is a good choice for
many situations.
crypt This method is similar to the md5 method for pre-7.2 installations. All new instal-
lations should use md5 in preference.
password The user must provide a plain-text password. This is not very secure, but useful
when you are trying to identify login problems.
ident The user is authenticated using the client name from the user’s host operating
system. This works with the pg_ident.conf file.
MatthewStones_4789C11.fm Page 312 Wednesday, February 23, 2005 6:48 AM
CHAPTER 11 ■ POSTGRESQL ADMINISTRATION
313
This allows all local users to access all databases, but the client system must provide the
password in an MD5-encoded form. Normally, this is transparent to the user, as the client will
determine that the password the client enters needs to be MD5-encoded before being sent to
the PostgreSQL server. An alternative would be to replace md5 with trust, which would say that
any user who had been able to log in to the local machine was also able to log in to the database,
without requiring further authentication.
■Note If you use MD5 authentication, you must ensure that your PostgreSQL users have passwords, or the
MD5-authenticated login will fail.
Generally, this minimal configuration is fine for local users, but it doesn’t allow any access
for users across the network. To do that, we need to add lines to the pg_hba.conf file. Suppose
we wanted to allow all users on the subnetwork 192.168.0.* access to all databases, providing
they had the appropriate MD5-encoded password. This is probably the most common type of
addition needed to the standard configuration file. We would add the following extra line to the
pg_hba.conf file:
host all all 192.168.0.0/16 md5
Now suppose some additional administrators require access from outside this subnet, but
we don’t want to permit ordinary users access. We would add a line to allow members of the
PostgreSQL admins group access from anywhere on the 192 subnetwork, like this:
host all +admins 192.0.0.0/8 md5
Note that there is additional configuration required to allow remote connections, which
must be set in the postmaster.opts file, as explained in the description of that file a bit later in
this chapter.
The pg_ident.conf File
This pg_ident.conf file is used in conjunction with the ident option of pg_hba.conf. This works
by determining the username on the machine the client logged in to, and maps that name to a
PostgreSQL username. It relies on the Identification Protocol, defined in RFC 1413. We would
not generally consider this a very secure method of access control.
The postgresql.conf File
postgresql.conf is the main configuration file that determines how PostgreSQL operates. The
file consists of a large number of lines, each of the form:
option_name = value
This sets the required behavior for each option. Where the option is a string, the value should
be enclosed in single quotes. Numbers do not need to be quoted. Boolean options should be
set to either true or false.
MatthewStones_4789C11.fm Page 313 Wednesday, February 23, 2005 6:48 AM
314
CHAPTER 11
■ POSTGRESQL ADMINISTRATION
Table 11-4 lists the main options in the postgresql.conf file.
Table 11-4. Principal postgresql.conf Options
Option Value and Meaning
listen_addresses Sets the address on which PostgreSQL accepts connec-
tions. This will normally be localhost, but for machines
with multiple IP addresses, you may wish to specify a
specific IP address.
port Sets the port on which PostgreSQL is listening. By default,
this is 5432.
max_connections Sets the number of concurrent connections allowed. On
most operating systems, this will be 100. Increasing this
number will increase the system resource overhead; in
particular, the amount of shared memory in use will
be increased.
superuser_reserved_connections Sets the number of connections from the maximum which
are reserved for superusers. By default, this is 2. You may
wish to increase it to ensure superusers are never prevented
from connecting to the database because too many ordinary
users are connected.
authentication_timeout Defines how long a client has to complete authentication
before it is automatically disconnected. By default, this is
60 seconds. You may wish to decrease it if you see many
unauthorized people attempting to connect to the database.
shared_buffers Sets the number of buffers being used by PostgreSQL.
A typical value would be 1000. Decreasing this value saves
system resources on a lightly loaded system. Increasing it
may improve performance on a heavily used production
system.
work_mem Tells PostgreSQL how much memory it can use before
creating temporary files for processing intermediate
results. The default is 1MB. If you have very large tables
and plenty of memory, increasing this value may improve
performance.
log_destination Determines where PostgreSQL logs server messages by
providing a comma-separated list of filenames.
log_min_messages Sets the level of message that is logged. The options, from
most logging down to least logging, are debug5, debug4,
debug3, debug2, debug1, info, notice, warning, error, log,
fatal, and panic. By default, notice will be used.
log_error_verbosity Sets the amount of detail written to the logs. The default is
default. Setting this option to terse reduces the amount
written. Setting it to verbose writes more information.
MatthewStones_4789C11.fm Page 314 Wednesday, February 23, 2005 6:48 AM
CHAPTER 11 ■ POSTGRESQL ADMINISTRATION
315
The postmaster.opts File
This postmaster.opts file sets the default invocation options for the postmaster program, which
is the main PostgreSQL program. Typically, it will contain the full path to the postmaster program,
a -D option to set the full path to the principal data directory, and optionally, a -i flag to enable
network connections. The postmaster.opts options are listed in Table 11-5.
log_connections Logs connections to the database. This is false by default,
but if you are running a secure database, you almost
certainly need to change this to true.
log_disconnections Logs disconnections from the database.
search_path Controls the order in which schemas are searched. The
default is $user,public. (See the “Schema Management”
section later in this chapter.)
default_transaction_isolation Sets the default transaction isolation level, which was
discussed in Chapter 9. The default is read committed,
which is generally a good choice.
deadlock_timeout Sets the length of time before the system checks for dead-
locks when waiting for a lock on a database table. By default,
this is set to 1000 milliseconds. You may want to increase
it on a heavily loaded production system.
statement_timeout Sets a maximum time, in milliseconds, that any statement
is allowed to execute. By default, this is set to 0, which
disables this feature.
stats_start_collector If set to true, PostgreSQL collects internal statistics, usable
by the pg_stat_activity and other statistics views.
stats_command_string If set to true, enables the collection of statistics on
commands that are currently being executed.
datestyle Sets the default date style, which was discussed in Chapter 4.
The default is iso, mdy.
timezone Sets the default time zone. By default, this is set to unknown,
which means PostgreSQL should use the system time zone.
default_with_oids Controls whether the CREATE TABLE command defaults to
creating tables with OIDs. By default, this is set to true at
the time of writing. This option may be required in the
future should PostgreSQL default to not creating OIDs but
you have an older application which relies on them being
present. However, we strongly suggest that you do not
assume OIDs are present.
Table 11-4. Principal postgresql.conf Options (Continued)
Option Value and Meaning
MatthewStones_4789C11.fm Page 315 Wednesday, February 23, 2005 6:48 AM
316
CHAPTER 11
■ POSTGRESQL ADMINISTRATION
Here is an example of a postmaster.opts file from Linux, allowing network connections:
/usr/local/pgsql/bin/postmaster '-i' '-D' '/usr/local/pgsql/data'
And here is a typical Windows file (which would all be on a single line), disallowing remote
connections:
C:/Program Files/PostgreSQL/8.0.0/bin/postmaster.exe "-D"
"C:/Program Files/PostgreSQL/8.0.0/data"
Notice the different quoting required on Windows systems.
Other PostgreSQL Subdirectories
The following are the other subdirectories normally found under the PostgreSQL base installation
directory:
• The
doc directory: This contains the online documentation, and may contain additional
documentation for user-contributed additions, depending on your installation choices.
• The
include and lib directories: These contain the header and library files needed to
create and run client applications for PostgreSQL. See Chapters 13 and 14 for details of
libpq and ecpg, which use these directories.
• The
man directory: On Linux (and UNIX) only, these contain the manual pages. Adding
this to your MANPATH, (for example, $ export MANPATH=$MANPATH:/usr/local/pgsql/man)
will allow you to view the PostgreSQL manual pages using the man command.
• The
share directory: This contains a mix of configuration sample files, user-contributed
material, and time zone files. There is also a list of standard SQL features supported by
the current version of PostgreSQL.
Table 11-5. postmaster Options
Option Description
-B nbufs Sets the number of shared memory buffers to nbufs.
-d level Sets the level of debug information (level should be a number 1 through 5)
written to the server log.
-D dir Sets the database directory (/data) to dir. There is no default value. If no
-D option is set, the value of the environment variable PGDATA is used.
-i Allows remote TCP/IP connections to the database.
-l Allows secure database connections using the Secure Sockets Layer (SSL)
protocol. This requires the -i option (network access) and support for SSL to
have been compiled in to the server.
-N cons Sets the maximum number of simultaneous connections the server will accept.
-p port Sets the TCP port number that the server should use to listen on.
help Gets a helpful list of options.
MatthewStones_4789C11.fm Page 316 Wednesday, February 23, 2005 6:48 AM
CHAPTER 11 ■ POSTGRESQL ADMINISTRATION
317
Database Initialization
When PostgreSQL is first installed, we must arrange for a database to be created. We did this
back in Chapter 3 by using initdb.
■Note Almost all PostgreSQL installations, with the exception of those built from source, arrange for
initdb to be called automatically if there is no database when the machine starts up.
It is important to initialize the PostgreSQL database correctly, as database security is
enforced by user permissions on the data directories. We need to stick to the following steps
to ensure that our database will be secure:
• Create a user to own the database. We recommend a user called postgres.
• Create a directory (data) to store the database files.
• Ensure that the postgres user owns that directory.
•Run initdb, as the postgres (never root) user to initialize the database.
Often, an installation script for a PostgreSQL package will perform these steps for you
automatically. On Windows, this is always done automatically. However, if you need to change
the defaults, or if you are manually installing the program, you need to perform these steps.
The initdb utility supports a few options. The most commonly used ones are listed in
Table 11-6.
The default database installation created by initdb contains information about the data-
base superuser account (we have been using postgres), a template database called template1,
and other database items. This initial template database is very important, as it is used as a
default template for all subsequent database creations.
To create additional databases, we must connect to the database system and request that
a new database be created. We can use the command-line createdb utility, or, more commonly,
we will do it from inside the database itself once we have logged in. We will meet both these
options a little later in this chapter, in the “Database Management” section. A connection
requires a username (probably with password) and a database name. In the initial installation,
we have only one user, usually postgres, we can connect with and only one database.
Table 11-6. Common initdb Options
Option Description
-D dir, pgdata=dir Specify the location of the data directory for this database.
-W, pwprompt Cause initdb to prompt for a database superuser password. A
password will be required to enable password authentication.
MatthewStones_4789C11.fm Page 317 Wednesday, February 23, 2005 6:48 AM
318
CHAPTER 11
■ POSTGRESQL ADMINISTRATION
Before we can connect to the database system, the server process must be running, as
described in the next section.
Server Control
The PostgreSQL database server runs as a listener process on UNIX and Linux systems, and
as a system service on Windows systems. As we saw in Chapter 3, the server process is called
postmaster and must be running for client applications to be able to connect to and use the
database.
If you wish to, you can start the postmaster process manually on Linux. On Windows, you
should always use the Control Panel’s Services applet, as shown in Figure 11-1.
Figure 11-1. Controlling the PostgreSQL service on Windows
The rest of this section applies only to Linux (or UNIX) users.
Running Processes on Linux and UNIX
Without any command-line arguments, the server will run in the foreground, log messages to
the standard output, and use a database stored at the location given by the environment vari-
able $PGDATA, if no -D option is specified.
Normally though, we will want to start the process in the background and log messages to
a file. When a connection attempt is made to the database, the postmaster process starts another
process called postgres to handle the database access for the connecting client.
It is the back-end server that reads the data and makes changes on behalf of one client
application. There can be multiple postgres processes supporting many clients at once, but
the total number of postgres processes is limited to a maximum, maintained by postmaster.
The postmaster program has a number of parameters that allow us to control its behavior, as
we saw when we examined the postmaster.opts file earlier in this chapter.
MatthewStones_4789C11.fm Page 318 Wednesday, February 23, 2005 6:48 AM
CHAPTER 11 ■ POSTGRESQL ADMINISTRATION
319
When it has successfully started, the postmaster process creates a file that contains its
process ID and the data directory for the database. By default for source-code built systems,
the file is /usr/local/pgsql/data/postmaster.pid.
The server log file should be redirected using a normal shell redirect for the standard
output and standard error:
postmaster >postmaster.log 2>&1
As mentioned earlier, the postmaster process needs to be run as a non-root user created to
be the owner of the database. We created such a user (postgres) in Chapter 3.
Starting and Stopping the Server on Linux and UNIX
The standard PostgreSQL distribution contains a utility, pg_ctl, for controlling the postmaster
process. We saw this briefly in Chapter 3, but we revisit it here for a more detailed exploration
of its features.
The pg_ctl utility is able to start, stop, and restart the server; force PostgreSQL to reload
the configuration options file; and report on the server’s status. The principal options are
as follows:
pg_ctl start [-w] [-s] [-D datadir] [-p path ][-o options]
pg_ctl stop [-w] [-D datadir] [-m [s[mart]] [f[ast]] [i[mmediate]]]
pg_ctl restart [-w] [-s] [-D datadir] [-m [s[mart]] [f[ast]] [i[mmediate]]]
[-o options]
pg_ctl reload [-D datadir]
pg_ctl status [ -D datadir ]
To use pg_ctl, you need to have permission to read the database directories, so you will
need to be using the postgres user identity.
The options to pg_ctl are described in Table 11-7.
Table 11-7. pg_ctl Options
Option Description
-D datadir Specifies the location of the database. This defaults to $PGDATA.
-l, log filename Appends server log messages to the specified file.
-w Waits for the server to come up, instead of returning immediately.
This waits for the server pid (process ID) file to be created. It times
out after 60 seconds.
-W Does not wait for the operation to complete; returns immediately.
-s Sets silent mode. Prints only errors, not information messages.
-o "options" Sets options to be passed to the postmaster process when it is started.
-m mode Sets the shutdown mode (smart, fast, or immediate).
MatthewStones_4789C11.fm Page 319 Wednesday, February 23, 2005 6:48 AM
320
CHAPTER 11
■ POSTGRESQL ADMINISTRATION
When stopping or restarting the server, we have a number of choices for how we handle
connected clients. Using pg_ctl stop (or restart) with smart (or s) is the default. This waits for
all clients to disconnect before shutting down. fast (f) shuts down the database without waiting
for clients to disconnect. In this case, client transactions that are in progress are rolled back
and clients forcibly disconnected. immediate (i) shuts down immediately, without giving the
database server a chance to save data, requiring a recovery the next time the server is started.
This mode should be used only in an emergency when serious problems are occurring.
We can check that PostgreSQL is running using pg_ctl status. This will tell us the process
ID of the listener postmaster and the command line used to start it:
# pg_ctl status
pg_ctl: postmaster is running (pid: 486)
Command line was:
/usr/local/pgsql/bin/postmaster '-i' '-D' '/usr/local/pgsql/data'
#
If you have built PostgreSQL from source code, you will normally want to create a script for
inclusion in /etc/init.d. A basic version of such a script was shown in Chapter 3. Most package-
based installations will provide a standard script for you. Do ensure that the PostgreSQL server
gets the opportunity for a clean shutdown whenever the operating system shuts down.
PostgreSQL Internal Configuration
We have now seen how to configure our PostgreSQL server, able to accept the remote connections
as required. It’s now time to look at the configuration elements of PostgreSQL that are set internally
to the server. We will be looking at the following topics:
•Users and groups
• Tablespaces
• Databases and schemas
• Permissions
Configuration Methods
Generally, there are (at least) three ways of configuring items internal to PostgreSQL:
• SQL Commands: We can use SQL, which has a large number of statements dedicated to
maintaining configuration information internal to the database. Many of these are standard
SQL statements (termed DDL, for Data Definition Language), usable on a wide range
of databases, but it is an area where most databases have proprietary SQL elements.
Learning how to use SQL to configure databases is important, as it helps you understand
what is actually happening. Also, it is essential to know in case the graphical tools you
might prefer are not available, or the bandwidth or connection available to the database
is very poor.
MatthewStones_4789C11.fm Page 320 Wednesday, February 23, 2005 6:48 AM
CHAPTER 11 ■ POSTGRESQL ADMINISTRATION
321
• Graphical tools: We can use a graphical tool. At the time of writing, the premier graph-
ical tool for PostgreSQL is pgAdmin III (), which was introduced
in Chapter 5. This tool, shown in Figure 11-2, is free for all uses; runs on Linux, FreeBSD,
and Windows 2000/XP; and is very easy to use.
Figure 11-2. pgAdmin III is a popular tool for administering PostgreSQL databases.
• Command-line versions: Some configuration options, notably those for creating users
and databases, have a command-line version available. Although these can be handy,
particularly for getting started, they are not generally the preferred way of configuring
PostgreSQL. If you wish to use them, you can simply invoke the command-line version
with a parameter of help to see usage information. It’s then easy to see how the options
map onto the underlying SQL syntax.
Generally, configuration must be done as an administrative user, which is postgres by
default, as we saw in Chapter 3. For the rest of this chapter, we will assume you are connected
to the database server as postgres, an administrative user.
User Configuration
It’s a good idea to give your users their own accounts, because then it is possible to more easily
manage changes in personnel, such as employees moving to different roles where they no
longer should have access to the database. Users are managed with the CREATE USER, ALTER USER,
and DROP USER commands.
MatthewStones_4789C11.fm Page 321 Wednesday, February 23, 2005 6:48 AM
322
CHAPTER 11
■ POSTGRESQL ADMINISTRATION
Creating Users
The CREATE USER command has the following syntax:
CREATE USER username
[ WITH
| [ ENCRYPTED | UNENCRYPTED ] PASSWORD 'password'
| CREATEDB | NOCREATEDB
| CREATEUSER | NOCREATEUSER
| IN GROUP groupname [, ]
| VALID UNTIL 'abstime' ]
Generally, you will always give each user a password. If you specify the option CREATEUSER,
then the user will be an administrative user, able to create other users. Those administrative
users’ psql login will also have a # prompt, rather than the > prompt.
The CREATEDB option allows the user to create databases. If you have groups (see the next
section), you can assign the user to one or more groups with the IN GROUP option. The VALID
UNTIL option allows you to express a time at which the user account will expire.
For example, the following creates a user, neil, who can create other users and databases,
but whose account will expire on December 31, 2006:
CREATE USER neil PASSWORD 'secret'
CREATEDB CREATEUSER
VALID UNTIL '2006-12-31';
Using the createuser Utility
PostgreSQL also has a utility, createuser, which we saw briefly in Chapter 3, to help with the
creation of PostgreSQL users if you wish to do this from the operating system command line.
This utility has the following form:
createuser [options ] username
Options to createuser allow you to specify the database server for which you want to create
a user and to set some of the user privileges, such as database creation. Table 11-8 lists the
createuser options.
Table 11-8. Command-Line createuser Options
Option Description
-h host, host host Specifies the database server host. This defaults to the
local machine.
-p port, port port Specifies the port. This defaults to the standard PostgreSQL
listener port, 5432.
-U user, username=user Specifies the user as whom you wish to connect to the server.
-q, quiet Does not print a response.
MatthewStones_4789C11.fm Page 322 Wednesday, February 23, 2005 6:48 AM
CHAPTER 11 ■ POSTGRESQL ADMINISTRATION
323
The createuser utility is simply a wrapper that is used to execute some PostgreSQL commands
to create the user.
Modifying Users
We modify users with the ALTER USER command. This command uses almost exactly the same
options as the CREATE USER command, but can be used only with an existing username.
ALTER USER username
[ WITH
| [ ENCRYPTED | UNENCRYPTED ] PASSWORD 'password'
| CREATEDB | NOCREATEDB
| CREATEUSER | NOCREATEUSER
| VALID UNTIL 'abstime' ]
There is also a special variant for renaming a user:
ALTER USER username RENAME TO new-username
So, if we wanted to prevent the user neil we created earlier from creating databases, we
would use the following:
ALTER USER neil NOCREATEDB;
Listing Users
We can have a quick look at the users configured on our database using the system view
pg_user. Here, we just select a small number of columns, to keep the output easier to read:
-d, createdb Allows this user to create databases.
-a, adduser Allows this user to create new users.
-P, pwprompt Prompts for a password to assign to the new user. A user
password is required for authentication when the newly
created user attempts to connect.
-i, sysid=ID number Specifies the user’s ID number. Generally, you should not use
this option but allow a default value to be used.
-e, echo Prints the command sent to the server to create the user.
help Prints a usage message.
Table 11-8. Command-Line createuser Options (Continued)
Option Description
MatthewStones_4789C11.fm Page 323 Wednesday, February 23, 2005 6:48 AM
324
CHAPTER 11
■ POSTGRESQL ADMINISTRATION
bpsimple=# SELECT usesysid, usename, usecreatedb, usesuper, valuntil
FROM pg_user;
usesysid | usename | usecreatedb | usesuper | valuntil
+ + + +
100 | rick | t | f |
1 | postgres | t | t |
101 | neil | f | f | 2006-12-31 00:00:00+00
(3 rows)
bpsimple=#
You can see the same information by using the \du command in psql, or visually in
pgAdmin III.
Removing Users
We can remove users with the DROP USER command, which is very simple:
DROP USER username;
A command-line alternative named dropuser is also available. Its syntax is as follows:
dropuser [options ] username
The options to dropuser include the same server connection options as createuser
(see Table 11-8), plus the -i option to ask the system to prompt for confirmation before deleting
the user.
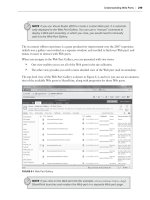
Managing Users Through pgAdmin III
All these user management tasks can be done through pgAdmin III. To create a new user, right-
click the Users part of the tree and select New User. This brings up the New User dialog box, as
shown in Figure 11-3. To modify a user, click a username and select Properties.
If you click the SQL tab in the dialog box, you can even see the SQL that will be executed.
This is helpful for checking how you do something in SQL, if you know how to do it graphically,
but are not quite sure of the exact SQL syntax.
MatthewStones_4789C11.fm Page 324 Wednesday, February 23, 2005 6:48 AM
CHAPTER 11 ■ POSTGRESQL ADMINISTRATION
325
Figure 11-3. Creating a user in pgAdmin III
Group Configuration
Groups are a configuration convenience—a useful way of grouping users together for adminis-
trative purposes. Later in the chapter, in the “Privilege Management” section, we will see how
having groups makes it easier to give and remove privileges from a group of users in a single
command. As with user configuration tasks, we can perform the group configuration tasks
described here through pgAdmin III as well.
Creating Groups
The syntax for the CREATE GROUP command is as follows:
CREATE GROUP groupname [ WITH USER comma-separated-list-of-users ]
For example, to add a new group, editors, and make the existing users jason and sofia
members, we would use the following statement:
CREATE GROUP editors WITH USER jason, sofia
Altering Groups
We can add and remove users from a group using ALTER GROUP, which has the following syntax:
ALTER GROUP groupname ADD USER username
ALTER GROUP groupname DROP USER username
As with CREATE GROUP, the name can be a comma-separated list of usernames.
MatthewStones_4789C11.fm Page 325 Wednesday, February 23, 2005 6:48 AM
326
CHAPTER 11
■ POSTGRESQL ADMINISTRATION
We can also rename a group with ALTER GROUP:
ALTER GROUP groupname RENAME TO new-groupname
Suppose we wanted to remove the user jason from our editors group and add the user
rick. We would use ALTER GROUP commands like this:
bpsimple=# ALTER GROUP editors DROP USER jason;
ALTER GROUP
bpsimple=# ALTER GROUP editors ADD USER rick;
ALTER GROUP
bpsimple=#
Listing Groups
We can display our groups and their users with the system view pg_group, as follows:
bpsimple=# SELECT * from pg_group;
groname | grosysid | grolist
+ +
usr | 100 | {100,101}
(1 row)
bpsimple=#
The grolist column is a list of the usesysid columns we saw when we looked at the
pg_user view, from which we can determine the usernames. The \dg command in psql gives
similar information.
Dropping Groups
We can remove groups with the DROP GROUP command, which is very simple:
DROP GROUP groupname
Note that dropping a group does not delete the users in that group.
Tablespace Management
One of the key manageability features introduced in PostgreSQL release 8.0 was the concept of
tablespaces. This makes it much easier for administrators to control how PostgreSQL’s data
tables are stored in the file system, which is useful for tasks such as managing large tables and
improving performance by distributing the load across different disk drives. Prior to version
8.0, it was possible to control how PostgreSQL placed its files, but it was not easy.
A tablespace is actually quite a simple concept. It’s a named PostgreSQL object, which
corresponds to a physical location on the host operating system. Later, in the “Database Manage-
ment” section, we will see how to create databases inside a tablespace, which means that the
data files for that database go in the physical location associated with the tablespace. Tablespaces
can be created only by administrative users possessing CREATE USER privileges.
Before creating a tablespace, we must first create a physical disk location to which to map
the tablespace.
MatthewStones_4789C11.fm Page 326 Wednesday, February 23, 2005 6:48 AM
CHAPTER 11 ■ POSTGRESQL ADMINISTRATION
327
Creating Tablespaces
Suppose we want to create a new location for storing PostgreSQL files on our Linux server in
/opt/pgdata. We need to do this from the operating system command line, not from within
psql. First, we must create the directory:
# mkdir /opt/pgdata
We must then change the ownership and group of the directory to be that of the operating
system user we used when we installed PostgreSQL, usually postgres, using the chown command.
# ls -ld /opt/pgdata
drwxr-xr-x 2 root root 4096 Nov 21 14:07 /opt/pgdata
# chown postgres.postgres /opt/pgdata
# ls -ld /opt/pgdata
drwxr-xr-x 2 postgres postgres 4096 Nov 21 14:07 /opt/pgdata
#
Now we are ready to create a PostgreSQL tablespace associated with our new directory. We
must do this from within the psql program. Directories you wish to associate with a tablespace
must always be empty before they can be associated. The command for creating tablespaces is
very simple:
CREATE TABLESPACE tablespacename [ OWNER ownername ] LOCATION 'directory'
If no owner is specified, then it defaults to the person executing the command. So, here is
the command to add a new tablespace to our installation:
bpsimple=# CREATE TABLESPACE datainopt LOCATION '/opt/pgdata';
We can see our tablespace by examining the pg_tablespace view, as follows:
bpsimple=# SELECT * FROM pg_tablespace;
spcname | spcowner | spclocation | spcacl
+ + +
pg_default | 1 | |
pg_global | 1 | |
datainopt | 1 | /opt/pgdata |
(3 rows)
bpsimple=#
We can see the file system locations in the spclocation column. The spcowner column is
the ID of the user who owns the tablespace, and spcacl is ownership information. The other
two tablespaces, pg_default and pg_global, are the system default tablespaces, which are
always present. We can see similar information using the \db command in psql.
Altering Tablespaces
At the time of writing, it is not possible to move a tablespace’s physical location. We can only
change its owner and name, as follows:
MatthewStones_4789C11.fm Page 327 Wednesday, February 23, 2005 6:48 AM
328
CHAPTER 11
■ POSTGRESQL ADMINISTRATION
ALTER TABLESPACE tablespacename OWNER TO newowner
ALTER TABLESPACE oldname RENAME TO newname
Dropping Tablespaces
We can also drop a tablespace, but we must delete all the objects in the tablespace first, or the
command will fail. Here is the command syntax:
DROP TABLESPACE tablespacename
That’s all there is to creating, altering, and deleting tablespaces. This may all have seemed
a bit pointless, especially since we’ve been working with only a small sample database. But
next, we move on to creating databases, and it will become clearer how useful tablespaces can
be for controlling the physical placement of database files, providing a big benefit in larger or
more demanding PostgreSQL installations.
Database Management
The key elements to any database installation are the actual databases—the objects in which
all the tables and data are stored. Different database systems manage the internal databases in
a variety of ways, but PostgreSQL is very straightforward. Each installation of the PostgreSQL
server (sometimes referred to as a database cluster) can manage and serve many individual
databases. Tablespaces, usernames, and groups are common across the whole PostgreSQL
installation. This can be seen clearly in the way pgAdmin III lays out its tree structure, as shown
in Figure 11-4.
Figure 11-4. Object layout inside the PostgreSQL database server
MatthewStones_4789C11.fm Page 328 Wednesday, February 23, 2005 6:48 AM
CHAPTER 11 ■ POSTGRESQL ADMINISTRATION
329
Creating Databases
PostgreSQL databases are created within psql with the CREATE DATABASE command, which has
the following syntax:
CREATE DATABASE dbname
[ [ WITH ] [ OWNER [=]owner ]
[ TEMPLATE [=] template ]
[ ENCODING [=] encoding ]
[ TABLESPACE [=] tablespace ] ]
The database name must be unique within the PostgreSQL installation. The OWNER option
allows the administrator to create a database owned by someone else, which is handy for users
who cannot create their own databases.
The TABLESPACE option allows us to specify in which of the tablespaces we created earlier
to place the underlying operating systems files for storing our data. This allows us to more
easily control our disk usage. If no tablespace is specified, the files go in a tablespace named
pg_default, which is automatically created when PostgreSQL is installed.
The TEMPLATE and ENCODING options specify the database layout and the multibyte encoding
required. These are safely omitted in normal use. Refer to the PostgreSQL documentation for
more details.
■Note To use psql, we must be connected to a database, so to create our first database, we must connect
to template1 (the default database) usually as the default user, postgres. We did this in Chapter 3 to create
our first database.
Altering and Listing Databases
We can change the name and owner of a database with the ALTER DATABASE command, as
follows:
ALTER DATABASE dbname RENAME TO newname
ALTER DATABASE dbname OWNER TO newowner
■Note There is also a variant of the ALTER DATABASE command for setting database options. For more
information, see the PostgreSQL online documentation.
To list our databases, we can use the \l command in psql.
Deleting Databases
To delete a database, we use the DROP DATABASE command, which has the following syntax:
DROP DATABASE dbname
MatthewStones_4789C11.fm Page 329 Wednesday, February 23, 2005 6:48 AM
330
CHAPTER 11
■ POSTGRESQL ADMINISTRATION
We cannot drop a database that has any open connections, including our own connection
from psql or pgAdmin III. We must switch to another database or template1 if we want to
delete the database we are currently connected to.
Creating and Deleting Databases from the Command Line
PostgreSQL provides two wrapper utilities, createdb and dropdb, to allow database creation
and deletion, respectively, from the operating system command line. These utilities have the
following forms:
createdb [ options ] dbname [ description ]
dropdb [ options ] dbname
The options for these utilities are very similar to the createuser and dropuser utilities
described earlier. They are listed in Table 11-9.
If we create a new database in the tablespace datainopt we created earlier, we can see the
layout of the underlying database files. We connect to the database server as the administrative
user to the default database template1, and then we use psql to check the tablespace. Finally,
we create the new database:
Table 11-9. Command-Line createdb and dropdb Options
Option Description
-h, host=hostname Specifies the database server host or socket directory
-p, port=port Specifies the database server port
-U, username=username Specifies the username to connect as
-W, password Prompts for password
-D, tablespace=tablespace Sets the default tablespace for the new database
-E, encoding=encoding Sets the encoding for the new database
-O, owner=owner Specifies the database user to own the new database
-T, template=template Specifies the template database to copy for the new database
-e, echo Shows the commands being sent to the server
-q, quiet Specifies not to write any messages
help Shows this help, then exits
version Outputs version information, then exits
MatthewStones_4789C11.fm Page 330 Wednesday, February 23, 2005 6:48 AM
CHAPTER 11 ■ POSTGRESQL ADMINISTRATION
331
# psql -U postgres template1
Welcome to psql 8.0.0, the PostgreSQL interactive terminal.
Type: \copyright for distribution terms
\h for help with SQL commands
\? for help with psql commands
\g or terminate with semicolon to execute query
\q to quit
template1=#
template1=# SELECT * FROM pg_tablespace;
spcname | spcowner | spclocation | spcacl
+ + +
pg_default | 1 | |
pg_global | 1 | |
datainopt | 1 | /opt/pgdata |
(3 rows)
template1=# CREATE DATABASE example1 OWNER rick TABLESPACE datainopt;
CREATE DATABASE
template1=#
We can then look at the underlying operating system files from the command line:
# cd /opt/pgdata
# ls -l
total 8
drwx 2 postgres postgres 4096 Nov 27 13:35 17864
-rw 1 postgres postgres 4 Nov 21 14:19 PG_VERSION
#
The rather strange number, 17864, is simply a name that PostgreSQL has chosen to use as
a directory to store the files. The PG_VERSION file is used by PostgreSQL internally to track which
version of software was used to create the database.
Schema Management
Inside each database, there is one more level before the actual tables: a schema, which is a
grouping of closely related database objects. Up to now, we have ignored the existence of
schemas, because PostgreSQL’s default behavior is to create a schema called public and place
all the tables in that schema. By default, PostgreSQL assumes that it should look for any table
your SQL accesses in the public schema. This means that users who have no need of schemas
can pretty much ignore them.
MatthewStones_4789C11.fm Page 331 Wednesday, February 23, 2005 6:48 AM