Beginning JavaScript Third Edition phần 8 ppt
Bạn đang xem bản rút gọn của tài liệu. Xem và tải ngay bản đầy đủ của tài liệu tại đây (1.5 MB, 79 trang )
width: 24px;
border: 1px solid #316AC5;
background-color: #C1D2EE;
padding: 2px;
cursor: pointer;
}
You’ve already seen the first three properties; they were used in the toolbar-button class. Next, a blue
border one pixel in width is added to the element, and the background color is changed to a light blue.
The padding is decreased to two pixels. You do this because padding and borders add extra height and
width to the HTML element. Take a look at Figure 13-15, which illustrates this concept.
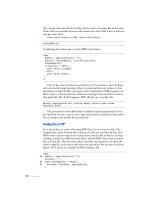
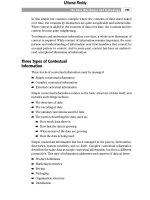
Figure 13-15
This is a side-by-side comparison of the
toolbar-button and toolbar-button-hover classes. The
toolbar-button class is 24 pixels in height and width plus three pixels of padding per side. That
makes
toolbar-button 30 pixels in height and width.
The
toolbar-button-hover class starts with the same 24 pixels in height and width. You then add a
one-pixel border, which adds two pixels to the height and width. Then you add two pixels of padding
on each side, which makes
toolbar-button-hover 30 pixels in height and width, just like toolbar-
button
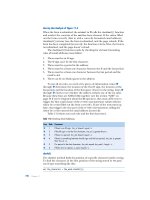
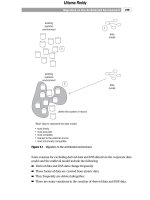
. If you used three pixels of padding instead of two in toolbar-button-hover, the button
would grow in size when the mouse pointer hovered over it, as Figure 13-16 shows.
Padding
<div/>
<div/>
Border
Both elements 30 pixels
in height and width
Padding
530
Chapter 13: Dynamic HTML in Modern Browsers
16_051511 ch13.qxp 4/13/07 6:23 PM Page 530
Figure 13-16
Let’s take a second and look at these two rules. Notice that each has three properties with the same val-
ues (
display, height, and width). You can take these properties out and write a new rule for all
<span/> elements inside the toolbar.
.toolbar span
{
display: inline-block;
height: 24px;
width: 24px;
}
You can now slim down the toolbar-button and toolbar-button-hover classes:
.toolbar-button
{
padding: 3px;
}
.toolbar-button-hover
{
border: 1px solid #316AC5;
background-color: #C1D2EE;
padding: 2px;
cursor: pointer;
}
By making this change, you can easily add style that is shared by both states.
The last property we’ll discuss for the button is the
cursor property. The mouse cursor (or pointer) is an
important user interface component. It can tell the user when something is going on in the background
or let him know when he can highlight text. It also changes to a hand when he moves the cursor over a
link, letting him know that something will happen when he clicks it.
Padding
<div/>
<div/>
Border
32px30px
Padding
531
Chapter 13: Dynamic HTML in Modern Browsers
16_051511 ch13.qxp 4/13/07 6:23 PM Page 531
As stated earlier, you want the user to understand what the toolbar is and what it does. By using the
cursor property and setting it to pointer, you show the user a hand when he moves his mouse over a
button. This offers the suggestion “Hey you! You can click me!”
Styling the Icons
The last style rule you need to write is one for the icons. These are simple <img/> elements with a CSS
class name of
toolbar-icon.
.toolbar-icon
{
height: 24px;
width: 24px;
}
By assigning height and width, you can constrain the image to a certain size. This will make sure that
the icons look uniform.
Storing Button Information
You need some way to store the button information. In this script, you’ll use a multi-dimensional array
to contain information for specific buttons. Let’s start with the first array. Let’s call it
myToolbar.
var myToolbar = new Array();
Each element in this array, myToolbar[x], will also be declared as an array. Each of these inner arrays
will hold information for a particular button.
You start this process with the array element of index
0.
myToolbar[0] = new Array();
Now you can use the elements of this array, namely myToolbar[0][0] and myToolbar[0][1], to hold
information about the first button. That information will be the image location for the icon and the page
(or JavaScript code) to load when the button is clicked. So you see that the following code holds the loca-
tion of the icon:
myToolbar[0][0] = “img/green.gif”;
The next line holds the web location, or JavaScript code, to load.
myToolbar[0][1] = “javascript: alert(‘You Clicked the Green Button!’)”;
Each button follows this pattern of defining a new Array object and inserting it in the first dimension.
Then you make the second dimension of the array hold the icon information and the link or JavaScript
code to load.
myToolbar[0] = new Array();
myToolbar[0][0] = “img/green.gif”;
myToolbar[0][1] = “javascript: alert(‘You Clicked the Green Button!’)”;
myToolbar[1] = new Array();
532
Chapter 13: Dynamic HTML in Modern Browsers
16_051511 ch13.qxp 4/13/07 6:23 PM Page 532
myToolbar[1][0] = “img/blue.gif”;
myToolbar[1][1] = “javascript: alert(‘You Clicked the Blue Button!’)”;
myToolbar[2] = new Array();
myToolbar[2][0] = “img/red.gif”;
myToolbar[2][1] = “”;
Building the Toolbar
You need a function to build the toolbar and populate it with buttons. Let’s write a function called
createToolbar() that will do that for you. It needs to accept two arguments: the first one is the name
of your toolbar, and the second is your multi-dimensional array containing the button information. You
know how the HTML should be structured, so let’s get started.
The first step is to dynamically create the
<div/> element for the toolbar.
function createToolbar(sName, aItems)
{
var toolbar = document.createElement(“div”);
toolbar.id = sName;
toolbar.className = “toolbar”;
//more code here
document.body.appendChild(toolbar);
}
In this code you create the <div/> element with the createElement() method and use the toolbar’s
name, specified by the first argument, as its
id attribute. You then assign its CSS class, toolbar, and
append it to the document with the
appendChild() method.
You now have an empty toolbar, so you need to use the
myToolbar array to populate it with buttons.
You’ll do this with a
for loop.
function createToolbar(sName, aButtons)
{
var toolbar = document.createElement(“div”);
toolbar.id = sName;
toolbar.className = “toolbar”;
for (var i = 0; i < aButtons.length; i++)
{
var thisButton = aButtons[i];
var button = document.createElement(“span”);
var icon = document.createElement(“img”);
//more code here
}
document.body.appendChild(toolbar);
}
533
Chapter 13: Dynamic HTML in Modern Browsers
16_051511 ch13.qxp 4/13/07 6:23 PM Page 533
Inside the loop, you get the element of the array that corresponds to this button and assign it to
thisButton. This enables you to easily access the button’s information. Then you create the required
<span/> and <img/> elements. The button variable references the <span/> element, and the icon vari-
able references the
<img/> element.
Next, add the
href attribute to button with the setAttribute() method. The value of this attribute is
contained in the
thisButton[1] element of the thisButton array. Also set the CSS class.
function createToolbar(sName, aButtons)
{
var toolbar = document.createElement(“div”);
toolbar.id = sName;
toolbar.className = “toolbar”;
for (var i = 0; i < aButtons.length; i++)
{
var thisButton = aButtons [i];
var button = document.createElement(“div”);
var icon = document.createElement(“img”);
button.setAttribute(“href”, thisButton[1]);
button.className = “toolbar-button”;
icon.src = thisButton[0];
icon.className = “toolbar-icon”;
button.appendChild(icon);
toolbar.appendChild(button);
}
document.body.appendChild(toolbar);
}
This code also sets the src and className properties for the icon. You then append icon to button
and add the button to the toolbar.
With this code, the toolbar is created and populated with buttons, but it currently has no functionality.
Remember, you want hover effects, and you want something to happen when a button is clicked.
Handling User Interaction
User interaction is an important part of DHTML; you usually want your HTML to react to something a
user does, and the toolbar is no exception. As already mentioned, there are three areas of user interaction
you want to handle:
❑ When the user moves her mouse pointer over a button
❑ When the user moves her mouse pointer off a button
❑ When the user clicks a button
You’ll write one function to handle these events:
button_mouseHandler().
534
Chapter 13: Dynamic HTML in Modern Browsers
16_051511 ch13.qxp 4/13/07 6:23 PM Page 534
The button_mouseHandler() Function
Using one function to handle the three mouse events is a time- and code-saving measure, especially in
the case of this DHTML script. The function begins with its definition and two variables:
function button_mouseHandler()
{
var eType = event.type;
var eSrc = event.srcElement;
//more code here
}
This DHTML script is quite similar to the image rollover scripts you wrote in the previous chapter. Here,
you’re concerned only with the element that the event was fired upon (the source element) and the event
type that called the event handler. The next step is to write the code for the
mouseover event.
function button_mouseHandler()
{
var eType = event.type;
var eSrc = event.srcElement;
if (eType == “mouseover”)
{
eSrc.className = “toolbar-button-hover”;
}
//more code here
}
This code checks to see if the event type is a mouseover event, and, if so, it changes the source element’s
className property to toolbar-button-hover.
Now it’s time to handle the
mouseout event. When the mouse pointer leaves the button, the desired
effect is to return the previously highlighted button to its original state. Therefore, the following code
changes the
className property of the source element (of the mouseout event) back to toolbar-
button
.
function button_mouseHandler()
{
var eType = event.type;
var eSrc = event.srcElement;
if (eType == “mouseover”)
{
eSrc.className = “toolbar-button-hover”;
}
else if (eType == “mouseout”)
{
eSrc.className = “toolbar-button”;
}
//more code here
}
535
Chapter 13: Dynamic HTML in Modern Browsers
16_051511 ch13.qxp 4/13/07 6:23 PM Page 535
Now things are beginning to take shape. When the mouse pointer moves over the button, its style
changes to give a highlight effect, and the mouse pointer leaving the button returns it to its original
state. Now you need to write the code to handle the
click event, and the following code does this:
function button_mouseHandler()
{
var eType = event.type;
var eSrc = event.srcElement;
//more code here
if (eType == “mouseover”)
{
eSrc.className = “toolbar-button-hover”;
}
else if (eType == “mouseout”)
{
eSrc.className = “toolbar-button”;
}
else if (eType == “click”)
{
eSrc.className = “toolbar-button”;
window.location.href = eSrc.getAttribute(“href”);
}
}
The code handling the click event does two things. First, it returns the clicked button’s className
property back to toolbar-button, and second, it navigates to the desired web page, or executes
JavaScript code.
But alas, all is not well. If you were to run this code, you would notice a few weird things happening.
Buttons would highlight and unhighlight at strange times, the icons would grow to the size of the but-
tons, and you’d see some very strange results if you clicked on a button when the mouse pointer was
over an icon (the browser would navigate to the URL specified in the
<img/> element’s src property).
These behaviors may seem weird, but they are normal. As the mouse pointer moves over the
<img/>
element, it is no longer over the <span/> element (the button). Therefore, the mouseout event fires as
the mouse leaves the
<span/> and enters the <img/>.
A simple solution to this problem is to check the source element’s
tagName property, and, if it’s IMG, to
access the image’s parent node: the
<span/> element that represents the button.
function button_mouseHandler()
{
var eType = event.type;
var eSrc = event.srcElement;
if (eSrc.tagName == “IMG”)
{
eSrc = eSrc.parentNode;
}
if (eType == “mouseover”)
536
Chapter 13: Dynamic HTML in Modern Browsers
16_051511 ch13.qxp 4/13/07 6:23 PM Page 536
{
eSrc.className = “toolbar-button-hover”;
}
else if (eType == “mouseout”)
{
eSrc.className = “toolbar-button”;
}
else if (eType == “click”)
{
eSrc.className = “toolbar-button”;
window.location.href = eSrc.getAttribute(“href”);
}
}
Now the eSrc variable will always reference the <span/> element, making the button behave as you
would expect it to.
Finishing createToolbar()
With the mouse event handler written, you can assign it to handle the appropriate events. Do this in
createToolbar().
function createToolbar(sName, aButtons)
{
var toolbar = document.createElement(“div”);
toolbar.id = sName;
toolbar.className = “toolbar”;
for (var i = 0; i < aButtons.length; i++)
{
var thisButton = aButtons[i];
var button = document.createElement(“span”);
var icon = document.createElement(“img”);
button.setAttribute(“href”, thisButton[1]);
button.className = “toolbar-button”;
button.onclick = button_mouseHandler;
button.onmouseover = button_mouseHandler;
button.onmouseout = button_mouseHandler;
icon.src = thisButton[0];
icon.className = “toolbar-icon”;
button.appendChild(icon);
toolbar.appendChild(button);
}
document.body.appendChild(toolbar);
}
Now the code for the toolbar is complete. You have the toolbar, you populated it with buttons, and you
added interactivity for those buttons. Now you need only to call
createToolbar().
537
Chapter 13: Dynamic HTML in Modern Browsers
16_051511 ch13.qxp 4/13/07 6:23 PM Page 537
Finishing Up
Creating a toolbar is easy; however, there is one caveat you must consider. Since you generate the HTML
elements dynamically and append them to
document.body, you must create the toolbar while the docu-
ment is loading, or after the document is loaded. If you attempt to load the toolbar at any other time,
you’ll get errors in your page.
In this exercise, you’ll use the
onload event handler to create the toolbar after the document is loaded.
Following is the complete source code for the toolbar DHTML script. Open the text editor of your choice
and type the following:
<!DOCTYPE html PUBLIC “-//W3C//DTD XHTML 1.0 Transitional//EN”
“ /><html xmlns=” /><head>
<title>IE Toolbar</title>
<style type=”text/css”>
.toolbar
{
background-color: #E4E2D5;
padding: 2px;
}
.toolbar span
{
display: inline-block;
height: 24px;
width: 24px;
}
.toolbar-button
{
padding: 3px;
}
.toolbar-button-hover
{
border: 1px solid #316AC5;
background-color: #C1D2EE;
padding: 2px;
cursor: pointer;
}
.toolbar-icon
{
height: 24px;
width: 24px;
}
</style>
<script type=”text/javascript”>
function button_mouseHandler()
{
var eType = event.type;
538
Chapter 13: Dynamic HTML in Modern Browsers
16_051511 ch13.qxp 4/13/07 6:23 PM Page 538
var eSrc = event.srcElement;
if (eSrc.tagName == “IMG”)
{
eSrc = eSrc.parentNode;
}
if (eType == “mouseover”)
{
eSrc.className = “toolbar-button-hover”;
}
else if (eType == “mouseout”)
{
eSrc.className = “toolbar-button”;
}
else if (eType == “click”)
{
eSrc.className = “toolbar-button”;
window.location.href = eSrc.getAttribute(“href”);
}
}
function createToolbar(sName, aButtons) {
var toolbar = document.createElement(“div”);
toolbar.id = sName;
toolbar.className = “toolbar”;
for (var i = 0; i < aButtons.length; i++)
{
var thisButton = aButtons[i];
var button = document.createElement(“span”);
var icon = document.createElement(“img”);
button.setAttribute(“href”, thisButton[1]);
button.className = “toolbar-button”;
button.onclick = button_mouseHandler;
button.onmouseover = button_mouseHandler;
button.onmouseout = button_mouseHandler;
icon.src = thisButton[0];
icon.className = “toolbar-icon”;
button.appendChild(icon);
toolbar.appendChild(button);
}
document.body.appendChild(toolbar);
}
var myToolbar = new Array();
myToolbar[0] = new Array();
myToolbar[0][0] = “img/green.gif”;
539
Chapter 13: Dynamic HTML in Modern Browsers
16_051511 ch13.qxp 4/13/07 6:23 PM Page 539
myToolbar[0][1] = “javascript: alert(‘You Clicked the Green Button!’)”;
myToolbar[1] = new Array();
myToolbar[1][0] = “img/blue.gif”;
myToolbar[1][1] = “javascript: alert(‘You Clicked the Blue Button!’)”;
myToolbar[2] = new Array();
myToolbar[2][0] = “img/red.gif”;
myToolbar[2][1] = “”;
</script>
</head>
<body onload=”createToolbar(‘myToolbar’, myToolbar);”>
</body>
</html>
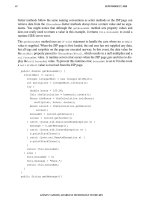
Save this file as toolbar_ie.htm. When you load it into Internet Explorer, you should see something
like what is shown in Figure 13-17.
Figure 13-17
Move your mouse pointer over the buttons, and you’ll see them become highlighted. When you move
your mouse over another button, the previous button un-highlights itself. Click any of the buttons. The
green and blue buttons will display an alert box, and the red button will take you to
www.wrox.com.
DHTML Example: The Toolbar in Firefox and
Opera
Writing the toolbar script for Firefox is surprisingly easy, as most of the code can be reused. As you’ve
already learned, IE and Firefox share many similarities, but they greatly differ in their event models.
The toolbar script follows this same pattern. You’ll have to make a change in the CSS and change the
event handlers to work with the DOM event model, but other than that your code will remain
unchanged.
540
Chapter 13: Dynamic HTML in Modern Browsers
16_051511 ch13.qxp 4/13/07 6:23 PM Page 540
Try It Out The Toolbar in Firefox and Opera
Open your text editor of choice and type the following:
<!DOCTYPE html PUBLIC “-//W3C//DTD XHTML 1.0 Transitional//EN”
“ /><html xmlns=” /><head>
<title>Firefox, Opera, and Safari Toolbar</title>
<style type=”text/css”>
.toolbar
{
background-color: #E4E2D5;
padding: 2px;
}
.toolbar span
{
display: -moz-inline-stack;
display: inline-block;
height: 24px;
width: 24px;
}
.toolbar-button
{
padding: 3px;
}
.toolbar-button-hover
{
border: 1px solid #316AC5;
background-color: #C1D2EE;
padding: 2px;
cursor: pointer;
}
.toolbar-icon
{
height: 24px;
width: 24px;
}
</style>
<script type=”text/javascript”>
function button_mouseHandler(e)
{
var eType = e.type;
var eSrc = e.target;
if (eSrc.tagName == “IMG”)
{
eSrc = eSrc.parentNode;
541
Chapter 13: Dynamic HTML in Modern Browsers
16_051511 ch13.qxp 4/13/07 6:23 PM Page 541
}
if (eType == “mouseover”)
{
eSrc.className = “toolbar-button-hover”;
}
else if (eType == “mouseout”)
{
eSrc.className = “toolbar-button”;
}
else if (eType == “click”)
{
eSrc.className = “toolbar-button”;
window.location.href = eSrc.getAttribute(“href”);
}
}
function createToolbar(sName, aButtons)
{
var toolbar = document.createElement(“div”);
toolbar.id = sName;
toolbar.className = “toolbar”;
for (var i = 0; i < aButtons.length; i++)
{
var thisButton = aButtons[i];
var button = document.createElement(“span”);
var icon = document.createElement(“img”);
button.setAttribute(“href”, thisButton[1]);
button.className = “toolbar-button”;
button.onclick = button_mouseHandler;
button.onmouseover = button_mouseHandler;
button.onmouseout = button_mouseHandler;
icon.src = thisButton[0];
icon.className = “toolbar-icon”;
button.appendChild(icon);
toolbar.appendChild(button);
}
document.body.appendChild(toolbar);
}
var myToolbar = new Array();
myToolbar[0] = new Array();
myToolbar[0][0] = “img/green.gif”;
myToolbar[0][1] = “javascript: alert(‘You Clicked the Green Button!’)”;
myToolbar[1] = new Array();
542
Chapter 13: Dynamic HTML in Modern Browsers
16_051511 ch13.qxp 4/13/07 6:23 PM Page 542
myToolbar[1][0] = “img/blue.gif”;
myToolbar[1][1] = “javascript: alert(‘You Clicked the Blue Button!’)”;
myToolbar[2] = new Array();
myToolbar[2][0] = “img/red.gif”;
myToolbar[2][1] = “”;
</script>
</head>
<body onload=”createToolbar(‘myToolbar’, myToolbar)”>
</body>
</html>
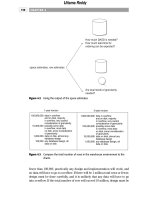
Save this file as toolbar_ff.htm. Open it in Firefox, Opera, or Safari, and you should see something
like what is shown in Figure 13-18.
Figure 13-18
How It Works
This code remains largely the same as in the IE example. The changes, few as they may be, begin with
the CSS. In the IE example you styled the buttons to be displayed inline-block, forcing the buttons to sit
side by side while adding block-style options. In this second example you had to do something different.
.toolbar span
{
display: -moz-inline-stack;
display: inline-block;
height: 24px;
width: 24px;
}
Firefox does not support the inline-block value, but it does have a vendor-specific equivalent called
-moz-inline-stack. Directly under it is another display style declaration, which is for Opera. Firefox
will ignore this second
display declaration, as it does not recognize inline-block as a valid value for
the
display property.
Now let’s jump to the mouse event handler. The primary changes made to the function are the values of
the
eType and eSrc variables, as well as an added parameter.
543
Chapter 13: Dynamic HTML in Modern Browsers
16_051511 ch13.qxp 4/13/07 6:23 PM Page 543
function button_mouseHandler(e)
{
var eType = e.type;
var eSrc = e.target;
if (eSrc.tagName == “IMG”)
{
eSrc = eSrc.parentNode;
}
if (eType == “mouseover”)
{
eSrc.className = “toolbar-button-hover”;
}
else if (eType == “mouseout”)
{
eSrc.className = “toolbar-button”;
}
else if (eType == “click”)
{
eSrc.className = “toolbar-button”;
window.location.href = eSrc.getAttribute(“href”);
}
}
Since you’re now dealing with the DOM event model, you need to add a parameter to the function for
the
event object. Then you use the target property to retrieve the element where the event fired. The
remainder of the function remains untouched: You make sure that
eSrc is a button and change the ele-
ment’s
className property according to the event.
Creating Cross-Browser DHTML
By now you’ve written one DHTML script and adapted it to work in both IE and Firefox. In this section,
you’ll combine the two versions into one cross-browser version. You probably already have an idea of
what code you’ll change, as you’ve already changed it once. However, here you’ll employ a few tricks as
well to ensure that the script works in both browsers.
Try It Out The Cross-Browser Toolbar
Open your text editor and type the following:
<!DOCTYPE html PUBLIC “-//W3C//DTD XHTML 1.0 Transitional//EN”
“ /><html xmlns=” /><head>
<title>Cross-Browser Toolbar</title>
<style type=”text/css”>
.toolbar
{
background-color: #E4E2D5;
544
Chapter 13: Dynamic HTML in Modern Browsers
16_051511 ch13.qxp 4/13/07 6:23 PM Page 544
padding: 2px;
}
.toolbar span
{
display: -moz-inline-stack;
display: inline-block;
height: 24px;
width: 24px;
}
.toolbar-button
{
padding: 3px;
}
.toolbar-button-hover
{
border: 1px solid #316AC5;
background-color: #C1D2EE;
padding: 2px;
cursor: pointer;
}
.toolbar-icon
{
height: 24px;
width: 24px;
}
</style>
<script type=”text/javascript”>
function button_mouseHandler(e)
{
var eType;
var eSrc;
if (window.event)
{
eType = event.type;
eSrc = event.srcElement;
}
else
{
eType = e.type;
eSrc = e.target;
}
if (eSrc.tagName == “IMG”)
{
eSrc = eSrc.parentNode;
}
if (eType == “mouseover”)
{
eSrc.className = “toolbar-button-hover”;
545
Chapter 13: Dynamic HTML in Modern Browsers
16_051511 ch13.qxp 4/13/07 6:23 PM Page 545
}
else if (eType == “mouseout”)
{
eSrc.className = “toolbar-button”;
}
else if (eType == “click”)
{
eSrc.className = “toolbar-button”;
window.location.href = eSrc.getAttribute(“href”);
}
}
function createToolbar(sName, aButtons)
{
var toolbar = document.createElement(“div”);
toolbar.id = sName;
toolbar.className = “toolbar”;
for (var i = 0; i < aButtons.length; i++)
{
var thisButton = aButtons[i];
var button = document.createElement(“span”);
var icon = document.createElement(“img”);
button.setAttribute(“href”, thisButton[1]);
button.className = “toolbar-button”;
button.onclick = button_mouseHandler;
button.onmouseover = button_mouseHandler;
button.onmouseout = button_mouseHandler;
icon.src = thisButton[0];
icon.className = “toolbar-icon”;
button.appendChild(icon);
toolbar.appendChild(button);
}
document.body.appendChild(toolbar);
}
var myToolbar = new Array();
myToolbar[0] = new Array();
myToolbar[0][0] = “img/green.gif”;
myToolbar[0][1] = “javascript: alert(‘You Clicked the Green Button!’)”;
myToolbar[1] = new Array();
myToolbar[1][0] = “img/blue.gif”;
myToolbar[1][1] = “javascript: alert(‘You Clicked the Blue Button!’)”;
myToolbar[2] = new Array();
myToolbar[2][0] = “img/red.gif”;
myToolbar[2][1] = “”;
546
Chapter 13: Dynamic HTML in Modern Browsers
16_051511 ch13.qxp 4/13/07 6:23 PM Page 546
</script>
</head>
<body onload=”createToolbar(‘myToolbar’, myToolbar)”>
</body>
</html>
Save this file as toolbar_xb.htm. Open it in IE, Firefox, and/or Opera. You should see the same thing
you saw in the previous two examples.
How It Works
As in the Firefox and Opera example, we’ll look only at the changes made to this version; those changes
are confined to the
button_mouseHandler() function. Because this is a cross-browser example, the
code must cater to both the IE and DOM event models.
function button_mouseHandler(e)
{
var eType;
var eSrc;
if (window.event)
{
eType = event.type;
eSrc = event.srcElement;
}
else
{
eType = e.type;
eSrc = e.target;
}
if (eSrc.tagName == “IMG”)
{
eSrc = eSrc.parentNode;
}
if (eType == “mouseover”)
{
eSrc.className = “toolbar-button-hover”;
}
else if (eType == “mouseout”)
{
eSrc.className = “toolbar-button”;
}
else if (eType == “click”)
{
eSrc.className = “toolbar-button”;
window.location.href = eSrc.getAttribute(“href”);
}
}
This new code uses object detection to assign eType and eSrc their proper values. When this process is
complete, the function behaves as it did in the previous examples.
547
Chapter 13: Dynamic HTML in Modern Browsers
16_051511 ch13.qxp 4/13/07 6:23 PM Page 547
This example hasn’t been very large, or overly complex. However, the concepts and problems reflect a
difficulty DHTML authors face all the time: working with two different event models and using CSS
workarounds to ensure that the DHTML displays correctly in both types of browser. If you’re aware of
this difficulty, dealing with it really isn’t too hard.
Summary
This chapter has featured quite a few diversions and digressions, but these were necessary to demon-
strate the position and importance of the Document Object Model in JavaScript.
This chapter covered the following points:
❑ You started by outlining four of the main standards—HTML, ECMAScript, XML, and
XHTML —and examined the relationships among them. You saw that a common aim emerging
from these standards was to provide guidelines for coding HTML web pages. Those guidelines
in turn benefited the Document Object Model, making it possible to access and manipulate any
item on the web page using script if web pages were coded according to these guidelines.
❑ You examined the Document Object Model and saw that it offered a browser- and language-
independent means of accessing the items on a web page, and that it resolved some of the prob-
lems that dogged older browsers. You saw how the DOM represents the HTML document as a
tree structure and how it is possible for you to navigate through the tree to different elements
and use the properties and methods it exposes in order to access the different parts of the web
page.
❑ Although sticking to the standards provides the best method for manipulating the contents of
the web page, none of the main browsers yet implements it in its entirety. You looked at the
most up-to-date examples and saw how they provided a strong basis for the creation of
dynamic, interoperable web pages because of their support of the DOM.
Exercise Questions
Suggested solutions to these questions can be found in Appendix A.
Question 1
Here’s some HTML code that creates a web page. Re-create this page, using JavaScript to generate the
HTML using only DOM objects, properties, and methods. Test your code in IE, Firefox, Opera, and
Safari (if you have it) to make sure it works in them.
548
Chapter 13: Dynamic HTML in Modern Browsers
16_051511 ch13.qxp 4/13/07 6:23 PM Page 548
Hint: Comment each line as you write it to keep track of where you are in the tree structure, and create a
new variable for every element on the page (for example, not just one for each of the TD cells, but nine
variables).
<html>
<head>
</head>
<body>
<table>
<thead>
<tr>
<td>Car</td>
<td>Top Speed</td>
<td>Price</td>
</tr>
</thead>
<tbody>
<tr>
<td>Chevrolet</td>
<td>120mph</td>
<td>$10,000</td>
</tr>
<tr>
<td>Pontiac</td>
<td>140mph</td>
<td>$20,000</td>
</tr>
</tbody>
</table>
</body>
</html>
Question 2
Augment your DOM web page so that the table has a border and only the headings of the table (that is,
not the column headings) are center-aligned. Again, test your code in IE, Firefox, Opera, and Safari (if
you have it).
Hint: Add any extra code to the end of the script code you have already written.
549
Chapter 13: Dynamic HTML in Modern Browsers
16_051511 ch13.qxp 4/13/07 6:23 PM Page 549
16_051511 ch13.qxp 4/13/07 6:23 PM Page 550
14
JavaScript and XML
In the previous chapter you took a brief look at Extensible Markup Language (XML). Like HTML,
it consists of elements. You saw that its purpose was to describe data rather than to actually dis-
play information in any particular format, which is the purpose of HTML. There is nothing special
about XML. It is just plain text with the addition of some XML tags enclosed in angle brackets. You
can use any software that can handle plain text to create and edit XML.
In this chapter you’ll be covering the fundamentals of XML. It’s a huge topic and deserves a whole
book to do it justice, so this’ll be a taster to get you started. Before you get down to coding, let’s
look at what XML can be used for.
What Can XML Do for Me?
Developers like XML for a variety of reasons. It makes many web development tasks much sim-
pler than they would be with HTML; it also makes possible many tasks that HTML simply cannot
do. It is a powerful language with the ability to mold to your specific needs.
XML is a data-centric language. It not only contains data, but it describes those data by using
semantic element names. The document’s structure also plays a part in the description. Unlike
HTML, XML is not a formatting language; in fact, a properly structured XML document is devoid
of any formatting elements. This concept is often referred to as the “separation of content and
style,” and is part of XML’s success, as it makes the language simple and easy to use.
For example, you can use XML as a data store like a database. In fact, XML is well suited for large
and complex documents because the data are structured; you design the structure and implement
it using your own elements to describe the data enclosed in the element. The ability to define the
structure and elements used in an XML document is what makes XML a self-describing language.
That is, the elements describe the data they contain, and the structure describes how data are
related to each other.
Another method in which XML has become useful is in retrieving data from remote servers.
Probably the most widely known applications of this method are the RSS and Atom formats for
17_051511 ch14.qxp 4/13/07 6:38 PM Page 551
web syndication. These XML documents, and others like them, contain information readily available to
anyone. Web sites or programs can connect to the remote server, download a copy of the XML docu-
ment, and use the information however needed.
A third, and extremely helpful, application of XML, is the ability to transfer data between incompatible
systems. An XML document is a plain text document; therefore, all operating systems can read and write
to XML files. The only major requirement is an application that understands the XML language and the
document structure. For example, Microsoft recently released details on Microsoft Office Open XML, the
file format used in Microsoft Office 2007. The files themselves are actually Zip files. However, any pro-
gram written to read the XML files contained in the Zip file can display the data with no problem; it
doesn’t matter whether they were written under Windows XP, Mac OS X, any flavor of Linux, or any
other operating system.
The Basics of XML
The advantage of XML over other document formats is that it specifies a protocol by which a document
can describe itself. For example, a document might describe itself as a particular chapter in a book, con-
taining the chapter’s title, the sections, and the text, which is broken into different paragraphs. In order
to write XML documents, you need to have a firm grasp on the fundamentals of the language.
Understanding XML Syntax
XML is a simple language with simple syntax and rules. By following the guidelines in this section,
you’ll create XML documents with little trouble.
XML Is a Well-Formed Language
Well-formed documents are those that comply with the rules of XML syntax. The requirements include,
but are not limited to, the following:
❑ All elements must have an opening and closing tag, or a closing slash in the empty element.
❑ Elements must be nested correctly within the root element.
It is important to make well-formed XML documents because every XML parser is built according to the
XML specification. It is an unforgiving language, meaning that any XML parser that follows the stan-
dard specification will never display documents that are not well formed.
Close the Tags!
The XML specification requires that all elements must have an opening tag and a closing tag. This is one
way in which XML is unlike HTML, in which several elements have no closing tag (like
<img> and
<br>). So when you open a tag, you need to close it when it contains the data that you want it to.
<?xml version=”1.0” encoding=”iso-8859-1”?>
<myElement>Some data go here</myElement>
552
Chapter 14: JavaScript and XML
17_051511 ch14.qxp 4/13/07 6:38 PM Page 552
This example shows a simple XML document. The first line contains the XML declaration. This tells the
application that is going to use this XML document which version of the specification the document
uses. Right now there is only version 1.0 (version 1.1 is coming soon). Note that the line starts with
<?
and ends with ?>. These are the delimiters that indicate there is an XML declaration instruction between
them. In this case, the instruction tells which version of XML the document uses. The declaration also
states the character encoding used in the document. In this case the document conforms to the 1.0 speci-
fication of XML and uses the ISO-8859-1 (Latin-1/West European) character set.
XML declarations have no closing tag.
After the declaration, you see a couple of tags enclosing some text. The first tag is the opening tag for the
myElement element, and the second is the closing tag for the same element. XML is a case-sensitive lan-
guage; therefore, make sure the closing tag exactly matches the opening tag.
A well-formed element does not need to have any data between the opening and closing tags. Take the
following line as an example:
<myElement></myElement>
This, too, is a well-formed XML element, even though it contains no data. This is referred to as an empty
element. In elements such as these, use a shorthand version of closing the tag.
<myElement />
This line of code, as far as an XML parser is concerned, is identical to the previous line of code. So when
you have empty elements, you can use the shorthand way of closing them.
There is no rule in XML that states an element must contain data.
Correctly Nest Elements
For years, browser makers have built their Web browsers to render and display pages that are not well
formed. Not that it’s a problem, as the Web has grown by leaps and bounds because of the everyman/-
woman. However, if you loaded these HTML documents into an XML parser, it would throw error after
error. The largest culprit would most likely be incorrectly nested elements.
XML requires properly nested elements; they cannot overlap as they can in HTML. For example, the fol-
lowing XML document is not well formed:
<?xml version=”1.0” encoding=”iso-8859-1”?>
<myDogs>
<name>Morgan</name>
<name>Molly
</myDogs></name>
This XML is almost well formed; however, the second <name/> element’s closing tag comes after the
<myDogs/> closing tag. This is an example of overlapping elements and will make any XML document
invalid. Close an open element before you close its parent element.
If you follow these two rules, you’ll have an easy time when writing XML documents. And speaking of
which, let’s delve more into XML’s syntax.
553
Chapter 14: JavaScript and XML
17_051511 ch14.qxp 4/13/07 6:38 PM Page 553
Document Structure
XML was designed to provide a means of storing data in a structured way. All XML documents must
have at least one element. The first element in the document is called the root element or the document ele-
ment. No matter which name you use, both terms mean the same thing. All XML documents must have a
root element, and they cannot have more than one.
Think of an operating system’s directory structure. Everything begins with the root directory (C:). This
main directory can have many subdirectories, and those subdirectories can have many more subdirecto-
ries, and so on.
An XML document is very similar. You start with the root element and build the document from there.
For example, look at the following XML document:
<?xml version=”1.0” encoding=”iso-8859-1”?>
<myDogs>
<name>Morgan</name>
<name>Molly</name>
</myDogs>
The first element, <myDogs/>, is the root element of the document. From here, two elements called
<name/> are added. You could even go farther and add more data (and elements) until you’re satisfied
with the document. There is no limit to the amount of elements you can use in a document; just remem-
ber that there can be only one root element, and that the document builds off of that element.
XML Elements
XML uses elements to describe the data enclosed in the document. So when you create your own XML
documents, make sure that the elements properly describe the data enclosed in them. Let’s expand upon
the dogs document.
<?xml version=”1.0” encoding=”iso-8859-1”?>
<myDogs>
<dog breed=”Labrador Retriever”>
<name>Morgan</name>
</dog>
<dog breed=”Labrador Retriever”>
<name>Molly</name>
</dog>
</myDogs>
This document has some new information, and the document structure has changed as a result. Despite
the changes, the document is still well formed, as each opening tag has a corresponding closing tag, and
the elements are nested correctly.
The very first line of an XML document contains the XML declaration. In this case the document con-
forms to the 1.0 specification of XML and uses the ISO-8859-1 (Latin-1/West European) character set.
The next line describes the start tag of the root element of the document. In this example, it’s saying
“This document contains information on my dogs.”
<myDogs>
554
Chapter 14: JavaScript and XML
17_051511 ch14.qxp 4/13/07 6:38 PM Page 554