Beginning Microsoft Visual Basic 2008 phần 5 potx
Bạn đang xem bản rút gọn của tài liệu. Xem và tải ngay bản đầy đủ của tài liệu tại đây (1.34 MB, 92 trang )
Chapter 10: Debugging and Error Handling
335
12. Add the following two properties to the end of the Computer class:
Public ReadOnly Property FreeMemory() As String
Get
‘Using the My namespace
Return Format(( _
My.Computer.Info.AvailablePhysicalMemory.ToString \ 1024), _
“#,###,##0”) & “ K”
End Get
End Property
Public ReadOnly Property TotalMemory() As String
Get
‘Using the My namespace
Return Format(( _
My.Computer.Info.TotalPhysicalMemory.ToString \ 1024), _
“#,###,##0”) & “ K”
End Get
End Property
13. Switch to the code for the Debug form and add the following highlighted Imports statement:
Imports System.Collections.Generic
Public Class Debug
14. You need to add a few private variable declarations next. Add the following code:
Public Class Debug
‘Using the Generics class
Private objStringValues As New Generics(Of String)
Private objIntegerValues As New Generics(Of Integer)
‘Using the List < T > class
Private objCustomerList As New List(Of Customer)
15. Add the following ListCustomer procedure to add customers to the list box on your form:
Private Sub ListCustomer(ByVal customerToList As Customer)
lstData.Items.Add(customerToList.CustomerID & _
“ - “ & customerToList.CustomerName)
End Sub
16. Next, you need to add the rest of the code to the Start button Click event handler. Select
btnStart in the Class Name combo box at the top of the Code Editor and then select the
Click
event in the Method Name combo box. Add the following highlighted code to the
Click
event handler:
Private Sub btnStart_Click(ByVal sender As Object, _
ByVal e As System.EventArgs) Handles btnStart.Click
c10.indd 335c10.indd 335 4/1/08 6:26:08 PM4/1/08 6:26:08 PM
Chapter 10: Debugging and Error Handling
336
‘Declare variables
Dim strData As String
lstData.Items.Add(“String variable data:”)
If strData.Length > 0 Then
lstData.Items.Add(strData)
End If
‘Add an empty string to the ListBox
lstData.Items.Add(String.Empty)
‘Demonstrates the use of the List < T > class
lstData.Items.Add(“Customers in the Customer Class:”)
objCustomerList.Add(New Customer(1001, “Henry For”))
objCustomerList.Add(New Customer(1002, “Orville Wright”))
For Each objCustomer As Customer In objCustomerList
ListCustomer(objCustomer)
Next
‘Add an empty string to the ListBox
lstData.Items.Add(String.Empty)
‘Demonstrates the use of Generics
lstData.Items.Add(“Generics Class Key/Value Pairs using String Values:”)
objStringValues.Add(“1001”, “Henry Ford”)
lstData.Items.Add(objStringValues.Key(0) & “ = “ & _
objStringValues.Value(0))
‘Add an empty string to the ListBox
lstData.Items.Add(String.Empty)
‘Demonstrates the use of Generics
lstData.Items.Add(“Generics Class Key/Value Pairs using Integer Values:”)
objIntegerValues.Add(“Henry Ford”, 1001)
lstData.Items.Add(objIntegerValues.Key(0) & “ = “ & _
objIntegerValues.Value(0))
‘Add an empty string to the ListBox
lstData.Items.Add(String.Empty)
‘Demonstrates the use of the Using statement
‘Allows acquisition, usage and disposal of the resource
lstData.Items.Add(“Computer Class Properties:”)
Using objMemory As New Computer
lstData.Items.Add(“FreeMemory = “ & objMemory.FreeMemory)
lstData.Items.Add(“TotalMemory = “ & objMemory.TotalMemory)
End Using
‘Add an empty string to the ListBox
lstData.Items.Add(String.Empty)
‘Demonstrates the use of the Continue statement
Dim strPassword As String = “POpPassword”
Dim strLowerCaseLetters As String = String.Empty
‘Extract lowercase characters from string
c10.indd 336c10.indd 336 4/1/08 6:26:08 PM4/1/08 6:26:08 PM
Chapter 10: Debugging and Error Handling
337
For intIndex As Integer = 0 To strPassword.Length - 1
‘Demonstrates the use of the Continue statement
‘If no uppercase character is found, continue the loop
If Not strPassword.Substring(intIndex, 1) Like “[a-z]” Then
‘No upper case character found, continue loop
Continue For
End If
‘Lowercase character found, save it
strLowerCaseLetters & = strPassword.Substring(intIndex, 1)
Next
‘Display lowercase characters
lstData.Items.Add(“Password lower case characters:”)
lstData.Items.Add(strLowerCaseLetters)
End Sub
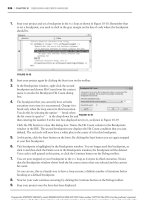
17. Before examining how the code works, hover your mouse over the Error List tab at the bottom
of the IDE so that the Error List window appears as shown in Figure 10 - 7 . If the Error List tab
is not visible, select View
Error List from the menu bar. You have one warning about a
potential error in your code. The line in question causes an error when you run your project;
however, this is deliberate and is intended to demonstrate some of the debugging capabilities
of Visual Studio 2008. You can ignore this warning for now, because you ’ ll be correcting it
shortly.
Figure 10-7
18. Save your project by clicking the Save All button on the toolbar.
How It Works
After building the user interface for the Debugging project, you add the Customer class. This class is
also straightforward and contains two private variables, a constructor, and two properties.
The two variables in the Customer class are declared as Private, which means that these variables are
accessible only to the procedures in the class:
Public Class Customer
Private intCustomerID As Integer
Private strName As String
The constructor for this class — a method called whenever a new object of this class is to be created —
is defined as a
Public procedure with a procedure name of New . All constructors for classes in the
.NET Framework must be declared with a procedure name of
New .
c10.indd 337c10.indd 337 4/1/08 6:26:09 PM4/1/08 6:26:09 PM
Chapter 10: Debugging and Error Handling
338
This constructor accepts two input parameters: customerID and name . The parameters are used to set
the values in the private variables defined for this class:
Public Sub New(ByVal customerID As Integer, ByVal name As String)
intCustomerID = customerID
strName = name
End Sub
Two properties are defined: CustomerID and CustomerName . These are read - only properties,
meaning that the consumer of this class can use these properties only to read the Customer ID and
customer name; consumers cannot change them:
Public ReadOnly Property CustomerID() As Integer
Get
Return intCustomerID
End Get
End Property
Public Property CustomerName() As String
Get
Return strName
End Get
End Property
End Class
The next class that you add to the Debugging project is the Generics class. This class will be used to
demonstrate the use of Generics in Visual Basic 2008.
The
Collections class in the .NET Framework allows you to store data in the collection in a key/
value pair. The key is always a string value that identifies the value, also known as an item . The item is
defined as an object, which allows you to use the
Collection class to store any data type that you
want in the item. So, for example, you can use the
Collection class to store Integer values or you
can use it to store
String values. No type checking is performed. This lack of specificity can lead to
performance problems as well as run - time problems.
Suppose you intend to use the
Collection class to store Integer values. If (through poor coding
practices) you allowed a
String value to be added to the collection, you would not receive a run - time
error when adding the item, but you could receive one when you tried to access the item.
The performance problems that you will encounter are the conversion of the data going into the
collection and the data coming out of the collection. When you add an item to the collection, the data
must be converted from its native data type to an
Object data type, since that is how the Item
property is defined. Likewise, when you retrieve an item from the collection, the item must be
converted from an
Object data type to the data type that you are using.
In Chapter 5 , when working with
ArrayList s (which are a kind of collection), you solved the
problem of being able to store items of the wrong type by creating a strongly typed collection class.
This did not solve the performance problem. Both problems are solved through Generics and through
the introduction of type constraints . A type constraint is specified on a class such as
Collection by
using the
Of keyword followed by a list of type name placeholders that are replaced by actual type
names when an object of the class is created. This provides type safety by not allowing you to add an
item that is not of the same data type that was defined for the class. It also improves performance
because the item does not have to be converted to and from the
Object data type. The data type for
c10.indd 338c10.indd 338 4/1/08 6:26:09 PM4/1/08 6:26:09 PM
Chapter 10: Debugging and Error Handling
339
the item is defined using the data type that was defined for the class. You ’ ll see how all of this works
in more detail as you explore the rest of the code and as you go through the debugging process.
After adding the
Generics class, you modify the class by adding a type constraint using the Of
keyword and defining a type list, which in this case contains only one type. This type name is a
placeholder that will be used throughout the class to represent the data type that this class is working
with. The actual data type is defined when an object of the class is created, as you ’ ll see later in your
code:
Public Class Generics(Of elementType)
End Class
You add two private variables to this class, with both of these variables being defined as an array. The
first variable is a defined as a
String data type, while the second variable is defined as a generic data
type, which is set when an object of the class is created. Note that you have used the type name
elementType , which was defined at the class level. This type name is replaced automatically by the
data type that is used to create the
Generics object.
Public Class Generics(Of elementType)
‘This class provides a demonstration of Generics
‘Declare Private variables
Private strKey() As String
Private elmValue() As elementType
The Add method allows you to add items to your collection. This method accepts two parameters; one
for the key and the other for the value, making a key/value pair. The
key parameter is always a string
value, and the
value parameter is defined using the data type that is used when a Generics
collection is created.
The first thing that you want to do in this procedure is to see whether the variable arrays have been
initialized. You do this by using the
IsNot operator and comparing the strKey array to a value of
Nothing . If the array is not equal to a value of Nothing , the array has already been initialized, and
you simply need to increment the array dimension by one. This is done by first getting the current
upper bounds of the array and then adding 1 to it.
If the variable arrays have not been initialized, you need to initialize them using the
ReDim statement
as shown in the
Else statement in the code that follows.
After the arrays have been expanded or initialized, you add the
key and value to the arrays:
Public Sub Add(ByVal key As String, ByVal value As elementType)
‘Check to see if the objects have been initialized
If strKey IsNot Nothing Then
‘Objects have been initialized
ReDim Preserve strKey(strKey.GetUpperBound(0) + 1)
ReDim Preserve elmValue(elmValue.GetUpperBound(0) + 1)
c10.indd 339c10.indd 339 4/1/08 6:26:10 PM4/1/08 6:26:10 PM
Chapter 10: Debugging and Error Handling
340
Else
‘Initialize the objects
ReDim strKey(0)
ReDim elmValue(0)
End If
‘Set the values
strKey(strKey.GetUpperBound(0)) = key
elmValue(elmValue.GetUpperBound(0)) = value
End Sub
You add two read - only properties to this class to return the key and the value for a key/value pair.
Notice that the
Value property is defined to return the data type that will be used when a Generics
object is created.
Public ReadOnly Property Key(ByVal Index As Integer) As String
Get
Return strKey(Index)
End Get
End Property
Public ReadOnly Property Value(ByVal Index As Integer) As elementType
Get
Return elmValue(Index)
End Get
End Property
End Class
The final class that you added was the Computer class. This class implements the IDisposable
interface. An interface in this sense is a set of methods and properties common to all classes that
implement it. In this case, the
IDisposable interface contains methods for releasing memory
resources when an object of the class is disposed of. Methods that use this class should call the
Dispose method when they are through with a Computer object.
To implement the interface, you add the
Implements statement and specify the IDisposable
interface. When you press the Enter key, Visual Studio 2008 adds the code from the
IDisposable interface to your class, as shown in the following code:
Public Class Computer
Implements IDisposable
Private disposedValue As Boolean = False ‘ To detect redundant calls
‘ IDisposable
Protected Overridable Sub Dispose(ByVal disposing As Boolean)
If Not Me.disposedValue Then
If disposing Then
‘ TODO: free other state (managed objects).
End If
‘ TODO: free your own state (unmanaged objects).
‘ TODO: set large fields to null.
End If
c10.indd 340c10.indd 340 4/1/08 6:26:10 PM4/1/08 6:26:10 PM
Chapter 10: Debugging and Error Handling
341
Me.disposedValue = True
End Sub
#Region “ IDisposable Support “
‘ This code added by Visual Basic to correctly implement
‘ the disposable pattern.
Public Sub Dispose() Implements IDisposable.Dispose
‘ Do not change this code. Put cleanup code in
‘ Dispose(ByVal disposing As Boolean) above.
Dispose(True)
GC.SuppressFinalize(Me)
End Sub
#End Region
End Class
You add two read - only properties to this class; FreeMemory and TotalMemory . These properties
return the available memory on your computer as well as the total amount of memory on your
computer. These properties use the
My.Computer.Info namespace to access the amount of available
memory and the total amount of memory.
The
AvailablePhysicalMemory and TotalPhysicalMemory properties of the My.Computer.Info
namespace return the available and total memory in bytes. However, we as users are used to seeing
these numbers in kilobytes. Therefore you convert the number of bytes into kilobytes and then have
that number formatted using commas.
Remember that there are 1024 bytes to a kilobyte, 1024 kilobytes to a megabyte, and so on. The number
that you pass to the
Format function will be in kilobytes after you divide the number of bytes by 1024.
You then add a space to the formatted number and then the letter
K indicating that the available and
total memory figures are in kilobytes:
Public ReadOnly Property FreeMemory() As String
Get
‘Using the My namespace
Return Format(( _
My.Computer.Info.AvailablePhysicalMemory.ToString \ 1024), _
“#,###,##0”) & “ K”
End Get
End Property
Public ReadOnly Property TotalMemory() As String
Get
‘Using the My namespace
Return Format(( _
My.Computer.Info.TotalPhysicalMemory.ToString \ 1024), _
“#,###,##0”) & “ K”
End Get
End Property
c10.indd 341c10.indd 341 4/1/08 6:26:10 PM4/1/08 6:26:10 PM
Chapter 10: Debugging and Error Handling
342
You add code to the Debug form class next. This class uses a class List < T > , which is a generic list
class. You ’ ll be using this class to hold a list of
Customer objects created from your Customer class.
The
List < T > class uses a dynamically sized array to hold the objects of the type that you specify: You
need to import the
System.Collections.Generic namespace in order to access the List < T > class.
You accomplish that requirement by using an
Imports statement.
Imports System.Collections.Generic
Next you define three private objects at the class level; these objects are available to all procedures in
this class. The first two objects use your
Generics class. Remember that the Generics class used the
Of keyword to define a type list. In the declaration of your objects, you use similar Of clauses to
specify that the
Generics class should be using a String data type in the type list for the first object
and an
Integer data type for the second object. The data type specified here will be applied
throughout the
Generics class.
The last object that you define here is an object that holds an array of
Customer objects created from
your
Customer class:
‘Using the Generics class
Private objStringValues As New Generics(Of String)
Private objIntegerValues As New Generics(Of Integer)
‘Using the List < T > class
Private objCustomerList As New List(Of Customer)
The ListCustomer procedure simply accepts a Customer object as input and adds the Customer ID
and
Customer Name to the list box on your form:
Private Sub ListCustomer(ByVal customerToList As Customer)
lstData.Items.Add(customerToList.CustomerID & _
“ - “ & customerToList.CustomerName)
End Sub
The Click event handler for the Start button contains the rest of the code for your project. You start
this procedure by declaring a local
String variable that will be used to demonstrate checking to see
whether a variable has been initialized.
The code following the variable declaration checks the length of the variable and then adds the
contents of the variable to the list box on the form.
Private Sub btnStart_Click(ByVal sender As Object, _
ByVal e As System.EventArgs) Handles btnStart.Click
‘Declare variables
Dim strData As String
lstData.Items.Add(“String variable data:”)
If strData.Length > 0 Then
lstData.Items.Add(strData)
End If
c10.indd 342c10.indd 342 4/1/08 6:26:10 PM4/1/08 6:26:10 PM
Chapter 10: Debugging and Error Handling
343
Since you will be writing the various results of your processing to the list box on your form, you ’ ll
want to add a blank entry to the list box to separate your results for aesthetic reasons, which is what
the next line of code does. Here you simply use the
Empty method of the String class to return an
empty string to be added to the list box:
‘Add an empty string to the ListBox
lstData.Items.Add(String.Empty)
This next section of code demonstrates the use of the List < T > class, as the comment in the code
indicates. You add two new
Customer objects to the objCustomerList object and then display those
customers in the list box. Using a
For Each . . . Next loop to iterate through the collection of
Customer objects, you add each customer to the list box by calling the ListCustomer function
passing that function the
Customer object:
‘Demonstrates the use of the List < T > class
lstData.Items.Add(“Customers in the Customer Class:”)
objCustomerList.Add(New Customer(1001, “Henry For”))
objCustomerList.Add(New Customer(1002, “Orville Wright”))
For Each objCustomer As Customer In objCustomerList
ListCustomer(objCustomer)
Next
Again you add a blank entry to the list box and use the objects that were defined using your Generics
class. The first object,
objStringValues , uses the Generics class with a String data type, as the
object name indicates. Remember that the
Add method in this class accepts a key/value pair and that
the
key parameter is always a String value. The value parameter uses the data type that was used to
initialize this class, which in this case is also a string.
When you add a key/value pair to your
objStringValues object, you want to display that data in
the list box on your form. You do this by accessing the
Key and Value properties in the Generics
class from which this object was derived:
‘Add an empty string to the ListBox
lstData.Items.Add(String.Empty)
‘Demonstrates the use of Generics
lstData.Items.Add(“Generics Class Key/Value Pairs using String Values:”)
objStringValues.Add(“1001”, “Henry Ford”)
lstData.Items.Add(objStringValues.Key(0) & “ = “ & _
objStringValues.Value(0))
Again you add another blank line to the list box and then add a key/value pair that uses an Integer
data type for the
value parameter to the objIntegerValues object. Then you add that key/value
pair to the list box:
‘Add an empty string to the ListBox
lstData.Items.Add(String.Empty)
‘Demonstrates the use of Generics
lstData.Items.Add(“Generics Class Key/Value Pairs using Integer Values:”)
objIntegerValues.Add(“Henry Ford”, 1001)
lstData.Items.Add(objIntegerValues.Key(0) & “ = “ & _
objIntegerValues.Value(0))
c10.indd 343c10.indd 343 4/1/08 6:26:11 PM4/1/08 6:26:11 PM
Chapter 10: Debugging and Error Handling
344
After you add another blank line to the list box, you use a Using . . . End Using block to create a new
object of the
Computer class, add the free memory and total memory of your computer to the list box,
and then dispose of the
Computer class.
When you use a class, you typically instantiate it using the
New keyword as you did with your
Generics class, use the class, and then dispose of the class by calling its Dispose method if it
implements one. The problem with that scenario is that when an exception occurs, the resource may or
may not be disposed of. Even if you implement the code using structure error handling, a topic I ’ ll
discuss later in this chapter, you are not always guaranteed to be able to dispose of the class.
The
Using statement is an efficient means of acquiring a resource, using it, and then disposing of it,
regardless of whether an exception occurs. There is one caveat to this: the class that you use in a
Using . . . End Using block must implement the IDisposable interface. This is why you added this
interface to your
Computer class.
In the following code, the object name,
objMemory , has not been defined anywhere except in the
Using statement. The Using statement takes care of declaring this object for you and sets it to a new
instance of the class that you specify, which in this case is the
Computer class. Keep in mind that the
object,
objMemory , is local to the Using . . . End Using block and you can only reference it within
this block.
When the
End Using statement is reached, the Common Language Runtime (CLR) automatically calls
the
Dispose method on the Computer class, thereby releasing its reference to it, and the Computer
class executes any cleanup code that has been implemented in the
Dispose method:
‘Add an empty string to the ListBox
lstData.Items.Add(String.Empty)
‘Demonstrates the use of the Using statement
‘Allows acquisition, usage and disposal of the resource
lstData.Items.Add(“Computer Class Properties:”)
Using objMemory As New Computer
lstData.Items.Add(“FreeMemory = “ & objMemory.FreeMemory)
lstData.Items.Add(“TotalMemory = “ & objMemory.TotalMemory)
End Using
Once again you add another blank line to the list box, and then you get to the final bit of code in this
procedure. In this section of code we wanted to demonstrate the use of the
Continue statement. The
Continue statement is an efficient means of immediately transferring control to the next iteration of a
loop. Instead of coding a lot of
If . . . Then statements in a loop, you can merely test to see whether a
condition is what you want and if it is not, you can call the
Continue statement to pass control to the
next iteration of a
Do , For , or While loop.
Take a look at the code that you have here. First you declare a couple of variables and set their values.
The first variable,
strPassword , is declared and set to a password that contains upper - and lowercase
letters. The second variable,
strLowerCaseLetters , is declared and set to an empty string so that the
variable is initialized.
Next, you set up a
For . . . Next loop to check each character in the strPassword variable. The
If . . . Then statement uses the Like operator to compare a character in the password variable to a
pattern of letters. If a match is found, the
Like operator returns a value of True . However, you are
using a negative comparison here, because you have included the
Not keyword in the If . . . Then
c10.indd 344c10.indd 344 4/1/08 6:26:11 PM4/1/08 6:26:11 PM
Chapter 10: Debugging and Error Handling
345
statement, so if the character in the password variable is not like one of the letters in the pattern,
[a - z] , you ’ ll execute the next statement, which is the Continue statement.
If the character in the password variable is a lowercase letter, you concatenate the character to the
strLowerCaseLetters variable, which is why you needed to initialize this variable to an empty
string when you declared it.
Finally, after all lowercase letters have been extracted from the password variable, you display the
results of the
strLowerCaseLetters variable in the list box on your form:
‘Add an empty string to the ListBox
lstData.Items.Add(String.Empty)
‘Demonstrates the use of the Continue statement
Dim strPassword As String = “POpPassword”
Dim strLowerCaseLetters As String = String.Empty
‘Extract lowercase characters from string
For intIndex As Integer = 0 To strPassword.Length - 1
‘Demonstrates the use of the Continue statement
‘If no uppercase character is found, continue the loop
If Not strPassword.Substring(intIndex, 1) Like “[a-z]” Then
‘No uppercase character found, continue loop
Continue For
End If
‘Lowercase character found, save it
strLowerCaseLetters & = strPassword.Substring(intIndex, 1)
Next
‘Display lowercase characters
lstData.Items.Add(“Password lower case characters:”)
lstData.Items.Add(strLowerCaseLetters)
End Sub
At this point, you are probably pretty eager to run your project and test your code. In this next Try It
Out, you examine the Exception Assistant in Visual Studio 2008. This useful assistant provides help
when an unhandled exception occurs in your code.
Try It Out Exception Assistant
1.
Start your project by clicking the Start button on the toolbar or by clicking the Debug menu
and choosing the Start menu item.
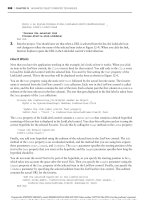
2. When your form is displayed, click the Start button on your form to have your code in the
Click event handler for the Start button executed. You ’ ll immediately see the Exception
Assistant shown in Figure 10 - 8 .
Note that the Exception Assistant dialog box displays the type of exception that occurred in the
title bar of the dialog box. It also provides links to some basic troubleshooting tips and also a link
at the bottom that provides the details of the exception.
c10.indd 345c10.indd 345 4/1/08 6:26:12 PM4/1/08 6:26:12 PM
Chapter 10: Debugging and Error Handling
346
3.
Click the View Detail link in Exception Assistant dialog box to view the View Detail dialog
box shown in Figure 10 - 9 . You are mainly interested in the exception message, and, as you can
see, it informs you that the object reference has not been set to an instance of an object.
Basically, you have not initialized the variable
strData .
Figure 10-8
Figure 10-9
4. Click the OK button to close the View Detail dialog box and then click the Close button ( ϫ ) in
the upper right - hand corner of the Exception Assistant dialog box to close it.
5. Now click the Stop Debugging button on the toolbar or click the Debug menu and select the
Stop Debugging menu item.
6. Locate the following section of code at the beginning of the btnStart_Click procedure:
If strData.Length > 0 Then
lstData.Items.Add(strData)
End If
c10.indd 346c10.indd 346 4/1/08 6:26:12 PM4/1/08 6:26:12 PM
Chapter 10: Debugging and Error Handling
347
7. Modify that code as shown here:
If strData IsNot Nothing Then
If strData.Length > 0 Then
lstData.Items.Add(strData)
End If
Else
strData = “String now initialized”
lstData.Items.Add(strData)
End If
8. Now run your project and click the Start button on your form once it is displayed. All of your
code should have executed, and the list box should be populated with the various results of
the processing that took place in the
btnStart_Click procedure.
How It Works
When an unhandled error occurs in your code while debugging, the Exception Assistant dialog box is
displayed and provides troubleshooting tips for the exception as well as a link to view the details of
the exception as was shown in Figure 10 - 8 . Figure 10 - 9 displayed the View Detail dialog box, which
provides the detailed information about the exception which can also be an invaluable tool for
determining the exact cause of the exception.
You modified the code that caused the error as shown here. Because the string variable
strData was
declared but never initialized, the variable is
Nothing . This means that it has not been set to an
instance of the
String class and therefore the properties and methods of the variable cannot be
referenced without causing a
NullReferenceException as shown in Figure 10 - 8 .
To rectify this problem, you first test the
strData variable to see if it is not equal to Nothing by using
the
IsNot operator as shown in the first line of code here. If the variable has been initialized, then you
can execute the code in the
If statement. Otherwise, processing falls through to the Else statement and
here you set the variable to a string constant and then display the contents of the variable in the list box:
If strData IsNot Nothing Then
If strData.Length > 0 Then
lstData.Items.Add(strData)
End If
Else
strData = “String now initialized”
lstData.Items.Add(strData)
End If
An alternative to the previous code example would be to use a Try . . . Catch block to handle the
exception. This technique is demonstrated later in this chapter.
Setting Breakpoints
When trying to debug a large program, you may find that you want to debug only a section of code; that
is, you want your code to run up to a certain point and then stop. This is where breakpoints come in
handy; they cause execution of your code to stop anywhere a breakpoint is set. You can set breakpoints
anywhere in your code and your code runs up to that point and stops.
c10.indd 347c10.indd 347 4/1/08 6:26:12 PM4/1/08 6:26:12 PM
Chapter 10: Debugging and Error Handling
348
Note that execution of the code stops before the line on which the breakpoint is set.
You can set breakpoints when you write your code, and you can also set them at run time by switching
to your code and setting the breakpoint at the desired location. You cannot set a breakpoint while your
program is actually executing a section of code such as the code in a loop, but you can when the program
is idle and waiting for user input.
When the development environment encounters a breakpoint, execution of your code halts, and your
program is considered to be in break mode. While your program is in break mode, a lot of debugging
features are available. In fact, a lot of debugging features are available to you only while your program is
in break mode.
You can set breakpoints by clicking the gray margin next to the line of code on which you want to set the
breakpoint. When the breakpoint is set, you see a solid red circle in the gray margin and the line is
highlighted in red. When you are done with a particular breakpoint you can remove it by clicking the
solid red circle. You see more of this in the Try It Out exercise in this section.
Sometimes you ’ ll want to debug code in a loop, such as one that reads data from a file. You know that
the first x number of records are good, and it is time - consuming to step through all the code repetitively
until you get to what you suspect is the bad record. A breakpoint can be set inside the loop and you can
set a hit counter on it. The code inside the loop executes the number of times that you specified in the hit
counter and then stops and places you in break mode. This can be a real time saver, and you will be
taking a look at breakpoint hit counts later in this section. You can also set a condition on a breakpoint,
such as when a variable contains a certain value or when the value of a variable changes. You also take a
look at this later in this section.
Try It Out Working with Breakpoints
1.
The first thing that you want to do is to set a breakpoint in your code. Using Figure 10 - 10 as a
guide, set the breakpoint in your code by clicking the gray margin to the left of the line of
code shown.
Figure 10-10
c10.indd 348c10.indd 348 4/1/08 6:26:13 PM4/1/08 6:26:13 PM
Chapter 10: Debugging and Error Handling
349
2. Run the project.
3. To get to the code where the breakpoint is set, click the Start button on your form. The code
executes up to the breakpoint, and the development environment window receives focus,
making it the topmost window. The entire line should be highlighted in yellow and the
breakpoint circle in the margin should now contain a yellow arrow in it pointing to the line of
code where execution has been paused, which is the
End If statement that was shown in
Figure 10 - 10 .
Also note that there are a few new windows at the bottom of the development environment.
What you see will vary depending on which windows you have specified to be shown — you
can choose different ones using the tabs at the bottom.
Take a pause in the Try It Out to learn about some of the features of the IDE in debug mode.
The Breakpoints Window
You can display the Breakpoints window, if the tab is not shown, in the bottom - right of the IDE by
clicking the Breakpoints icon on the Debug toolbar or by selecting Debug
Windows Breakpoints.
The Breakpoints window shows what line of code the current breakpoint is at, any conditions it has, and
the hit count if applicable, as shown in Figure 10 - 11 .
Figure 10-11
The Breakpoints window shows all the breakpoints you have set in your code. When a breakpoint is
encountered, it is highlighted in the code and also highlighted in the Breakpoint window, as shown in
Figure 10 - 11 . In this window, you can set new breakpoints, delete existing breakpoints, and change the
properties of the breakpoints. You will see more of this later in the chapter.
Useful Icons on the Toolbar
In this Try It Out, you want to step through your code line by line. On the Standard toolbar in the IDE
there are three icons of particular interest to you as shown in Figure 10 - 12 .
The first icon is the Step Into icon. When you click this icon, you can step through your code line
by line. This includes stepping into any function or procedure that the code calls and working
through it line by line.
The second icon is the Step Over icon. This works in a similar way to Step Into, but you pass
straight over the procedures and functions — they still execute, but all in one go. You then
move straight on to the next line in the block of code that called the procedure.
❑
❑
c10.indd 349c10.indd 349 4/1/08 6:26:13 PM4/1/08 6:26:13 PM
Chapter 10: Debugging and Error Handling
350
Last is the Step Out icon. This icon allows you to jump to the end of the procedure or function
that you are currently in and to move to the line of code after the line that called the procedure or
function. This is handy when you step into a long procedure and want to get out of it. The rest
of the code in the procedure still gets executed, but you do not step through it.
Figure 10-12
There is one more really useful button worth adding to the toolbar: Run To Cursor. The Run To Cursor
icon enables you to place your cursor anywhere in the code following the current breakpoint where
execution has been paused and then click this icon. The code between the current breakpoint and where
the cursor is positioned is executed, and execution stops on the line of code where the cursor is located.
To add this button, you right - click any empty area of the toolbar and choose Customize from the context
menu. In the Customize dialog box, click the Commands tab, and then select Debug in the Categories
list. In the Commands list, select Run To Cursor. After you select Run To Cursor, you drag its icon from
the Commands list onto the debug toolbar, to form a group of icons as shown in Figure 10 - 13 , and then
click the Close button to close the Customize dialog box.
Figure 10-13
You are now ready to continue working through the Try It Out.
Try It Out Working with Breakpoints (cont.)
1.
You ended the last step of the Try It Out at the breakpoint. Before continuing, you want to
examine the contents of the string variable,
strData . Hover your mouse over the variable to
view a Data Tip, as shown in Figure 10 - 14 . Notice that the variable name is listed along with
its contents, a magnifying glass, and a down arrow.
Clicking the contents of the variable in the Data Tip puts you in edit mode for the variable, and
you can actually change the contents of that variable. Clicking the magnifying glass will cause
the contents of the variable to be displayed automatically in the Text Visualizer dialog box, which
is a useful tool for displaying the data for string variables that contain a significant amount of
data. Clicking the down arrow provides you a drop - down list of options for viewing the
contents of the variable and contains an option for Text Visualizer, XML Visualizer, and
HTML Visualizer.
❑
Figure 10-14
2. At this point, you ’ ll want to test the debugging icons on the toolbar, starting with the Run To
Cursor icon first. Place your cursor on the line of code that calls the
ListCustomer procedure
as shown in Figure 10 - 15 .
c10.indd 350c10.indd 350 4/1/08 6:26:13 PM4/1/08 6:26:13 PM
Chapter 10: Debugging and Error Handling
351
Click the Run To Cursor icon on the toolbar. The code between the breakpoint at the End If
statement shown in Figure 10 - 14 and the line of code that calls the
ListCustomer procedure,
shown in Figure 10 - 15 , is executed. Your project stops execution on the line of code on which
you have your cursor.
Figure 10-15
3. Click the Step Into icon next, and you should now be at the beginning of the ListCustomer
procedure. Data Tips can be displayed for objects that contain multiple values as well as
variables that contain only a single value.
Hover your mouse over the customerToList parameter for this procedure to display the Data Tip for
this object. You ’ ll see a plus sign next to the object name in the Data Tip. Click the plus sign, or simply
hover your mouse over it, and the contents of the object are displayed as shown in Figure 10 - 16 .
Note that this Data Tip not only displays the properties in the Customer class, the class that the
customerToList object is derived from, but also the private variables in that class. You also
have the same options for viewing the contents of string variables, which is indicated by the
presence of the magnifying glass and down arrow icons.
Since the text, which is supposed to read “ Henry Ford ” , is misspelled, you ’ ll want to correct it
in the Data Tip. This can be done by editing the
strName variable in the Data Tip. Click the text
“
Henry For ” in the Data Tip to put it into edit mode. Correct the text by adding the letter d at
the end of the text and then click the name or variable name in the Data Tip. Note that the text for
both the property and variable has been updated with your corrections.
It should be noted that you can change the contents of Integer data types in the Data Tip as well.
Figure 10-16
4. Click the Step Into icon once more and you should be at the first line of code in the
ListCustomer procedure.
5. Since you do not want to see any of this code at this time, you are going to step out of this
procedure. This places you back at the line of code that called this procedure. Click the Step
Out icon. Note that you are taken out of the
ListCustomer procedure and back to where the
call originated.
6. Now click the Step Into icon twice more so that you are back at the call to the ListCustomer
procedure once again.
7. The final icon to be tested is the Step Over icon. Click this icon now and note that you have
totally stepped over the execution of the
ListCustomer procedure. The procedure was
actually executed. However, since you chose to step over it, the debugger does not show you
that the procedure was executed.
c10.indd 351c10.indd 351 4/1/08 6:26:14 PM4/1/08 6:26:14 PM
Chapter 10: Debugging and Error Handling
352
8. Continue processing as normal and have the rest of the code execute without interruption. If
you hover your mouse over the Start icon on the toolbar, you will notice that the tooltip has
been changed from Start to Continue. Click this icon to let the rest of the code run. You should
now see your completed form as shown in Figure 10 - 17 .
Figure 10-18
Figure 10-17
In the following Try It Out, you examine the Breakpoint Hit Count dialog box. The Breakpoint Hit
Count dialog box allows you to define the number of executions of a loop should be performed before
the IDE stops execution of your code and puts it into break mode. As previously described, this is
useful for processing loops, because you can specify how many iterations the loop should make before
you encounter a breakpoint.
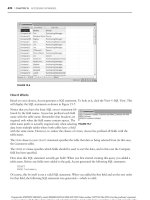
Try It Out Using the Breakpoint ’ s Hit Count
1.
Stop your project and set a breakpoint in the For loop as shown in Figure 10 - 18 . Remember
that to set a breakpoint, you need to click in the gray margin on the line of code where the
breakpoint should be.
Start your project again by clicking the Start icon on the toolbar.
c10.indd 352c10.indd 352 4/1/08 6:26:14 PM4/1/08 6:26:14 PM
Chapter 10: Debugging and Error Handling
353
2. In the Breakpoints window, right - click the second breakpoint and choose Hit Count from the
context menu to invoke the Breakpoint Hit Count dialog box.
3. The breakpoint that you currently have set halts execution every time it is encountered.
Change it to break only when the loop enters its third execution. You do this by selecting the
option break when the hit count is equal to in the drop - down list and then entering the
number 3 in the text box displayed next to it, as shown in Figure 10 - 19 .
Figure 10-19
Click the OK button to close this dialog box. Notice the Hit Count column in the Breakpoints
window in the IDE. The second breakpoint now displays the Hit Count condition that you just
defined.
4. At this point, click the Start button on the form. By clicking the Start button you are again
stopped at your first breakpoint.
5. This breakpoint is highlighted in the Breakpoints window. You no longer need this
breakpoint, so click it and then click the Delete icon in the Breakpoints window;
the breakpoint will be deleted. Your code is still paused at this point, so click the Continue
button on the Debug toolbar.
6. You are now stopped at your breakpoint in the For loop as it enters its third execution. Notice
that the Breakpoints window shows the hit count criteria that you selected and also the
current hit count.
As you can see, this is a handy way to have a loop execute a definite number of iterations before
breaking at a defined breakpoint.
7. Now let your code continue executing by clicking the Continue button on the Debug toolbar.
8. Stop your project once the form has been displayed.
In the following Try It Out, you modify the properties of the only breakpoint that you have left.
c10.indd 353c10.indd 353 4/1/08 6:26:14 PM4/1/08 6:26:14 PM
Chapter 10: Debugging and Error Handling
354
Try It Out Changing Breakpoint Properties
1. In the previous Try It Out, you modified the breakpoint while the project was running. This
time you modify the breakpoint while the project is stopped. To view the Breakpoints window,
click the Debug menu, choose Windows, and then choose the Breakpoints sub menu item.
2. In the Breakpoints window right - click the breakpoint, and choose Hit Count from the context
menu to display the Breakpoint Hit Count dialog box. Notice the Reset button. When you
click this button, you reset the hit counter for the next execution, but this is not what you ’ ll do
at this point.
3. Here you ’ ll change the hit count back to its original setting. Select break always in the drop -
down box and then click the OK button to close this dialog box.
4. To set a specific condition for this breakpoint, right - click the breakpoint and choose Condition
from the context menu to invoke Breakpoint Condition dialog box. Enter the condition as shown
in Figure 10 - 20 . This causes this breakpoint to break only when the variable
intIndex is equal
to
3 . Note that you could also specify that the breakpoint would be activated when the value of a
variable changes. Click the OK button to close the dialog box and then start your project.
Figure 10-20
5. Click the Start button on your form. Once the intIndex variable is equal to 3 , the breakpoint
is activated, and the execution of the code is paused at the line where the breakpoint is
specified. This is actually your fourth time into the loop, as the
For . . . Next loop specifies a
starting index of
0 for the variable intIndex .
6. Finally, go ahead and let your code finish executing by clicking the Continue button on the
Debug toolbar. Once your form is displayed, go ahead and stop your project.
Debugging Using the Watch Window
The Watch window provides a method for you to watch variables and expressions easily while the code
is executing — this can be invaluable when you are trying to debug unwanted results in a variable. You
can even change the values of variables in the Watch window. You can also add as many variables and
expressions as needed to debug your program. This provides a mechanism that allows you to watch the
values of your variables change without any intervention on your part.
c10.indd 354c10.indd 354 4/1/08 6:26:15 PM4/1/08 6:26:15 PM
Chapter 10: Debugging and Error Handling
355
You can add and delete a variable or expression to the QuickWatch dialog box only when your program
is in break mode. Therefore, before you run your program, you need to set a breakpoint before the
variable or expression that you want to watch. When the breakpoint has been reached, you can add as
many Watch variables or expressions as needed.
In the following Try It Out, you add the
intIndex variable to the Watch window and also add an
expression using the
intIndex variable. This enables you to observe this variable and expression as you
step through your code.
Try It Out Using QuickWatch
1.
Start your program again. When your form displays, switch to the IDE and clear the current
breakpoint by deleting it in the Breakpoints window or by clicking it in the gray margin
where it is set. Then set a new breakpoint as shown in Figure 10 - 21 .
Figure 10-22
Figure 10-21
2. You can add a QuickWatch variable or expression only while your program is paused. Click
the Start button on the form so the breakpoint will be encountered and your program paused.
3. When the breakpoint has been encountered, right - click the variable, intIndex , in the
For . . . Next loop and choose QuickWatch from the context menu to invoke the QuickWatch
dialog box. Note that this variable has not only been added to the Expression drop - down box
but has also been placed in the Current value grid in the dialog, as shown in Figure 10 - 22 .
Click the Add Watch button to add this variable to the Watch window.
Since the variable is declared in the
For . . . Next loop, you see an error here. You can safely ignore this
error, because once the loop has started processing, the variable will be declared.
c10.indd 355c10.indd 355 4/1/08 6:26:15 PM4/1/08 6:26:15 PM
Chapter 10: Debugging and Error Handling
356
4. While you have the QuickWatch dialog box open, set an expression to be evaluated. Add the
expression intIndex = 1 in the Expression drop - down box. Then click the Add Watch button
to have this expression added to the Watch window. Now close the QuickWatch dialog box by
clicking the Close button.
5. If you do not see the Watch window at the bottom of the IDE, select Debug Windows
Watch Watch 1. You should see a variable and an expression in the Watch window, as
shown in Figure 10 - 23 .
The second watch expression that you added here returns a value of True when the
intIndex variable equals 1 , so Visual Studio 2008 sets the type to Boolean once you enter the
For . . . Next loop.
Figure 10-23
Figure 10-24
6. Step through your code line by line so that you can watch the value of the variable and
expression change. Click the Step Into icon on the Debug toolbar to step to the next line of
code. Keep clicking the Step Into icon to see the values of the variable and expression in the
Watch window change.
As you step through the loop in your code, you continue to see the value for the
intIndex variable
change in the Watch window. When the value of the variable in the Watch window turns the color red,
as shown in Figure 10 - 24 , the value has just been changed. You can manually change the value anytime
by entering a new value in the Value column in the Watch window.
7. When you are done, click the Continue icon on the Debug toolbar to let your code finish
executing. Then stop your project once the form has been displayed.
Debugging with the Locals Window
The Locals window is similar to the Watch window, except that it shows all variables and objects for the
current function or procedure. The Locals window also lets you change the value of a variable or object,
and the same rules that apply to the Watch window apply here (that is, the program must be paused
before a value can be changed). The text for a value that has just changed also turns red, making it easy
to spot the variable or object that has just changed.
c10.indd 356c10.indd 356 4/1/08 6:26:15 PM4/1/08 6:26:15 PM
Chapter 10: Debugging and Error Handling
357
The Locals window is great if you want a quick glance at everything that is going on in a function or
procedure, but it is not very useful for watching the values of one or two variables or expressions. The
reason for this is that the Locals window contains all variables and objects in a procedure or function.
Therefore, if you have a lot of variables and objects, you have to scroll through the window constantly to
view the various variables and objects. This is where the Watch window comes in handy; it lets you
watch just the variables that you need. In this Try It Out, you examine the contents of the Locals window
in two different procedures. This demonstrates how the contents of the Locals window change from one
procedure to the next.
Try It Out Using the Locals Window
1.
To prepare for this exercise, you need to have the current breakpoint set and set a new
breakpoint in the
ListCustomer procedure. Locate the ListCustomer procedure and
set a breakpoint on the one line of code in that procedure:
lstData.Items.Add(customerToList.CustomerID & _
“ - “ & customerToList.CustomerName)
2. Now start your program.
3. If you do not see the Locals window at the bottom of the IDE, select Debug Windows
Locals. Notice that at this point the Locals window contains no variables or objects. This is
because you have not entered a procedure or function. Click the Start button on the form, and
your breakpoint in the
ListCustomer procedure is encountered first and execution is paused.
4. Notice the various objects and their types listed in the Locals window. The first item in the list
is
Me , which is the form itself. If you expand this item, you see all the objects and controls
associated with your form. If you expand the
customerToList object, you ’ ll see the
properties and variables defined in the
Customer class from which this object is derived as
shown in Figure 10 - 25 .
Figure 10-25
5. Now click the Continue icon on the Debug toolbar until you encounter your second
breakpoint.
6. Now take a look at the Locals window, and you see a different set of objects and variables.
The one constant item in both procedures is
Me , which is associated with the form.
c10.indd 357c10.indd 357 4/1/08 6:26:16 PM4/1/08 6:26:16 PM
Chapter 10: Debugging and Error Handling
358
7. If you step through a couple of lines of code in the loop where the breakpoint has paused your
program, you see the values in the Locals window change. You can continue to step through
your code, or you can click the Continue icon on the Debug toolbar to let your program run to
completion.
After you change your build configuration from Debug to Release, debugging is no longer available;
even if you have breakpoints set in your code, they will not be encountered.
8. To clear all breakpoints in your code, you can delete each breakpoint in the Breakpoints
window, or you can click the Debug menu and choose Delete All Breakpoints. When you are
done, stop your project.
Error Handling
Error handling is an essential part of any good code. In Visual Basic 2008 the error mechanism is based
on the concept of exceptions that can be thrown to raise an error and caught when the error is handled. If
you do not provide any type of error handling and an error occurs, your user receives a message about
an unhandled exception, which is provided by the CLR, and then the program may terminate,
depending on the type of error encountered. This is not a user - friendly message and does not inform the
user about the true nature of the error or how to resolve it. The unhandled error could also cause users to
lose the data that they were working with or leave the user and the data in an unknown state.
Visual Studio 2008 provides structured error - handling statements that are common across all languages.
Structured error handling is a way to organize blocks of code in a structure that handles errors. In this
section you examine structured error handling and how it can be incorporated into your programs with
very little effort.
Structured error handling in Visual Studio 2008 is incorporated with the
Try . . . Catch . . . Finally
block. You execute the code that might throw an exception in the
Try block, and you handle anticipated
errors in the
Catch block. The Finally block, which is optional, is always executed, if present, and
allows you to place any cleanup code there regardless of whether an error has occurred. If an error
occurs that was not handled in the
Catch block, the CLR displays its standard error message and
terminates your program. Therefore, it is important to try to anticipate all possible errors for the code
that is contained in the
Try block.
Take a look at the syntax for the
Try . . . Catch . . . Finally statement:
Try
[try statements]
[Exit Try]
Catch exceptionvariable As exceptiontype
[catch statements]
[Exit Try]
[Additional Catch blocks]
Finally
[finally statements]
End Try
c10.indd 358c10.indd 358 4/1/08 6:26:16 PM4/1/08 6:26:16 PM
Chapter 10: Debugging and Error Handling
359
The try statements are the statements to be executed that may cause an error.
The
exceptionvariable can be any variable name. It will be set to contain the value of the
error that is thrown.
The
exceptiontype specifies the exception class type that the exception belongs to. If this type
is not supplied, your
Catch block handles any exception defined in the System.Exception
class. This argument allows you to specify the type of exception that you maybe looking for. An
example of a specific exception is
IOException , which is used when performing any type of IO
(input/output) against a file.
The
catch statements handle and process the error that has occurred.
The
finally statements are executed after all other processing has occurred.
The optional Exit Try statement allows you to completely break out of a
Try . . .
Catch . . . Finally block and resume execution of code immediately following the
Try . . . Catch . . . Finally block.
You can have multiple
Catch blocks, meaning that you can test for multiple errors with different
exception types within the same
Try block. When an error occurs among the try statements, control is
passed to the appropriate
Catch block for processing.
When you define a
Catch block, you can specify a variable name for the exception and define the type of
exception you want to catch, as shown in the following code fragment. This code defines an exception
variable with a name of
IOExceptionErr , and the type of exception is an IOException . This example
traps any type of IO exception that may occur when processing files and stores the error information in
an object named
IOExceptionErr :
Catch IOExceptionErr As IOException
code to handle the exception goes here
When dealing with mathematical expressions, you can define and catch the various errors that you may
encounter such as a divide - by - zero exception. You can also catch errors such as overflow errors, which
may occur when multiplying two numbers and trying to place the result in a variable that is too small
for the result. However, in cases such as these, it may be better to check for problems in advance — you
should use exceptions only in exceptional circumstances.
Using Structured Error Handling
In the following Try It Out you add some structured error handling to the sample program with which
you have been working. When you first ran the Debugging project you received the
NullReferenceException that was shown in Figure 10 - 8 , because you tried to access the properties of
the
strData string variable before it had been set. This code is a prime candidate for structured error
handling. You temporarily bypassed the problem at that point by using an
If . . . Then . . . Else
statement to first see whether the variable had been initialized. A cleaner way to handle such a case is in
a
Try . . . Catch block.
❑
❑
❑
❑
❑
❑
c10.indd 359c10.indd 359 4/1/08 6:26:17 PM4/1/08 6:26:17 PM