Beginning Microsoft Visual Basic 2008 phần 7 docx
Bạn đang xem bản rút gọn của tài liệu. Xem và tải ngay bản đầy đủ của tài liệu tại đây (1.32 MB, 92 trang )
Chapter 15: Programming Custom Graphics
519
Using System Colors
Now you know that you can choose colors from a list of possibilities as well as define your own. The
final thing you need to learn about colors is the idea of system colors.
When using Windows, the user has the ability to define all of the colors that are used for things like
buttons, menus, captions, and so on. If you ’ re building the UI for your own controls, it ’ s reasonable to
assume that from time to time you ’ ll need to know what these colors are so that your controls have the
same look and feel as the existing controls in the system.
System colors are exposed through the
System.Drawing.SystemColors class. If you want to find a list
of all the system colors, look in the MSDN documentation under
System.Drawing.SystemColors
class. Alternatively, use IntelliSense when in the Code Editor or the Object Browser.
In this Try It Out, you ’ ll add a button to the control palette that is the same as the menu bar.
Try It Out Adding System Colors
1.
Open the Code Editor for ColorPalette.Designer.vb . Find the constructor and add the
following highlighted code:
Public Sub New()
‘ This call is required by the Windows Form Designer.
InitializeComponent()
‘ Add any initialization after the InitializeComponent() call.
‘Add the colors
AddColor(Color.Black)
AddColor(Color.White)
AddColor(Color.Red)
AddColor(Color.Blue)
AddColor(Color.Green)
AddColor(Color.Gray)
AddColor(Color.DarkRed)
AddColor(Color.DarkBlue)
AddColor(Color.DarkGreen)
AddColor(Color.DarkGray)
AddColor(Color.FromArgb(208, 112, 222))
AddColor(Drawing.SystemColors.MenuBar)
End Sub
2. Run the project. You should see a new color that matches the menu bar color.
c15.indd 519c15.indd 519 4/1/08 6:38:54 PM4/1/08 6:38:54 PM
Chapter 15: Programming Custom Graphics
520
Using Different Tools
Now that you have successfully cracked the nut of drawing filled circles on the page, turn your attention
to building the other tools that you can use to put your applications together. In the next Try It Out, you
add a menu that lets you select the tool you want.
If you need a refresher on how to use the Visual Basic 2008 Menu Designer, refer to Chapter 9 .
Try It Out Adding a Tools Menu
1. Open the Forms Designer for Form1 and change the Anchor property for Canvas to Bottom,
Right, Left.
2. Click the title bar of the form and then resize the form so that there is enough room for a
MenuStrip control at the top.
3. Drag a MenuStrip control onto the top of the form; then right - click MenuStrip1 and choose
Insert Standard Items from the context menu to have the standard menus inserted.
4. Resize the form if necessary so that the Canvas control is just under the menu. Then click the
Canvas control and change the
Anchor property to Top, Bottom, Right, Left.
5. Click the Tools menu on the MenuStrip and then click in the white Type Here box that appears
at the bottom of the Tools menu and enter Ci & rcle . Using the Properties window set the
Checked property to True and the CheckOnClick property to Tr ue .
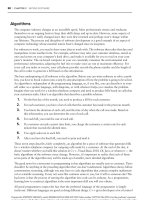
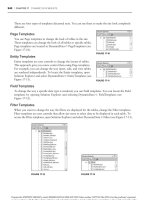
6. In the new Type Here box at the bottom, enter & Hollow Circle , and in the Properties window,
set the
CheckOnClick property to True . You can see the results of these steps in Figure 15 - 7 .
Figure 15-7
c15.indd 520c15.indd 520 4/1/08 6:38:55 PM4/1/08 6:38:55 PM
Chapter 15: Programming Custom Graphics
521
Implementing Hollow Circle
Up until now, you have used a solid circle as the graphics pen to perform the drawing on your form. In
this Try It Out, you ’ ll be implementing the functionality to use the hollow circle graphics pen. You ’ ll also
be adding the necessary code that will allow you to select which pen you want to use from the
Tools menu.
Try It Out Implementing Hollow Circle
1.
The first thing you need to do is change the GraphicTools enumeration defined in the
PaintCanvas class to include the hollow circle tool. Open the Code Editor for PaintCanvas
and add the following highlighted code to the enumeration:
Public Class PaintCanvas
‘Public enumerations
Public Enum GraphicTools As Integer
CirclePen = 0
HollowCirclePen = 1
End Enum
2. Switch to the Code Editor for Form1. In the Class Name combo box, select
CircleToolStripMenuItem , and then select the Click event in the Method Name combo
box. Add the following highlighted code to the
Click event handler:
Private Sub CircleToolStripMenuItem_Click(ByVal sender As Object, _
ByVal e As System.EventArgs) Handles CircleToolStripMenuItem.Click
‘Set the tool
Canvas.GraphicTool = PaintCanvas.GraphicTools.CirclePen
‘Uncheck the Hollow Circle menu item
HollowCircleToolStripMenuItem.Checked = False
End Sub
3. Select HollowCircleToolStripMenuItem in the Class Name combo box and the Click
event in the Method Name combo box. Add the following highlighted code:
Private Sub HollowCircleToolStripMenuItem_Click(ByVal sender As Object, _
ByVal e As System.EventArgs) Handles HollowCircleToolStripMenuItem.Click
‘Set the tool
Canvas.GraphicTool = PaintCanvas.GraphicTools.HollowCirclePen
‘Uncheck the Circle menu item
CircleToolStripMenuItem.Checked = False
End Sub
c15.indd 521c15.indd 521 4/1/08 6:38:55 PM4/1/08 6:38:55 PM
Chapter 15: Programming Custom Graphics
522
4. It only makes sense that, since you ’ ve implemented a menu, you should add code to the Exit
menu item. Select
exitToolStripMenuItem in the Class Name combo box and the Click
event in the Method Name combo. Then add the following highlighted code to the
Click event handler:
Private Sub exitToolStripMenuItem_Click(ByVal sender As Object, _
ByVal e As System.EventArgs) Handles exitToolStripMenuItem.Click
‘Close the application
Me.Close()
End Sub
5. Open the Code Editor for PaintCanvas again and modify the Select Case GraphicTool
statement in the
DoMousePaint method as follows:
‘What tool are you using?
Select Case GraphicTool
‘CirclePen
Case GraphicTools.CirclePen
‘Create a new graphics circle
Dim objGraphicsCircle As New GraphicsCircle()
‘Set the point for drawing
objGraphicsCircle.SetPoint(e.X, e.Y, GraphicSize, _
objColor, True)
‘Store this for addition
objGraphicsItem = objGraphicsCircle
‘HollowCirclePen
Case GraphicTools.HollowCirclePen
‘Create a new graphics circle
Dim objGraphicsCircle As New GraphicsCircle()
‘Set the point for drawing
objGraphicsCircle.SetPoint(e.X, e.Y, GraphicSize, _
objColor, False)
‘Store this for addition
objGraphicsItem = objGraphicsCircle
End Select
c15.indd 522c15.indd 522 4/1/08 6:38:55 PM4/1/08 6:38:55 PM
Chapter 15: Programming Custom Graphics
523
6. Next, you need to change the GraphicsCircle class itself so that it knows when to draw a
filled circle and when to draw a hollow circle. Open the Code Editor for
GraphicsCircle
and add the following highlighted code to the
Draw method:
Public Overrides Sub Draw(ByVal graphics As System.Drawing.Graphics)
If IsFilled = True Then
‘Create a new pen
Dim objSolidBrush As New SolidBrush(Me.Color)
‘Draw the circle
graphics.FillEllipse(objSolidBrush, Me.Rectangle)
Else
‘Create a pen
Dim pen As New Pen(Me.Color)
‘Use DrawEllipse instead
Dim objRectangle As Rectangle = Me.Rectangle
objRectangle.Inflate(-1, -1)
graphics.DrawEllipse(pen, objRectangle)
End If
End Sub
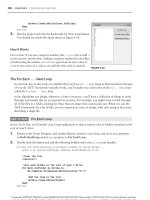
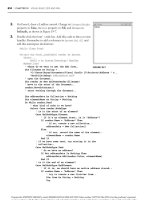
7. Finally, run the program. You should be able to select a new graphic tool from the menu and
draw both filled and hollow circles, as shown in Figure 15 - 8 .
Figure 15-8
How It Works
When the menu options are selected, Click events get fired. You can respond to these messages and
set the
GraphicsTool property on the PaintCanvas control to a new mode. When you change the
mode, you also need to change the check mark on the menu. The currently selected menu item will be
automatically checked, but you need to uncheck the menu item that isn ’ t selected. You do this by
setting the
Checked property of the opposite menu item to False .
c15.indd 523c15.indd 523 4/1/08 6:38:55 PM4/1/08 6:38:55 PM
Chapter 15: Programming Custom Graphics
524
Private Sub HollowCircleToolStripMenuItem_Click(ByVal sender As Object, _
ByVal e As System.EventArgs) Handles HollowCircleToolStripMenuItem.Click
‘Set the tool
Canvas.GraphicTool = PaintCanvas.GraphicTools.HollowCirclePen
‘Uncheck the Circle menu item
CircleToolStripMenuItem.Checked = False
End Sub
Irrespective of the mode used, PaintCanvas.DoMousePaint still gets called whenever the mouse
draws on the control. However, you do need to accommodate the new tool by changing the
Select
Case GraphicTool
statement to look for HollowCirclePen as well as CirclePen . Depending on
which is selected, you pass
True (filled) or False (not filled) through to SetPoint :
‘What tool are you using?
Select Case GraphicTool
‘CirclePen
Case GraphicTools.CirclePen
‘Create a new graphics circle
Dim objGraphicsCircle As New GraphicsCircle()
‘Set the point for drawing
objGraphicsCircle.SetPoint(e.X, e.Y, GraphicSize, _
objColor, True)
‘Store this for addition
objGraphicsItem = objGraphicsCircle
‘HollowCirclePen
Case GraphicTools.HollowCirclePen
‘Create a new graphics circle
Dim objGraphicsCircle As New GraphicsCircle()
‘Set the point for drawing
objGraphicsCircle.SetPoint(e.X, e.Y, GraphicSize, _
objColor, False)
‘Store this for addition
objGraphicsItem = objGraphicsCircle
End Select
In GraphicsCircle itself, choosing whether to use the FillEllipse method to draw a filled circle or
use the
DrawEllipse method for a hollow one is a simple determination. The only wrinkle you have
to contend with is
DrawEllipse ; the width and height of the bounding rectangle have to be one pixel
smaller than those used for
FillEllipse . This is due to an idiosyncrasy in the way the Windows
graphics subsystem works. You ’ ll often find when working with graphics features that you have to
experiment a little!
c15.indd 524c15.indd 524 4/1/08 6:38:56 PM4/1/08 6:38:56 PM
Chapter 15: Programming Custom Graphics
525
Public Overrides Sub Draw(ByVal graphics As System.Drawing.Graphics)
If IsFilled = True Then
‘Create a new pen
Dim objSolidBrush As New SolidBrush(Me.Color)
‘Draw the circle
graphics.FillEllipse(objSolidBrush, Me.Rectangle)
Else
‘Create a pen
Dim pen As New Pen(Me.Color)
‘Use DrawEllipse instead
Dim objRectangle As Rectangle = Me.Rectangle
objRectangle.Inflate(-1, -1)
graphics.DrawEllipse(pen, objRectangle)
End If
End Sub
Now that you ’ ve learned the basics of building user controls that support their own user interface,
take a look at the image - handling capabilities in Visual Basic 2008.
Working with Images
The .NET Framework has very good support for loading and saving common image formats. In
particular, you ’ re able to load images of these types:
.bmp : The standard Windows bitmap format
.gif : The standard lossless common Internet file format for graphic files and small images
.jpeg or .jpg : The standard lossy common Internet file format for photo - quality images
.png : The competitor to .gif that doesn ’ t have the tricky licensing implications
.tiff : The standard file format for storing and manipulated scanned documents
.wmf / .emf : The standard file formats for saving Windows Metafiles
.ico : The standard file format for program icons
.exif : The preferred file format for storage used internally with digital cameras
Prior to .NET, developers wanting to work with the most common Internet file formats (namely,
.gif
and
.jpeg ) had to buy third - party libraries. Now, support is built directly into the .NET Framework, so
from day one you can start building applications that can handle these formats. What ’ s more surprising
is that the .NET Framework also supports saving these files. This allows you to load a
.gif file and save
❑
❑
❑
❑
❑
❑
❑
❑
c15.indd 525c15.indd 525 4/1/08 6:38:56 PM4/1/08 6:38:56 PM
Chapter 15: Programming Custom Graphics
526
it as, say, a .bmp or .png file. There are two ways in which you can use images with Visual Basic 2008.
First, you can use the PictureBox control that you can find in the Visual Studio 2008 Toolbox. This is a
control that you place on a form, set a reference to an image, either at design time or runtime and it deals
with painting itself. This is a quick way of getting a fixed image on a form. The second way in which you
can use images is inside your owner - draw controls. In the following exercise, you ’ ll see how you can
tweak WroxPaint so that, rather than drawing on a dull, white background, you ’ re actually drawing on
an image you load.
Drawing Images
The property on the control takes a System.Drawing.Image object. In addition to using the Image class
with PictureBox and a few other controls in the .NET Framework, you can also use it with your own
owner - draw controls.
In the next Try It Out, you start by providing a way for your owner - drawn controls to display an image
loaded from one of the supported image formats.
Try It Out Setting the BackgroundImage
1.
Open the Designer for Form1. Using the Toolbox drag an OpenFileDialog control onto the
form. Set the Name property of the control to dlgFileOpenBackground .
2. Switch to the Code Editor for Form1. You are going to wire up the Open menu item under the
File menu to show the Open File dialog box. Select
openToolStripMenuItem in the Class
Name combo box and then select the
Click event in the Method Name combo box. Add the
following highlighted code to the
Click event handler:
Private Sub openToolStripMenuItem_Click(ByVal sender As Object, _
ByVal e As System.EventArgs) Handles openToolStripMenuItem.Click
‘Set the open file dialog properties
With dlgFileOpenBackground
.Filter = “Image files (*.gif,*.jpg,*.jpeg,*.bmp,*.wmf,*.png)” & _
“|*.gif;*.jpg;*.jpeg;*.bmp;*.wmf;*.png|All files (*.*)|*.*”
.FilterIndex = 1
.Title = “Open Picture Files”
End With
‘Show the dialog
If dlgFileOpenBackground.ShowDialog() = DialogResult.OK Then
‘Create a new image that references the file
Dim backgroundImage As Image = _
Image.FromFile(dlgFileOpenBackground.FileName)
‘Set the background of the canvas
Canvas.BackgroundImage = backgroundImage
End If
End Sub
c15.indd 526c15.indd 526 4/1/08 6:38:56 PM4/1/08 6:38:56 PM
Chapter 15: Programming Custom Graphics
527
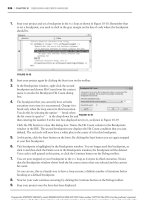
3. Run the project. Select File Open from the menu and find a .bmp , .jpg , .jpeg , or .gif file
somewhere on your computer. (If you try to open a file from the network, you may get a
security exception.) The image will be displayed as shown in Figure 15 - 9 .
Figure 15-9
How It Works
If you said, “ But I didn ’ t do anything! ” you ’ re quite right — you didn ’ t have to write any code to
support the background image. By default, the
Control class from which UserControl is ultimately
derived already supports a
BackgroundImage property, and you ’ ve set this to the image you loaded.
Therefore, the base class is dealing with drawing the image.
The loading is actually done with the shared
FromFile method on the Image class. This method is the
easiest way of loading a file from a disk:
‘Show the dialog
If dlgFileOpenBackground.ShowDialog() = DialogResult.OK Then
‘Create a new image that references the file
Dim backgroundImage As Image = _
Image.FromFile(dlgFileOpenBackground.FileName)
‘Set the background of the canvas
Canvas.BackgroundImage = backgroundImage
End If
Finally, when you ’ re actually drawing on the image, you may find the paint process sluggish. This is
because the control is spending a lot of time drawing the image onto the control, and this slows
everything down. Try using a smaller image, or consider this Try It Out an illustration of how to
manipulate images rather than a neat paint package!
c15.indd 527c15.indd 527 4/1/08 6:38:57 PM4/1/08 6:38:57 PM
Chapter 15: Programming Custom Graphics
528
Scaling Images
If you resize the form, you ’ ll notice that the image is actually tiled. More importantly, if you make the
control too small to accommodate the whole image, the sides of the image are clipped. What you want is
for the image to be scaled so that it fits the control exactly. Therefore, in the next Try It Out, you take over
control of drawing the background image from the base
Control class and provide a new
implementation of the
BackgroundImage property.
Try It Out Drawing the Image Yourself
1.
Open the Code Editor for PaintCanvas .
2. Rather than adding your code to draw the image to the Paint method, you ’ re going to work
with a different event called
OnPaintBackground . This method is called before the Paint
method. Add the following code:
Protected Overrides Sub OnPaintBackground( _
ByVal e As System.Windows.Forms.PaintEventArgs)
‘Paint the invalid region with the background brush
Dim backgroundBrush As New SolidBrush(BackColor)
e.Graphics.FillRectangle(backgroundBrush, e.ClipRectangle)
‘Paint the image
If Not BackgroundImage Is Nothing Then
‘Find our client rectangle
Dim clientRectangle As New Rectangle(0, 0, Width, Height)
‘Draw the image
e.Graphics.DrawImage(BackgroundImage, clientRectangle)
End If
End Sub
3. Now select (PaintCanvas Events) in the Class Name combo box and the Resize event in the
Method Name combo box. Add the following highlighted code to the
Resize event handler:
Private Sub PaintCanvas_Resize(ByVal sender As Object, _
ByVal e As System.EventArgs) Handles Me.Resize
‘Invalidate the control
Me.Invalidate()
End Sub
c15.indd 528c15.indd 528 4/1/08 6:38:57 PM4/1/08 6:38:57 PM
Chapter 15: Programming Custom Graphics
529
How It Works
All you ’ re trying to do is take over the action of drawing the background image. As mentioned before,
painting is a two - phase process: First, the background is erased (the
PaintBackground event), and
second, the control is given the opportunity to paint its user interface (the
Paint event).
With the
BackgroundImage property set, when the base class needs to draw the background, it will
automatically draw the image. You should stop it from doing this; otherwise you ’ ll effectively be
drawing the image twice — in other words, it ’ ll draw the image and then you ’ ll draw your own image
on top of it.
However, you do need to mimic the functionality that erases the background; otherwise things will
not work properly. To do this, you create a new
SolidBrush that uses the current background color
(
BackColor ) and paint it on the area that ’ s marked as invalid ( ClipRectangle ):
Protected Overrides Sub OnPaintBackground( _
ByVal e As System.Windows.Forms.PaintEventArgs)
‘Paint the invalid region with the background brush
Dim backgroundBrush As New SolidBrush(BackColor)
e.Graphics.FillRectangle(backgroundBrush, e.ClipRectangle)
After you have painted the background, you then need to draw the image. You can do this easily by
using the
DrawImage method of the Graphics object. But to stretch the image you need to provide a
rectangle that describes the bounds of the image. When you have that, you give
DrawImage both the
image and the rectangle, and the image is drawn.
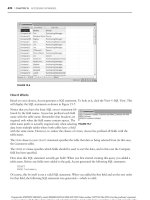
Figure 15-10
4. Now run the project again. This time, when you open the image it will appear stretched or
shrunken to fit the whole screen and will adjust itself as you resize the form as shown in
Figure 15 - 10 .
c15.indd 529c15.indd 529 4/1/08 6:38:57 PM4/1/08 6:38:57 PM
Chapter 15: Programming Custom Graphics
530
‘Paint the image
If Not BackgroundImage Is Nothing Then
‘Find our client rectangle
Dim clientRectangle As New Rectangle(0, 0, Width, Height)
‘Draw the image
e.Graphics.DrawImage(BackgroundImage, clientRectangle)
End If
End Sub
Preserving the Aspect Ratio
The problem you have now is that the image is stretched out of shape. Ideally, you want to make the
image bigger or smaller while preserving the aspect ratio, which is the ratio between the width and
the height, of the image. The aspect ratio describes the ratio between the width and height of the image.
The .NET Framework does not have any support for preserving the aspect ratio when it stretches an
image. However, with a little work, you can do this yourself.
Try It Out Preserving the Aspect Ratio
1.
Open the Code Editor for PaintCanvas again. Add the following highlighted code to
OnPaintBackground .
Protected Overrides Sub OnPaintBackground( _
ByVal e As System.Windows.Forms.PaintEventArgs)
‘Paint the invalid region with the background brush
Dim backgroundBrush As New SolidBrush(BackColor)
e.Graphics.FillRectangle(backgroundBrush, e.ClipRectangle)
‘Paint the image
If Not BackgroundImage Is Nothing Then
‘Find our client rectangle
Dim clientRectangle As New Rectangle(0, 0, Width, Height)
‘How big is the image?
Dim intImageWidth As Integer = BackgroundImage.Width
Dim intImageHeight As Integer = BackgroundImage.Height
‘What’s the aspect ratio?
Dim ratio As Double = _
CType(intImageHeight, Double) / CType(intImageWidth, Double)
c15.indd 530c15.indd 530 4/1/08 6:38:58 PM4/1/08 6:38:58 PM
Chapter 15: Programming Custom Graphics
531
‘Scale the image
If intImageWidth > clientRectangle.Width Then
intImageWidth = clientRectangle.Width
intImageHeight = _
CType(CType(intImageWidth, Double) * ratio, Integer)
End If
If intImageHeight > clientRectangle.Height Then
intImageHeight = clientRectangle.Height
intImageWidth = _
CType(CType(intImageHeight, Double) / ratio, Integer)
End If
‘You need to center the image
Dim pntImageLocation As New Point( _
(clientRectangle.Width / 2) - (intImageWidth / 2), _
(clientRectangle.Height / 2) - (intImageHeight / 2))
Dim sizImageSize As New Size(intImageWidth, intImageHeight)
Dim recImageRectangle As New Rectangle(pntImageLocation, sizImageSize)
‘Draw the image
e.Graphics.DrawImage(BackgroundImage, recImageRectangle)
End If
End Sub
2. Run the project. Now if you load an image, it will scale and preserve the aspect ratio.
How It Works
Preserving the aspect ratio is a bit of rudimentary math coupled with throwing a few rectangles
together. First, you need to know how big the area that you have to fit the image into actually is. You
call this
clientRectangle .
Protected Overrides Sub OnPaintBackground( _
ByVal e As System.Windows.Forms.PaintEventArgs)
‘Paint the invalid region with the background brush
Dim backgroundBrush As New SolidBrush(BackColor)
e.Graphics.FillRectangle(backgroundBrush, e.ClipRectangle)
‘Paint the image
If Not BackgroundImage Is Nothing Then
‘Find our client rectangle
Dim clientRectangle As New Rectangle(0, 0, Width, Height)
Next, you need to look at the image itself to see how big it is. You then need to know the aspect ratio.
If, for example, you had an aspect ratio of 2:1 (width:height), and you had an image that was 200
pixels wide, you would know that the height had to be 100 pixels. Alternatively, if it were 25 pixels
tall, it would be 50 pixels wide.
c15.indd 531c15.indd 531 4/1/08 6:38:58 PM4/1/08 6:38:58 PM
Chapter 15: Programming Custom Graphics
532
‘How big is the image?
Dim intImageWidth As Integer = BackgroundImage.Width
Dim intImageHeight As Integer = BackgroundImage.Height
‘What’s the aspect ratio?
Dim ratio As Double = _
CType(intImageHeight, Double) / CType(intImageWidth, Double)
When you calculate the aspect ratio, you want a floating - point number, so you have to convert the
Integer width and height values to Double .
Next, you look at the shape of the client area compared to the shape of the image. If the native width
of the image (in other words the size before its scaled) is wider than the width of the window, you fix
the width of the image as being equal to the width of the client area. After you ’ ve done that, you
use the aspect ratio to work out how tall the image should be. (Again, you ’ ve used conversions to
Double s to make sure that the calculations work properly.)
‘Scale the image
If intImageWidth > clientRectangle.Width Then
intImageWidth = clientRectangle.Width
intImageHeight = _
CType(CType(intImageWidth, Double) * ratio, Integer)
End If
Alternatively, if the height of the client area is taller than the height of the image, you need to do the
opposite — in other words, fix the height of the image and then work out the width:
If intImageHeight > clientRectangle.Height Then
intImageHeight = clientRectangle.Height
intImageWidth = _
CType(CType(intImageHeight, Double) / ratio, Integer)
End If
At this point you have an adjusted width and height of the image. When you have that, to start
drawing, you need to work out the upper - left corner. To do this, you divide the width of the client area
by two to get the exact middle and subtract half of the width of the image from it. This gives you the x
coordinate at which drawing should start. Then, you do the same for the height:
‘You need to center the image
Dim pntImageLocation As New Point( _
(clientRectangle.Width / 2) - (intImageWidth / 2), _
(clientRectangle.Height / 2) - (intImageHeight / 2))
When you have the location, you build a rectangle using the adjusted width and height:
Dim sizImageSize As New Size(intImageWidth, intImageHeight)
Dim recImageRectangle As New Rectangle(pntImageLocation, sizImageSize)
c15.indd 532c15.indd 532 4/1/08 6:38:58 PM4/1/08 6:38:58 PM
Chapter 15: Programming Custom Graphics
533
Finally, you use DrawImage to actually draw the image on the screen:
‘Draw the image
e.Graphics.DrawImage(BackgroundImage, recImageRectangle)
End If
End Sub
More Graphics Methods
In this chapter, you have used a few of the graphics features available with the .NET Framework. There
are some commonly used methods on the
Graphics object that we haven ’ t touched.
Whenever you have a
Graphics object, either when you ’ re building owner - draw controls or forms, try
using these methods:
DrawLine draws a single line between two points.
DrawCurve and DrawClosedCurve draw a curve between a set of points.
DrawArc draws a portion of a circle.
DrawBezier draws a cubic Bezier curve defined by four points.
DrawPie draws a slice of a circle (like a pie chart).
DrawPolygon draws regular and irregular polygons from an array of points.
DrawIcon draws Windows icons.
All of these methods use the
Brush , Pen , Point , and Rectangle objects that you ’ ve seen used
throughout this chapter. Each of these methods has an associated
Fill method that fills in the shape
after it ’ s drawn it.
Summary
In this chapter, you looked at how you could build your own user interface on your controls and forms.
Previously, you have been able to build your user interface only by plugging other people ’ s controls
together. Here you focused on building controls derived from
System.Windows.Forms.UserControl ,
because you ’ re interested in building component - based software.
After a discussion of the difference between vector and raster graphics, you proceeded to build a simple
application that allowed the user to draw dots on the screen using the mouse. You then looked at
building a separate control that provided the user with a set of colors that they could choose from when
drawing. You saw how to use the Color dialog box to add new colors and how to create new colors using
the Windows RGB (red, green, blue) color scheme.
❑
❑
❑
❑
❑
❑
❑
c15.indd 533c15.indd 533 4/1/08 6:38:58 PM4/1/08 6:38:58 PM
Chapter 15: Programming Custom Graphics
534
Finally, you took a look at the Image class and saw how this could load a variety of file formats,
including Windows bitmap,
.jpeg , and .gif . You also saw how to scale images and preserve their
aspect ratio.
To summarize, you should know how to:
Use the mouse events to capture the current x, y coordinates of the mouse on the screen.
Invalidate only the rectangle that you are working in to prevent screen flicker.
Add and use named system colors as well as custom defined colors using their RGB values.
Use the different graphics tools such as circle and hollow circle.
Load, resize, and preserve the aspect ratio of images.
❑
❑
❑
❑
❑
c15.indd 534c15.indd 534 4/1/08 6:38:59 PM4/1/08 6:38:59 PM
16
Accessing Databases
Most applications manipulate data in some way. Visual Basic 2008 applications often manipulate
data that come from relational databases. To do this, your application needs to interface with
relational database software such as Microsoft Access, Microsoft SQL Server, Oracle, or Sybase.
Visual Studio 2008 provides the data access tools and wizards to connect to these databases and
retrieve and update their data. In this chapter, you will look at some of these tools and wizards
and use them to retrieve data from a database.
In Chapter 17 , you will concentrate more on writing code directly, which gives you more flexibility
and control than relying on Visual Studio 2008 to create it for you. With practice, writing code will
also take less time than working through a wizard.
In this chapter, you will:
Learn what a database really is
Examine the SQL
SELECT statement
Examine data access components
Examine data binding in Windows Forms
Use the data access wizards in Visual Studio 2008
Note that in order to work through the exercises in this chapter, you will need Microsoft Access
2000 or later.
What Is a Database?
A database consists of one or more large, complex files that store data in a structured format.
The database engine, in your case Microsoft Access, manages the file or files and the data within
those files.
❑
❑
❑
❑
❑
c16.indd 535c16.indd 535 4/1/08 6:39:25 PM4/1/08 6:39:25 PM
536
Chapter 16: Accessing Databases
Microsoft Access Objects
A Microsoft Access database file, which has the extension mdb , contains tables, queries, forms, reports,
pages, macros, and modules, which are referred to as database objects. That ’ s a lot of information in one
large file, but Microsoft Access manages this data quite nicely. Forms, reports, pages, macros, and
modules are generally concerned with letting users work with and display data. You will be writing
Visual Basic 2008 applications to do this, so the only database objects you ’ re really concerned about at
the moment are tables and queries.
Tables
A table contains a collection of data, which is represented by one or more columns and one or more rows
of data. Columns are typically referred to as fields in Microsoft Access, and the rows are referred to as
records. Each field in a table represents an attribute of the data stored in that table. For example, a field
named First Name would represent the first name of an employee or customer. This field is an attribute
of an employee or customer. A record in a table contains a collection of fields that form a complete set of
attributes of one instance of the data stored in that table. For example, suppose a table contains two
fields: First Name and Last Name. These two fields in a single record describe the name of that one
person. This is illustrated in Figure 16 - 1 .
Figure 16-1
Queries
A query in a database is a group of Structured Query Language (SQL) statements that allow you to
retrieve and update data in your tables. Queries can be used to select or update all of the data in one or
more tables or to select or update specific data in one or more tables.
Query objects in Microsoft Access are a hybrid of two types of objects in SQL Server: views and stored
procedures. Using database query objects can make your Visual Basic 2008 code simpler, because you
have fewer complex SQL queries included in your code. They can also make your programs faster,
because database engines can compile queries when you create them, whereas the SQL code in a Visual
Basic 2008 program needs to be reinterpreted every time it ’ s used.
c16.indd 536c16.indd 536 4/1/08 6:39:25 PM4/1/08 6:39:25 PM
537
Chapter 16: Accessing Databases
To really understand the implications of queries, you need to learn some SQL. Fortunately, compared to
other programming languages, basic SQL is really simple.
The SQL SELECT Statement
The American National Standards Institute (ANSI) defines the standards for ANSI SQL. Most database
engines implement ANSI SQL to some extent and often add some features specific to the given
database engine.
The benefit of ANSI SQL is that, once you learn the basic syntax for SQL, you have a solid grounding
from which you can code the SQL language in almost any database. All you need to learn is a new
interface for the database that you are working in. Many database vendors extended SQL to use
advanced features or optimizations for their particular database. It is best to stick with ANSI standard
SQL in your coding whenever possible, in case you want to change databases at some point.
The SQL
SELECT statement selects data from one or more fields in one or more records and from one or
more tables in your database. Note that the
SELECT statement only selects data — it does not modify the
data in any way.
The simplest allowable
SELECT statement is like this:
SELECT * FROM Employees;
This means “ retrieve every field for every record in the Employees table .” The * indicates “ every field. ”
Employees indicates the table name. Officially, SQL statements in Microsoft Access should end in a
semicolon. It usually doesn ’ t matter if you forget the semicolons, as Access will add them automatically.
If you wanted to retrieve only first and last names, you can give a list of field names instead of a
* :
SELECT [First Name], [Last Name] FROM Employees;
You need to enclose these field names in square brackets because these field names contain spaces. The
square brackets indicate to the SQL interpreter that, even though there is a space in the name, it should
treat
First Name as one object name and Last Name as another object name. Otherwise, the interpreter
would be unable to follow the syntax.
SQL is a lot like plain English — even a nonprogrammer could probably understand what it means.
Now say you wanted to retrieve only the employees whose last names begin with D. To do this, you add
a
WHERE clause to your SELECT statement:
SELECT [First Name], [Last Name] FROM Employees WHERE [Last Name] LIKE ‘D*’;
A WHERE clause limits the selection of data to only those records that match the criteria in the WHERE
clause. The preceding
SELECT statement would cause the database to look at the Last Name column and
only select those records where the employee ’ s last name begins with the letter D.
c16.indd 537c16.indd 537 4/1/08 6:39:26 PM4/1/08 6:39:26 PM
538
Chapter 16: Accessing Databases
Last, if you want to retrieve these items in a particular order, you can, for example, order the results by
first name. You just need to add an
ORDER BY clause to the end:
SELECT [First Name], [Last Name] FROM Employees
WHERE [Last Name] LIKE ‘D*’ ORDER BY [First Name];
This means that if you have employees called Angela Dunn, Zebedee Dean, and David Dunstan, you
will get the following result:
Angela Dunn
David Dunstan
Zebedee Dean
You ’ re specifying a specific command here, but the syntax is pretty simple — and very similar to how
you would describe what you want to an English speaker. Usually, when ordering by a name, you want
to order in an ascending order so that A comes first and Z comes last. If you were ordering by a number,
though, you might want to have the bigger number at the top — for example, so that a product with the
highest price appears first. Doing this is really simple — just add
DESC (short for descending) to the
ORDER BY clause, which causes the results to be ordered in descending order:
SELECT [First Name], [Last Name] FROM Employees
WHERE [Last Name] LIKE ‘D*’ ORDER BY [First Name] DESC;
The D* means “ begins with a D followed by anything. ” If you had said *D* it would mean “ anything
followed by D followed by anything, ” basically, “ contains D. ” The preceding command would return the
following:
Zebedee Dean
David Dunstan
Angela Dunn
If you want to make it clear that you want the results in an ascending order, you can add ASC to the
ORDER BY clause instead of DESC . But you don ’ t really need to, since this is the default sort order.
You can summarize this syntax in the following way:
SELECT
select-list
FROM
table-name
[WHERE
search-condition
]
[ORDER BY
order-by-expression
[ASC | DESC]]
This means that you must provide a list of fields to include or use a * to select them all. You must
provide a table - name. You can choose to provide a search - condition. You can choose to provide an
order - by - expression, and if you do, you can make it either ascending or descending.
SQL gets considerably more complicated when you start working with several tables in the same query.
But, for various reasons, you don ’ t need to do this all that much when working with Visual Basic 2008.
c16.indd 538c16.indd 538 4/1/08 6:39:26 PM4/1/08 6:39:26 PM
539
Chapter 16: Accessing Databases
Anyway, the best way to get SQL into your head is to practice. Before moving on, please try to answer
these questions in your head:
How would you write a query to retrieve the
Name , Description , and Price fields from a table
called
Product ?
What would you add to the query to retrieve only items with
DVD in their description?
How would you order the results so that the most expensive item comes first?
Queries in Access
SQL is really a basic programming language, and if you are a programmer who needs to access
databases, you will need to use it. However, Microsoft Access provides wizards and visual tools that
enable novice programmers to write queries without knowing SQL. Even for SQL programmers, these
can sometimes prove useful. These tools, demonstrated in this section, end up producing SQL statements
that you can view and modify if you wish, so they can be a good way to learn more about SQL.
Creating a Customer Query
In this Try It Out, you use Access to create a simple query that will select customer information from the
Customer table in the
Northwind.mdb database. You ’ ll need to ensure that the sample databases were
installed when you installed Microsoft Access or Microsoft Office. You ’ ll create this query and then view
the SQL
SELECT statement that gets generated by Access.
❑
❑
❑
1. For Access 2000: Open Microsoft Access and click the Open icon on the toolbar. In the Open
dialog box, navigate to
C:\Program Files\Microsoft Office\Office11\Samples\ and
open
Northwind.mdb. Then click the OK button.
For Access 2003: Open Microsoft Access and click the Help menu. Next, choose Sample
Databases and then choose Northwind Sample Database. If the samples are not installed, you
will be prompted to install them. They are stored in the same location as the Access 2000
database based on the Office installation directory.
The path to Microsoft Office will vary depending on the version you have installed and the installation
path chosen at setup.
2. When the database opens, you will see two sections in the navigation bar on the left: Objects
and Groups. The Objects section lists all of your database object types, which were discussed
in the section on databases. You can also use Groups to gather related objects of any type, in
any way you want (see Figure 16-2).
Try It Out
Creating a Customer Query
c16.indd 539c16.indd 539 4/1/08 6:39:26 PM4/1/08 6:39:26 PM
540
Chapter 16: Accessing Databases
3. Since you want to take a look at how an SQL SELECT statement is built by Access, click the
Queries icon under the Objects tab.
4. You are going to build a new query, so double-click Create query in Design view in the results
window (see Figure 16-3).
Figure 16-2
Figure 16-3
5. The Show Table dialog box appears and allows you to select one or more tables to be in your
query. You only want to select one table: Customers. Click the Customers table and then click
the Add button to have this table added to the Query Designer. Then click the Close button to
close the Show Table dialog box.
6. The Customers table is displayed with all available fields plus an asterisk. You can select the
fields that you want to be added to your query, or you can select the asterisk, which will select
all fields from the table. For this exercise just select a few fields for your query. Double-click
c16.indd 540c16.indd 540 4/1/08 6:39:27 PM4/1/08 6:39:27 PM
541
Chapter 16: Accessing Databases
CompanyName in the Customers table to add it to the first column in the grid below the
table. The Field and Table cells are automatically filled in. You also want to sort the data by
this field, so click in the Sort cell and choose Ascending to have the results of your query
sorted by this field. Your screen should now look like Figure 16-4. Notice that the primary key
for the table is in bold: CustomerID.
7. You now need to add the ContactName field to your grid. Double-click this field in the
Customers table and it will be automatically added to the next available column in the grid.
Then add ContactTitle in the same way. Your completed query should now look like the one
in Figure 16-5.
Figure 16-4
Figure 16-5
c16.indd 541c16.indd 541 4/1/08 6:39:27 PM4/1/08 6:39:27 PM
542
Chapter 16: Accessing Databases
8. Click the Save icon on the toolbar, enter the name CustomerQuery in the Save As dialog box,
and then click OK.
9. On the toolbar click the run icon, indicated by an exclamation point (!), and you will see
results similar to the ones shown in Figure 16-6. Notice that the results are sorted on the
CompanyName field in ascending order.
Figure 16-6
How It Works
From the choices you made, Access generates an SQL statement. To look at it, click the View menu and
select the SQL View menu item. This will display the SQL statements as shown in Figure 16-7.
Notice that you have the basic SQL
SELECT statement followed by the field names. Access has
prefixed each field name with the table name. Remember that brackets are required only when the
field names contain spaces. The table name prefix is actually required only when selecting data from
multiple tables where both tables have a field with the same name. However, to reduce the chance of
errors, Access has prefixed all fields with the table name.
Figure 16-7
c16.indd 542c16.indd 542 4/1/08 6:39:28 PM4/1/08 6:39:28 PM
543
Chapter 16: Accessing Databases
The FROM clause in your SELECT statement specifies the table that data is being selected from (in this
case, the Customers table).
The
ORDER BY clause specifies which fields should be used to sort the data, and in this case the
CompanyName field has been specified.
How does this SQL statement actually get built? When you first started creating this query you added a
table name. Before any fields were added to the grid, Access generated the following SQL statement:
SELECT
FROM Customers;
Of course, this on its own is not a valid SQL statement. When you added the first field and set the sort
order for that field, the following SQL statement was generated — which is valid:
SELECT Customer.CompanyName
FROM Customers
ORDER BY Customers.CompanyName;
As you continued to add fields, the rest of the field names were added to the SQL statement until the
complete SQL statement shown in Figure 16-7 was generated.
The next section discusses the basic data access components that are needed in Windows Forms to
display data. Since you have been using Microsoft Access in your examples here, the focus is on the data
access components provided in Visual Studio 2008 that assist you in accessing the data in an Access
database.
Data Access Components
There are three main data access components in Visual Basic 2008 that you need for retrieving and
viewing data from the database: BindingSource, TableAdapter, and DataSet. The BindingSource
and DataSet components are located in the Toolbox under the Data tab, as shown in Figure 16 - 8 . The
TableAdapter can be automatically generated depending on the path you take when adding data access
components, as you ’ ll soon discover. Take a brief look at each one of these components in turn.
c16.indd 543c16.indd 543 4/1/08 6:39:28 PM4/1/08 6:39:28 PM