Beginning Microsoft Visual Basic 2008 phần 8 potx
Bạn đang xem bản rút gọn của tài liệu. Xem và tải ngay bản đầy đủ của tài liệu tại đây (2.03 MB, 92 trang )
611
Chapter 17: Database Programming with SQL Server and ADO.NET
4. Change the Data Source to Microsoft SQL Server (SqlClient). Put in your server name. Choose
the type of authentication and user information to login to your database server. For database
name, enter pubs . Click the Test Connection button to verify your choices. When you get a
valid connection, click OK.
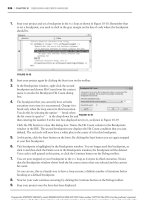
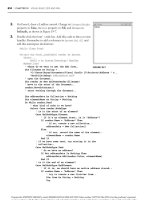
5. Now, expand the new Data Connection in Server Explorer and view the tables as shown in
Figure 17 - 15 . Drag the
authors table and the titleauthor table on to the designer. You will
not use the
titleauthor table in this Try It Out, but notice the relationship created for you
by the Designer.
Figure 17-14
Figure 17-15
c17.indd 611c17.indd 611 4/1/08 6:40:15 PM4/1/08 6:40:15 PM
612
Chapter 17: Database Programming with SQL Server and ADO.NET
6. Save the project.
7. On the form add a DataGridView with the default properties. Increase the width of the form
and DataGridView so you can display more fields on the form.
8. Go to the code behind next. In the form1 load sub, add the following code.
Dim PubsDB As New PubsDataContext
Dim authors = From author In PubsDB.authors _
Where author.state = “CA”
DataGridView1.DataSource = authors
9. Run the application to see all authors in California. You should see a form like Figure 17 - 16 .
Figure 17-16
Figure 17-17
10. Add the following code to form load. Here you are selecting a single row from the database.
Run the application and notice the new form title as shown in Figure 17 - 17 .
Dim author1 = PubsDB.authors.SingleOrDefault(Function(au) au.au_id = “172-32-1176”)
Me.Text = author1.au_fname + “ “ + author1.au_lname
c17.indd 612c17.indd 612 4/1/08 6:40:16 PM4/1/08 6:40:16 PM
613
Chapter 17: Database Programming with SQL Server and ADO.NET
11. Add the following code to form load between the last two lines you added. Here you are
selecting a single row from the database and then changing it. Run the application and note
the new form title and the updated grid last name as shown in Figure 17 - 18 .
Dim author1 = PubsDB.authors.SingleOrDefault(Function(au) au.au_id = “172-32-1176”)
author1.au_lname = “Test”
PubsDB.SubmitChanges()
Me.Text = author1.au_fname + “ “ + author1.au_lname
Figure 17-18
How It Works
This application shows just how amazing LINQ is to developers. By writing one simple VB query and
binding to a DataGridView, you were able to filter records from an object. In this case, it was an Entity
class representing a database table. First, you declare a new instance of the
PubsDataContext as
PubsDB . PubsDB is now considered an entity.
Dim PubsDB As New PubsDataContext
Next, you declare an object named authors to hold the results of the query against the authors table.
The query is a simple
where clause for all authors in the state “ CA ” .
Dim authors = From author In PubsDB.authors _
Where author.state = “CA”
The third line simply binds the result of the LINQ query to the DataGridView.
DataGridView1.DataSource = authors
c17.indd 613c17.indd 613 4/1/08 6:40:16 PM4/1/08 6:40:16 PM
614
Chapter 17: Database Programming with SQL Server and ADO.NET
The last four lines were added to allow data updates. First, you selected a single row using the
SingleOrDefault method. If the database might return nothing, you need to use this method
otherwise you can use the method
Single . Once you get an instance of a single author, you can
update any column. You updated the last name to
“ Test ” . To push the changes to the database, just
call
SubmitChanges() . Finally, you put the new value in the title of the form:
Dim author1 = PubsDB.authors.SingleOrDefault(Function(au) au.au_id = “172-32-1176”)
author1.au_lname = “Test”
PubsDB.SubmitChanges()
Me.Text = author1.au_fname + “ “ + author1.
Now, that was what you call easy. You should use the IntelliSense to view the objects, properties, and
methods available to you with LINQ. It is a simple way to work with your data. In the chapter exercises,
you get to research LINQ to Objects and write a query against a dictionary object.
Summary
This chapter covers a few very important ADO.NET classes, particularly the SqlConnection ,
SqlDataAdapter , SqlCommand , and SqlParameter classes. You saw firsthand how valuable these
classes can be when selecting, inserting, updating, and deleting data. These particular classes are
specifically for accessing SQL Server, but similar principles apply to the OLE DB counterparts.
You also saw the
DataSet and DataView classes from the System.Data namespace put to use, and you
used both of these classes to create objects that were bound to the controls on your forms. Of particular
interest to this discussion is the
DataView object, as it provides the functionality to perform sorting and
searching of data. The
DataView class provides the most flexibility between the two classes, because you
can also present a subset of data from the
DataSet in the DataView .
You saw how easy it is to bind the controls on your form to the data contained in either the
DataSet or
the
DataView . You also saw how to manage the navigation of the data in these objects with the
CurrencyManager class. This class provides quick and easy control over the navigation.
This chapter has demonstrated using manual control over the navigation of data on the form and
manual control over the insertion, update, and deletion of data in a data store. You should use the
techniques that you learned in this chapter when you need finer control of the data, especially when
dealing with complex table relationships such as you have dealt with here.
You also got a taste of LINQ. LINQ is a topic that deserves an entire book, but you saw how powerful it
is. In a few lines of code (no SQL), you were able to write a query to filter a group of objects like you can
in SQL.
c17.indd 614c17.indd 614 4/1/08 6:40:17 PM4/1/08 6:40:17 PM
615
Chapter 17: Database Programming with SQL Server and ADO.NET
To summarize, after reading this chapter you should:
Feel comfortable using the ADO.NET classes discussed in this chapter
Know when to use the
DataSet class and when to use the DataView class
Know how to bind controls on your form manually to either a
DataSet or a DataView object
Know how to use the
CurrencyManager class to navigate the data in a DataSet or DataView
object
Know how to sort and search for data in a
DataView object
Be familiar with the Object Relational Desiner in Visual Studio
Know how to use LINQ to query an Entity Class
Exercises
1. Create a Windows Forms application that will display data to the user from the Authors table in
the Pubs database. Use a DataGridView object to display the data. Use the simple select state-
ment here to get the data:
Select * From Authors
2. Looking at the DataGridView, it is not very user - friendly. Update the column headings to make
more sense. If you know SQL, you can give each column an alias. The current column header
names are
au_id , au_lname , au_fname , phone , address , city , state , zip , and contract .
The solution to this exercise will give each column an alias in SQL.
3. Create a Windows Forms application. On form1, add a ListBox named ListBox1. On form load,
create a dictionary object with key/value pairs of names and states of your friends. Now, write a
query to return all of your friends in a certain state. Take your result and bind it to the ListBox
using a
for each loop. You may need to add a reference to System.Data.Linq .
❑
❑
❑
❑
❑
❑
❑
c17.indd 615c17.indd 615 4/1/08 6:40:17 PM4/1/08 6:40:17 PM
c17.indd 616c17.indd 616 4/1/08 6:40:17 PM4/1/08 6:40:17 PM
18
ASP.NET
As we look to the future, the Internet is sure to increase its presence in business. Developers need
to gain knowledge of building robust, dynamic web sites. In this chapter, you will learn about
building Web Forms applications. You will focus on the basics for web site development and move
to database - driven applications. With Visual Studio 2008, you will be building data - driven sites in
no time.
Visual Studio 2008 is the best tool for creating ASP.NET sites on the market today. It provides you
with the best Intellisense, debugging, and control library to create web sites written in Visual Basic.
You can build ASP.NET web sites (sometimes referred to as Web Forms applications), web services
and even sites targeted for mobile devices in VS 2008. Also, you do not need IIS or any web server
to host your site with VS 2008; ASP.NET Development Server is a built - in web server you can use
to host your sites while developing them.
In this chapter, you will:
Look at a basic overview of web applications (thin - client applications)
See the advantages of Web Forms versus Windows Forms
Understand the control toolbox
Explore client and server processing
Assess the possible locations for web sites in VS 2008 (IIS and ASP.NET Development
Server)
Error handling has been omitted from all of the Try It Outs in this chapter to save space. You
should always add the appropriate error handling to your code. Review Chapter 10 for
error - handling techniques.
Before you get your first look at the code, you will have a short lesson on the building blocks
developers use to create web applications.
❑
❑
❑
❑
❑
c18.indd 617c18.indd 617 4/1/08 6:40:45 PM4/1/08 6:40:45 PM
618
Chapter 18: ASP .NET
Thin - Client Architecture
In previous chapters, you have seen thick - client applications in the type of Windows Forms applications.
Most of the processing is completed by the client application you built earlier, and many of the
applications stood on their own and needed no other applications or servers. In web development, on
the other hand, most of the processing is completed on the server and then the result is sent to the
browser.
When you develop Web Forms applications, you do not have to distribute anything to the user. Any user
who can access your web server and has a web browser can be a user. You must be careful with the
amount of processing you place on the client. When you design a thin - client system, you must be aware
that your users or customers will use different clients to access your application. If you try to use too
much processing on the client, it may cause problems for some users. This is one of the major differences
between Windows and Web Forms applications. You will learn about the major difference between these
two types of Visual Studio 2008 applications later in this chapter.
When dealing with a Windows Forms application, you have a compiled program that must be
distributed to the user ’ s desktop before they can use it. Depending upon the application, there may also
be one or more supporting DLLs or other executables that also need to be distributed along with the
application.
In thin - client architecture, there is typically no program or DLL to be distributed. Users merely need to
start their browsers and enter the URL of the application web site. The server hosting the web site is
responsible for allocating all resources the web application requires. The client is a navigation tool that
displays the results the server returns.
All code required in a thin - client application stays in one central location: the server hosting the web site.
Any updates to the code are immediately available the next time a user requests a web page.
Thin - client architecture provides several key benefits. First and foremost is the cost of initial distribution
of the application — there is none. In traditional client/server architecture, the program would have to
be distributed to every client who wanted to use it, which could be quite a time - consuming task if the
application is used in offices throughout the world.
Another major benefit is the cost of distributing updates to the application — again, there is none. All
updates to the web site and its components are distributed to the web server. Once an update is made, it
is immediately available to all users the next time they access the updated web page. In traditional
client/server architecture, the updated program would have to be distributed to every client, and the
updates could take days or weeks to roll out. Thin-client architecture allows a new version of an
application to be distributed instantly to all the users without having to touch a single desktop.
Another major benefit is that you can make changes to the back - end architecture and not have to worry
about the client. Suppose, for example, that you want to change the location of the database from a
low - end server to a new high - end server. The new server would typically have a new machine name. In
a traditional client/server application, the machine name of the database server is stored in the code or
Registry setting. You would need to modify either the code or the Registry setting for every person who
uses the application. In thin - client architecture, you simply need to update the setting of the web server
to point to the new database server and you are in business, and so are all of the clients.
c18.indd 618c18.indd 618 4/1/08 6:40:46 PM4/1/08 6:40:46 PM
619
Chapter 18: ASP .NET
You can see that in a thin - client architecture model, any client with a browser can access your web site
and immediately have access to updates. In fact, if your changes were transparent to the user, the client
wouldn ’ t even know that changes had been made.
Now that you have a basic understanding of thin - client architecture, look at how Web Forms work.
Web Forms versus Windows Forms
In this section, you will get an overview of the advantages of both Windows Forms and Web Forms. This
will give you an idea of when you build each type of application to solve a customer ’ s problem. You will
almost always have to choose between these two types of architecture when building solutions. It is
important to understand some of the advantages of both.
Windows Forms Advantages
Windows Forms applications have advantages in some types of systems. Typically, applications that
require a responsive interface, such as a point - of - sale system at a retail store, are Windows Forms
applications. Also, in most cases, processor - intensive applications such as games or graphics programs
are better suited to a Windows Forms program.
A major advantage for Windows Forms is trust. When a user installs the application, it is given trust in
the current zone. With this high-enough level of trust, you can store data and state about the current
session on the local computer. The user can run the application and it can interact with the local file
system or Registry seamlessly. Trust is very limited, however, for an Internet application.
Another advantage is having control over the client application. This allows you to build a very
powerful, rich, user interface. You will see that there are numerous controls not available to a Web Form
(although this is becoming less of a difference) that permit the developer to create user - friendly
applications. Windows Forms allow for a more ample user interface.
Also, application responsiveness is an advantage with Windows Forms. With most or all of the
processing being done on the client, the need to send data over the wire can be reduced. Any amount of
data sent to servers can cause latency. For an application running locally on a computer, the normal
events are handled more quickly. Also, the speed of data transmission over a local network is much
faster than the typical Internet connection. This speed will allow data to move across the wire faster and
create less of a bottleneck for the user.
Web Forms Advantages
The advantages of Web Forms may seem to be greater than the advantages of Windows Forms. Do not
permit this to transform you into a full - time web developer for every project. There will always be times
when Windows Forms are a better solution.
The greatest advantage for a web application is distribution. To distribute a Web Forms application, just
install it on the web server. That is it. No need to create an installation for every version of Windows and
ship CDs. When you make a change, just publish the change to the web server, and the next time a
customer comes to the site, he or she will use the latest application.
c18.indd 619c18.indd 619 4/1/08 6:40:46 PM4/1/08 6:40:46 PM
620
Chapter 18: ASP .NET
Version control, or change control, is another advantage. With all of your application code at the same
location, making changes is a breeze. You never have to worry about one user on version 8 and another
on version 10; all users access the same application. As soon as you publish the change, all users see the
update with no user intervention necessary.
Have you heard the term platform independence ? Web applications have it. It doesn ’ t matter what type of
computer the user has — as long as there is a browser and a connection to your web server, the user can
access your application. There is no need to build application versions for different operating systems.
These advantages can add up to millions of dollars of savings over a Windows application. Being able to
make quick changes and maintain one code base are great advantages. Still, there are times when a web
application will not provide an adequate user experience. Make sure you evaluate both options for every
project. Now, let ’ s look more closely at Web Forms development.
Web Applications: The Basic Pieces
In its simplest form, a web application is just a number of web pages. For the user to access the web
pages, there must be a web server and browser. A request is made by the browser for the page on the
server. The server then processes the web page and returns the output to the browser. The user sees
the page inside the browser window. The pages that the users see may contain HyperText Markup
Language (HTML), cascading style sheets (CSS), and client - side script. Finally, the page displays in the
browser for the user.
In this section, you will receive a basic overview of each piece of the system.
Web Servers
There are many web servers on the market today. The most well known web servers in use today are
Microsoft Internet Information Services (IIS) and Apache. For this book, you will focus exclusively on IIS.
Browsers
Every user of a Web Forms application must have a browser. The four most popular browsers are
Microsoft Internet Explorer (IE), Mozilla Firefox, Netscape, and Opera. When you develop public web
sites, you must be aware that the site may render differently in each browser. You will find that IE is the
most lenient when it comes to valid HTML. We will focus on IE 7 for this book.
HyperText Markup Language
Also known as HTML, this is the presentation or design layout of the web page. HTML is a tag - based
language that allows you to change the presentation of information. For example, to make text bold in
HTML, just place the
< b > tag around the text. The following text is an example of HTML.
This is < b > bold < /b > in HTML.
c18.indd 620c18.indd 620 4/1/08 6:40:47 PM4/1/08 6:40:47 PM
621
Chapter 18: ASP .NET
If the previous text is then rendered by a browser, it would be displayed like this:
This is
bold
in HTML.
Browsers will interpret HTML and should conform to the standards from the World Wide Web
Consortium (W3C). The W3C was created to develop common protocols for the Web in the 1990s. You
can read more about the W3C at their web site, at
www.w3.org/ .
Although VS 2008 allows you to design ASP.NET web sites without firsthand knowledge of HTML, you
gain have hands - on exercises creating web pages with HTML later in the chapter.
VBScript and JavaScript
A major part of web development is client - side script. If you are creating an application for the public
that uses client - side script, you will need to use JavaScript for support in all browsers. VBScript is a
Microsoft - centric language that is more like Visual Basic syntax, so when developing an intranet site
where you can control which version of IE the user uses, you can use VBScript.
Client - side scripting is typically used for data validation and dynamic HTML (DHTML). Validation
scripts enforce rules that may require the user to complete a field on the screen before continuing.
DHTML scripts allow the page to change programmatically after it is in memory on the browser.
Expanding menus is an example of DHTML. Currently, IE supports more DHTML than is required by
the W3C. This may cause you to have to create DHTML for each target browser.
One of the great features of Visual Studio 2008 is the validation and navigation controls. You can drag
these controls onto your web page without writing any client - side script. In most instances, these
controls will manage, but for others, you will need to be self - sufficient in the creation of client - side script.
For this reason, you will write some of your own scripts later in this chapter.
Cascading Style Sheets
Cascading style sheets (CSS) allows for the separation of layout and style from the content of a web
page. You can use CSS to change fonts, colors, alignment, and many other aspects of web page
presentation. The best part of CSS is it can be applied to entire site. By using a master CSS page, you can
easily maintain and quickly change the look and feel of the entire web site by changing one page. You
will learn more about CSS in this chapter.
Active Server Pages
With Visual Studio 2008, a new version of Active Server Pages is here: ASP.NET. This new version makes
it even easier to create dynamic, data - driven web sites. This section will explain the features and benefits
of ASPX or Web Forms.
c18.indd 621c18.indd 621 4/1/08 6:40:47 PM4/1/08 6:40:47 PM
622
Chapter 18: ASP .NET
Benefits of ASP.NET Web Pages
When you create web applications, you could use many solutions. The most common types of pages are
Active Server Pages (
.asp and .aspx ), JavaServer Pages ( .jsp ), Cold Fusion Pages ( .cfm ) and basic
HTML (
.htm or .html ). In this book, you will mainly focus on ASPX, but you will see some HTML also.
Execution time is one benefit in which ASP.NET stands out above the rest. When an ASP.NET page is
requested the first time, a compiled copy is placed into memory on the server for the next request. This
provides for great performance gains over interpreted languages.
Using Visual Studio 2008 to design your applications also makes a big difference in productivity. The
.NET Framework supplies thousands of namespaces, objects, and controls for use developing Web
Forms applications. Also, ASP.NET also supports all .NET - compatible languages. By default, Visual
Basic 2008, C#, and JScript.NET are all available in Visual Studio 2008.
Special Web Site Files
When you work with ASP.NET, you will see many special files. These files are very important and each
could have an entire chapter written about it. The two files discussed here, global.asax and web.config,
enable you to make sitewide changes from one location. There is much more to learn about these, and
you can do research at
.
Global.asax
The global.asax file allows you to add code to certain application - level events. The most common events
are
Application_Start , Application_End , Session_Start , Session_End , and Application_
Error
. Application start and end events fire when the actual web application inside of IIS changes state.
This event will fire with the first request to a web site after the server or IIS is restarted. The session
events fire on a per user/browser session on the web server. When you save data to the user ’ s session,
you must be careful. This data will be saved for every user/browser that is browsing the application.
This can create an extra load on the server. The final event is
Application_Error . You can use this to
log all unhandled events in one common place. Make sure to redirect users to a friendly error page after
logging the error.
Web.config
Web.config is exactly what it appears to be — a configuration file for the web application; it is an XML
document. You can update many application settings for security, errors, and much, much more. In most
production apps, you will store your connection string to the database here.
Development
As you build Web Forms applications in Visual Studio 2008, you will work in the IDE you are familiar
with from Windows Forms applications. As you work with web pages, you will have the option of using
what is known as a code - behind page. This will allow you to keep your application logic separate from the
presentation code. You will have three views to work from: Design, Source, and Code view, the common
ways to build applications. Design and Source view are for the
.aspx page that contains the user
interface and data validation. The Code view is the
.vb file that is the code - behind page. Visual Studio
2008 makes creating web applications an easy task.
c18.indd 622c18.indd 622 4/1/08 6:40:47 PM4/1/08 6:40:47 PM
623
Chapter 18: ASP .NET
Controls: The Toolbox
The default controls you will use to build web applications are all in the Toolbox. If you do not see the
Toolbox, press Ctrl+Alt+X to view it. The controls are organized by category. The categories along with
some controls are shown in Figure 18 - 1 . At left, the Toolbox is shown with just the categories; at center,
the Standard controls tab is expanded to show the list of controls; at right, the Data tab has been
expanded.
Figure 18-1
The Toolbox is fully customizable. You can add, remove, or rearrange any tab or control by right - clicking the
Toolbox and using the context menu options. Also, you can copy common code snippets to the Toolbox
as a shortcut. To copy code to the Toolbox, highlight the text and drag it onto the tab where you want to
add the shortcut. Next, right - click the shortcut and rename it so that it makes sense. To insert code onto a
page, just drag the shortcut to the location where you want the code. In this chapter, you will gain
hands - on experience working with controls on many tabs.
Building Web Applications
In this section, you will create a small web application demonstrating different aspects of web
development. In accomplishing this, you will see how the basics of Web Forms applications work.
Creating a Web Form for Client - and Server - Side
Processing
The Web Form in this Try It Out will contain HTML and server controls. The HTML controls will have
client - side processing, and the server controls will process the code on the server.
c18.indd 623c18.indd 623 4/1/08 6:40:47 PM4/1/08 6:40:47 PM
624
Chapter 18: ASP .NET
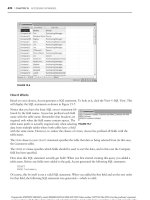
Try It Out Server and Client - Side Processing
1.
Start this project by choosing File New Web Site. Make sure Visual Basic is the language, and
select ASP.NET web site on the Templates pane. For the Location, change the drop - down box to
File System and enter [The default path for VS 2008] \Client_ServerProcessing . A default path
for Vista will look like C:\Users\Bryan\Documents\Visual Studio 2008\WebSites\
Client_ServerProcessing . Click OK to create a file system site that will use the built - in
development web server for testing. The New Web Site dialog box will look like Figure 18 - 2 .
Figure 18-2
2. Visual Studio will create the default folders and files for the web site. Take a look at the Solution
Explorer window, shown in Figure 18 - 3 . The
Default.aspx page will be open in the IDE.
Figure 18-3
3. Add the following standard controls to Default.aspx while in Design mode. (To get to
Design mode, while viewing the
.aspx page click the Design option on the lower left of the
pane, or simply press Shift+F7.) Do not worry about the position of the controls for now, but
make sure you use controls from the Standard and HTML tabs on the toolbox.
c18.indd 624c18.indd 624 4/1/08 6:40:48 PM4/1/08 6:40:48 PM
625
Chapter 18: ASP .NET
The area at the bottom of the Default.aspx page that has Design, Split, Source, and other
HTML tags to the right is known as the tag navigator .
First, add the controls to the form. You can arrange them in any order for now.
❑ From the Standard controls tab, add one Button and two Label controls.
❑ From the HTML controls tab, add one Input (Button) control.
4. Now, change the properties of the controls. Refer to Figure 18 - 4 as a guide.
❑ Set the ID of the Standard:Button to btnServer and the Text to Server .
❑ Set the ID of the HTML:Input (Button) to btnClient and the Value to Client .
❑ Set the ID of the upper Standard:Label to lblServer and the Text to Server .
❑ Set the ID of the lower Standard:Label to lblClient and the Text to Client .
5. You will have to enter line breaks and spaces on the page to move the controls around. This is
called relative positioning ; each control is placed relative to the previous control. You can also use
absolute positioning , which is like what you are used to in Windows Forms applications. Arrange
the controls so they resemble Figure 18 - 4 . When you finish, press Ctrl+F5 to run the project
without debugging and see the page in the browser.
6. Close the browser and go back to Visual Studio 2008. Double - click the btnServer to jump to
the
btnServer_Click event handler. Depending on your settings, you will be either on the
code - behind page or working in the source of the
.aspx page. Add the following
highlighted code to the event:
Sub btnServer_Click(ByVal sender As Object, ByVal e As System.EventArgs)
lblServer.Text = “Changed”
End Sub
Figure 18-4
c18.indd 625c18.indd 625 4/1/08 6:40:48 PM4/1/08 6:40:48 PM
626
Chapter 18: ASP .NET
Run the program again by pressing Ctrl+F5 and test the button ’ s Click event. The label will
display
Changed after you click the Server button.
7. Create an event handler for the HTML Input (Button) and add a title to the page. (Make sure
you have the
Default.aspx page open in the IDE and the Properties Window has DOCUMENT
selected.) To add a title, find the
Title property and set it to My First Page . On the tag
navigator, click Source to change to HTML view. In the Client Object & Events combo box,
choose
btnClient . Next, select onclick in the event combo box and add this highlighted code
to the event VS 2008 creates. Note: JavaScript is case sensitive.
function btnClient_onclick() {
document.getElementById(“lblclient”).innerText = “Changed”;
document.getElementById(“lblServer”).innerText = “Server”;
}
8. Run the project again by pressing Ctrl+F5. Test both buttons.
How It Works
Now you can see that Web Forms development is very similar to Windows Forms development. This
is one of the benefits of .NET development and Visual Studio 2008. Microsoft has made it easy for any
developer to switch from device to web to Windows development with only a small learning curve.
First, look at the HTML source. The first line of code is the
Page directive:
< %@ Page Language=”VB” AutoEventWireup=”false” CodeFile=”Default.aspx.vb”
Inherits=”_Default” % >
Depending on the mode you develop in, you may see different default attributes set by Visual Studio
2008. If you work with code in the
.aspx page, only the Language attribute is set by Visual Studio 2008.
The
Page directive has over 30 attributes that can be set. I will discuss only the default attributes. If
you want to explore the rest, search for
@Page in the help files for VS 2008 or on http://msdn2
.microsoft.com/
.
Take a look at the default attributes in the
Default.aspx page. First, you see the Language attribute.
This is set to the language that all server code will compile into.
AutoEventWireup is the second
attribute. Visual Studio 2008 sets this attribute to
false . If you leave this attribute out of the Page
directive, the default value is
true , and certain events can be executed twice. Microsoft recommends
always setting the
AutoEventWireup attribute to false . Next, you have the CodeFile attribute. This
is the page that contains the code when using a separate code file or the code - behind page. Finally,
there is the
Inherits attribute. This is simply the class name the page will inherit from.
The next line in the source code is the
!DOCTYPE element. This tells IE 6 and later that the document
conforms to the
XHTML 1.0 Document Type Definition (DTD) specified by the W3C for English:
< !DOCTYPE html PUBLIC “-//W3C//DTD XHTML 1.0 Transitional//EN”
“ >
The actual HTML root element is next. You will see this element with no attributes set in many instances.
Here VS has specified that the namespace for custom tags will be
.
If you browse to this site, you will see that this is the XHTML namespace defined by the W3C.
< html xmlns=” >
c18.indd 626c18.indd 626 4/1/08 6:40:49 PM4/1/08 6:40:49 PM
627
Chapter 18: ASP .NET
After the root HTML element is the HEAD element. Children of this element are items that are not
rendered, but may affect how the page displays. You will place
SCRIPT , META , TITLE , LINK , STYLE , and
other elements here to define the page ’ s look and feel.
LINK and STYLE elements are both used for CSS.
The first element is
TITLE . This is the title the browser displays for the page. Next, there is a META
object that defines the client scripting language as
VBScript . After the META object is the client script
you created.
The root script tags define the section of the page that is available to add procedures. The only event
is the
onclick event of the btnClient control. When you click the client button, this procedure
executes. The first line of the subroutine uses the
getElementById function to find the object in the
document that has an
ID of lblclient . Once it is found, the innerText is set to Changed . The same
function is used to find the
lblServer object on the next line. The innerText is then changed to
Server . This is added to reset the Server button ’ s label.
< head runat=”server” >
< title > My First Page < /title >
< script language=”javascript” type=”text/javascript” >
// < !CDATA[
function btnClient_onclick() {
document.getElementById(“lblclient”).innerText = “Changed”;
document.getElementById(“lblServer”).innerText = “Server”;
}
// ]] >
< /script >
< /head >
What you may not notice is the difference in the way each button performs event handling. It is hard
to notice running locally, but go back to the web page and watch the status bar of the browser while
you click each button. When you click the Server button, the page actually calls the web server to
process the event. The Client button did not call back to the server; the browser handled the
event itself.
Now, you are at the
BODY tag. This is where Visual Studio adds the controls. All objects inside the FORM
tag are sent back to the server for processing.
< body >
< form id=”form1” runat=”server” >
When you click the Server button, the form is actually submitted to the server. Here are two lines of
HTML that are sent to the browser from the ASP.NET DLL.
< form name=”form1” method=”post” action=”Default.aspx” id=”form1” >
< input type=”submit” name=”btnServer” value=”Server” id=”btnServer” / >
You can look at the HTML source set to the browser by choosing View Source from the IE menu.
c18.indd 627c18.indd 627 4/1/08 6:40:49 PM4/1/08 6:40:49 PM
628
Chapter 18: ASP .NET
The browser knows that btnServer is a submit button. The function of a submit button is to pass
form data back to a web server. In this case, the action is set to
Default.aspx . The form uses the post
method to send data to
Default.aspx . For most pages you will create, you can stay in design mode
and never look at the HTML if you are not comfortable with it.
The final portion of the code displayed on the
Default.aspx page was the markup for the controls.
These are the controls you placed onto the design area of the form.
< div >
< asp:Button ID=”btnServer” runat=”server” Text=”Server” / >
& nbsp; & nbsp; & nbsp; & nbsp; & nbsp;
< asp:Label ID=”lblServer” runat=”server”
Text=”Server” > < /asp:Label >
< br / >
< br / >
< input id=”btnClient” type=”button” value=”Client” onclick=”return
btnClient_onclick()” / > [{[SPACE]}] & nbsp; & nbsp; & nbsp; & nbsp;
< asp:Label ID=”lblClient” runat=”server”
Text=”Client” > < /asp:Label >
< br / >
< /div >
< /form >
< /body >
< /html >
Finally, look at the Default.aspx.vb page. In the code for the OnClick event of the btnServer
control, you set the text of the label to
Changed .
Partial Class _Default
Inherits System.Web.UI.Page
Protected Sub btnServer_Click(ByVal sender As Object,
ByVal e As System.EventArgs) Handles btnServer.Click
lblServer.Text = “Changed”
End Sub
End Class
You have completed your first ASP.NET page. In this exercise, you saw a few basic controls and
learned that client and server code are handled differently. In the next section, you will learn where
you can host web sites with Visual Studio 2008.
Web Site Locations with VS 2008
When you create a new site, you will have a choice of locations for the site. The example in this chapter
uses the File System location for the web site, as shown in Figure 18 - 5 . One advantage of this location is
that the web server is not accessible to external users.
Always make sure you test your site on the actual version of IIS running on the production server before
going live.
c18.indd 628c18.indd 628 4/1/08 6:40:50 PM4/1/08 6:40:50 PM
629
Chapter 18: ASP .NET
Figure 18-5
There are three other ways to work with web site projects, as you can see in left panel of the Choose
Location window. The first is using local IIS (see Figure 18 - 6 ).
Figure 18-6
If you have a local web server, you can host your application there. This allows others to see the site and
test it. The second option is to use an FTP site. In this case, you are most likely using a hosting company.
All you have to do is add the location and authentication information, and you can code your application
on the production server. You can see the setup screen for an FTP site in Figure 18 - 7 .
c18.indd 629c18.indd 629 4/1/08 6:40:50 PM4/1/08 6:40:50 PM
630
Chapter 18: ASP .NET
Figure 18-7
The final option is a Remote Site. Again, this also may be used when you use a hosting company. If your
hosting company supports FrontPage Extensions, you can use this option as shown in Figure 18 - 8 .
Figure 18-8
Performing Data Entry and Validation
One of the basic functions of almost every web site is to gather some kind of information from the user. You
probably have seen screens that have links such as Contact us or Create an account. Any place you see a text
box on a web page, data entry and validation are probably taking place. In this Try It Out, you will learn the
basics of using built in validation controls and accessing the data the user enters into the web page.
c18.indd 630c18.indd 630 4/1/08 6:40:51 PM4/1/08 6:40:51 PM
631
Chapter 18: ASP .NET
Try It Out Data Entry and Validation
1.
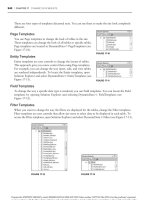
Create a new web site and name it DataEntry by choosing File New Web Site from the menu.
2. Add four labels, three text boxes, and one button to the Default.aspx page. Make sure you
use server controls from the Standard tab of the Toolbox. Using the format menu, set each
control ’ s positioning to absolute. Finally, align the controls to resemble Figure 18 - 9 .
Figure 18-9
3. Set the properties of the eight controls and the document.
❑ Set the Title of the Document to Data Entry and Validation .
❑ Set the ID of the Button to btnComplete and the Text to Complete .
❑ Set the ID of the upper-left TextBox to txtFirstName .
❑ Set the ID of the upper-right TextBox to txtLastName .
❑ Set the ID of the lower TextBox to txtEmail .
❑ Set the ID of the upper-left Label to lblFirstName and the Text to First Name .
❑ Set the ID of the upper-right Label to lblLastName and the Text to Last Name .
❑ Set the ID of the middle Label to lblEmail and the Text to Email .
❑ Set the ID of the lower Label to lblWelcome and Text to Welcome .
c18.indd 631c18.indd 631 4/1/08 6:40:51 PM4/1/08 6:40:51 PM
632
Chapter 18: ASP .NET
4. Test the page by pressing Ctrl+F5. When the page opens, you will test three items. First, enter
your name and e - mail and then click the Complete button. The page will post back to the
server, and the HTML returned will still have your data in the textboxes. This is default
behavior known as view state . Second, type the text < SCRIPT > alert “ Hi “ < /SCRIPT > into the
First Name text box and click Complete. You will see the error message shown in Figure 18 - 10 .
ASP.NET 3.5 has a feature called request validation that will check for any dangerous input
from the user unless you explicitly turn it off. Finally, test the tab order. You can control the
tab order by the order the controls appear in the HTML source or by the
TabIndex property
on each control. Change the tab order if it is not correct.
Figure 18-10
5. It is time to do something with the data the user enters. First, you need to open the code - behind
page. The easiest way to do this is press F7. Next, add an event handler for page load. To do
this, select
_Default Events from the Objects combo box on the left and Load from the Events
combo box. Add the following highlighted code to update
lblWelcome with the data input.
Protected Sub _Default_Load(ByVal sender As Object, _
ByVal e As System.EventArgs) Handles Me.Load
If Page.IsPostBack Then
‘If this is a postback and not the initial page load
‘Display the data to the user
Me.lblWelcome.Text = “Hello “ + Me.txtFirstName.Text + “ “ + _
Me.txtLastName.Text + “ < BR > ” + “Your email address is “ + _
Me.txtEmail.Text
End If
End Sub
c18.indd 632c18.indd 632 4/1/08 6:40:51 PM4/1/08 6:40:51 PM
633
Chapter 18: ASP .NET
6. Add validation to the input. Visual Studio has built - in controls just for this. To see the
controls, switch to Design mode by clicking the View Designer icon on the Solution Explorer.
Go to the Toolbox and find the Validation tab, which includes prebuilt controls to assist with
data validation. Add two RequiredFieldValidator controls and one ValidationSummary
control to the form. Use the layout menu to set each control ’ s positioning to absolute.
Set the following properties for RequiredFieldValidator:
❑ Set ID to rfvFirstName.
❑ Set Display to None.
❑ Set ControlToValidate to txtFirstName.
❑ Set ErrorMessage to First name is required.
Set the following properties for RequiredFieldValidator:
❑ Set ID to rfvEmail .
❑ Set Display to None.
❑ Set ControlToValidate to txtEmail.
❑ Set ErrorMessage to Email is required .
Set ValidationSummary ’ s ID to ValidationSummary . Your page should look like Figure 18 - 11
when you finish.
Figure 18-11
c18.indd 633c18.indd 633 4/1/08 6:40:52 PM4/1/08 6:40:52 PM
634
Chapter 18: ASP .NET
7. Run your project and try to submit blank entries for first name and e - mail. You will see two
error messages similar to those displayed in Figure 18 - 12 .
Figure 18-12
This quick example explains how easy data validation is in ASP 3.5. Other controls are available for
enforcing data validation. The CompareValidator control tests a control to make sure it matches a value.
This value can be a constant, another control, or even a value from a data store. RangeValidator tests
that a value is within a specified range. For example, you can test to make sure a person is between 18
and 35 years old.
How It Works
Without writing any code, you are able to require that data entry fields are completed on a web page.
You take advantage of controls already created for quick and hearty data validation.
You use the RequiredFieldValidator control to make sure the user entered data. You set a couple of
properties on the control. You set the
ErrorMessage to a string that displays in the
ValidationSummary control. Setting
Display= “ None ” causes the error message not to be shown
inside of the RequiredFieldValidator control. The required property, ControlToValidate, is set to the ID
of the control that was required.
< asp:RequiredFieldValidator ID=”rfvFirstName” runat=”server”
ErrorMessage=”First name is required” Display=”None”
ControlToValidate=”txtFirstName” style=”z-index: 1;left: 272px;
top: 325px;position: absolute” >
< /asp:RequiredFieldValidator >
c18.indd 634c18.indd 634 4/1/08 6:40:52 PM4/1/08 6:40:52 PM
635
Chapter 18: ASP .NET
The style attribute is added by Visual Studio when using absolute positioning. With absolute
positioning, you can drag and drop controls basically where you want them.
You use the ValidationSummary control as a central location for displaying all error messages. If you
decide not to use a summary object, you could set the
display property of the individual validation
controls to
true . Then, the error messages are displayed within the validation control. No property
changes are needed to use the ValidationSummary control. You just add it to the form at the location
you wanted to display validation messages.
< asp:ValidationSummary ID=”ValidationSummary1” runat=”server”
style=”z-index: 1;
left: 9px;top: 313px;position: absolute;height: 38px;width: 882px” / >
The only code you write is added to the Page_Load event named _Default_Load . Here, you tested for a
postback using the
IsPostBack property of the Page object. If it was a postback, you display the name
and e - mail entered by the user. You can still use the
Page_Load event in VS 2008. To insert the event
automatically, go into design view on the aspx page and double - click on the page (not on any controls).
The event will be generated and you will be brought to the new event in the code behind.
If Page.IsPostBack Then
‘If this is a post back and not the initial page load
‘Display the data to the user
Me.lblWelcome.Text = “Hello “ + Me.txtFirstName.Text + “ “ + _
Me.txtLastName.Text + “ < BR > ” + “Your email address is “ + _
Me.txtEmail.Text
End If
Designing the Site ’ s Look and Feel
In the past, a major drawback of web development was maintaining a consistent look and feel across
an entire site in a manageable way. Developers created user controls and inserted server - side includes
in every page to try and accomplish this. For the most part, this worked. The hard part was making
sure the opening tags that were in certain include files were closed in the pages that included them.
Another cause of frustration for the designer was making sure all user controls or include files
displayed in the same location. This took time, and with every changed page, someone had to make
sure the entire site looked OK. Today, Visual Studio 2008 has the tools that can be used to maintain a
consistent look and feel.
Themes, navigation controls, and master pages are the tools to accomplish a consistent look and feel. You
will learn about all three in the next Try It Out.
c18.indd 635c18.indd 635 4/1/08 6:40:52 PM4/1/08 6:40:52 PM