Beginning Microsoft Visual C# 2008 PHẦN 6 doc
Bạn đang xem bản rút gọn của tài liệu. Xem và tải ngay bản đầy đủ của tài liệu tại đây (2.88 MB, 135 trang )
Chapter 19: Basic Web Programming
639
The label labelResult again has a Text property where the result is set:
labelResult.Text = String.Format(“{0} {1} selected the event {2}”,
firstName, lastName, selectedEvent);
Instead of displaying the results on the same page, ASP.NET makes it easy to display the results in a
different page, as shown in the following Try It Out.
Try It Out Displaying the Results in a Second Page
1.
Create a new WebForm with the name ResultsPage.aspx .
2. Add a label to the ResultsPage with the name labelResult .
3. Add code to the Page_Load method to the class _ResultsPage as shown here:
public partial class _ResultsPage : System.Web.UI.Page
{
protected void Page_Load(object sender, EventArgs e)
{
try
{
DropDownList dropDownListEvents =
(DropDownList)PreviousPage.FindControl(“dropDownListEvents”);
string selectedEvent = dropDownListEvents.SelectedValue;
string firstName =
((TextBox)PreviousPage.FindControl(“textFirstName”)).Text;
string lastName =
((TextBox)PreviousPage.FindControl(“textLastName”)).Text;
string email = ((TextBox)PreviousPage.FindControl(“textEmail”)).Text;
labelResult.Text = String.Format(“{0} {1} selected the event {2}”,
firstName, lastName, selectedEvent);
}
catch
{
labelResult.Text = “The originating page must contain “ +
“textFirstName, textLastName, textEmail controls”;
}
}
}
4. Set the Default.aspx page ’ s Submit button ’ s PostbackUrl property to
ResultsPage.aspx .
c19.indd 639c19.indd 639 3/24/08 4:33:09 PM3/24/08 4:33:09 PM
Part III: Web Programming
640
5. You can remove the Click event handler of the Submit button because it is not required
anymore.
6. Start the Default.aspx page, fill in some data, and click the Submit button. You are
redirected to the page
ResultsPage.aspx , where the entered data is displayed.
How It Works
With ASP.NET, the Button control implements the property PostbackUrl to define the page that
should be requested from the Web server. This property creates client - side JavaScript code to request
the defined page with the client - side
onclick handler of the Submit button:
< input type=”submit” name=”buttonSubmit” value=”Submit”
onclick=”javascript:webForm_DoPostBackWithOptions(
new WebForm_PostBackOptions( & quot;buttonSubmit & quot;,
& quot; & quot;, false, & quot; & quot;, & quot;ResultPage.aspx & quot;,
false, false))” id=”buttonSubmit” / >
The browser sends all the data from the form inside the first page to the new page. However, inside the
newly requested page it is necessary to get the data from controls that have been defined with
the previous page. To access the controls from a previous page, the
Page class defines the property
PreviousPage . PreviousPage returns a Page object, where the controls of this page can be accessed
using the
FindControl() method. FindControl() is defined to return a Control object, so you must
cast the return value to the control type that is searched:
DropDownList dropDownListEvents =
(DropDownList)PreviousPage.FindControl(“dropDownListEvents”);
Instead of using the FindControl() method to access the values of the previous page, access to the
previous page can be strongly typed, which is less error prone during development. To make this
possible, the next Try It Out defines a custom struct that is returned with a property from the
default_aspx class.
Try It Out Creating a Strongly Typed PreviousPage
1.
Create the App_Code folder in the Web application by selecting the Web folder in the Solution
Explorer and selecting Website
Add Folder App_Code Folder.
2. In the Solution Explorer, select the App_Code folder and add a new C# file named
RegistrationInformation.cs by selecting Website Add New Item Class.
3. Implement the struct RegistrationInformation in the file RegistrationInformation.cs
as shown:
public struct RegistrationInformation
{
public string FirstName { get; set; }
public string LastName { get; set; }
c19.indd 640c19.indd 640 3/24/08 4:33:09 PM3/24/08 4:33:09 PM
Chapter 19: Basic Web Programming
641
public string Email { get; set; }
public string SelectedEvent { get; set; }
}
4. Add the public property RegistrationInformation to the class _Default in the file
Default.aspx.cs :
public RegistrationInformation RegistrationInformation
{
get
{
return new RegistrationInformation()
{
FirstName = textFirstName.Text,
LastName = textLastName.Text,
Email = textEmail.Text,
SelectedEvent = dropDownListEvents.SelectedValue
};
}
}
5. Add the PreviousPageType directive to the file ResultPage.aspx following the Page
directive:
< %@ Page Language=”C#” AutoEventWireup=”true” CodeFile=”ResultPage.aspx.cs”
Inherits=”ResultPage_aspx” % >
< %@ PreviousPageType VirtualPath=”~/Default.aspx” % >
6. Within the Page_Load() method of the class _ResultsPage , now the code can be simplified:
protected void Page_Load(object sender, EventArgs e)
{
try
{
RegistrationInformation ri = PreviousPage.RegistrationInformation;
labelResult.Text = String.Format(“{0} {1} selected the event {2}”,
ri.FirstName, ri.LastName, ri.SelectedEvent);
}
catch
{
labelResult.Text = “The originating page must contain “ +
“textFirstName, textLastName, textEmail controls”;
}
}
c19.indd 641c19.indd 641 3/24/08 4:33:09 PM3/24/08 4:33:09 PM
Part III: Web Programming
642
Input Validation
When users enter data, it should be checked to confirm that the data is valid. The check can happen on
the client and on the server. Checking the data on the client can be done by using JavaScript. However,
if the data is checked on the client using JavaScript, it should also be checked on the server, because you
can never fully trust the client. It is possible to disable JavaScript in the browser, and hackers can use
different JavaScript functions that accept incorrect input. It is absolutely necessary to check the data on
the server. Checking the data on the client as well leads to better performance, as no round - trips occur
to the server until the data is validated on the client.
With ASP.NET it is not necessary to write the validation functions yourself. Many validation controls
exist that create both client - and server - side validation.
The following example shows the
RequiredFieldValidator validation control that is associated
with the text box
textFirstname . All validator controls have in common the properties ErrorMessage
and
ControlToValidate . If the input is not correct, then ErrorMessage defines the message that is
displayed. By default, the error message is displayed where the validator control is positioned. The
property
ControlToValidate defines the control where the input is checked.
< asp:TextBox ID=”textFirstname” runat=”server” > < /asp:TextBox >
< asp:RequiredFieldValidator ID=”RequiredFieldValidator1” runat=”server”
ErrorMessage=”Enter your first name” ControlToValidate=”textFirstName” >
< /asp:RequiredFieldValidator >
The following table lists and describes all the validation controls:
Control Description
RequiredFieldValidator Specifies that input is required with the control that is
validated. If the control to validate has an initial value set,
which the user has to change, you can set this initial value
with the
InitialValue property of the validator control.
RangeValidator Defines a minimum and maximum value that the user is
allowed to enter. The specific properties of the control are
MinimumValue and MaximumValue .
RegularExpressionValidator With the ValidationExpression property a regular
expression using Perl 5 syntax can be set to check the user
input.
c19.indd 642c19.indd 642 3/24/08 4:33:10 PM3/24/08 4:33:10 PM
Chapter 19: Basic Web Programming
643
Control Description
CompareValidator Compares multiple values (such as passwords). Not only
does this validator support comparing two values for
equality, additional options can be set with the
Operator
property. The
Operator property is of type
ValidationCompareOperator , which defines enumeration
values such as
Equal , NotEqual , GreaterThan , and
DataTypeCheck . Using DataTypeCheck , the input value
can be checked to determine whether it is of a specific data
type, e.g., correct date input.
CustomValidator If the other validator controls don ’ t fulfill the requirements
of the validation, the
CustomValidator can be used. With
the
CustomValidator , both a client - and server - side
validation function can be defined.
ValidationSummary Writes a summary for a page instead of writing error
messages directly to the input controls .
With the sample application that you ’ ve created until now, the user can input first name, last name, and
e - mail address. In the following Try It Out, you extend the application by using validation controls.
Try It Out Checking for Required Input and E-mail Address
1.
Open the previously created project EventRegistrationWeb using Visual Studio.
2. Open the file default.aspx .
3. Add a new column to the table by selecting the right column in the Design View of the editor
and choosing Table Insert Column to the Right.
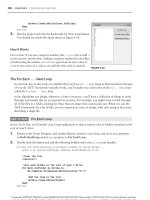
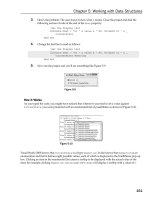
4. First name, last name, and e - mail address are required inputs. A check is done to determine
whether the e - mail address has the correct syntax. Add three
RequiredFieldValidator
controls and one
RegularExpressionValidator control, as shown in Figure 19 - 9 .
Figure 19-9
c19.indd 643c19.indd 643 3/24/08 4:33:10 PM3/24/08 4:33:10 PM
Part III: Web Programming
644
5. Configure the validation controls as defined in this table:
Validation Control Property Value
RequiredFieldValidator1
ErrorMessage First name is required.
ControlToValidate textFirstName
RequiredFieldValidator2
ErrorMessage Last name is required.
ControlToValidate textLastName
RequiredFieldValidator3
ErrorMessage Email is required.
ControlToValidate textEmail
Display Dynamic
RegularExpressionValidator1
ErrorMessage Enter a valid email.
ControlToValidate textEmail
ValidationExpression
\w+([ - +.’]\w+)*@\w+([ -
.]\w+)*\.\w+([ - .]\w+)*
Display Dynamic
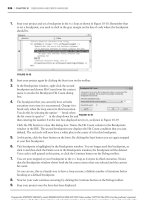
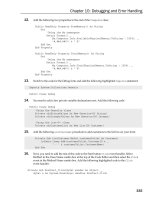
6. It is not necessary to enter the regular expression manually. Instead, you can click the ellipsis
button of the
ValidationEpression property in the Properties window to start the Regular
Expression Editor, shown in Figure 19 - 10 . This editor provides some predefined regular
expressions, including the regular expression to check for an Internet e - mail address.
Figure 19-10
c19.indd 644c19.indd 644 3/24/08 4:33:10 PM3/24/08 4:33:10 PM
Chapter 19: Basic Web Programming
645
7. If a postback is done to a page that is different from the page that includes the validator
controls (using the
PostBackUrl property that was set earlier), in the new page you must
verify that the result of the previous page was valid, using the
IsValid property. Add this
code to the
Page_Load() method of the _ResultsPage class:
protected void Page_Load(object sender, EventArgs e)
{
try
{
if (!PreviousPage.IsValid)
{
labelResult.Text = “Error in previous page”;
return;
}
//
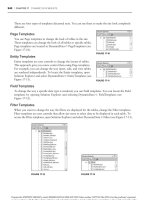
8. Now you can start the application. When data is not entered or not entered correctly, the
validator controls show error messages, as shown in Figure 19 - 11 .
Figure 19-11
How It Works
The validator controls create both client - side JavaScript code to verify input on the client, and
server - side code to validate input on the server. It is also possible to turn JavaScript off by setting
the validator property
EnableClientScript to false . Instead of changing the property with every
validator control, you can also turn off JavaScript by setting the property
ClientTarget of the
Page class.
Depending on the client type, the ASP.NET controls might return JavaScript to the client. This
behavior depends on the
ClientTarget property. By default, the ClientTarget is set to
“ automatic ” , where, depending on the Web browser ’ s functionality, scripting code is returned or
not. If the
ClientTarget is set to “ downlevel ” , then scripting code is not returned for any clients,
while setting the
ClientTarget property to “ uplevel ” always returns scripting code.
c19.indd 645c19.indd 645 3/24/08 4:33:11 PM3/24/08 4:33:11 PM
Part III: Web Programming
646
Setting the property ClientTarget can be done inside the Page_Load() method of the Page class:
protected void Page_Load(object sender, EventArgs e)
{
ClientTarget = “downlevel”;
}
State Management
The HTTP protocol is stateless. The connection that is initiated from the client to the server can be closed
after every request. However, normally it is necessary to remember some client information from one
page to the other. There are several ways to accomplish this.
The main difference among the various ways to keep state is whether the state is stored on the client or
on the server. The following table shows an overview of state management techniques and how long the
state can be valid:
State Type Client or Server Resource Time Valid
ViewState Client Within a single page only .
Cookie Client Temporary cookies are deleted when the browser
is closed; permanent cookies are stored on the disk
of the client system.
Session Server Session state is associated with a browser session.
The session is invalidated with a timeout (by
default, 20 minutes).
Application Server Application state is shared among all clients. This
state is valid until the server restarts.
Cache Server Similar to application state, cache is shared.
However, when the cache should be invalidated,
there ’ s much better control.
Now let ’ s take a more detailed look at these techniques.
Client - Side State Management
In this section, you are going to step into client - side state management by looking at two techniques:
ViewState and cookies.
c19.indd 646c19.indd 646 3/24/08 4:33:11 PM3/24/08 4:33:11 PM
Chapter 19: Basic Web Programming
647
ViewState
One technique to store state on the client was already discussed: ViewState. ViewState is used
automatically by the Web server controls to make events work. The ViewState contains the same state as
the control when sent to the client. When the browser sends the form back to the server, the ViewState
contains the original values, but the values of the controls that are sent contain the new values. If there ’ s
a difference, the corresponding event handlers are invoked.
The disadvantage to using ViewState is that data is always transferred from the server to the client, and
vice versa, which increases network traffic. To reduce network traffic, ViewState can be turned off. To do
so for all controls within the page, set the
EnableViewState property to false with the Page directive:
< %@ Page Language=”C#” AutoEventWireUp=”true” CodeFile=”Default.aspx.cs”
Inherits=”_Default” EnableViewState=”false” % >
The ViewState can also be configured on a control by setting the EnableViewState property of a
control. Regardless of what the page configuration says, when the
EnableViewState property is
defined for the control, the control value is used. The value of the page configuration is used only for
these controls when the ViewState is not configured.
It is also possible to store custom data inside the ViewState. This can be done by using an indexer with
the
ViewState property of the Page class. You can define a name that is used to access the ViewState
value with the
index argument:
ViewState[“mydata”] = “my data”;
You can read the previously stored ViewState as shown here:
string mydata = (string)ViewState[“mydata”];
In the HTML code that is sent to the client, you can see the ViewState of the complete page within a
hidden field:
< input type=”hidden” name=”__VIEWSTATE”
value=”/wEPDwUKLTU4NzY5NTcwNw8WAh4HbXlzdGF0ZQUFbXl2YWwWAgIDD2QWAg
IFDw8WAh4EVGV4dAUFbXl2YWxkZGTCdCywUOcAW97aKpcjt1tzJ7ByUA==” / >
Using hidden fields has the advantage that every browser can use this feature, and the user cannot
turn it off.
The ViewState is only remembered within a page. If the state should be valid across different pages, then
using cookies is an option for state on the client.
Cookies
A cookie is defined in the HTTP header. Use the HttpResponse class to send a cookie to the
client.
Response is a property of the Page class that returns an object of type HttpResponse . The
HttpResponse class defines the Cookies property that returns an HttpCookieCollection . Multiple
cookies can be returned to the client with the
HttpCookieCollection .
c19.indd 647c19.indd 647 3/24/08 4:33:12 PM3/24/08 4:33:12 PM
Part III: Web Programming
648
The following sample code shows how a cookie can be sent to the client. First, an HttpCookie object is
instantiated. In the constructor of this class, the name of the cookie is set — here it is
mycookie . The
HttpCookie class has a Values property to add multiple cookie values. If you just have one cookie
value to return, you can use the
Value property instead. However, if you plan to send multiple cookie
values, it is better to add the values to a single cookie instead of using multiple cookies.
string myval = “myval”;
HttpCookie cookie = new HttpCookie(“mycookie”);
cookie.Values.Add(“mystate”, myval);
Response.Cookies.Add(cookie);
Cookies can be temporary and valid within a browser session, or they can be stored on the client disk.
To make the cookie permanent, the
Expires property must be set with the HttpCookie object. With the
Expires property, a date defines when the cookie is not valid anymore; here, it is set to a date three
months from the current date.
Although a specific date can be set, there is no guarantee that the cookie is stored until the date is
reached. The user can delete the cookie, and the browser application also deletes the cookie if too many
cookies are stored locally. The browser has a limit of 20 cookies for a single server, and 300 cookies for all
servers. When the limit is reached, the cookies that haven ’ t been used for some time are deleted.
HttpCookie cookie = new HttpCookie(“mycookie”);
cookie.Values.Add(“mystate”, “myval”);
cookie.Expires = DateTime.Now.AddMonths(3);
Response.Cookies.Add(cookie);
When the client requests a page from the server, and a cookie for this server is available on the client, the
cookie is sent to the server as part of the HTTP request. Reading the cookie in the ASP.NET page can be
done by accessing the
cookies collection in the HttpRequest object.
Similarly to the HTTP response, the
Page class has a Request property that returns an object of type
HttpRequest . The property Cookies returns an HttpCookieCollection that can now be used to read
the cookies sent by the client. A cookie can be accessed by its name with the indexer, and then the
Values property of the HttpCookie is used to get the value from the cookie:
HttpCookie cookie = Request.Cookies[“mycookie”];
string myval = cookie.Values[“mystate”];
ASP.NET makes it easy to use cookies, but you must be aware of the cookie ’ s restrictions. Recall that
a browser accepts just 20 cookies from a single server and 300 cookies for all servers. There ’ s also a
restriction regarding the size of a cookie, which cannot store more than 4K of data. These restrictions
ensure that the client disk won ’ t be filled with cookies.
Server - Side State Management
Instead of remembering state with the client, it is also possible to remember state with the server. Using
client - side state has the disadvantage that the data sent across the network increases. Using server - side
state has the disadvantage that the server must allocate resources for its clients.
Let ’ s look into the server - side state management techniques.
c19.indd 648c19.indd 648 3/24/08 4:33:12 PM3/24/08 4:33:12 PM
Chapter 19: Basic Web Programming
649
Session
Session state is associated with a browser session. A session starts when the client first opens an
ASP.NET page on the server, and ends when the client doesn ’ t access the server for 20 minutes.
You can define your own code that should run when a session starts or ends within the Global Application
Class. To create a Global Application Class, select Website
Add New Item Global Application Class.
With this class, the file
global.asax is created. Inside this file some event handler routines are defined:
< %@ Application Language=”C#” % >
< script runat=”server” >
void Application_Start(Object sender, EventArgs e) {
// Code that runs on application startup
}
void Application_End(Object sender, EventArgs e) {
// Code that runs on application shutdown
}
void Application_Error(Object sender, EventArgs e) {
// Code that runs when an unhandled error occurs
}
void Session_Start(Object sender, EventArgs e) {
// Code that runs when a new session is started
}
void Session_End(Object sender, EventArgs e) {
// Code that runs when a session ends.
// Note: The Session_End event is raised only when the sessionstate mode
// is set to InProc in the Web.config file. If session mode is set to
// StateServer or SQLServer, the event is not raised.
}
< /script >
Session state can be stored within an HttpSessionState object. The session state object associated
with the current HTTP context can be accessed with the
Session property of the Page class. In the
Session_Start() event handler, session variables can be initialized; in the example, the session state
named
mydata is initialized to 0 :
void Session_Start(Object sender, EventArgs e) {
// Code that runs on application startup
Session[“mydata”] = 0;
}
c19.indd 649c19.indd 649 3/24/08 4:33:13 PM3/24/08 4:33:13 PM
Part III: Web Programming
650
Reading session state, again, can be done with the Session property using the session state name:
void Button1_Click(object sender, EventArgs e)
{
int val = (int)Session[“mydata”];
Label1.Text = val.ToString();
val += 4;
Session[“mydata”] = val;
}
To associate the client with its session variables, by default ASP.NET uses a temporary cookie with a
session identifier. ASP.NET also supports sessions without cookies, where URL identifiers are used to
map the HTTP requests to the same session.
Application
If data should be shared between different clients, then application state can be used. Application
state can be used in a manner that ’ s very similar to the way session state is used. With application state,
the class
HttpApplicationState is used, and it can be accessed with the Application property of the
Page class.
In the example, the application variable with the name
userCount is initialized when the Web
application is started.
Application_Start() is the event handler method in the file global.asax that
is invoked when the first ASP.NET page of the Web site is started. This variable is used to count every
user accessing the Web site:
void Application_Start(Object sender, EventArgs e) {
// Code that runs on application startup
Application[“userCount”] = 0;
}
In the Session_Start() event handler, the value of the application variable userCount is incremented.
Before changing an application variable, the application object must be locked with the
Lock() method;
otherwise, threading problems can occur because multiple clients can access an application variable
concurrently. After the value of the application variable is changed, the
Unlock() method must be called.
Be aware that the time between locking and unlocking is very short — you shouldn ’ t read files or data
from the database during that time. Otherwise, other clients must wait until the data access is completed.
void Session_Start(Object sender, EventArgs e) {
// Code that runs when a new session is started
Application.Lock();
Application[“userCount”] = (int)Application[“userCount”] + 1;
Application.UnLock();
}
Reading the data from the application state is as easy as it was with the session state:
Label1.Text = Application[“userCount”].ToString();
Don ’ t store too much data in the application state because the application state requires server resources
until the server is stopped or restarted.
c19.indd 650c19.indd 650 3/24/08 4:33:13 PM3/24/08 4:33:13 PM
Chapter 19: Basic Web Programming
651
Cache
Cache is server - side state that is similar to application state insofar as it is shared with all clients. Cache
is different from application state in that cache is much more flexible: There are many options to define
when the state should be invalidated. Instead of reading a file with every request, or reading the
database, the data can be stored inside the cache.
For the cache, the namespace
System.Web.Caching and the class Cache are needed. Adding an object
to the cache is shown in the following example:
Cache.Add(“mycache”, myobj, null, DateTime.MaxValue,
TimeSpan.FromMinutes(10), CacheItemPriority.Normal, null);
The Page class has a Cache property that returns a Cache object. Using the Add() method of the Cache
class, any object can be assigned to the cache. The first parameter of the
Add() method defines the name
of the cache item. The second parameter is the object that should be cached. With the third parameter,
dependencies can be defined, e.g., the cache item can be dependent on a file. When the file changes, the
cache object is invalidated. In the example there ’ s no dependency because
null is set with this
parameter.
With parameters four and five, a time can be set specifying how long the cache item is valid. Parameter
four defines an absolute time when the cache item should be invalidated, whereas parameter five
requires a sliding time that invalidates the cache item after it hasn ’ t been accessed for the time defined
with the sliding expiration. Here, a sliding time span is used, invalidating the cache after the cache item
hasn ’ t been used for 10 minutes.
Parameter six defines a cache priority.
CacheItemPriority is an enumeration for setting the cache
priority. If the ASP.NET worker process has high memory usage, the ASP.NET runtime removes cache
items according to their priority. Items with a lower priority are removed first. With the last parameter, it
is possible to define a method that should be invoked when the cache item is removed. An example of
where this can be used is when the cache is dependent on a file. When the file changes, the cache item is
removed and the event handler is invoked. With the event handler, the cache can be reloaded by reading
the file once more.
Cache items can be read by using the indexer, as you ’ ve already seen with the session and application
state. Before using the object returned from the
Cache property, always check whether the result is null ,
which happens when the cache is invalidated. When the returned value from the
Cache indexer is not
null , the returned object can be cast to the type that was used to store the cache item:
object o = Cache[“mycache”];
if (o == null)
{
// Reload the cache.
}
else
{
// Use the cache.
MyClass myObj = (MyClass)o;
//
}
c19.indd 651c19.indd 651 3/24/08 4:33:13 PM3/24/08 4:33:13 PM
Part III: Web Programming
652
Authentication and Authorization
To secure the Web site, authentication is used to verify that the user has a valid logon, while authorization
checks whether the user who was authenticated is allowed to use the resource.
ASP.NET offers Windows and Forms authentication. The most frequently used authentication technique
for Web applications is Forms authentication, which is covered here. ASP.NET also has some great new
features for Forms authentication. Windows authentication makes use of Windows accounts and IIS to
authenticate users.
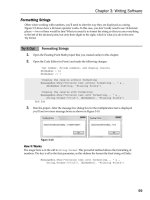
ASP.NET has many classes for user authentication. Figure 19 - 12 shows the structure of the new
architecture. With ASP.NET, many new security controls such as
Login or PasswordRecovery are
available. These controls make use of the Membership API. With the Membership API, it is possible to
create and delete users, validate logon information, or get information about currently logged - in users.
The Membership API itself makes use of a membership provider . With ASP.NET 2.0, different providers
exist to access users in an Access database, the SQL Server database, or the Active Directory. It is also
possible to create a custom provider that accesses an XML file or any custom store.
Membership Provider
Membership API
Security Controls
Figure 19-12
Authentication Configuration
This chapter demonstrates Forms authentication with a Membership provider. In the following Try It
Out, you configure security for the Web application and assign different access lists to different folders.
Try It Out Confi guring Security
1.
Open the previously created Web application EventRegistrationWeb using Visual Studio.
2. Create a new folder named Intro by selecting the Web directory in the Solution Explorer and
then selecting Website
Add Folder Regular Folder. This folder will be configured to be
accessed by all users, while the main folder will be accessible only by authenticated users.
3. Start the ASP.NET Web Application Administration by selecting Website ASP.NET
Configuration in Visual Studio 2008.
4. Select the Security tab, as shown in Figure 19 - 13 .
c19.indd 652c19.indd 652 3/24/08 4:33:14 PM3/24/08 4:33:14 PM
Chapter 19: Basic Web Programming
653
Figure 19-13
Figure 19-14
5. Click the link to the Security Setup Wizard. In the Welcome Screen, click the Next button. From
step 2 of the wizard, select the access method From the Internet, as shown in Figure 19 - 14 .
c19.indd 653c19.indd 653 3/24/08 4:33:14 PM3/24/08 4:33:14 PM
Part III: Web Programming
654
6. Click Next. Here, step 3, you can see the configured provider (see Figure 19 - 15 ). The default
provider is ASP.NET Access, meaning the user accounts are stored in an Access database. This
configuration cannot be changed in the Wizard mode, but you can change it afterward.
Figure 19-15
7. Click the Next button twice, which takes you to step 5, where you add new users. Create a
new account, as shown in Figure 19 - 16 .
8. After one user is successfully created, click the Next button for step 6 of the wizard (see Figure
19 - 17 ). Here, you can configure which users are allowed or denied access to the Web site or
specific directories. Add a rule to deny anonymous users. Next, select the Intro directory and
add a rule to allow anonymous users. Then click the Next button and finally the Finish
button.
c19.indd 654c19.indd 654 3/24/08 4:33:14 PM3/24/08 4:33:14 PM
Chapter 19: Basic Web Programming
655
Figure 19-17
Figure 19-16
c19.indd 655c19.indd 655 3/24/08 4:33:15 PM3/24/08 4:33:15 PM
Part III: Web Programming
656
Figure 19 - 18 shows the result of the Security tab after the Security Setup Wizard is finished.
Figure 19-18
How It Works
After you complete the security configuration, a new Access database is created. Having refreshed the
files in the Solution Explorer, you can see a new SQL Server Express database
ASPNETDB.mdf in the
directory
App_Data . This database contains tables that are used by the SQL Membership provider.
Now, along with the Web application, you will also see the configuration file
web.config . This file
contains the configuration for Forms authentication because authentication across the Internet was
selected, and the
< authorization > section denies access to anonymous users. If the Membership
provider were changed, the new provider would be listed in the configuration file. Because the
SQL provider is the default provider already defined with the machine configuration file, there is no
need for it to be listed here.
< ?xml version=”1.0” encoding=”utf-8”? >
< configuration >
< system.web >
< authorization >
< deny users=”?” / >
< /authorization >
< authentication mode=”Forms” / >
< /system.web >
< /configuration >
c19.indd 656c19.indd 656 3/24/08 4:33:16 PM3/24/08 4:33:16 PM
Chapter 19: Basic Web Programming
657
Within the Intro subfolder, you can see another configuration file, web.config . The authentication
section is missing from this configuration file because the authentication configuration is taken from
the parent directory. However, the authorization section is different. Here, anonymous users are
allowed with
< allow users= ” ? ” / > :
< ?xml version=”1.0” encoding=”utf-8”? >
< configuration >
< system.web >
< authorization >
< allow users=”?” / >
< /authorization >
< /system.web >
< /configuration >
Using Security Controls
ASP.NET includes many security controls. Instead of writing a custom form to ask the user for a
username and password, a ready - to - use
Login control is available. The security controls and their
functionality are described in the following table:
Security Control Description
Login A composite control that includes controls to ask for username and
password .
LoginStatus Includes hyperlinks to log in or log out, depending on whether the user is
logged in or not .
LoginName Displays the name of the user .
LoginView Different content can be displayed depending on whether the user is
logged in or not .
PasswordRecovery A composite control to reset forgotten passwords. Depending on the
security configurations, the user is asked for the answer to a previously
set secret question or the password is sent by e - mail.
ChangePassword A composite control that allows logged in users to change their password .
CreateUserWizard A wizard to create a new user and write the user information to the
Membership provider .
The following Try It Out adds a login page to the Web application.
c19.indd 657c19.indd 657 3/24/08 4:33:16 PM3/24/08 4:33:16 PM
Part III: Web Programming
658
Try It Out Creating a Login Page
If you tried to start the Web site after it was configured to deny anonymous users, you should have
received an error because a
login.aspx page is missing. If a specific login page is not configured with
Forms authentication,
login.aspx is used by default. You now create a login.aspx page:
1. Add a new Web Form and name it login.aspx .
2. Add the Login control to the form. In Design View, you see the control shown in Figure 19 - 19 .
Figure 19-19
Figure 19-20
3. That ’ s all that ’ s necessary to create a login page. Now when you start the site default.aspx ,
you are redirected to
login.aspx , where you can enter the user credentials for the user you
created earlier.
How It Works
After adding the Login control, you can see this code in the Source View:
< asp:Login ID=”Login1” runat=”server” >
< /asp:Login >
The properties for this control enable you to configure the text for the header, username, and
password labels, and for the login button, too. You can make the check box Remember Me Next Time
visible by setting the
DisplayRememberMe property.
If you want more control over the look and feel of the
Login control, you can convert the control to
a template. You can do this in the Design View by clicking the smart tag and selecting Convert to
Template. Next, when you click Edit Templates, you get a view like that shown in Figure 19 - 20 , where
you can add and modify any controls.
For verifying the user credentials, when the Login In button is clicked, the method
Membership
.ValidateUser()
is invoked by the control, and you don ’ t have to do this yourself.
c19.indd 658c19.indd 658 3/24/08 4:33:17 PM3/24/08 4:33:17 PM
Chapter 19: Basic Web Programming
659
When users don ’ t have an account to log in with the EventRegistration Website, they should create their
own login. This can be done easily with the
CreateUserWizard control, as shown in the next Try It Out.
Try It Out Using the CreateUser Wizard
1.
Add a new Web page named RegisterUser.aspx in the Intro folder previously created. This
folder is configured to be accessed from anonymous users.
2. Add a CreateUserWizard control to this Web page.
3. Set the property ContinueDestinationPageUrl to ~/Default.aspx .
4. Add a LinkButton control to the Login.aspx page. Set the content of this control to
Register User , and the PostBackUrl property of this control to the Web page
Intro/RegisterUser.aspx .
5. Now you can start the application. Clicking the link Register User on the Login.aspx page
redirects to the page
RegisterUser.aspx where a new account will be created with the
entered data.
How It Works
The CreateUserWizard control is a wizardlike control that consists of multiple wizard steps, which
are defined with the element
< WizardSteps > :
< asp:CreateUserWizard ID=”CreateUserWizard1” runat=”server”
ContinueDestinationPageUrl=”~/Default.aspx” >
< WizardSteps >
< asp:CreateUserWizardStep runat=”server” / >
< asp:CompleteWizardStep runat=”server” / >
< /WizardSteps >
< /asp:CreateUserWizard >
These wizard steps can be configured in the designer. The smart tag of the control enables you to configure
each of these steps separately. Figure 19 - 21 shows configuration of the step Sign Up for Your New
Account, and Figure 19 - 22 shows the step complete. You can also add custom steps with custom controls
to add special requirements, such as having users accept a contract before signing up for an account.
Figure 19-21
c19.indd 659c19.indd 659 3/24/08 4:33:17 PM3/24/08 4:33:17 PM
Part III: Web Programming
660
Reading and Writing to an SQL
Server Database
Most Web applications need access to a database to read data from it and write data to it. In this section,
you create a new database to store event information, and learn how to use this database from ASP.NET.
First you create a new SQL Server database in the next Try It Out. This can be done directly from within
Visual Studio 2008.
Try It Out Creating a New Database
1.
Open the previously created Web application EventRegistrationWeb.
2. Open the Server Explorer. If you cannot already see it in Visual Studio, you can open the
window by selecting View
Other Windows Server Explorer.
3. In the Server Explorer, select Data Connections, right - click to open the context menu, and
select Create New SQL Server Database. The dialog shown in Figure 19 - 23 opens.
4. Enter (local) for the server name, and BegVCSharpEvents for the database name.
Figure 19-22
Figure 19-23
c19.indd 660c19.indd 660 3/24/08 4:33:18 PM3/24/08 4:33:18 PM
Chapter 19: Basic Web Programming
661
5. After the database is created, select the new database in Server Explorer.
6. Select the entry Tables below the database, and from Visual Studio select Data Add
New Table.
7. Enter the following column names and data types (see Figure 19 - 24 ).
Column Name Data Type
I d
int
Title
nvarchar(50)
Date
datetime
Location
nvarchar(50)
Figure 19-24
8. Configure the ID column as a primary key column with an identity increment of 1 and an
identity seed of 1. Configure all columns to not allow
null s.
9. Save the table with the name Events .
10. Add a few events to the table with some sample titles, dates, and locations.
To display and edit data, there ’ s a separate Data section in the Toolbox, representing data controls. The
data controls can be categorized into two groups: data view and data source. A data source control is
associated with a data source such as an XML file, a SQL database, or a .NET class; data views are
connected with a data source to represent data.
c19.indd 661c19.indd 661 3/24/08 4:33:18 PM3/24/08 4:33:18 PM
Part III: Web Programming
662
The following table describes all the data controls:
Data Control Description
GridView Displays data with rows and columns .
DataList Displays a single column to display all items .
DetailsView Can be used together with a GridView if you have a master/detail relationship
with your data .
FormView Displays a single row of the data source .
Repeater Template - based. You can define what HTML elements should be generated
around the data from the data source.
ListView New in .NET 3.5. This is template - based, similar to the Repeater control.
The data source controls and their functionality are listed in the following table:
Data Source Control Description
SqlDataSource Accesses the SQL Server or any other ADO.NET provider (e.g., Oracle,
ODBC, and OLEDB). Internally, it uses a
DataSet or a DataReader
class.
AccessDataSource Enables you to use an Access database .
LinqDataSource New in .NET 3.5. Enables using LINQ providers as a data source.
ObjectDataSource Enables you to use .NET classes as the data source .
XmlDataSource Enables you to access XML files. Using this data source, hierarchical
structures can be displayed.
SiteMapDataSource Uses XML files to define a site structure for creating links and references
with a Web site. This feature is discussed in Chapter 20 .
In the next Try It Out, you use a GridView control to display and edit data from the previously
created database.
c19.indd 662c19.indd 662 3/24/08 4:33:18 PM3/24/08 4:33:18 PM
Chapter 19: Basic Web Programming
663
Try It Out Using a GridView Control to Display Data
1.
In the Solution Explorer, create a new regular folder Admin.
2. Create a new Web page EventsManagement.aspx in the Admin folder.
3. Add a GridView control to the Web page.
4. In the Choose Data Source combo box of the control ’ s smart tag, select < New data source > .
The dialog shown in Figure 19 - 25 opens.
5. Select Database and enter the name EventsDataSource for this new data source.
Figure 19-25
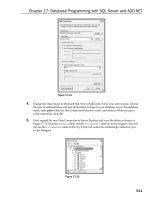
6. Click OK to configure the data source. The Configure Data Source dialog opens. Click the
New Connection button to create a new connection.
7. In the Add Connection dialog shown in Figure 19 - 26 , enter (local) as the server name, and
select the previously created database BegVCSharpEvents. Click the Test Connection button to
verify that the connection is correctly configured. When you ’ re satisfied that it is, click OK.
The next dialog (shown in Figure 19 - 27 ) opens, for storing the connection string.
c19.indd 663c19.indd 663 3/24/08 4:33:19 PM3/24/08 4:33:19 PM