McGraw-Hill- PDA Robotics - Using Your PDA to Control Your Robot 1 Part 10 docx
Bạn đang xem bản rút gọn của tài liệu. Xem và tải ngay bản đầy đủ của tài liệu tại đây (442.97 KB, 20 trang )
Click OK after entering the information and the dialog shown in
Figure 8.4 is displayed, showing the application information.
The additional SDKs to add are grayed out because this is the evalua-
tion version. No additional SDKs are needed for this project anyway.
The Creator Code and Minimum OS Version is grayed out as well, but
this will be changed in the code later.
Click Finish to create the project files and open the project window
(see Figure 8.5).
Click on the source folder and then double click on pdarobotMain.c to
open this file for editing. First, open the Constructor for the Palm OS
1.6 by clicking on the Resources folder and double-click the file pdaro-
bot.rsrc. The constructor window will appear with the project
PDA Robotics
158
Figure 8.4
Application
information.
Figure 8.5
The PDA Robot
project window.
PDA 08 5/27/03 8:47 AM Page 158
resources viewable in a dialog. From here, we will create the buttons
and labels that will make the graphical user interface (GUI) for
PDARobot.prc.
Double click Main under Forms to bring up the main dialog, allowing
us to place the buttons and labels, after which we can assign the IDs
needed for tracking in the event loop of main.c (see Figures 8.6 and
8.7).
Clicking Window/Catalog will bring up the catalog window that con-
tains the controls to be placed on the form (see Figure 8.8).
Figure 8.9 shows the form with the buttons and labels in place. The
IDs and captions have been assigned to each. I made the Object
Chapter 8 / PDA Robot Palm OS Software Using Code Warrior 8.0
159
Figure 8.6
Portion of the
constructor menu.
Figure 8.7
Clean palette where
the controls will be
placed.
PDA 08 5/27/03 8:47 AM Page 159
Identifier the same as the Label displayed on each Object. To generate
the header file used when we compile and link the program, click
File/Generate Header File or simply click File/Save.
PDA Robotics
160
Figure 8.8
UI Objects.
Figure 8.9
Form with the
controls placed.
PDA 08 5/27/03 8:47 AM Page 160
If we switch back to the Metrowerks CodeWarrior IDE and click
Project/Make or hit F7, the application will build and generate
PDARobot.prc that can be loaded on the PDA and run (though nothing
will happen when you press the buttons).
It can be run on the Windows desktop by starting the emulator pro-
vided by Palm OS (that was installed with the evaluation version of
CodeWarrior). To do this, start the emulator (after downloading or
acquiring a ROM of the device) and in the IDE, click Project/Run or hit
Ctrl+F5. Figure 8.11 shows the program so far, running in the Palm OS
Emulator. It looks exactly the same running on the device.
Chapter 8 / PDA Robot Palm OS Software Using Code Warrior 8.0
161
Figure 8.10
The Release and
Debug executables
in the OBJ directory.
Figure 8.11
PDA Robot running
on the Palm OS
Emulator.
PDA 08 5/27/03 8:47 AM Page 161
The AppStart() function reads in any saved information and initializes
the infrared libray by calling the function StartApplication, which I
should have called InitializeInfrared().
// FUNCTION: AppStar t
//
// DESCRIPTION: Get the current application's preferences.
//
// RETURNED:
// errNone - if nothing went wrong
static Err AppStar t(void)
{
UInt16 prefsSize;
// Read the saved preferences / saved-state information.
prefsSize = sizeof(pdarobotPreferenceType);
if (PrefGetAppPreferences(
appFileCreator, appPrefID, &g_prefs, &prefsSize, true) !=
noPreferenceFound)
{
// FIXME: setup g_prefs with default values
}
if (!Star tApplication())
return 0;
return errNone;
}
The AppStop() function saves any preferences and calls
StopApplication() which shuts down the infrared communication.
// FUNCTION: AppStop
//
// DESCRIPTION: Save the current state of the application.
static void AppStop(void)
{
// Write the saved preferences / saved-state information. This
// data will be saved during a HotSync backup.
PrefSetAppPreferences(
appFileCreator, appPrefID, appPrefVersionNum,
&g_prefs, sizeof(pdarobotPreferenceType), true);
StopApplication();
// Close all the open forms.
FrmCloseAllForms();
}
PDA Robotics
162
PDA 08 5/27/03 8:47 AM Page 162
StartApplication loads the IR library, opens and binds a port, saving
the information in the variable irref so it can be used elsewhere. This
is the first step in creating the IrDA link.
//
// Loads the Infrared Librar y and opens and binds the por t.
//
static Boolean Star tApplication(void )
{
if (SysLibFind(irLibName,&irref) != 0)
{
FrmAlert(IrLibProblemAler t);
return false;
}
else
{
if (IrOpen(irref,irOpenOptSpeed115200) != 0)
{
FrmAlert(IrLibProblemAler t);
return false;
}
}
IrSetConTypeLMP(&connect);
packet.buff = (unsigned char *)"Data";
packet.len = 4;
IrBind(irref,&connect,callback);
return true;
}
StopApplication unbinds the port, disconnects, and closes the IR con-
nection.
//
// Shut down connections, close the library
//
static void StopApplication(void)
{
IrUnbind(irref,&connect);
if (IrIsIrLapConnected(irref))
IrDisconnectIrLap(irref);
IrClose(irref);
}
Chapter 8 / PDA Robot Palm OS Software Using Code Warrior 8.0
163
PDA 08 5/27/03 8:47 AM Page 163
The callback(IrConnect *con, IrCallBackParms *parms) function is
called whenever an infrared event happens, for example, when PDA
Robot sends us some data, this function is automatically called with
the event and data embedded in the parms parameter.
static void callback(IrConnect *con, IrCallBackParms *parms)
{
char* event;
char out= 0;
FormType *frm; // = FrmGetActiveForm();
switch (parms->event)
{
case LEVENT_DISCOVERY_CNF:
//
// This event was triggered by PDA Robot when
// we broadcast a discover y to ALL IrDA compliant
// devices. StoreDiscovery throws away all devices
// except PDA Robot. My HP printer always responds to
// the discover y request.
//
event = "DISCOVERY_CNF";
StoreDiscovery(parms->deviceList); break;
case LEVENT_PACKET_HANDLED:
packet_in_use = false;
event = "PACKET_HANDLED"; break;
case LEVENT_DATA_IND:
//
// PDA Robot has sent some data because we requested it.
// Let's copy the data to a global variable so it can be used
// elsewhere.
//
event = "DATA_IND";
MemMove(&received_data, parms->rxBuff, parms->rxLen);
MemMove(&out, &received_data[1], 1);
frm = FrmGetActiveForm ();
FrmDrawForm(frm);
StrPrintF((char *) range_data, "%u", out);//value);
current_range = out;
//
PDA Robotics
164
PDA 08 5/27/03 8:47 AM Page 164
// Display the range in the Range Label if we are in autonomous mode
//
if( autonomous == true )
{
FrmCopyLabel (frm, MainRangeLabel, (char*)&range_data);
}
range_aquired = true;
FrmDrawForm(FrmGetActiveForm());
break;
case LEVENT_STATUS_IND:
switch (parms->status)
{
case IR_STATUS_NO_PROGRESS:
event = "S_NO_PROGRESS"; break;
case IR_STATUS_LINK_OK:
event = "S_LINK_OK"; break;
case IR_STATUS_MEDIA_NOT_BUSY:
event = "S_MEDIA_NOT_BUSY"; break;
default:
event = "S_UNKNOWN";
}
break;
case LEVENT_TEST_CNF:
switch (parms->status)
{
case IR_STATUS_SUCCESS:
event = "TEST_SUCCESS"; break;
case IR_STATUS_FAILED:
event = "TEST_FAILED"; break;
}
break;
case LEVENT_TEST_IND:
event = "TEST_IND"; break;
default: event = "UNKNOWN";
}
}
//
// StoreDiscovery goes through the devices list returned when we
// sent out a Discovery request to all IrDA devices in the vicinity.
// It throws away all devices except PDA Robot and set the connection
// information returned to us by it.
//
void StoreDiscovery(IrDeviceList* deviceList)
{
UInt8 i;
Chapter 8 / PDA Robot Palm OS Software Using Code Warrior 8.0
165
PDA 08 5/27/03 8:47 AM Page 165
char info[36];
// clear the label
StrCopy((char *)&info, (char *)"______________________________");
FrmCopyLabel (FrmGetActiveForm(), MainStatusLabel, (char*)&info);
if( deviceList->nItems == 0 )
{
StrCopy((char *)&info, (char *)"NO Devices Discovered ");
FrmCopyLabel (FrmGetActiveForm(), MainStatusLabel, (char*)&info);
return;
}
for (i = 0; i < deviceList->nItems; i++)
{
//
// We don't want to recognize any device but PDA Robot
// so ensure that the device name is 'Generic IrDA'. This
// is the default name used by the MCP2150 chip. We will
// connect with the first found
//
if( (StrCompare((char *)"Generic IrDA", (char *) &deviceList->dev[i].xid[3])) == 0)
{
dev = deviceList->dev[i].hDevice;
connect.rLsap = deviceList->dev[i].xid[0];
StrCopy((char *)&info, (char *)"Discovered PDA Robot ");
FrmCopyLabel (FrmGetActiveForm(), MainStatusLabel, (char*)&info);
}
}
}
//
// Information Access Service Callback. This function
// is called when we query PDA Robot for information.
// If we received the LSAP information then we connect
// to to PDA Robot.
//
static void IrIasCallback(IrStatus status) {
UInt8 b;
UInt8 i;
if((query.retCode)!=IAS_RET_SUCCESS)
{
return;
}
i=IrIAS_GetType(&query);
PDA Robotics
166
PDA 08 5/27/03 8:47 AM Page 166
switch(i)
{
case IAS_ATTRIB_MISSING:
break;
case IAS_ATTRIB_INTEGER:
if(rtype!=0)
{
rlsap = connect.rLsap = IrIAS_GetIntLsap(&query);
}
connect.rLsap = rlsap;
packet.buff = (unsigned char *)&controlPacket;
packet.len = sizeof(controlPacket);
//
// Open a connection with PDA Robot
//
IrConnectReq(irref, &connect, &packet, DEFAULT_TTP_CREDIT);
rtype=0;
break;
case IAS_ATTRIB_USER_STRING:
b=IrIAS_GetUserStringCharSet(&query);
FrmCopyLabel (FrmGetActiveForm (), MainRangeLabel,
(char*)IrIAS_GetUserString(&query));
break;
default:
//
// Unknown IAS Reply
//
break;
}
}
Please go to www.pda-robotics.com to download the entire source
code and executable for this program.
Chapter 8 / PDA Robot Palm OS Software Using Code Warrior 8.0
167
PDA 08 5/27/03 8:47 AM Page 167
This page intentionally left blank.
169
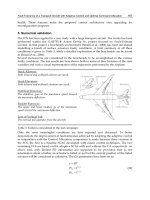
The software for the Pocket PC was designed and written using the
eMbedded Visual Tools 3.0 IDE and compiler, in conjunction with the
Pocket PC 2002 Software Development Kit (SDK). Both are provided
free from Microsoft.
The Microsoft eMbedded Visual Tools 3.0 deliver a complete desktop
development environment for creating applications and system com-
ponents for Windows-powered devices, including the Pocket PC and
Handheld PC.
The eMbedded Visual Tools include eMbedded Visual Basic and
eMbedded Visual C++, including SDKs for the Pocket PC 2000, Palm-
size PC, and Handheld PC. The eMbedded Visual Tools are the suc-
cessor to the separate Windows CE Toolkits for VC++ and VB. This
version is stand-alone and does not require Visual Studio. Read the
specifications on the data sheet.
The Pocket PC 2002 SDK allows you to write enterprise and consumer
applications for this innovative platform. The Pocket PC 2002 SDK
provides a brand new Pocket PC 2002 device emulator, more docu-
mentation, and more samples. In addition, this SDK includes all the
necessary application programming interfaces (APIs) and documenta-
tion for both Pocket PC 2002 and Pocket PC 2002 Phone Edition
devices.
PDA Robot
Software for
Pocket PC 2002
(Windows CE)
9
PDA 09 5/27/03 8:50 AM Page 169
Copyright 2003 by The McGraw-Hill Companies, Inc. Click Here for Terms of Use.
Install eMbedded Visual Tools 3.0 (eVC 3.0) first, followed by Pocket
PC 2002. The Pocket PC 2002 installation will point the eVC 3.0 to the
correct header and library files, install the emulator, and set up the
compilation targets.
Figure 9.1 shows the main window of eMbedded Visual Tools 3.0.
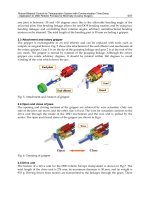
When the code is complied and run with the Pocket PC 2002 emula-
tion option, the emulator is invoked and the program can be run on
your desktop. Figures 9.2 and 9.3 show the default emulator that ships
with Pocket PC 2002 and PDABot.exe running on the emulator.
Microsoft eMbedded Visual C++ 3.0 Overview
Microsoft eMbedded Visual C++ 3.0 is the most powerful way for
developers to build applications for the next generation of Windows
CE-based communication, entertainment, and information-access
devices. This stand-alone IDE brings a new level of productivity to
Windows CE development without compromising flexibility, perform-
ance, or control.
With eMbedded Visual C++, developers can accomplish the
following:
PDA Robotics
170
Figure 9.1
Embedded Visual
C++ IDE.
PDA 09 5/27/03 8:50 AM Page 170
Chapter 9 / PDA Robot Software for Pocket PC 2002
171
Figure 9.2
Standard Pocket PC
emulator.
Figure 9.3
PDA Robot running
on the Pocket PC
emulator.
PDA 09 5/27/03 8:50 AM Page 171
• Take advantage of a familiar development environment by build-
ing Windows CE applications using a stand-alone IDE designed
to target Windows CE development;
• Access Windows CE-specific documentation targeted for the
platform SDKs users have installed on their workstation;
• Save time and money by using the Windows CE version of the
Microsoft Foundation Classes (MFC) and the Active Template
Library; and
• Build enterprise solutions with data-access capabilities through
ActiveX Data Objects (ADO) for Windows CE, transactional pro-
cessing via Microsoft Transaction Server, and more through close
integration with Windows CE operating system services.
Benefits of using the eMbedded Visual C++ include the following:
• Gain direct access to the features of the underlying operating sys-
tem without the need for additional code, providing full control
over device hardware and operating system services.
• Access all the features of every permutation of the Windows CE
operating system to construct the fastest, most functional
Windows CE applications.
• Be the first to program the newest and most exciting Windows CE
devices, using Windows CE platform SDKs for eMbedded Visual
C++ as they become available.
• Get in on the ground floor and perhaps build the “killer applica-
tion” for a next-generation operating system.
• Expand development options to include a whole new group of
computer users and equip those normally resistant to computers
with the simplicity of Windows CE running focused applica-
tions, such as Internet browsing, task-specific business process-
es, or entertainment programs.
• Build highly mobile applications that can access remote data
stores and communicate with networked servers.
PDA Robotics
172
PDA 09 5/27/03 8:50 AM Page 172
Increased Developer Productivity
• Leverage existing knowledge and training by building Windows
CE solutions from within the same development environment as
that used for traditional Windows development.
• Gain increased programmer productivity with IntelliSense tech-
nology, providing on-the-fly programming assistance including
statement completion, parameter information, and syntax error
checking. Minimize software development effort by building
reusable ActiveX components—usable from both eMbedded
Visual C++ and eMbedded Visual Basic Windows CE applications.
• Quickly select and configure project deployment information
within the environment to target the widest variety of Windows
CE devices and processors.
Simplified Debugging and Deployment
• Quickly test and execute applications by allowing the eMbedded
Visual Tools to automatically copy and launch applications on a
mobile device or emulator after compilation.
• Fix bugs fast with an integrated debugger that helps eliminate
errors in applications as they are running on Windows CE
devices or within an emulator.
• Gain maximum control over Windows CE development through
a variety of additional tools designed to provide details on appli-
cation execution.
• Avoid the need for costly hardware investments by first testing
applications on a Windows CE device emulator, providing the
look and feel of a physical device from within a PC environment.
And, with the Pluggable SDK model, new emulators can be easi-
ly added to the Toolkit as they become available.
Comprehensive Access to the Windows CE Platform
• Gain control over communication mechanisms, such as TCP/IP,
running via an infrared port or serial port to build compelling
mobile applications.
Chapter 9 / PDA Robot Software for Pocket PC 2002
173
PDA 09 5/27/03 8:50 AM Page 173
• Take advantage of COM, the world’s most successful and power-
ful component model, to build reusable solutions for Windows
CE-based devices.
• Maximize development effort by reusing existing ActiveX con-
trols created for the Windows CE platform. Harness the full
power of Windows CE by using eMbedded Visual C++ to access
every API on all Windows CE devices.
• Graphically build applications using the CommandBar and
MenuBar controls, unique Windows CE graphical elements that
combine toolbars and menus onto a single control for Windows
CE platforms. Allow the Platform Manager to automatically con-
figure a connected Windows CE device for application testing
and execution.
• Build compact and efficient COM servers using the Windows CE
version of the Active Template Library.
• Use MFC for Windows CE, a proven application framework to
build solutions for Windows CE devices, including applications
using the DOC/View architecture.
Build for the Latest Windows CE Devices
• Build solutions for the Handheld PC Pro, Palm-size PC, and
Pocket PC Windows CE devices with maximum mobility and
minimum maintenance and administration.
• Build powerful data-retrieval and analysis applications for the
Pocket PC.
• Gain maximum flexibility and quickly add to the capabilities of
the Windows CE Toolkits by being able to plug in the develop-
ment kits for the latest Windows CE platforms.
Fast, Flexible Data Access
• Use a subset of the powerful ADO data access mechanism found
on desktop and workstation computers to build high-perform-
ance data-aware solutions.
• With Windows CE Services, maintain local copies of database
tables from any data store, including Microsoft Access and SQL
PDA Robotics
174
PDA 09 5/27/03 8:50 AM Page 174
Server, that are automatically synchronized upon connection to
the remote data source.
Building the PDA Robot Pocket PC Application
To build the application, first, download and install the free eVC 3.0
IDE and Pocket PC 2002 SDK installations from the Microsoft site.
Start the eVC IDE and click File/New. Select WCE Pocket PC 2002
MCF App Wizard and name the project. Check the central processing
units (CPUs) you would like to include as targets. To use the emulator,
you must check the WCE x86. Check the other CPUs such as WCE
ARM.PDABot. Click OK and select Dialog Based and the language you
want. Click Next and be sure to check the Windows Sockets option.
Enter the title you want in the case “PDA Robotics.” Click Next, Next,
Finish. The project has now been created and we can begin placing the
buttons and edit boxes on the screen.
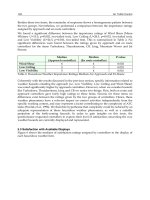
Switch to the Resources tab, Under PDABot resources/Dialog, double-
click on IDD_PDABOT_DIALOG. The blank form will appear, on
which we will add the buttons and two edit boxes. Place the controls
as shown in Figure 9.4.
Chapter 9 / PDA Robot Software for Pocket PC 2002
175
Figure 9.4
Editing the
resources.
PDA 09 5/27/03 8:50 AM Page 175
To assign an ID to a control, highlight it and hit enter. Below is the
message map showing the IDs and their associated functions. When a
user clicks on a button, the associated function is called. This is all
handled by the Windows subsystem.
BEGIN_MESSAGE_MAP(CPDABotDlg, CDialog)
//{{AFX_MSG_MAP(CPDABotDlg)
ON_BN_CLICKED(IDC_CONNECT_IRDA, OnConnectIrda)
ON_BN_CLICKED(IDC_CLOSE_IRDA, OnCloseIrda)
ON_BN_CLICKED(IDC_ROBOT_FWD, OnRobotFwd)
ON_BN_CLICKED(IDC_ROBOT_LEFT, OnRobotLeft)
ON_BN_CLICKED(IDC_ROBOT_STOP, OnRobotStop)
ON_BN_CLICKED(IDC_ROBOT_RIGHT, OnRobotRight)
ON_BN_CLICKED(IDC_ROBOT_REV, OnRobotRev)
ON_BN_CLICKED(IDC_RANGE, OnRange)
ON_BN_CLICKED(IDC_AUTO, OnAuto)
ON_BN_CLICKED(IDC_MANUAL, OnManual)
ON_BN_CLICKED(IDC_WIRELESS, OnWireless)
ON_WM_TIMER()
//}}AFX_MSG_MAP
END_MESSAGE_MAP()
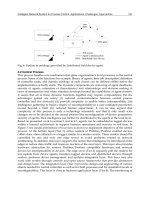
In order to have access to some of the objects like the edit boxes, we
need to assign member variables to them. Do this by clicking
View/ClassWizard and switching to the Member Variables tab. Figure
9.5 shows the ClassWizard with the Member Variables assigned to the
edit boxes. We can now get and set the information of these edit boxes
because the Member Variable in the dialog gives users access to the
CEdit class.
PDA Robotics
176
Figure 9.5
ClassWizard.
PDA 09 5/27/03 8:50 AM Page 176
Double-clicking on a button will create a function that is called when
it is clicked. Users will be directed into the function where they can
add the code. The name of the function is generated by the IDE. For
example, the function generated for the Wireless button is named
OnWireless.
void CPDABotDlg::OnWireless()
{
// Add Code here
}
Creating the IrDA Link
The following code is used to establish the Infrared Data Association
(IrDA) data link with PDABot’s body. This socket could be equivalent
to the information that flows up and down the spinal column, trans-
ferring information to the brain (PDA), where it makes a decision and
sends a return control command. The PDA initiates a conversion with
the body and asks, “Who are you?” The MCP2150 will identify itself
as “Generic IrDA” until its identifier is reprogrammed to that which
the designer chooses. How to do this is discussed in detail in the chap-
ter about the MCP2150. For the explanation of this code, I will use the
default MCP2150 identifier (“Generic IrDA”). The fact that a device
must identify itself by the IrDA standard allows users to use this secu-
rity feature by means of a keyed handshake or simply by agreeing to
only accept the socket agreed upon association name.
When users click on the Connect button program control, they are
directed to the function OnConnectIrda() shown in the following code.
It checks to see if a link is already established by referencing the mem-
ber variable m_bIrDAConnected, which is set by the return value of
InitiateIrDAConnection(). I wrote the function InitiateIrDAConnection()
to do the work of creating the socket and establishing the link with PDA
Robot.
void CPDABotDlg::OnConnectIrda()
{
//
// Create the IrDA association with PDA Robot
//
if( !m_bIrDAConnected)
{
m_bIrDAConnected = InitiateIrDAConnection();
Chapter 9 / PDA Robot Software for Pocket PC 2002
177
PDA 09 5/27/03 8:50 AM Page 177