Positioning Techniques in Surgical Applications - part 7 pot
Bạn đang xem bản rút gọn của tài liệu. Xem và tải ngay bản đầy đủ của tài liệu tại đây (1.42 MB, 33 trang )
15
15 Spine surgery
15.1 Cervical spine – 186
15.1.1 Supine position/CRP horseshoe-shaped headrest – 186
15.1.2 Supine position/skull clamp – 188
15.1.3 Supine position/spine holding unit MAQUET T554.0000 – 190
15.1.4 Prone position/CRP horseshoe-shaped headrest – 192
15.1.5 Prone position/spine holding unit / skull clamp – 194
15.2 Thoracic spine, lumbar spine – 196
15.2.1 Prone position – 196
15.2.2 Lateral position – 198
15.2.3 Supine position – 200
Chapter 15 · Spine surgery186
15
15.1 Cervical spine
15.1.1 Supine position/ CRP horseshoe-shaped headrest
. Figs. 15.1, 15.2.
Indications
Ventral access to the upper and lower cervical vertebrae without the possibili-
ty of intraoperative, external reposition measures for:
4 dens fractures, dens pseudarthrosis
4 posttraumatic lesions, misalignment and fractures in the upper and lower
cervical vertebrae
4 tumours, spondylitis, spondylodiscitis
4 degenerative changes of the lower cervical vertebrae
Preparations
4 Arm positioning devices
4 CRP horseshoe-shaped headrest
4 Shaving in the area of the incision and preoperative skin cleansing
Positioning
4 Standard operating table position 1, position 2 or universal operating
table
4 Anaesthetic preparation and induction in supine position with 2 adapted
arm positioning devices
4 When positioning the patient, take appropriate measures to prevent
decubitus at areas which are subjected to pressure
4 Fix and pre-position the CRP horseshoe-shaped headrest to the head part
of the operating table
edge of the operating table, scapula still on the table
4 Position and fix the head on the CRP horseshoe-shaped headrest
4 Position both arms at the body with arm protection or secure the arms,
possibly fixing with plasters
4 Apply the neutral electrode and connect to the HF surgery device
4 Arrange absorbent drapes or self-adhesive covers for preoperative skin
disinfection
4 Position the operating lights
4 Patient warming system
Risks
4 Dislocation, reposition loss
4 Normal positioning of the operating table in the theatre
4 M ove the patient towards the head end until the shoulders are at the upper
4 Iatrogenic injuries to the eyes and soft tissues (head fixing! )
15
187
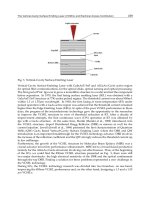
. Fig. 15.1. Supine position on universal
operating table with CRP back plate 1150.45
and CRP horseshoe-shaped headrest
. Fig. 15.2. Supine position on CRP
operating table 1150.16 with CRP
horseshoe-shaped headrest
15.1 · Cervical spine
Chapter 15 · Spine surgery188
15
15.1.2 Supine position/skull clamp
. Figs. 15.3, 15.4.
Indications
Ventral access to the upper and lower cervical vertebrae with the possibility of
intraoperative, external reposition measures for:
4 dens fractures, dens pseudarthrosis
4 posttraumatic lesions, misalignment and fractures in the upper and lower
cervical vertebrae
4 tumours, spondylitis, spondylodiscitis
Preparations
4 Arm positioning devices
4 Padded arm protection
4 Skull clamp
4 Shaving in the area of the incision and preoperative skin cleansing
Positioning
4 Standard operating table position 1, position 2 or universal operating
table
4 Anaesthetic preparation and induction in supine position with 2 adapted
arm positioning devices
4 When positioning the patient, take appropriate measures to prevent
decubitus at areas which are subjected to pressure
4 Fix and pre-position the skull clamp to the head part of the operating
table
edge of the operating table, scapula still on the table
4 Position and fix the head in the skull clamp
4 Position both arms at the body with arm protection or secure the arms,
possibly fixing with plasters
4 Apply the neutral electrode and connect to the HF surgery device
4 Arrange absorbent drapes or self-adhesive covers for preoperative skin
disinfection
4 Position the operating lights
4 Patient warming system
Risks
4 Iatrogenic injuries at the skull clamp
4 Dislocation, reposition loss
4 Normal positioning of the operating table in the theatre
4 M ove the patient towards the head end until the shoulders are at the upper
15
189
. Fig. 15.3. Supine position on universal
operating table with CRP back plate 1150.45
and CRP skull clamp
. Fig. 15.4. Supine position on CRP operating
table 1150.16 with CRP skull clamp
15.1 · Cervical spine
Chapter 15 · Spine surgery190
15
15.1.3 Supine position/spine holding unit
MAQUET T554.0000
. Figs. 15.5, 15.6.
Indications
Ventral access to the upper and lower cervical vertebrae with the possibility of
intraoperative, external reposition measures for:
4 dens fractures, dens pseudarthrosis
4 posttraumatic lesions, misalignment and fractures in the upper and lower
cervical vertebrae
4 tumours, spondylitis, spondylodiscitis
Preparations
4 Arm positioning devices
4 Padded arm protection
4
4 Gel cushion
4 Shaving in the area of the incision and preoperative skin cleansing
Positioning
4 Standard operating table position 1, position 2 or universal operating
table
4 Anaesthetic preparation and induction in supine position with 2 adapted
arm positioning devices
4
4
4 When positioning the patient, take appropriate measures to prevent
decubitus at areas which are subjected to pressure
4 Fit part 1 (adapter) to the side rails of the head plate
4 Connect part 2 (telescopic bar) and part 3 (moving foot section) and fasten
to part 1 (adapter)
4
4
edge of the operating table, scapula still on the table
4
4 Position both arms at the body with arm protection or secure the arms,
possibly fixing with plasters
4
to part 2 (telescopic bar) for intraoperative reposition and positioning
4 Position the image converter
4 Apply the neutral electrode and connect to the HF surgery device
4 Arrange absorbent drapes or self-adhesive covers for preoperative skin
disinfection
4 Position the operating lights
4 Patient warming system
Risks
4 Injuries at the head and skull clamp from the halo ring
4 Dislocation, reposition loss
Spine holding unit T544.0000
Fit part 5 (special adapter with 4 short bars in ball bearings) to the ready
positioned halo ring
Normal positioning of the operating table in the theatre
Fasten part 4 (screw tension device) to part 2 (telescopic bar)
Move the patient towards the head end until the shoulders are at the upper
Fasten part 5 (special adapter) to part 4 (screw tension device)
Possibly fit a radiolucent neck rest adjustable in height (hypomochlion, 6)
15
191
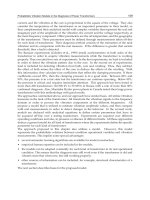
. Fig. 15.5. The head is fixed firmly in the
»Wilde« halo ring and fastened with an adap-
ter to the spindle
. Fig. 15.6. The hypomochlion is positioned
under the vertebra being operated to sup-
port the cervical spine
15.1 · Cervical spine
5
4
6
1
2
3
5
4
2
6
1
Chapter 15 · Spine surgery192
15
15.1.4
Prone position/CRP horseshoe-shaped headrest
. Figs. 15.7, 15.8.
Indications
Rear access to the upper and lower cervical vertebrae without the possibility
of intraoperative, external reposition measures for:
4 pseudarthrosis in the upper cervical vertebrae
4 posttraumatic lesions, fractures and misalignment at the occipitocervical
junction and at the upper and lower cervical vertebrae
4 tumours
Preparations
4 Arm positioning devices
4 Padded arm protection
4 Thorax, pelvic and wedge cushions, padded roll
4 Special bolster for prone position
4 CRP horseshoe-shaped headrest
4 Gel cushion
4 Shaving in the area of the incision and preoperative skin cleansing
Positioning
4 Standard operating table position 1, position 2 or universal operating
table
4 Anaesthetic preparation and induction in supine position with 2 adapted
arm positioning devices
4 Transfer to the prepared operating table in the induction room
4 Position both tables next to each other, with the prepared table lowered
4 Place the patient in the prone position on the padded cushion on the
prepared operating table and take him into the theatre
4
4 When positioning the patient, take appropriate measures to prevent
decubitus at areas which are subjected to pressure
4 Position the head on the special head positioning cushion
4 Position the axillae freely with the thorax bolsters and ensure that the
pelvic bolster finishes with the anterior superior iliac crest
4 Position both arms on the arm positioning devices
4 Apply the neutral electrode and connect to the HF surgery device
4 Arrange self-adhesive drapes for preoperative skin disinfection
4 Position the operating lights
4 Patient warming system
Risks
4
4 Dislocation, reposition loss
Normal positioning of the operating table in the theatre
Iatrogenic injuries to the eyes and soft tissues (head fixing!)
15
193
. Fig. 15.7. Prone position on universal ope-
rating table with CRP back plate 1150.45 and
CRP horseshoe-shaped headrest
. Fig. 15.8. CRP horseshoe-shaped headrest
with gel padding for very comfortable
positioning
15.1 · Cervical spine
Chapter 15 · Spine surgery194
15
15.1.5 Prone position/spine holding unit/skull clamp
. Figs. 15.9–15.12.
Indications
Rear access to the upper and lower cervical vertebrae with the possibility of
intraoperative, external reposition measures for:
4 pseudarthrosis in the upper cervical vertebrae
4 posttraumatic lesions, fractures and misalignment at the occipitocervical
junction and at the upper and lower cervical vertebrae
4 tumours
Preparations
4 Arm positioning devices
4 Padded arm protection
4 Thorax, pelvic and wedge cushions, padded roll
4 Special bolster for prone position
4 Vertebral column holding unit/skull clamp
4 Gel cushion
4 Shaving in the area of the incision and preoperative skin cleansing
Positioning
4 Standard operating table position 1, position 2 or universal operating
table
4 Anaesthetic preparation and induction in supine position with 2 adapted
arm positioning devices
4 Transfer to the prepared operating table in the induction room
4 Position both tables next to each other, with the prepared table lowered
4 Place the patient in the prone position on the padded cushion on the
prepared operating table and take him into the theatre
4
4
4
4
4
4
4 Position both arms at the body with arm protection or secure the arms,
possibly fixing with plasters
4 Position the axillae freely with the thorax bolsters and ensure that the
pelvic bolster finishes with the anterior superior iliac crest
4 Position the image intensifier
4 Apply the neutral electrode and connect to the HF surgery device
4 Arrange self-adhesive covers for preoperative skin disinfection
4 Position the operating lights
4 Patient warming system
Risks
4 Iatrogenic injuries at the skull clamp
4 Injuries to the head and at the skull clamp caused by the halo ring
4 Dislocation, reposition loss
Normal positioning of the operating table in the theatre
When positioning the patient, take appropriate measures to prevent
decubitus at areas which are subjected to pressure
Fit part 5 (special adapter with 4 short bars in ball bearings) to the ready
positioned halo ring
Fit part 1 (adapter) to the side rails of the head plate
Connect part 2 (telescopic bar) and part 3 (moving foot section) and fasten
to part 1 (adapter)
Fasten part 4 (screw tension device) to part 2 (telescopic bar)
Fasten part 5 (special adapter) to part 4 (screw tension device)
4
15
195
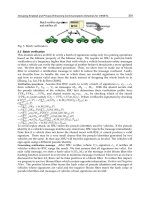
. Fig. 15.9. The head is fixed firmly in the
»Wilde« halo ring and fastened with an
adapter to the spindle
. Fig. 15.12. One image intensifier for each
scanning level
. Fig. 15.11. Spine holding unit on Maquet 1120 with a Bekhterev patient in prone
position
. Fig. 15.10. Stable fixing of the head with the halo ring
15.1 · Cervical spine
1
2
3
4
5
1
2
5
4
Chapter 15 · Spine surgery196
15
15.2 Thoracic spine, lumbar spine
15.2.1 Prone position
. Figs. 15.13–15.17.
Indications
Rear access to the thoracic and lumbar spine and costotransversectomy for
operating:
4 posttraumatic lesions, fractures and misalignment in the thoracic and
lumbar spine
4 tumours, spondylitis, spondylodiscitis
4 scoliosis
4 spondylolisthesis
Preparations
4 Arm positioning devices
4 Special head positioning cushion for prone position
4 Thorax, pelvic and wedge cushions, padded roll
4 Special bolster for prone position
4 Shaving in the area of the incision and preoperative skin cleansing
Positioning
4 Standard operating table position 1, position 2 or universal operating
table
4 Anaesthetic preparation and induction in supine position with 2 adapted
arm positioning devices
4 Transfer to the prepared operating table in the induction room
4 Position both tables next to each other, with the prepared table lowered
4 Place the patient in the prone position on the padded cushion on the
prepared operating table and take him into the theatre
4
4 When positioning the patient, take appropriate measures to prevent
decubitus at areas which are subjected to pressure
4 Position the head on the special head positioning cushion
4 Position the axillae freely with the thorax bolsters and ensure that the
pelvic bolster finishes with the anterior superior iliac crest
4 Position both arms on the arm positioning devices
4 Position the image intensifier
4 Apply the neutral electrode and connect to the HF surgery device
4 Arrange self-adhesive covers for preoperative skin disinfection
4 Position the operating lights
4 Patient warming system
Risks
4 Iatrogenic injuries to the eyes and soft tissues of the head
4 Intraoperative loss of the achieved positioning (secondary dislocation)
Normal positioning of the operating table in the theatre
15
197
. Fig. 15.17. The image intensifier remains in swivelled adjustment
during the operation
. Fig. 15.13. Prone position on universal operating table with CRP
back plate 1150.45 and CRP head plate
. Fig. 15.14. By using the narrow CRP back plate 1150.45, the Iso-C3D
can also be used in the prone position without any problems
. Fig. 15.15. Prone position on CRP operating table 1150.16 with CRP
head plate for 360° use of image intensifier
. Fig. 15.16. Prone position on universal operating table 1150.30 with
arm positioning in maximum 90° abduction
15.2 · Thoracic spine, lumbar spine
Chapter 15 · Spine surgery198
15
15.2.2
Lateral position
. Figs. 15.18–15.22.
Indications
Thoracotomy, thoracolumbar access, lumbotomy for operating:
4 posttraumatic lesions, fractures and misalignment in the thoracic and
lumbar spine
4 tumours, spondylitis, spondylodiscitis
4 scoliosis
4 spondylolisthesis
Preparations
4 Arm positioning devices
4 Gel ring, gel cushion, Goepel leg holder, lateral supports, radial adjusting
clamps, padded cushions (normal and flat) and wedge cushions or tunnel
cushions, body belts
4 Shaving in the area of the incision and preoperative skin cleansing
Positioning
4 Standard operating table position 1 or universal operating table
4 Anaesthetic preparation and induction in supine position with 2 adapted
arm positioning devices
4
4 When positioning the patient, take appropriate measures to prevent
decubitus at areas which are subjected to pressure
4 Fit the radial adjusting clamp to the side rail of the head plate, position the
Goepel leg holder
4 Spread out the arm on the side not being operated
4
4
not lie directly on the shoulder
4 Fit the radial adjusting clamps to the side rails of the leg plates/head plate
and position the body support on the level of the sacrum, symphysis and
scapula, with the tip of the scapula positioned freely
4
1st possibility: position the legs with the padded cushions (normal and
flat) and possibly wedge cushions
4 Fix the lower leg and positioning aids with the body belts
4
2nd possibility: position the legs with the tunnel cushion
4 Position the image intensifier
4 Apply the neutral electrode and connect to the HF surgery device
4 Arrange absorbent drapes or self-adhesive covers for preoperative skin
disinfection
4 Position the operating lights
4 Patient warming system
Normal positioning of the operating table in the theatre
Move the patient onto the healthy side
Move the lower arm forwards so that the weight of the upper body does
15
199
. Fig. 15.21. Back support at the scapula and sacrum. Fig. 15.20. Use of image intensifier from the side opposite the
surgeon
. Fig. 15.18. Lateral position on CRP operating table 1150.16
with 2 CRP accessory adapters
. Fig. 15.19. Lateral position on universal operating table with
side positioning cushions for anatomic positioning of the lower
arm
. Fig. 15.22. The image intensifier remains in swivelled adjustment
during the operation
15.2 · Thoracic spine, lumbar spine
Chapter 15 · Spine surgery200
15
15.2.3 Supine position
. Figs. 15.23–15.25.
Indications
Front access to the cervicothoracic junction and to the upper thoracic spine,
thoracotomy, transperitoneal access, lumbotomy for operating:
4 posttraumatic lesions, fractures and misalignment in the thoracic and
lumbar spine and in the lumbosacral junction
4 tumours, spondylitis, spondylodiscitis
4 scoliosis
4 spondylolisthesis
Preparations
4 Arm positioning devices
4 Shaving in the area of the incision and preoperative skin cleansing
Positioning
4 Standard operating table position 1, universal operating table
4 Anaesthetic preparation and induction in supine position with 2 adapted
arm positioning devices
4
4 When positioning the patient, take appropriate measures to prevent
decubitus at areas which are subjected to pressure
4 Position both arms in abduction position on the arm positioning devices
4 Apply the neutral electrode and connect to the HF surgery device
4 Arrange absorbent drapes or self-adhesive covers for preoperative skin
disinfection
4 Position the operating lights
4 Patient warming system
Normal positioning of the operating table in the theatre
15
201
. Fig. 15.23. Supine position on CRP opera-
ting table 1150.16 with arm positioning in
maximum 90° abduction for operations to
the lumbar spine
. Fig. 15.25. Arm protection from the elbow
to the hand with arms positioned at the body
. Fig. 15.24. Supine position on universal
operating table with arms positioned at the
body for operations to the thoracic spine
15.2 · Thoracic spine, lumbar spine
16
16 Pelvis
16.1 Pelvic girdle – 204
16.1.1 Supine position – 204
16.1.2 Lateral position – 206
16.1.3 Prone position – 208
16.2 Acetabulum – 210
16.2.1 Supine position – 210
16.2.2 Lateral position – 212
16.2.3 Prone position – 214
Chapter 16 · Pelvis204
16
16.1 Pelvic girdle
16.1.1 Supine position
. Figs. 16.1–16.6.
Indications
Access to the front pelvic girdle, ilium, iliosacral joint and hip joint (Pfannen-
stiel, modified Stoppa, ilioinguinal, anterolateral,
operating:
4 fractures, misalignment and posttraumatic lesions in the front pelvic
girdle, ilium, iliosacral joint and at the symphysis
4 tumours, osteomyelitis, ossification
4 tamponade for pelvic bleeding
4 placement of the pelvic cingulum
Preparations
4 Arm positioning devices
4 Possibly table extension
4 Shaving in the area of the incision and preoperative skin cleansing
Positioning
4 Standard operating table position 1, position 2 or universal operating table,
possibly table extension
4 Anaesthetic preparation and induction in supine position with 2 adapted
arm positioning devices
4
4 When positioning the patient, take appropriate measures to prevent
decubitus at areas which are subjected to pressure
4 Position both arms in the abduction position on the arm positioning
devices
4 Apply the neutral electrode and connect to the HF surgery device
4 Arrange absorbent drapes or self-adhesive covers for preoperative skin
disinfection
4 Position the operating lights
4 Patient warming system
Judet, Smith-Peterson) for
Normal positioning of the operating table in the theatre
16
205
. Fig. 16.1. Supine position on universal operating table with
CRP back plate 1150.45 and supported extension plate
. Fig. 16.2. By using the narrow CRP back plate 1150.45, the Iso-C3D
can also be used in the supine position without any problems
. Fig. 16.3. Supine position on the CRP operating table 1150.16, using
the image intensifier
. Fig. 16.4. Arms positioned with maximum 90° abduction and in
supination position for 360° use of the image intensifier
. Fig. 16.6. Use of the image intensifier after placing a pelvis fixator
. Fig. 16.5. System 1120 with leg plate extension
16.1 · Pelvic girdle
Chapter 16 · Pelvis206
16
16.1.2 Lateral position
. Figs. 16.7–16.9.
Indications
Lateral, anterolateral and rear access to the ilium and iliosacral joint for
operating:
4 fractures, misalignment and posttraumatic lesions of the ilium, pelvic
column and iliosacral joint
4 tumours, osteomyelitis, ossification, gluteal compartment syndrome
4 exposure of the sciatic nerve
Preparations
4 Arm positioning devices
4 Gel ring, gel cushion, Goepel leg holder, side supports, radial adjusting
clamps, padded cushions (normal and flat) and wedge cushions, tunnel
cushions, body belts, possibly table extension
4 Shaving in the area of the incision and preoperative skin cleansing
Positioning
4 Standard operating table position 1, position 2 or universal operating table,
possibly table extension
4 Anaesthetic preparation and induction in supine position with 2 adapted
arm positioning devices
4
4 When positioning the patient, take appropriate measures to prevent
decubitus at areas which are subjected to pressure
4 Fit the radial adjusting clamp to the rail of the head plate, position the
Goepel leg holder
4 Spread out the arm on the side not being operated
4
4
not lie directly on the shoulder
4 Fit the radial adjusting clamps to the side rails of the leg plates/head
plate and position the body supports on the level of the sacrum of the
symphysis and the scapula
4
1st possibility: position the legs with the padded cushions (normal and
flat) and possibly wedge cushions
4 Fix the lower leg and the positioning aids with the body belts
4
2nd possibility: position the legs with the tunnel cushion
4 Apply the neutral electrode and connect to the HF surgery device
4 Arrange absorbent drapes or self-adhesive covers for preoperative skin
disinfection
4 Position the operating lights
4 Patient warming system
Normal positioning of the operating table in the theatre
Move the patient onto the healthy side
Move the lower arm forwards so that the weight of the upper body does
16
207
. Fig. 16.9. Lateral position on universal
operating table with lateral positioning
cushion and operating table in flex position
for neutral position of the spinal column
. Fig. 16.7. Lateral position on CRP operating
table 1150.16 with 2 CRP accessory adapters
and lateral positioning cushion for anatomic
positioning of the lower arm
16.1 · Pelvic girdle
. Fig. 16.8. Lateral position on universal
operating table with vacuum mat
Chapter 16 · Pelvis208
16
16.1.3 Prone position
. Figs. 16.10–16.13.
Indications
Dorsal access to the sacrum, hip joint, iliosacral joint for:
4 fractures, misalignment and posttraumatic lesions in the area of the
sacrum, iliosacral joint and hip joint
4 tumours, gluteal compartment syndrome
4 exposure of the sacral nerve and the sciatic nerve
Preparations
4 Arm positioning devices
4 Special head positioning pillow for prone position
4 Thorax, pelvic and wedge cushion, padded roll
4 Possibly table extension
4 Shaving in the area of the incision and preoperative skin cleansing
Positioning
4 Standard operating table position 1, position 2 or universal operating
table
4 Anaesthetic preparation and induction in supine position with 2 adapted
arm positioning devices
4 Transfer to the prepared operating table in the induction room
4 Position both tables next to each other, with the prepared table lowered
4 Place the patient in prone position on the padded cushion of the prepared
operating table and take him into the theatre
4
4 When positioning the patient, take appropriate measures to prevent
decubitus at areas which are subjected to pressure
4 Position the head on the special head positioning cushion
4 Position both arms on the arm positioning devices
4 Apply the neutral electrode and connect to the HF surgery device
4 Arrange self-adhesive covers for preoperative skin disinfection
4 Position the operating lights
4 Patient warming system
. Fig. 16.10. Prone position on CRP ope r-
ating table 1150.16 with CRP head plate
for 360° use of the image intensifier
Normal positioning of the operating table in the theatre
16
209
. Fig. 16.11. Prone position on universal
operating table 1150.30 with arms positioned
in maximum 90° abduction
. Fig. 16.13. Prone position on universal
operating table 1150.30 with maximum
longitudinal displacement toward the head
for optimum use of the image intensifier
. Fig. 16.12. Prone position on universal
operating table 1150.30 with bolsters (MHH)
and use of the image intensifier
16.1 · Pelvic girdle