Beginning Red Hat Linux 9 phần 10 pps
Bạn đang xem bản rút gọn của tài liệu. Xem và tải ngay bản đầy đủ của tài liệu tại đây (839.38 KB, 44 trang )
here is the default contents (it's seems quite long, doesn't it?):
########################################################
# This was written and is maintained by:
# Kirk Bauer <>
#
# Please send all comments, suggestions, bug reports,
# etc, to
#
########################################################
# NOTE:
# All these options are the defaults if you run logwatch with no
# command−line arguments. You can override all of these on the
# command−line.
# You can put comments anywhere you want to. They are effective for the
# rest of the line.
# this is in the format of <name> = <value>. Whitespace at the beginning
# and end of the lines is removed. Whitespace before and after the = sign
# is removed. Everything is case *insensitive*.
# Yes = True = On = 1
# No = False = Off = 0
# Default Log Directory
# All log−files are assumed to be given relative to this directory.
# This should be /var/log on just about all systems
LogDir = /var/log
# Default person to mail reports to. Can be a local account or a
# complete email address.
MailTo = root
# If set to 'Yes', the report will be sent to stdout instead of being
# mailed to above person.
Print = No
# if set, the results will be saved in <filename> instead of mailed
# or displayed.
#Save = /tmp/logwatch
# Use archives? If set to 'Yes', the archives of logfiles
# (i.e. /var/log/messages.1 or /var/log/messages.1.gz) will
# be searched in addition to the /var/log/messages file.
# This usually will not do much if your range is set to just
# 'Yesterday' or 'Today' it is probably best used with
# Archives = Yes
# Range = All
# The default time range for the report
# The current choices are All, Today, Yesterday
Range = yesterday
# The default detail level for the report.
# This can either be Low, Med, High or a number.
# Low = 0
# Med = 5
# High = 10
Detail = Low
Monitoring Security
407
# The 'Service' option expects either the name of a filter
# (in /etc/log.d/scripts/services/*) or 'All'.
# The default service(s) to report on. This should be left as All for
# most people.
Service = All
# If you only cared about FTP messages, you could use these 2 lines
# instead of the above:
#Service = ftpd−messages # Processes ftpd messages in /var/log/messages
#Service = ftpd−xferlog # Processes ftpd messages in /var/log/xferlog
# Maybe you only wanted reports on PAM messages, then you would use:
#Service = pam_pwdb # PAM_pwdb messages − usually quite a bit
#Service = pam # General PAM messages usually not many
# You can also choose to use the 'LogFile' option. This will cause
# logwatch to only analyze that one logfile for example:
#LogFile = messages
# will process /var/log/messages. This will run all the filters that
# process that logfile. This option is probably not too useful to
# most people. Setting 'Service' to 'All' above analyizes all LogFiles
# anyways
As we read through the file, we see that most of the lines are comments (since they start with the # sign, and
that's a widely used way of introducing comments in most script and configuration files). So, out of all those
lines, the only entries that are in effect are:
LogDir = /var/log
MailTo = root
Print = No
Range = yesterday
Detail = Low
These are highlighted in bold in the example. If we consult the man page for logwatch (run the command man
logwatch), we can see that logwatch will check the log files in /var/log, looking for entries from the previous
day, and e−mail a report containing a low level of detail to root.
If we've run our system for a few days and checked root mail, we'll have seen messages from logwatch, so
how is this happening? Scheduling of unattended jobs on Red Hat Linux 9, and most other Unix flavors, is
handled by the cron daemon. This daemon looks for files containing information about what to run and when
to run it in the directories /var/spool/cron and /etc/cron.d, and in the file /etc/crontab. On Red Hat Linux 9, the
/etc/crontab file is the one that is configured by default.
If we examine the contents of this file, we see that there are a few lines of environment information, and some
other lines starting with numbers:
SHELL=/bin/bash
PATH=/sbin:/bin:/usr/sbin:/usr/bin
MAILTO=root
HOME=/
# run−parts
01 * * * * root run−parts /etc/cron.hourly
02 4 * * * root run−parts /etc/cron.daily
22 4 * * 0 root run−parts /etc/cron.weekly
42 4 1 * * root run−parts /etc/cron.monthly
Monitoring Security
408
The numbers specify when cron should run the command described by the rest of the line. There are five
fields which are, from left to right, minute, hour, day of month, month, and day of week. Where an asterisk is
used, this means "I don't care". So the four scheduled jobs in the default Red Hat Linux 9 crontab are run at
the following times:
Scheduled Time Interpretation
01 * * * * 01 minutes past each hour
02 4 * * * 04:02 every day
22 4 * * 0 04:22 every Sunday (1=Monday, 2=Tuesday, etc., Sunday=0 or 7)
42 4 1 * * 04:42 on the 1
st
day of every month
The jobs are essentially similar; run the run−parts script as root and pass the name of a directory (e.g.
/etc/cron. hourly for the job run at 1 minute past each hour). The run−parts script simply runs every
executable file it finds in the directory that it is given (except files ending in the characters ~ or ,, and a few
other exceptions). If we look in the /etc/cron. daily directory, we'll see a file called 00−logwatch, which is a
symbolic link to the logwatch command.
All this means that, at 04:02 every day, the root user will be mailed a message containing summaries of
important information entered into various log files in /var/log the previous day. This is all set up for us when
Red Hat Linux is installed, but now we know how it works, we can adjust the configuration to suit. If, for
example, we'd like more information in the messages, we can simply edit /etc/log.d/logwatch.conf and change
the Detail = Low line to Detail = High. Maybe we'd like the message to be sent at a different time, say 00:15.
Easy −just delete the file 00−logwatch from /etc/cron.daily (so the 04:02 daily cron job no longer runs) and
add the following line to /etc/crontab:
15 00 * * * root /usr/sbin/logwatch
It's as simple as that.
System Integrity
Once a hacker has gained access to a system, they will often want to install modified versions of system files
to ensure their continued access and to gather more information that will help them achieve their objectives. If
our security analysis has identified this threat as one we need to consider, we need to have some means of
identifying when our system may have been compromised in this way, so we can take remedial action (restore
the compromised file from a trusted backup).
But if we're checking the system for modified files, we'll not only identify files modified by intruders, we'll
also identify files that may have been inadvertently modified by authorized individuals, or that have become
corrupt due to hardware problems (e.g. bad blocks appearing on disk drives).
Enter tripwire
Tripwire
Tripwire is an Open Source system integrity checker that is available for Red Hat Linux. It is a useful
weapon in the system administrator's armory, so this section will take you through obtaining it and setting it
up. Note that when Tripwire scans the system to detect changes, it's doing a lot of work and will hit the
processor(s) and file I/O hard.
System Integrity
409
Try it Out: Downloading, Configuring, and Running Tripwire
Tripwire is available in RPM format for Red Hat Linux, which makes installation very
straightforward. It's available on the Red Hat Linux 9 CD−ROMs, but as an interesting exercise, we'll
try using the rpm command's built−in FTP and HTTP client. We'll use the rpm command to download
and install the Tripwire RPM with a single command! Open a terminal window and switch to the root
user and type in the following command (all on one line):
Note You'll need to change the httpproxy IP address and httpport port number to suit your
Internet connection (omit them if you don't need to go through a proxy server to access
the Internet).
# rpm −iv −−httpproxy 10.4.65.2 −−httpport 3128
/>2.3.1−17.i386.rpm
The command also assumes that you're running on an Intel architecture machine. If not, replace the
occurrences of i386 with your machine's architecture.
After a few minutes (depending on the speed of your Internet connection), you should see the
message Preparing packages for installation followed by tripwire−2.3.1−17, and be returned to the
command prompt.
1.
You can confirm that the Tripwire package was installed by running the following command:
# rpm −q tripwire
If all is well, you'll get the package version information back; if not, you'll get a message saying that
package tripwire is not installed (in which case, just download the RPM in the conventional way, and
try again).
2.
Now we've got tripwire installed, we can go on to configure its policies and complete the setup.
Before diving in to the configuration, we should take time to read the README file in
/usr/share/doc/tripwire−2.3.1, and the twintro and twpolicy man pages to familiarize ourselves with
the required configuration tasks. These can be divided into three distinct steps:
Setting up the policy file♦
Initializing the Tripwire database♦
Configuring Tripwire to run periodically and report system integrity violations♦
3.
Let's begin with the policy file. Tripwire's policy file defines which files and directories tripwire
should monitor for changes, and what sort of changes are significant. For some files, e.g. /bin/login,
any change in file contents, modification date, or ownership is suspicious, but we'd expect them to be
accessed frequently. Other files, such as log files, are expected to grow in size, but not change
ownership.
The policy file that is installed with the RPM in /etc/tripwire/twpol. txt tells Tripwire to monitor many
files that probably don't exist on our system, so we'll get lots of spurious error messages when we run
an integrity check. What we really need to do is edit the policy file so that files and directories that
don't exist aren't monitored, and conversely, if there are files and directories that do exist but are
commented out in the policy file are reinstated. It would be tedious to do this by hand, so let's use our
new−found knowledge of Perl to write a script to do it for us.
4.
The algorithm we need to employ is straightforward. If we find a line that looks like an instruction to5.
System Integrity
410
Tripwire to check a file or directory (optional whitespace, string beginning with /), then we should
check that the file or directory exists. If not, we should comment out the line to prevent Tripwire from
generating an error.
Similarly, if we find a line in the policy file that looks like a commented out file (optional whitespace,
#, optional whitespace, string beginning with /), then we should check if the file or directory exists. If
it does, then we'll remove the comment to reinstate the file.
We'll write the script as a filter, so it reads configuration lines from STDIN and writes to STDOUT.
Any lines that don't look like either of the types of line we're interested in are passed through
unmodified. It would be nice to know how much work we've saved ourselves by counting up the
number of lines that the script modifies.
Here's the script (hopefully your new knowledge of Perl will give you an idea of the structure that
we've employed, even if the details are still a bit beyond you − they'll come with practice):
#! /usr/bin/perl −w
# Filter for Tripwire policy file. Looks for lines that
# start with optional whitespace and a filename, and
# comments them out if the file does not exist. Also
# looks for commented out lines containing filename and
# removes comment if they do exist.
$Additions = 0;
$Removals = 0;
# Read each line from stdin into the $line variable
while ($line = <STDIN>) {
# Look for lines that match a pattern (the Perl
# pattern matching characters are enclosed in [])
# start with optional white space [ ^\s* ]
# then a '#' [ # ]
# then more optional white space [ \s* ]
# then a string starting with '/' that doesn't
# contain white space [ \/\S+ ]
#
# The last part of the pattern is enclosed in ()
# so that if the pattern matches, we can access
# this part through the $1 variable.
#
# This pattern matches a commented out entry/
if ( $line =~ /^\s*#\s*(\/\S+)/ ) {
# Found commented out entry. If the file exists,
# strip off the comment character.
if ( −e $1 ) {
$line =~ s/^\s*#//;
$Additions++;
}
# Now look for a line that's like the above but
# without the '#' comment character.
} elsif ( $line =~ /^\s*(\/\S+)/ ) {
# Found entry that starts with " /". If file
# does not exist, then comment out entry.
if ( ! −e $1 ) {
$line = "# " . $line;
$Removals++;
}
}
# Output the line (whether modified or not)
6.
System Integrity
411
print $line;
}
# Print the statistics on STDERR, so they won't get redirected by >
print STDERR "Number of additions: $Additions\n";
print STDERR "Number of removals: $Removals\n";
Create a text file containing this script and call it /usr/local/bin/cleanpol.pl, and make it executable by
running the following command:
Note Depending on the examples you've followed earlier in the book, you may need to acquire
root privileges at this point.
# chmod +x /usr/local/bin/cleanpol.pl
7.
Now we can use this Perl script to produce a customized Tripwire policy file:
# cd /etc/tripwire
# mv twpol.txt twpol.txt.orig
# /usr/local/bin/cleanpol.pl <twpol.txt.orig \ >twpol.txt
Number of additions: 38
Number of removals: 125
This little script saved us from making 163 manual changes to the Tripwire policy file! (The number
of changes made on your system will vary depending on which packages you have installed.) You can
review the changes that were made with the diff command:
diff twpol.txt.orig twpol.txt
8.
Now, use gedit, or your favorite text editor, to review the contents of the updated
/etc/tripwire/twpol.txt file. In particular, there may be a problem with the line defining the policy for
/sbin/e2fsadm. If the cleanpol.pl script uncommented this line, then the note tune2fs? at the end of the
line is treated by Tripwire as a relative path to a file, and the policy file is rejected. Simply delete this
note. In other words:
/sbin/e2fsadm −> $(SEC_CRIT) ; tune2fs?
becomes:
/sbin/e2fsadm −> $(SEC_CRIT) ;
9.
Now we have set up the Tripwire policy file, the next step is to initialize the Tripwire database. This
is done by running the twinstall.sh script in /etc/tripwire:
# ./twinstall.sh
This script asks us to enter site and local passphrases (a term used to describe a long "password"),
generates encryption keys and cryptographically secures the configuration and policy files to prevent
unauthorized changes:
[root@rh9 tripwire]# ./twinstall.sh
−−−−−−−−−−−−−−−−−−−−−−−−−−−−−−−−−−−−−−−−−−−−−
The Tripwire site and local passphrases are used to
sign a variety of files, such as the configuration,
policy, and database files.
Passphrases should be at least 8 characters in length
10.
System Integrity
412
and contain both letters and numbers.
See the Tripwire manual for more information.
−−−−−−−−−−−−−−−−−−−−−−−−−−−−−−−−−−−−−−−−−−−−−
Creating key files
(When selecting a passphrase, keep in mind that good passphrases typically
have upper and lower case letters, digits and punctuation marks, and are
at least 8 characters in length.)
Enter the site keyfile passphrase:
Verify the site keyfile passphrase:
Generating key (this may take several minutes) Key generation complete.
(When selecting a passphrase, keep in mind that good passphrases typically
have upper and lower case letters, digits and punctuation marks, and are
at least 8 characters in length.)
Enter the local keyfile passphrase:
Verify the local keyfile passphrase:
Generating key (this may take several minutes) Key generation complete.
−−−−−−−−−−−−−−−−−−−−−−−−−−−−−−−−−−−−−−−−−−−−−−−
Signing configuration file
Please enter your site passphrase:
Wrote configuration file: /etc/tripwire/tw.cfg
A clear−text version of the Tripwire configuration file
/etc/tripwire/twcfg.txt
has been preserved for your inspection. It is recommended
that you delete this file manually after you have examined it.
−−−−−−−−−−−−−−−−−−−−−−−−−−−−−−−−−−−−−−−−−−−−−−
Signing policy file
Please enter your site passphrase:
Wrote policy file: /etc/tripwire/tw.pol
A clear−text version of the Tripwire policy file
/etc/tripwire/twpol.txt
has been preserved for your inspection. This implements
a minimal policy, intended only to test essential
Tripwire functionality. You should edit the policy file
to describe your system, and then use twadmin to generate
a new signed copy of the Tripwire policy.
The final step in initialization is to run the command tripwire −− init. We are prompted for the local
passphrase, then Tripwire scans all the files listed in the configuration file and gathers baseline data
against which all future scans are run. This may take several minutes, so be patient:
Note It is vital that we are confident the system is in a sound state before initializing the database,
otherwise there's little point in using Tripwire. After the database is initialized, it's a good idea
to put a copy on write−once media (e.g. CD−ROM) so that it cannot be altered:
# tripwire −−init
Please enter your local passphrase:
Parsing policy file: /etc/tripwire/tw.pol
Generating the database
*** Processing Unix File System ***
Wrote database file: /var/lib/tripwire/rh9.twd
The database was successfully generated.
11.
System Integrity
413
Setting up Tripwire to Run Automatically
We've already seen how logwatch is set up to run automatically every day at 04:02. We can very easily set up
Tripwire to run at the same time.
Create a two−line script called /etc/cron. daily/run−tripwire containing the following lines:
#!/bin/sh
/usr/sbin/tripwire −−check
Make sure the script is owned by root and has permissions of 500 (r−x−−−−−−) so it is executable only by
root. This script invokes Tripwire and gets it to check the system's integrity according to the rules in the
policy file, and using the database we just created as its baseline. When cron runs this script at 04:02 every
day its output is sent to root (or whoever is configured in the MAILTO variable in /etc/crontab).
Updating the Tripwire Database
We'll test the script by running it now. Type /etc/cron.daily/run−tripwire on the command line as root, and
check that Tripwire runs successfully. Examine the output produced carefully, and we should see that
Tripwire has spotted the addition of the run−tripwire script to /etc/cron.daily and flagged it as a critical
change.
To stop Tripwire from reporting this change, which we made and know is OK, as a policy violation every
time it runs, we need to update Tripwire's database. We do this by running tripwire −−update, specifying a
Tripwire report file that we wish to use for the update. To see what files are available, run
ls−ltr/var/lib/tripwire/report; choose the last report listed as this will be the most recent one.
The command to run (all on one line) is then:
# tripwire −−update −−twrfile /var/lib/tripwire/report/rh9−20030209−
040304.twr
replacing the report filename with the most recent .twr file on your system. This will produce a text file and
start vi for us so we can edit the file. Each proposed database update is tagged with [x], and if we don't want
the update to be made, we simply delete the 'x'. If we don't want to use vi, then add −−visual gedit to the
command and Tripwire will start the graphical editor instead.
When we exit the editor, we're asked for the local passphrase, and then updates are applied to the database.
Subsequent Tripwire integrity checks should no longer warn us about the change to /etc/cron.daily.
Network Security
Virtually all Red Hat Linux 9 systems will be connected to other computers via a network at some time. This
may be a permanent connection through a network adapter to a LAN (Local Area Network), an "always on"
connection to the Internet, or a dial−up connection to an Internet Service Provider that is active only when
required. Whatever the connection, we need to make sure that a hacker cannot use it to gain access to our
system, or mount a "denial of service" attack that prevents legitimate use of our computing resources. In this
section, we'll look at some of the techniques that we can use to secure our system and make life hard for the
potential hacker.
System Integrity
414
Unless we are connected to an isolated network where every machine is secure and trusted, we must assume
that all the information we send and receive across the network can be intercepted by a third party (i.e.
someone other than us and the intended recipient of the data).
Network Services
One way a hacker may try to gain unauthorized access to our system is by exploiting weaknesses in the
network services that we are running on our Red Hat Linux system. These are programs − often run in the
background with no controlling terminal (called "daemons" in Unix, and "services" in Microsoft Windows) −
that provide services to other computers. Examples include file transfer protocol (ftp), Web, Network File
System (NFS), and print servers.
Enabling and disabling services
The first and easiest way of reducing our vulnerability is to disable all the services that we don't need. In
particular, we need to be very careful about older services that send sensitive information (such as user names
and passwords) across the network without any form of encryption (in plain text). Also, services that
gratuitously hand out information about our system should be avoided where possible.
The following tables will help you to decide which services you need to run.
Service TCP/UDP
Port number
Description Red Hat
Package
Security Level Run it?
echo 7 Sends received
characters back to
sender.
xinetd None. No. (Unless you
really need to
debug remote
terminal
problems)
daytime 13 Sends current date
and time as ASCII
string back to sender.
xinetd None. No. Use NTP for
time
synchronisation.
It is more
accurate and has
better security
features.
chargen 19 Generates continuous
stream of ASCII
characters for testing
terminals.
xinetd None. No. (Unless you
really need to
debug remote
terminal
problems)
chargen 20 (data)
21 (control)
Random ports
>1023
File Transfer
Protocol. Allows
transfer of files to
and from remote
systems.
vsftp or
wu−ftpd
Weak. user names and
passwords sent in
plain text.
"Anonymous FTP"
allows access with no
password.
No. Use FTP
instead.
ssh 22 Secure shell. Allows
remote system to
Openssh Good. Data is
encrypted and
Only if remote
access to
Network Services
415
access command line
shell on local
machine.
connections can be
authenticated to
ensure remote system
is the right one and
not an imposter.
command line
required.
telnet 23 Allows remote
system to access
command line shell
on local machine.
telnet−server Weak. User names
and passwords sent in
plain text.
No. Use ssh
instead.
SMTP 25 Simple Mail Transfer
Protocol. Used to
transfer mail between
systems.
sendmail Weak. Mail tranferred
in plain text.
Only if mail
needs to be
handled locally.
Encrypt sensitive
mail before
sending.
time 37 Sends current time
(in seconds since
00:00 1st Jan 1900)
back to sender.
xinetd None. No. Use NTP for
time
synchronisation.
It is more
accurate and has
better security
features.
finger 79 Gives information
about local system or
users to remote
machine.
finger−server None. No.
http 80 Web server. Httpd Depends on server
configuration.
Only if Web
server needs to
run on system.
auth
(ident)
113 Indentification
protocol. Allows
remote system to
determine indentity
of a user of a
particular TCP/IP
connection.
pident Supports DES
encryption of returned
information.
Only if needed to
access some
public services
(e.g. some ftp
sites and IRC).
sftp 115 Secure File Tranfer
Protocol. FTP−like
data transfers over
secure SSH
connection.
openssh Good. Only if file
transfer required.
nntp 119 Network News
Transfer Protocol.
Used to transfer
USENET news
groups.
inn Depends on server
configuration.
Only if
newsgroup server
needs to be run
on system.
smb 137
138
Server Message
Block. Allows
Microsoft Windows
Samba Weak. Information
passed over network
without encryption.
Only use to
access
information that
Network Services
416
139 system to access Red
Hat Linux
filesystems as
network shares.
Passwords may be
encrypted, but
algorithm is weak.
is not sensitive.
https 443 Secure Web server. Httpd Depends on server
configuration.
Only if Web
server needs to
run on system.
Ipd 515 Print Daemon.
Allows remote
machines to send
print jobs to our
printers.
LPRng or cups Weak. Information
passed over network
without encryption.
Only run if your
system has
printers you want
to share.
rsh/rlogin 514 Allows remote
system to access
command line shell
on local machine
without supplying a
password.
rsh−server Weak. Relies on DNS
(Domain Name
Service) to identify
remote system, so
vulnerable if DNS
compromised.
No.
nfs 2049 (requires
portmapper to
be listening on
port 111)
Network File System.
Allows other systems
to access file systems
remotely.
nfs−utils Weak. Information
passed over network
without encryption.
Only use to
access
information that
is not sensitive.
Having decided which services are required, we need to make sure they are started, and make sure that any of
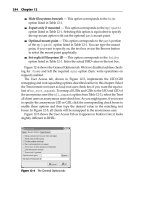
the undesirable services are stopped. This is done through the Red Hat Service Configuration application. As
an example, we'll use the Red Hat Service Configuration application to turn off the lpd and portmapper
services since our theoretical demonstration machine doesn't have any printers attached to it (so there's no
point in running lpd), and we're not using NFS or NIS (so there's no point in running portmapper).
Try it Out: Running the Service Configuration Application
Start the Service Configuration application by choosing Main Menu | System Settings | Server
Settings | Services, or typing redhat−config−services at the command prompt.
1.
If you're not logged on as root (and you shouldn't be!), you'll be prompted for the root password in
this dialog:
2.
Now the services configuration menu appears:3.
Network Services
417
In the Service Configuration window, there are a few important things to note. First, the status line
immediately below the toolbar icons shows us that the system is running in Runlevel 5, and that this
is the runlevel that is being edited. (A runlevel is a particular state of the operating system,
characterized by a set of processes that are started. If we haven't changed the system runlevel, then
we'll be editing the default, which is just what we want. For more information on runlevels, see the
man pages for inittab and telinit. Be careful if you experiment with these, as mistakes could render
your system unbootable, forcing you to boot from CD−ROM to correct the problem.)
If you click on the name of a service, the information panels on the right of the window will show a
brief description of what the service is for, together with its status.
Note Not all services represented here represent external services, some are internal
daemons vital for the smooth running of your computer. It's a good idea to take a
moment to read through all the descriptions here and start to familiarize yourself with
what's available.
4.
Now scroll through the list of services, and clear the check boxes next to lpd and portmapper, as these
are two services that do allow remote connections to our system and that are enabled by default but
probably aren't needed in the majority of cases.
When we make a change to any of the services, the Save button is no longer grayed out. So, when
you're happy with the changes you've made, click on save to update the configuration files. Note that
this does not actually start or stop any services; all it does is update configuration files so that next
time the runlevel that is being edited is entered, the right services are started, and when it is being left,
the right services are stopped. If you want to make the change effective immediately, highlight the
service and click the Start, Stop or Restart buttons on the toolbar according to what you want to do.
5.
xinetd
You may have noticed in the table of services and their daemons presented earlier that several services (such
as echo, daytime, and chargen) appear to be provided by the same service, namely xinetd. This isn't a typo −
xinetd does provide these, and it also looks after a whole lot more.
xinetd is an enhanced version of the standard Unix inetd (internet daemon) program, which manages incoming
connections to many different services (hence it is sometimes called a "super server"). It is a long−running
service (usually started when the system boots) that listens for incoming TCP/IP connections on ports that it
has been told about in its configuration file. When a connection request arrives, xinetd checks that the
Network Services
418
connection should be allowed, then starts the appropriate server (if required) to handle the connection. In this
section, we'll take a brief look at some of the configuration options xinetd has that relate to system security.
xinetd's main configuration file is /etc/xinetd.conf. Let's have a look at that now:
This file simply sets up some sensible default values that apply to all services managed by xinetd (by placing
them inside defaults {} ), then tells xinetd to read configuration information from all the files in /etc/xinetd.d.
The default values have the following meanings:
instances = 60 No more than 60 instances of each sub−server will be started
logtype = SYSLOG
authpriv
Service log output is sent to syslogd using the authpriv facility (so that the output is
logged to a file that can only be read by privileged users)
log_on_success =
HOST PID
Logs remote host address and process id (if there is one) when a service is started or
exits
log_on_failure =
HOST
Logs remote host address when a service failed to start (with the reason for the
failure)
cps = 25 30 Allows maximum connection rate of 25 connections per second (first number) and
disable service for 30 seconds (second number) if this rate is exceeded
Monitoring Services
It is useful to be able to check what services are running on our Red Hat Linux 9 system, and especially what
ports they are listening on. This is because before a remote machine can make a connection to our local
machine, some process on our local machine has to be ready to receive network packets (listening) sent to its
port number.
There are a couple of tools that we can use to identify what ports are listening on our machine: netstat and
nmap.
netstat
Netstat is a multipurpose utility for reporting on all things relating to networks. We'll invoke it with the
following flags:
Flag Meaning
−t TCP
Network Services
419
−u UDP
−1 Port sockets in state "listening"
−n Show numeric values for hosts and ports
−P Show process ID that owns sockets
# netstat −nutlp
Active Internet connections (only servers)
Proto Recv−Q Send−Q Local Address Foreign Address State PID/Program name
tcp 0 0 127.0.0.1:32769 0.0.0.0:* LISTEN 718/xinetd
tcp 0 0 0.0.0.0:6000 0.0.0.0:* LISTEN 979/X
tcp 0 0 0.0.0.0:22 0.0.0.0:* LISTEN 704/sshd
tcp 0 0 127.0.0.1:25 0.0.0.0:* LISTEN 832/sendmail
udp 0 0 0.0.0.0:68 0.0.0.0:* 772/dhclient
udp 0 0 10.4.65.253:123 0.0.0.0:* 803/ntpd
udp 0 0 127.0.0.1:123 0.0.0.0:* 803/ntpd
udp 0 0 0.0.0.0:123 0.0.0.0:* 803/ntpd
This lists the TCP and UDP sockets that are ready to receive incoming data (connections in the case of TCP
and datagrams for UDP). We can see that this machine is listening on four TCP/IP ports which are the
numbers after the ':' in the Local Address column (22 for ssh, 25 for incoming mail, 6000 for X11 and 32769
for the xinetd "super" server). It will also accept datagrams on port 68 (DHCP client) and 123 (Network Time
Protocol service).
Three TCP/IP addresses appear in this local address column: 0.0.0.0 means that the server is listening on all
addresses, 127.0.0.1 is the machine's loopback address, and 10.4.65.253 is the address of the machine's
Ethernet card (leased from a DHCP server).
If we leave out the −l flag, netstat will show us all the active connections. If we leave out the −n flag, netstat
will look up port names in /etc/services and host names using DNS, giving symbolic output. Try varying the
flags to see what information is returned.
We can check the output of the netstat command to make sure that we don't have any programs listening on
TCP or UDP ports that we're not expecting. The −p flag, which gets netstat to print out the PID (Process ID)
and name of the process that opened the socket, is very useful for identifying "rogue" programs, perhaps
modified by an intruder, that are listening on unexpected ports. (Of course, if we've got Tripwire set up and
we're running regular scans, we'll quickly identify if an intruder has modified a program.)
nmap
Nmap takes a different approach to the problem of identifying which ports are being listened to (are "open" in
nmap parlance) on a machine. It sends special packets to ports on the machine in question, and listens for the
response. This enables it to deduce whether the port is open, closed, or even being blocked by a firewall (more
on that later). Nmap isn't installed by default, but is on the Red Hat Linux CD−ROMs, so you may need to
install it if you want to try these examples.
First, by way of example, let's get nmap to see what ports are open on our machine. We'll use the flags −sUT
to tell nmap we want it to scan both TCP and UDP ports, and accept the defaults for everything else
(including the port range, which is 1 to 1023, since these are the ports that privileged services use, plus others
that are mentioned in /etc/services).
Here's the output from a test system:
Network Services
420
# nmap −sUT localhost
Starting nmap V. 3.00 ( www.insecure.org/nmap/ )
Interesting ports on rh9 (127.0.0.1):
(The 3064 ports scanned but not shown below are in state: closed)
Port State Service
22/tcp open ssh
25/tcp open smtp
68/udp open dhcpclient
123/udp open ntp
6000/tcp open X11
Nmap run completed −− 1 IP address (1 host up) scanned in 3 seconds
It has identified the same ports as netstat did, with the exception of xinetd listening on tcp/32769. This is
because port 32769 is not in the range 1 to 1023, nor is it listed in /etc/services, so it won't get scanned by
default. If we used the −p flag to specify port numbers (e.g. added "−p 1−65535" to the command line to have
all ports scanned), then the open port is found and listed with "unknown" in the service column.
Notice that nmap needs to be told which host to scan the ports on, suggesting that it can be used to scan for
open ports on remote machines. Nmap is indeed capable of scanning for open ports on a range of remote
machines, even choosing addresses at random. However, it is wise to get written permission from the owners
of systems before scanning their ports, since this action may be seen as a prelude to illegal hacking activity.
After all, it is just like walking past a row of parked cars and trying the doors on each one to see if they're
locked. If a policeman caught you doing that, you'd have a hard time explaining that if you were only looking
for unlocked cars so you could tell the owners to be more careful.
IP traffic
It is surprisingly easy to capture and analyze network traffic. There are many tools available that enable users
with sufficient privileges to record the headers and contents of network packets into files on disk and analyze
the contents later. With broadcast network media, such as Ethernet, every machine on a network segment
receives all the packets, regardless of who the packet is addressed to. Normally, the receiving network card
discards packets not addressed to it, but most network cards can be configured to operate in "promiscuous"
mode, which allows them to receive and process packets regardless of their intended destination. (Ethernet
switches, as opposed to hubs, have intelligence and effectively create a series of point−to−point Ethernet
links, instead of sending all packets to all machines. This not only improves security, it can also improve
performance.)
We'll use a utility called tcpdump (from the RPM package of the same name) to demonstrate just how easy it
is to capture data not destined for our machine. (As with nmap above, make sure you have permission to do
this if you're going to try it on a network that you don't own!)
Our theoretical test setup is this. There are three machines, all connected to a 10/100 Ethernet hub, and all on
a private subnet 192.168.1/24 (that's shorthand for a subnet 192.168.1.0 with a netmask of 255.255.255.0, i.e.
24 bits). Fred (192.168.1.l) is a Windows machine that we'll use as a telnet client, Bob (192.168.1.2) is a
Linux server we'll be telnetting in to, and Kate (192.168.1.3) is our Red Hat Linux 9 machine. On Kate, we su
to root and type:
# tcpdump −i eth0 −l −q −X src or dst port 23
This tells tcpdump to listen to all packets on interface eth0 (−i eth0), buffer the output line−by−line (−1), don't
print lots of header information (−q) but do print the packets in ASCII (−X) and show only packets where the
Network Services
421
source or destination port is 23 − the telnet port − (src or dstport 23). We'll get an acknowledgment:
tcpdump: listening on eth0
and tcpdump will log all telnet packets it sees on the network segment.
Now we go to Fred, our Windows machine, and telnet from there to Bob, our Linux server. As soon as we do,
we see the packets being logged by tcpdump, even though that's running on a machine that's not the
destination for the packets!
# tcpdump −i eth0 −1 −q −X src or dst port 23
tcpdump: listening on eth0
12:11:51.070377 fred.3335 > bob.telnet: tcp 0 (DF)
0x0000 4500 0030 317b 4000 8006 3342 0a04 4101 E 01{@ 3B A.
0x0010 0a04 4102 0d07 0017 24e6 7419 0000 0000 A $.t
0x0020 7002 2000 26f7 0000 0204 05b4 0101 0402 p &
12:11:51.070826 bob.telnet > fred.3335: tcp 0 (DF)
0x0000 4500 0030 0000 4000 4006 a4bd 0a04 4102 E 0 @.@ A.
0x0010 0a04 4101 0017 0d07 f267 5575 24e6 741a A gUu$.t.
0x0020 7012 16d0 e838 0000 0204 05b4 0101 0402 p 8
If we look carefully at the packet log, we can find the Password prompt and see what the user typed in
response. The password has been highlighted to make it easier to see, but hackers don't need that much help −
they'll probably use an automated password sniffer that'll decode the packets for them:
12:12:02.265222 bob.telnet > fred.3335: tcp 10 (DF) [tos 0x10]
0x0000 4510 0032 9d51 4000 4006 075a 0a04 4102 E 2.Q@.@ Z A.
0x0010 0a04 4101 0017 0d07 f267 55fc 24e6 746e A gU.$.tn
0x0020 5018 16d0 2c48 0000 5061 7373 776f 7264 P ,H Password
0x0030 3a20
12:12:02.465557 fred.3335 > bob.telnet: tcp 0 (DF)
0x0000 4500 0028 4a7b 4000 8006 1a4a 0a04 4101 E (J{@ J A.
0x0010 0a04 4102 0d07 0017 24e6 746e f267 5606 A $.tn.gV.
0x0020 5010 21a8 0941 0000 2020 2020 2020 P.! A
12:12:03.180919 fred.3335 > bob.telnet: tcp 1 (DF)
0x0000 4500 0029 4b7b 4000 8006 1949 0a04 4101 E )K{@ I A.
0x0010 0a04 4102 0d07 0017 24e6 746e f267 5606 A $.tn.gV.
0x0020 5018 21a8 a337 0000 6620 2020 2020 P.! 7 f
12:12:03.218203 bob.telnet > fred.3335: tcp 0 (DF) [tos 0x10]
0x0000 4510 0028 9d52 4000 4006 0763 0a04 4102 E (.R@.@ c A.
0x0010 0a04 4101 0017 0d07 f267 5606 24e6 746f A gV.$.to
0x0020 5010 16d0 1418 0000 65fd 01ff fb05 P e
12:12:03.423073 fred.3335 > bob.telnet: tcp 1 (DF)
0x0000 4500 0029 4c7b 4000 8006 1849 0a04 4101 E )L{@ I A.
0x0010 0a04 4102 0d07 0017 24e6 746f f267 5606 A $.to.gV.
0x0020 5018 21a8 9736 0000 7220 2020 2020 P.! 6 r
12:12:03.423232 bob.telnet > fred.3335: tcp 0 (DF) [tos 0x10]
0x0000 4510 0028 9d53 4000 4006 0762 0a04 4102 E (.S@.@ b A.
0x0010 0a04 4101 0017 0d07 f267 5606 24e6 7470 A gv.$.tp
0x0020 5010 16d0 1417 0000 6465 6420 4861 P ded.Ha
12:12:03.555199 fred.3335 > bob.telnet: tcp 1 (DF)
0x0000 4500 0029 4d7b 4000 8006 1749 0a04 4101 E )M{@ I A.
0x0010 0a04 4102 0d07 0017 24e6 7470 f267 5606 A $.tp.gV.
0x0020 5018 21a8 a435 0000 6520 2020 2020 P.! 5 e
12:12:03.555354 bob.telnet > fred.3335: tcp 0 (DF) [tos 0x10]
0x0000 4510 0028 9d54 4000 4006 0761 0a04 4102 E (.T@.@ a A.
0x0010 0a04 4101 0017 0d07 f267 5606 24e6 7471 A gV.$.tq
Network Services
422
0x0020 5010 16d0 1416 0000 0d0a 0869 6e3a P in:
12:12:03.699442 fred.3335 > bob.telnet: tcp 1 (DF)
0x0000 4500 0029 4e7b 4000 8006 1649 0a04 4101 E )N{@ I A.
0x0010 0a04 4102 0d07 0017 24e6 7471 f267 5606 A $.tq.gV.
0x0020 5018 21a8 a534 0000 6420 2020 2020 P.! 4 d
This is what we mean when we say that the telnet protocol sends passwords in plain text across the network. If
that network uses broadcast media, then every machine on the same network segment as the sender receives
the unencrypted password on its network interface. Most of the time, the other machines will just ignore this
data, but all it takes is one of them to be running a promiscuous mode packet logger like tcpdump and all the
passwords sent by telnet can be captured. Ftp suffers from a similar vulnerability. Fortunately, there are secure
alternatives to both telnet and ftp (ssh and sftp respectively) that encrypt all data they send over the network
using strong encryption techniques so the eavesdropper is not able to glean any useful information from the
packets.
Another packet analyzer that can be installed from the Red Hat Linux 9 CDs is called Ethereal. This has a
graphical front end that makes it much easier to set up filters and interpret the contents of packets. When
Ethereal is started (as root, by simply typing ethereal at the command prompt − once the Ethereal RPM has
been installed, of course!), the main window opens. The Capture | Start menu option opens another window
where capture options can be set:
Note the check box to put the interface (eth0) in promiscuous mode, so packets not intended for this machine
can be captured. Once capturing is running, another window is updated continuously with packet counts.
Network Services
423
With the options chosen in the example capture window, the main display is also updated in real time:
This example shows the start of an ssh session between two machines. This time, we won't be seeing any plain
text passwords!
The point of showing tcpdump and ethereal is not to encourage you to go sniffing for packets on networks, but
rather to illustrate just how easy it is to capture sensitive information such as passwords that are sent across
broadcast networks, such as Ethernet. However, if you make sure that you use protocols such as ssh and sftp
that encrypt sensitive data, then it won't matter if someone is capturing the packets you send.
Network Services
424
Firewalls
Firewalls are another useful tool for improving the security of our system. They come in different flavors, but
all do essentially the same thing; network traffic passing through the firewall is analyzed and the decision
about what to do with the traffic (let it through, throw it away and tell the sender, throw it away and don't tell
the sender, etc.) is made based on the rules configured by the firewall administrator.
Some firewalls analyze network traffic at the packet level; these are called "packet filters". They can work
with any network traffic, but can implement only fairly simple rules based on the contents of the packet
header (typically where the packet came from, where it's going to and what flags are set). Other firewalls
understand more about the higher level protocols used for e−mail and web browsing. They can perform more
complex tasks such as scanning e−mail attachments for viruses, or requiring users to authenticate themselves
before allowing access to certain Web sites. In a typical corporate environment, the protection provided by
simple packet filtering firewalls is enhanced with more sophisticated firewalls and proxies that can analyze
the contents of the packets as well as their headers.
Since the Linux kernel has built in packet filtering capabilities, we'll look at how we can configure these to
enhance the security of our Red Hat Linux system.
Network Connections
Before we get into the mechanics of configuring the Red Hat Linux built in firewall, we need to understand
how network connections work. For TCP/IP connections, there are two basic protocols; TCP (Transmission
Control Protocol) and UDP (Universal Datagram Protocol).
TCP is a connection−oriented protocol. This means that when two machines wish to communicate via TCP,
their TCP stacks negotiate a connection and the application (such as a Web browser talking to Web server
using HTTP), and TCP ensures that packets are delivered to the application in the right order, with no
duplicates. The mechanism for setting up a connection involves the exchange of TCP packets between the
systems that have different flags set in their headers. First, the client (that's the machine that wants to establish
a connection) sends the server (the machine the client wants to connect to) a TCP packet with the SYN flag
set. The server replies with a packet whose header has both the SYN and ACK flags set, and when the client
receives this packet, it sends one back with just the ACK bit set. From this point on, the connection is
established, and the client and server can exchange packets.
When the connection is no longer required, either party can request that it is closed by sending the other end a
TCP packet with the FIN flag set. The recipient replies with a packet having the ACK flag set, then performs
whatever termination steps are required by the application. When this is done, a packet with the FIN flag set is
sent back to the end that initially requested the connection to be closed. When this is acknowledged with a
packet where the ACK bit is set, the connection is finished.
UDP is a much simpler, connection−less protocol. All that happens here is that the originator sends the UDP
datagram to the recipient, and the network layer tries its best to deliver it. Unlike TCP, delivery is not
guaranteed, and datagrams traveling over long distances may go by different routes and therefore arrive out of
order at the other end. All the logic for synchronizing client and server, or re−trying failed packets, has to be
handled by the application code.
It is important that we understand the differences between TCP and UDP when configuring firewalls. With
TCP, the direction of the connection (i.e. incoming, where the client is remote and the server is on our
machine, or outgoing where the client is local and the server is remote) is determined by the exchange of
Firewalls
425
SYN, SYN+ACK, ACK packets at the start of the connection, but with UDP, there is no connection, so
incoming and outgoing simply refer to the direction of the packet.
Configuring the Red Hat Linux Firewall
Configuring the Red Hat Linux firewall is very straightforward. Start the Security Level Configuration
application by choosing Main Menu | System Settings | Security Level, or by typing
redhat−config−securitylevel at the command prompt. If you are not logged on as root, and you haven't
recently supplied the root password to enable you to update system wide settings, you'll be prompted to do
that before the Security Level Configuration starts. When it does, you'll see this window.
Under the Security Level: drop−down list, the options are High, Medium, and No firewall:
The High setting configures the firewall to reject all incoming TCP connections (by blocking TCP
packets that have the SYN flag set, and ACK cleared), and reject all incoming UDP packets, with the
exception of replies to DNS queries on port 53 that come from the name servers we told Red Hat
Linux about when we configured the network settings. (If the DNS replies were blocked, then we
would be unable to resolve any host names that aren't defined in the local /etc/hosts file, which would
make using the Internet very tedious.)
Important Note that, since incoming connections are blocked, we can't run a Web server or
any other kind of server behind such a firewall.
•
The Medium setting configures the firewall to reject all incoming TCP connections to ports in the
range 0 to 1023, and also incoming UDP packets for these port numbers. NFS and X11 traffic are also
blocked. The significance of the ports in the range 0 to 1023 is that these are "privileged" ports, and a
program has to be running with root authority in order to open sockets on them. However, this does
not mean that ports with numbers 1024 to 65536 can only have unprivileged programs opening
sockets on them. It is quite possible to set up a Web server running with root authority listening on,
•
Firewalls
426
say, port 8080.
If we select No firewall as the security level, then the firewall is disabled.•
If we find that the default firewall rules do not meet our requirements, then we can select the Customize radio
button. This enables the remaining options on the window:
If we check the box against a network interface in the Trusted devices section, this configures the firewall to
allow all traffic to and from that interface (because we trust all the machines connecting via that interface).
However, can we be sure that one of these machines has not been compromised and that the packets coming
from it are the work of a hacker?
The other options on the dialogue enable us to allow incoming connections on a selection of well−known
ports for different services. For example, let's pretend that our example machine will be running a Web server,
and we'll need remote access via ssh for administration, so the WWW and SSH boxes need to be checked.
This ends up looking like this:
Firewalls
427
When we press the OK button, the firewall configuration is updated and saved so that the machine will reboot
with the new configuration in place.
Lokkit
There is another tool that we can use to configure the firewall on our Red Hat Linux systems. It's called
Lokkit (installed from the gnome−lokkit RPM). It is a simple to use configuration tool that asks a series of
simple questions and configures the firewall according to the answers you supply. It's not as versatile or
powerful as the method we've just discussed, so we'll make no more mention of it here.
Note Note that Lokkit is not meant for custom firewall configuration and has fewer options than the
Red Hat redhat−config−securitylevel tool.
There is one significant drawback with using the Security Level Configuration or Lokkit applications to
configure our packet filtering firewall; both configure only rules that selectively block incoming network
traffic. Outgoing traffic and traffic that is forwarded (that is received on one network interface and sent out on
another) by our Red Hat system are not checked in any way. This means that, should you have a system
behind your firewall that has been compromised (hacked or maybe infected by a virus), it is free to transmit
whatever it likes through your firewall. It is a good idea to configure your firewall to block selected outgoing
and forwarded traffic too. For example, you may want to force all Internet access for machines behind the
firewall to be handled by secure proxy servers. This can be done by blocking outgoing Internet access for all
machines except the proxy servers. More detailed firewall configuration like this is done with the iptables
command, so let's look at how to do that.
Firewalls
428
iptables
Important This section is a brief introduction to setting up customized security beyond
what is possible with the GUI tools provided by Red Hat. It's not meant to be
comprehensive, as everyone's needs are different, and it'd be impossible to cater
to them all. However, hopefully it'll give you a taste of the tools available.
Blocking and allowing traffic based on direction (i.e. incoming or outgoing) and port number gives some
degree of control over network traffic, but there are situations when we need finer control. For example, we
may want to run a Web server that can be accessed only from machines within our department, and not from
machines elsewhere. Or we may want to prevent users on certain machines from being able to FTP files from
our machine while allowing others to do so. The firewalling code in Red Hat Linux 9 is perfectly able to cope
with these situations, and far more complex ones, but we have to roll up our sleeves and configure it from the
command line.
This is where the iptables command comes in. It is used to manipulate the kernel's packet filtering tables, so
we can fine tune the firewall settings to our environment. Let's see how to implement a concrete example.
Imagine our Red Hat machine has two network interfaces: eth0 has the IP address 192.168.1.1 and eth1 has
the IP address 192.168.10.1. Both interfaces have netmasks of 255.255.255.0. We're running a Web server
listening on port 80, and an FTP server that uses ports 20 and 21. We need to allow machines with IP
addresses starting with 192.168.10 access to the Web server, but nobody else. We also need to allow all
machines in the 192.168.1.0 network access to the FTP server, except 192.168.1.57. How do we configure
this?
The first thing to do is look at the existing firewall configuration. Log on to the machine and switch to the root
user. Run the following command to get a verbose listing of the current firewall rules:
# iptables −L −v
Rules are grouped together into chains. There are three default chains:
INPUT, which handles incoming network packets destined for processes on the local machine•
OUTPUT, which handles outgoing network packets produced by the local machine•
FORWARD, which handles packets that arrive on one interface and leave on another (i.e. the local
machine is forwarding them).
•
There may be other user defined chains too.
To set up our machine to meet the above specification, we'll clear out (or flush) the existing rules with the
following command:
# iptables −F
Note We can use this command to delete the named user−defined chain:
# iptables −X name
We're going to be dealing only with packets coming into our machine in this example, so we'll be configuring
rules in the INPUT chain. Our first step is to configure the default behaviors − or Policy − for the INPUT
chain so that if it receives a packet that doesn't match any rules, it drops (discards) it. This is the most security
conscious approach, as it means that everything is blocked unless we explicitly allow it. The command to set
Firewalls
429
the policy on the INPUT chain to DROP is:
# iptables −P INPUT DROP
As soon as we type that in, all incoming network packets are dropped, so before we do so, we'd better make
sure that we're logged in to the machine on the console. If not, then we'll lose our connection to the machine
and won't be able to get it back!
Note We could also have used REJECT instead of DROP as the policy. This would result in a
message being sent back to the sender of a blocked packet informing them that the port is not
reachable. This is polite, and could prevent a hapless user from continually retrying a
connection attempt that will never work. However, it also confirms our presence to a would−be
hacker. The policy of DROP silently discards the incoming packet, so our would−be hacker
won't even know there's anything listening at our IP address. Of course, this is only valid if we
never respond to any requests − once you've responded to one, you've given the game away.
Now, we need to allow machines with IP addresses on the 192.168.10/24 network access to the Web server.
This is listening on TCP port 80. We'll add a rule that says accept any packet arriving on interface eth1 from a
machine in the 192.168.10/24 network that is destined for port 80. The syntax for this is:
# iptables −A INPUT −p tcp −s 192.168.10/24 −i eth1 −−dport 80 −j ACCEPT
Here:
−A INPUT means append the rule to the INPUT chain•
−p tcp means match packets for the TCP protocol•
−s 192.168.10/24 means match packets with a source address in the 192.168.10/24 network•
− i eth1 means match packets on the eth1 interface•
− −dport 80 means match packets with a destination port of 80•
− j ACCEPT means jump to the ACCEPT target (that is, allow the packet through)•
Note We don't have to specify the network interface, but doing so would prevent someone spoofing an IP
address on the wrong network from gaining access.
Our second requirement is to allow ftp access to hosts in the 192.168.1/24 network attached to eth0, except
192.168.1.57. We'll have to do this as a pair of rules; the first is a specific rule to block ftp access from
192.168.1.57 and the second is a more general rule that allows the others in. Since packets are passed to rules
in order, we want to place our more restrictive rules first to ensure that they match. So, our two new rules are
created with:
# iptables −A INPUT −p tcp −s 192.168.1.57 −−dport 20:21 −j DROP
# iptables −A INPUT −p tcp −s 192.168.1/24 −i eth0 −−dport 20:21 −j ACCEPT
If we view our tables with the following command, we'll see our rules eventually:
# iptables −L −v
If DNS is configured on our machine, we'll find that all the DNS queries time out because we've blocked all
the DNS traffic! So, we need to add some more rules to allow important network traffic through:
# iptables −A INPUT −p all −s nameserver −−dport domain −j ACCEPT
Firewalls
430
(We need to replace nameserver with the TCP/IP address of our nameserver.) Now our name server queries
should work again. Here's what our rules look like:
# iptables −L −v
Chain INPUT (policy DROP 26 packets, 2276 bytes)
pkts bytes target prot opt in out source destination
0 0 ACCEPT tcp −− eth0 any 192.168.10.0/24 anywhere tcp
dpt:http
0 0 DROP tcp −− any any 192.168.1.57 anywhere tcp
dpts:ftp−data:ftp
0 0 ACCEPT tcp −− any any 192.168.1.0/24 anywhere tcp
dpts:ftp−data:ftp
0 0 ACCEPT all −− any any nameserver anywhere tcp
dpts:domain
Chain FORWARD (policy ACCEPT 0 packets, 0 bytes)
pkts bytes target prot opt in out source destination
Chain OUTPUT (policy ACCEPT 1190 packets, 430K bytes)
pkts bytes target prot opt in out source destination
Once we've configured our rules, we need to make sure that they work as expected. In this example, we'd try
ftp and Web server access from different hosts to see that they were allowed or blocked as required. Once
we're happy with the rules, we need to save them so that they will be reactivated if the machine is rebooted.
We do this with the following command:
# service iptables save
Security Awareness
The final part of this chapter deals with "softer" security concerns, such as maintaining awareness of security
issues.
Security Alerts
Security problems with software are found and fixed on an almost daily basis. It is important to be aware of
any security vulnerabilities that affect software you have running on your system as soon as they are
discovered. Perhaps the easiest way to do this is to subscribe to a security alert service. Red Hat provide their
own through the Red Hat Network, we mentioned earlier, and its is very useful because you will be notified
only of problems that affect the RPMs that you have installed on your system. You'll also get notified
immediately if there's an update to a Red Hat supplied RPM that you've just installed.
As well as the Red Hat Network, there are many Web sites offering useful security information. Here are just
a few of them.
Red Hat Errata Web Site
Red Hat provides another Web site that you can use to check out security related fixes for the packages that
you have installed. The URL for this site is From this page, you
can access Security Alerts, Bug Fixes and Enhancements for all currently supported releases of Red Hat
Linux. There's also a link to the Red Hat Security Resource Center, where you can subscribe to a monthly
Security Awareness
431