A Guide to Microsofl Excel 2002 for Scientists and Engineers phần 1 pdf
Bạn đang xem bản rút gọn của tài liệu. Xem và tải ngay bản đầy đủ của tài liệu tại đây (939.34 KB, 34 trang )
act
a
chart
type-
-
A
Guide to Microsofl Excel
2002
for Scientists and Engineers
A
Guide to Microsoft Excel 2002
for
Scientists and Engineers
Third Edition
Bernard
V.
Liengme
St.
Francis Xavier University
Nova Scotia, Canada
ELSEVIER
BUTIERWORTH
HEINEYANN
AMSTERDAM BOSTON HEIDELBERG LONDON NEW YORK OXFORD
PARIS SAN DIEGO SAN FRANCISCO SINGAPORE SYDNEY TOKYO
Elsevier Butterworth-Heinemann
Linacre House, Jordan Hill, Oxford
OX2
8DP
200
Wheeler Road, Burlington,
MA
01803
First published
2000
Third edition
2002
Reprinted
2003
Copyright
0
2000,
2002
Bernard
V.
Liengme. All rights reserved
The right of Bernard
V.
Liengme to be identified as the author
of
this work
has been asserted in accordance with the Copyright, Designs
and Patents Act 1988
No
part
of
this publication may be reproduced in any material
form
(including
photocopying or storing in any medium by electronic means and whether
or
not transiently or incidentally
to
some other use
of
this publication) without
the written permission
of
the copyright holder except in accordance with the
provisions
of
the Copyright, Designs and Patents Act
1988
or under the terms of
a licence issued by the Copyright Licensing Agency Ltd,
90
Tottenham Court Road,
London, England
W1T
4LP.
Applications for the copyright holder’s written
permission
to
reproduce any part of this publication should
be
addressed
to the publisher.
Permissions may
be
sought directly from Elsevier’s Science and
Technology Rights Department in Oxford,
UK:
phone:
(44)
(0)
1865 843830;
fax:
(+a)
(0)
1865 853333;
e-mail:
.You may also
complete your request on-line via the Elsevier homepage
(n),
by selecting ‘Customer Support‘ and then ‘Obtaining
Permissions’.
British Library Cataloguing in Publication Data
A
catalogue record for this book is available from the British Library
Library
of
Congress Cataloguing in Publication Data
A
catalogue record for this book is available from the Library
of
Congress
ISBN
0
7506
5613
1
For information on all Butterworth-Heinemann publications
visit our website at www.bh.com
Printed and bound in Great Britain by Martins the Printers, Berwick upon Tweed
Contents
Preface
xi
1
The
Microsoft@'
Excel
Window
Concepts
Exercise
1
:
Anatomy
of
the Window
Exercise 2: The Workspace
Exercise
3:
The Menu Bar
Exercise 4: The Toolbars
Exercise
5:
Customizing Menus and Toolbars
Exercise
6:
Getting Help
Problems
2
Basic
Operations
Concepts
Exercise
1
:
Filling in a Series
of
Numbers
Exercise
2:
Entering and Copying a Formula
Notes
on
Copying Formulas
Exercise
3:
Formatting the Results
Notes
on
Precision and Formatting
Exercise 4: Displayed and Stored Values
Exercise
5:
Formats Get Copied
Exercise
6:
Too
Many Digits
Exercise 7: Calculation Example
Exercise
8:
Entering Formulas by Pointing
Exercise
9:
References: Relative, Absolute and Mixed
Exercise
10:
Editing and Formatting
Exercise
1
1
:
What's
in
a Name?
Exercise 12: Custom Formats
Exercise 13
:
Symbols and Such
Exercise 14: Fractions
Natural Language Formulas
Problems
3
Printing
a
Worksheet
Concepts
Exercise
1
:
A Quick Way to Print
Exercise
2:
Another Way to Print
Exercise
3:
Page Setup
Exercise 4: Changing Margins
Exercise
5:
Header and Footer
Documenting Worksheets
1
1
4
7
9
11
12
15
17
18
20
21
22
23
24
25
27
28
30
31
32
35
37
39
40
41
42
43
43
44
45
46
47
49
vi
A
Guide to Microso$ Excel
2002
for
Scientists
and
Engineers
Exercise
6:
Gridlines and Row/Column Headings
Exercise
7:
Setting the Print Area
Exercise
8:
Printing Titles
Exercise
9:
Forcing Page Breaks
Exercise
10:
Viewing and Printing Formulas
Summary
of
Print Commands
4
Using Functions
Concepts
Exercise
1
:
AutoSum and AutoCalculate
Exercise
2:
Insert Function
Exercise
3:
Entering a Function Directly
Exercise
4:
Mixed Numeric and Text Values
Exercise
5:
Trigonometric Functions
Exercise
6:
Exponential Functions
Exercise
7:
Rounding Function
Exercise
8:
Array Functions
Some Other Mathematical Functions
Working with Time
Problems
5
Decision
Functions
Concepts
The
IF
and the Logical Functions
Exercise
1
:
A What-if Analysis
Exercise
2:
Avoiding Division by Zero
Exercise
3:
Quadratic Equation Solver
Exercise
4:
Protecting the Worksheet
Exercise
5:
Imaginary Roots
Exercise
6:
Logical Functions
Table Lookup Functions
Exercise
7:
Horizontal Lookup
Exercise
8:
Vertical Lookup
Exercise
9:
Conditional Summing and Counting
Exercise
10:
Array Formulas
Problems
6
Charts
Concepts
Types
of
Charts
Line and
XY
(Scatter) Charts
Embedded Charts and Chartsheets
Anatomy
of
a
Chart
Smoothing Option
Exercise
1:
Creating an
XY
Chart
49
50
51
51
52
53
55
58
60
62
63
64
67
67
69
70
71
72
73
73
76
77
78
80
81
82
82
84
85
87
88
90
93
93
93
95
95
96
96
Contents
vii
Exercise
2:
Modifying
a
Chart
Exercise
3:
Line Chart with Two Data Series
Exercise
4:
XY
Chart with Two Y-Axes
Exercise
5:
Combination Chart
Exercise
6:
Chart with Error Bars
Exercise
7:
Changing Axis Crossings
Exercise
8:
Blank Cells in
a
Data Series
Exercise
9:
Selecting Non-adjacent Data
Exercise
10:
A
Chart with Two X-Ranges
Exercise
1
1
:
A Bar Chart with
a
Difference
Exercise
12:
Displaying Units
Exercise
13:
Setting the Default Chart Type
Selecting a Chart Component
Too Much Data
Dynamic Charts
Printing a Chart
Problems
7
Curve Fitting
Concepts
Exercise
1
:
Finding the
Slope
and Intercept
Exercise
2:
Adding the Trendline to a Chart
Exercise
3:
Adding the Trendline Equation
Exercise
4:
The LINEST Function
Exercise
5:
LINEST with Polynomial Data
Exercise
6:
Non-linear Plots
Exercise
7:
Residuals
Exercise
8:
Calibration Curve
Exercise
9:
Interpolation
Exercise
10:
Difference Formulas and Tangents
Problems
8
User-defined Functions
Concepts
Security Alert
Exercise
1
:
The Visual Basic Editor
Syntax for a Function
Exercise
2:
A Simple Function
Naming Functions and Variables
Worksheet and
VBA
Functions
Exercise
3:
When Things
Go
Wrong
Programming Structures
Exercise
4:
The
IF
Structure
Exercise
5:
Boolean Operators
Exercise
6:
The SELECT Structure
100
104
106
108
108
110
111
111
112
112
113
114
115
116
116
117
117
119
120
121
123
125
126
128
129
130
131
134
136
139
139
141
142
143
145
146
147
148
148
150
152
viii
A
Guide to Microsoft Excel
2002
for
Scientists and Engineers
Exercise
7:
The FOR .NEXT Structure
Exercise
8:
The DO .LOOP Structures
Variables and Data Types
Exercise
9:
A User-defined Array Function
Exercise
10:
Inputting an Array
Exercise
1 1
:
Improving Insert Function
Exercise
12:
Some Debugging Tricks
Using Functions from Other Workbooks
Problems
9
Modelling
I
Concepts
Exercise
1
:
Model
of
a Bouncing Ball
Exercise
2:
Population Model
Exercise
3:
Titration Model
Exercise
4:
Making Waves
Exercise
5:
Taking Control
Problems
10
Solving Equations
Concepts A: Finding
Roots
Exercise
1
:
The Bisection Method
Finding Roots with Goal Seek
Exercise
2:
A Simple Quadratic Equation
Exercise
3:
Solving a Cubic Equation
Exercise
4:
Transcendental Equations
Using
Excel’s Solver
Exercise
5:
Roots of
a
Cubic Equation with Solver
Exercise
6:
Using a Constraint
Solver Options
Concepts B: Solving Simultaneous Equations
Exercise
7:
A Simple Simultaneous Equations Problem
Exercise
8:
An Improved Simultaneous Equations Solver
Exercise
9:
Non-linear Simultaneous Equations Solver
Concepts C: Matrix Algebra
Exercise
10:
Some Matrix Operations
Exercise
1 1
:
Solving Systems
of
Linear Equations
Concepts D: Curve Fitting
Exercise
12:
A
Linear Curve Fit
Exercise
13:
A
Gaussian Fit
with
Solver
Matrix Diagonal
Problems
154
156
160
161
163
164
165
166
169
171
171
174
176
181
183
186
189
189
192
193
195
197
197
198
200
202
203
204
204
206
207
208
210
212
214
21
5
217
219
Contents
ix
11
Numerical Integration
Concepts
Exercise
1
:
The Trapezoid Rule
Exercise
2:
Simpson’s
’/3
Rule
Exercise
3:
Adding Flexibility
Exercise
4:
Going Modular
Exercise
5:
Tabular Data
Improper Integrals
Exercise
6:
Gaussian Integration
Exercise
7:
Monte Carlo Techniques
Problems
12
Differential Equations
Concepts
Exercise
1
:
Euler’s Method
Exercise
2:
The Runge-Kutta Method
Exercise
3:
Solving with a User-defined Function
Simultaneous and Second-order Differential Equations
Exercise
4:
Solving a Second-order Equation
Exercise
5:
The Simple Pendulum
Problems
13
Modelling
I1
Concepts
Exercise
1
:
The Four-bar Crank: Using Solver
Exercise
2:
Temperature Profile: Circular References
Exercise
3:
Temperature Profile: Matrix Method
Exercise
4:
Emptying the Tank
Exercise
5:
An Improved Tank Emptying Model
Problems
14
Statistics for Experimenters
Concepts
Exercise
1
:
Descriptive Statistics
Exercise
2:
Frequency Distribution
Exercise
3:
The Confidence Limits
Exercise
4:
Experimental and Expected Mean
Exercise
5:
Pooled Standard Deviation
Exercise
6:
Comparing Paired Arrays
Exercise
7:
Comparing Repeated Measurements
Exercise
8:
The Calibration Curve Revisited
Exercise
9:
More on the Calibration Curve
Problems
22
1
223
225
227
230
232
233
23 5
228
23
a
24
1
242
245
247
249
250
25
1
253
255
255
259
262
264
272
268
275
275
277
279
28
1
284
289
285
287
29
1
295
15
Report Writing
Concepts
Exercise
1
:
Copy
and Paste
Exercise
2:
Object Embedding
Embedding vs Linking
Exercise
3:
Embedding and Linking
Exercise
4:
Creating an Equation
Exercise
5:
Interactive Web Page
Answers
to
Starred Problems
297
297
299
300
301
301
3
03
307
Index
315
Preface
Microsoft@ Excel
is
a ‘number crunching’ application with the
accountant as its primary target. However, it also provides the
scientist or engineer with a very powerful computational tool.
True, there are more sophisticated mathematical applications, such
as Mathematica, MathCAD, Maple, etc., but none are as widely
available as Microsoft Excel. Furthermore, the learning curve for
Excel
is
very gentle; a little learning goes a long way! Once a few
basic skills have been mastered, many spreadsheets may be
developed
in
much the same way one would proceed with pencil,
paper and calculator, but with more speed, higher precision and
greater flexibility.
This
Guide
is designed to give readers a wide range of examples
from which they may learn how to apply Excel to problems in their
specialized fields. For the student reader, no advanced knowledge
of science or engineering is expected and
no
one who has taken, or
is currently taking, an introductory calculus course should find the
mathematics difficult. In many cases numerical methods are used
to find approximate answers to problems which can be solved by
analytical methods. It is a great confidence booster to know you
have obtained the correct result and encourages one to try problems
for which the exact methods are either very complex or non-
existent.
This is very much a practical book designed to show how to get
results. The problem sets at the ends of the chapters are part of the
learning process and should be attempted. Many of the questions
are answered
in
the last chapter. The
Guide
is suitable for use as
either a textbook in a course on scientific computer applications,
as a supplementary text
in
a numerical methods course, or as a self-
study book. Professionals may find Excel useful to solve one-off
problems rather than writing and debugging a program, or for
prototyping and debugging complex programs.
A
few topics are
not covered by the
Guide:
the major ones being the database
functions and subroutine modules. These are fully covered
in
Excel
books targeted at the business community and the techniques are
applicable to any field.
When
I
was working on the first edition
of
this book Microsoft
introduced Excel
97, Since then we have had Excel
2000
and then
xii
A
Guide to Microsoft Excel
2002
for
Scientists and Engineers
Information
box:
Boxes
like
this
contain
additional
information,
shortcuts,
etc.
The
Save
tool
New
to
Excel
2002
Website:
www.bh.com
/companions/0750656
13
1
Excel 2002. While these have only a marginal effect on
functionality, there have been some significant changes
in
the
appearance of dialog boxes and
in
some terminology. This book
uses Excel
2002
for its screen captures but readers with earlier
versions should have no difficulty following the instructions.
I
am indebted to many people: my students and colleagues for
helpful suggestions, to readers of earlier versions who e-mailed
comments, Nikki Dennis and Matthew Flynn for agreeing to
publish the first edition, Rachel Hudson ofButtenvorth-Heinemann
for her invaluable assistance with the present project, and my wife,
Pauline, without whom this book would still be a pipe-dream.
I
welcome e-mailed comments and corrections (hopefully with a
third edition, these will be few and minor!), and will try to respond
to them all. Please check
my
web site and the
Guide’s
web site at
www.bh.com/companions/0750656
13
1
for updates.
I
hope you enjoy learning to ‘excel’.
Bernard
V.
Liengme
http:/www,stfx.ca/people/bl
iengme
Conventions
used
in this
book
Information boxes
in
the left margin are used to convey additional
information, tips, shortcuts, etc.
Data which the user is expected to type is displayed
in
a
monospaced font. This avoids the problems of using quotes. For
example;
in
cell
A1
enter the text
Resistor
Codes.
Non-printing keys are shown as graphics. For example, rather than
asking the reader to press the Control and Home keys, we use text
such as: press
[ctrll+[Homel.
When
two
keys are shown separated by
f,
the user must hold down the first key while tapping the second.
Generally when a new reference is made to a button on a toolbar,
a graphic of the icon is shown
in
the left column. New features
in
Microsoft Excel
2002
are flagged
in
the left margin.
In the Problems section of each chapter, an asterisk against a
problem number indicates that a solution is given at the end of the
book. Excel files for answered problems and additional files may
be found at:
www.bh.com/companions/075065613
1.
The Microsoft@
Excel Window
Concepts
Exercise
1:
Anatomy
of
the Window
You are probably anxious to start using Microsoft@ Excel.
However, you must first become familiar with its window and we,
the reader and the writer, must agree on some basic terminology.
It is useful to conform to the terminology that Microsoft uses
so
that you will know what topic to search
in
Help when more
assistance is needed. Unless you are new to Windows@, many of
the topics covered
in
this chapter will be familiar. You should learn
the names of the various parts of the window and how to access
commands using menus and toolbars.
Begin this exercise by starting Excel. Your screen will
look
similar
to that
in
Figure
1
.l.
There could be some minor differences
because Excel allows the user to customize the menus and toolbars.
Furthermore, starting with Excel
2000,
the items displayed
in
toolbars and
in
the initial drop down menus change with usage.
A
tool that has been recently used will be displayed on the initial
menu. We will look at customization
in
Exercise
5.
It is convenient to divide the window into seven main parts: title
bar, menu bar, Standard toolbar, Formatting toolbar, workspace,
task pane and status bar. You will be familiar with the first four
areas from using other applications
so
they will be described only
briefly.
Title
bar
In
starting Microsoft@ Excel, we have opened a new
workbook.
Because we have not yet saved our work, Excel has given this the
default name of
Bookl.
Menu
bar
The menu bar provides the user with one way to access the
Microsoft Excel
commands.
Commands are actions you perform
on
your worksheet. Examples are: saving the data to a file, printing a
worksheet, changing the appearance of some text, etc.
Toolbars
Toolbars are another, more intuitive and quicker, method of
accessing commands. Each
tool
on a toolbar is depicted by an
icon.
2
A
Guide to Microsoft Excel
2002
for
Scientists and Engineers
Specifications:
For other limits
(such as the maximum number
of
characters allowed in a cell) use the
Answer Wizard in Help to search
for
specifications.
We may speak
of,
for example, ‘clicking on the Copy tool’ or the
‘Copy button.’
Formula bar
We will examine this more closely in a later chapter. For now,
click the mouse in several places within the workspace and watch
the information change in the
name box
which is the left-hand part
of the formula bar.
As
you select different cells you will also note
how the corresponding column and row headings are highlighted.
Works pace
This is the central part
of
your work. It is here that you will type
data and perform calculations. Note how the main part of the space
is divided by gridlines into
rows
and
columns.
The smallest unit of
space, where a row and a column intersect, is called a
cell.
At the
top of the worksheet are the 256
column headings
starting with
A
and ending with
IV.
To the left are the
row headings
numbered
1
to 65,536. How many cells are there on a single worksheet?
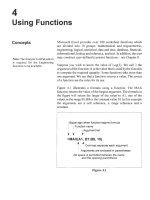
Title bar Menu bar Standard Formatting
Question box
I
I
I
Formula bar tootbar
toolbar
1
TaskDane
What we are looking at
in
Figure
1.1
is only part of one of the
worksheets
which makes up your
workbook.
To
the far right, and
at the bottom of the workspace, you will see the vertical and
The Microsoft Excel Window
3
New
to
Excel
2002
horizontal
scroll bars
which allow you to view other parts of the
worksheet. Also at the bottom are the
sheet tabs
which give you
access to the other worksheets. Excel normally opens a new
workbook with three worksheets. It is possible that your copy of
Excel has been configured to give a new workbook some other
number of worksheets. We may delete or add extra worksheets to
a maximum of 255 depending on the amount of memory in your
computer. Later, we will be introduced to chart sheets. We will not
investigate
module
sheets which were made redundant with
Microsoft Excel 95.
Task pane
In
Excel 2002, to the right of the workspace is the task pane. This
is designed as a productivity tool. It adds no new functionality but
groups frequently used tools in one place. However, it greatly
reduces the amount of the workspace that is visible
so
you may
wish to close it. There is more on this topic
in
Exercises
4
and 5.
Question box
In Excel 2002, to the right of the menu bar is the question box.
This provides a handy way of starting Help and recalling earlier
topics you have looked up.
Status bar
The status bar provides information. To the left is the
message
area.
If your mouse pointer is within the workbook area, this
should be showing the word ‘Ready’. To the right are some
sculptured boxes called the
keyboard indicators.
Press the
[Capslock]
key a few times and watch the text ‘CAPS’ appear and disappear.
Cells and ranges
Clearly, we need a way to refer to a specific cell on the worksheet.
We have seen that a cell occurs at the intersection of a column and
a row. We speak of a
cell reference
which is a combination of the
column heading and the row number. The cell at the top left, which
is at the intersection of column A and row
1,
has the cell reference
Al. The cell below
is
A2 while the cell to the right is B1. This
method ofreferring to cells using the column letter is called the A1
method.
There is another method
in
which the column letter
is
converted to
a number; this is called the R1 C1 method since the top left cell has
the address R1 C
1
using this method. We shall not pursue this.
4
A
Guide to Microsoft Excel
2002
for Scientists and Engineers
3
length
4
width
Exercise 2: The
Workspace
I
61
71
Carefilly note that in this paragraph we have not spoken of a cell
name.
In Chapter
2
we find that this has a very specific meaning.
5
6
A
range
is a rectangular block of cells. The cells Al, A2, A3,
B1,
B2 and
B3
form a range which we can refer to using Al:B3.
In
general a range is denoted by the cell references of the top left cell
and the bottom right cell separated by a colon. Since a range may
be a one by one block, the word
range
may also refer to a single
cell.
In
a later chapter, we will learn how to reference a range from
another worksheet
in
the current or another workbook.
area
42
perimetre
26
In
this exercise you will learn how to enter data into a cell, edit this
data and move around (navigate) the worksheet. We also introduce
the
formula
concept. By the end of step (8) of this exercise your
worksheet should resemble that
in
Figure 1.2, complete with
misspellings. If you do not have time to complete the exercise
in
one session go to step (a)
of
Exercise 3 to see how to save your
work.
I
I
A
I
B
I
C
I
I
1
]Area and Perimeter calculations
I
(a) We wish to enter some data into cell
A1
so
this needs to be the
active cell.
There are two ways of knowing which is the active
cell. Look
in
the name box
of
the formula bar (it is just above
the
A
column heading). Does it say ‘A1
’?
Alternatively,
in
the
worksheet is there a border around cell AI? This is called the
cell selector.
If
AI
is not the active cell, the quickest way to
make it
so is to press
@+[Home].
(b)
With
AI
as
the active cell, type the heading
Area and
Perimeter calculations
and then press the
[Enterl
key. Note how
the active cell becomes A2. Pressing
[Enterl
always moves the
cell selector down one row. If you make a typing error
continue on; we will see how to make corrections later. Press
[Enterl
once more to move to A3.
The
Microsoft
Excel
Window
5
n
_.
may be completed
in
one
of
severa
ways. They differ
in
how the:
relocate the cell pointer.
We may use the keys:
(c) In
A3
type the word
length
but do not press
[Enter].
This time use
the mouse to click the Enter button (the green
t4
button) in the
formula bar
-
see Figure
1.3.
This time the cell selector has not
moved. We have now seen
two
methods of completing a data
entry: pressing the
[Enter]
key and clicking the Enter button on
the formula bar.
Comnleting an entrv:
A
cell entry
LI
Y
\Enter&], Ic-ShiftJ+(Enter~],
[TabSl,
[z5xshlf+[TabS),
PJ,
m,
FJ,
@
(d) To move to cell
A4
,
press the
@
or the
[w]
key.
Do
not
left click the cell
A4.
It will get
you
to
A4
but this is a bad
We may also use the Enter button
habit. If you are working with a formula, clicking another cell
(4)
on the formula bar. This
enters its reference into the formula. Continue typing the
displays only when a cell
is
being
words
width, area
and
perimetre
in
A4, A5
and
A6,
modified.
respectively. We will correct the incorrect spelling later.
are
urged
not
to
develop
the
habit
of
clicking another cell to
(e) In cells
B3
and
B4
enter the values
6
and
7,
respectively.
complete an entry; this will give
erroneous results when you start
working with formulas.
If you start an entry in the wrong
cell. use the
[Escl
key or the Cancel
button
(X)
on the formula bar
to
terminate the action.
(f)
In
B5
we will use a formula to calculate the area. In this cell
type
=B3*B4.
There are
two
important items to note here:
(1)
a formula always begins with the equal sign, and
(2)
the
multiplication operator is not
x
but
*.
Ifyou pressed
[Enter]
rather
than the Enter
(4)
button in the formula bar to complete the
formula, return
to
cell
B5
by
clicking it once. Notice how the
cell now displays the
result
of the formula while in the
formula bar we can see the actual
contents
of this cell.
Cancel Enter
button button
Figure
1.3
(g)
In
B6
we shall purposely make a mistake. To compute the
perimeter, type the formula
=2*B3+B4
and click the Enter
button
(4).
If you pressed
[Enter],
go back to
B6
since we are
going to correct it. The formula we need
is
2*(63+B4)
to give
6
A
Guide to
Microsoft
Excel
2002
for Scientists and Engineers
the correct result; the reason for this is given
in
Chapter
3.
Here we will see one way of making a correction. Move the
mouse until the pointer
is
in the formula bar; note how the
pointer changes shape from a hollow
+
shape to a
1
(I-beam)
shape. Move the I-beam to just after the
*
symbol and press the
a
key to insert the opening parenthesis. Now press the
(End]
key and add the closing parenthesis,
a.
Click the Enter button
(d)
to complete the editing. The cell should now show the
correct value.
Your worksheet should now be similar to that in Figure
1.2.
Type another number
in
B3. Note how the values shown
in
cells
B5
and B6 change as soon as the entry is completed.
We have entered three types of data: text, numbers and formulas.
Note how text is left justified while numbers are displayed right
justified. Later we will see how to change this justification or
alignment.
We have learnt how to move armnd the worksheet using the
mouse and the arrow keys. Before completing this exercise, take
some time out to explore how the scroll bars work and find what
happens when you press
[-I
and
[=Up].
Compare the effects
with pressing these keys when the key
is
held down.
Remember that
m+m
will always return you to A1
.
If your
mouse has
a
wheel between the two buttons you may wish to
experiment with it.
With cell AI
as
the active cell, see what
@
+
a
does. Try the
same command starting first from A3 and then from A6. Return to
A1 and find the effect of
+ [End].
You may also try
Go
To
-
either from the Edit menu or by using either
[F51
or
[ctrl+G
as a
shortcut.
Now we will alter the text in cells AI to A6. For the purpose
of
the
exercise we will assume that we want each word to start with a
capital letter. There are
a
number of ways of doing this.
(h) Make A3 the active
cell
and retype the entire word
Length
to
make the correction.
(i)
The next correction will be made by editing. Using
[ctrll+lHome],
make AI active. To edit the cell press
m.
The status bar will
display Edit rather than Ready and the mouse pointer has
become an I-beam. You can also tell you are
in
Edit mode by
The Microsoft Excel Window
7
looking at the lower right corner of the cell selector border. In
Ready mode it has a block shape called the
cell
handle;
in
Edit
mode the corner resembles an inverted
L
shape. Position the
pointer before the first letter of ‘calculations’, press
[Deletel
and
then
an
upper
‘cy.
While we are
in
A1
,
we can try another experiment. Because
A1 contains text and the cells to its right are empty, the text in
A
1
can overflow into B
1
and C
1.
Click on C
1,
type some text
and press
[Enter].
Now we have ‘lost’ some characters of the last
word
in
A1
.
To
restore it click the Undo key or use the Undo
item on the Edit menu.
The
Undo
tool
Shortcut:
The keyboard shortcut
for
Undo
is
m+Z.
Hold down
m
while tapping the
Z
key.
(i)
Double click on A4 and you will find that this too places you
in
edit mode. Press the
[End)
key. What happens? Now press
[Home].
Type a ‘W’. Now we have two ‘w’s because the default
in Excel is
insert mode
-
anything we type is inserted into
existing text.
You
can toggle between insert and
overtype
(also
called
typeover)
mode with the
[Insert]
key.
In
overtype mode the
status bar displays OVR and in the cell one or more characters
are highlighted. Experiment with the
[CBksp]
and
[Deletel
keys
while editing the cell entry to
Width.
(k) In steps (i) and
(i)
we did the editing within the cell. Make A5
the active cell but this time click the mouse in the formula bar
and do the editing there. Press
[w]
when you have made
the change. Do the same with A6 changing only the first letter;
do not correct its spelling. After clicking the Entry button
(a),
click the Spelling button and let Excel find this and any other
HThe Spelling
tool
Shortcut:
The
keyboard
shortcut
for Spelling
is
a.
spelling errors.
Exercise
3:
The Menu
In
this exercise we look at the main menu bar and find out how to
use some of its various commands.
(a) We are going to save the file containing the work you did in
Exercise
2.
Click File on the menu bar to pull down its menu.
Choose the Save item to bring up the Save dialog which is
common to all Windows applications. Select the folder you
have chosen
to
keep your Excel file
in.
I
suggest you name this
workbook CHAP1
.XLS
so
that we can refer to it again.
Bar
Note how the title bar has changed to reflect the new name.
Next time you start Excel, the name of this file will appear at
the bottom of the File menu. This gives you a quick way of
8
A
Guide to Microsoft Excel
2002
for Scientists and Engineers
reopening the file. This feature may not be available if you are
on a network.
(b) Next we will explore the Format menu. You may be wondering
Keyboard
alternative:
An
why some letters in the names
of
menu items are underlined.
alternative way to open a menu
is:
You can open a menu using this letter
in
association with the
Press
@,
use
the
@
and
keys
key in place
of
clicking the mouse. To open the Format
to
the
main
menu
and
menu, hold down and press the
@
key. Note the triangle
symbol
(b)
to the right of the Columns item. When you click
press
[Entert'].
on an item with this symbol a
submenu
appears. Click on
-
Columns and note the ellipses (three dots . .
.)
after the Width
item. When you click on such an item,
in
a menu or a
submenu, a
dialog box
is opened. Click on Width to open its
dialog box. Click the Cancel button since we do not wish to
change the column width at this time.
(c) Open the Format menu again. Excel
2000
and 2002 display a
drop down menu with a downward pointing arrow at the
bottom. To make the menu less cluttered, items that you
seldom use are not immediately displayed. The menu will
expand if you wait or if you click on the arrow
-
see Figure
1.4.
Most expanded menus are much larger than this example!
Use the
(Escl
key to close the menu.
In
Exercise
4
we learn how
to customize Excel
so that all menu items show immediately.
WClick
to
expand menu
Figure
1.4
The Microsoft Excel Window
9
Exercise
4:
The
Tool
bars
The
tool
BThe What’s This tool
WThe
Spell
tool
(d) You may sometimes wish to use a keyboard shortcut rather
than clicking the mouse. Open the Edit menu.
If
you have not
copied something since logging on to your computer, the
clipboard will be empty and the Paste feature will be displayed
in
light text
-
we say it is
greyed out.
If an item
in
a menu is
greyed out it is currently unavailable to you.
To
the right
of
Cut we see the text
[Ctrll+X,
while to the right of
Go
To
is
ICtrl]+G
or
[.
These are notes telling you that Cut may be
accessed by holding down the
[Ctrll
key while you press the
X
key without ever opening a menu. Experiment with the
@+C
and
m+V
to copy the entry in A6 to A10.
To close a menu opened by mistake either click the mouse
anywhere
in
the workbook window or repeatedly press the
[Escl
key
until nothing in the menu bar is highlighted.
Microsoft Excel provides a number of toolbars. The Standard and
the Formatting toolbars are generally displayed all the time. Others
appear when the context is right.
An icon on a toolbar allows the user to quickly access one of the
Excel commands without the need to open a menu. In addition,
since the icons are simple pictures, there is little to learn. For
example, if you wish to print a worksheet using the menu bar, you
either know the Print command is
in
the File menu or you must go
searching for it. On the other hand, the icon depicting a printer is
self-explanatory and easy to find.
(a) The pictures for some buttons are less obvious. However,
when you move the mouse pointer over an icon without
clicking and wait a second or
two,
Excel displays a
tool
tip
naming the tool associated with the icon. For some icons you
may find that this method does not give enough information.
Let’s use the context-sensitive method to get more
information. Open the Help menu and click on the item
What
s
This?
The cursor changes to a question mark. Move the cursor
to the
Spell
tool (it has ABC on its icon) and left click it. A
larger tool tip with additional information is displayed. Note
that if you need additional information about another icon you
must visit the Help menu item again.
(b) By default, the Standard and Formatting toolbars are shown
side by side in newer versions of Excel to give more room for
the worksheet area. Of course, this means that fewer tools can
IO
A
Guide to Microsoft Excel
2002
for
Scientists and Engineers
be displayed. Figure
1.5
shows the Formatting toolbar. Note
the double arrow on the right
of
the toolbar; this gives us
access to the otherwise hidden tools.
Figure
1.5
The handle on the left of the toolbar may be used to move the
toolbar. When the cursor is moved over the handle we get a
cursor with four arrows
+.
Carefully drag the Formatting
toolbar’s handle to the left to reveal more formatting tools but
fewer Standard tools.
If
your toolbar moves below the
Standard toolbar, use the menu commandToolslCustomize and
click on the
Options
tab. Remove the check mark from
Show
Standard and Formatting toolbars on
two
rows
-
see Figure
1.6.
Note also the options concerning the Menu commands.
If you drag the toolbar down too far it will become a floating
menu; it will be a window with its own title bar. To dock the
toolbar drag it with the title bar into the area where Excel
generally displays toolbars.
Figure
1.6
The
Microsoft
Excel
Window
I
I
(d) While by default Excel displays only the Standard and the
Formatting toolbars, it has a wide variety of specialized
toolbars. Generally these become visible when needed.
So,
for
example, when we are working on a chart, Excel displays the
Chart toolbar provided it
is
checked in the YiewlToolbars
menu.
The Drawing toolbar is useful for annotating a worksheet with
arrows and other symbols. Use the menu command
-
ViewlIoolbars to make the
Drawing
toolbar visible. Note that
its normal docking place is above the status bar but it can be
made floating by dragging its handle. Experiment with the
drawing tools and then use YiewlIoolbars to hide the toolbar.
The command YiewJTask Pane may be used to open and close
the task pane.
Exercise
5:
Customizing
Menus
The menus and toolbars are set
up
for the average user. Sometimes
we would like something different. Microsoft Excel makes it easy
to
modify the menus and the toolbars.
(a)
A
menu or toolbar can be customized only when the
Customization window is open. We do this with
-
Toolslcustomize. The window is depicted in Figure
1.7.
It
is
similar to Figure 1.6 but this time the
Toolbars
tab is open.
and Toolbars
(b) When Figure
1.7
was captured, the Drawing toolbar was
displayed. We saw
in
step (c) of Exercise
4
how to open and
close toolbars with YiewlIoolbars. The Customize window
provides another method. Once again all that is needed is to
place or remove a check mark in the appropriate box.
If
you
scroll down the list of toolbars you will find another way
of
displaying the task pane.
WThe
Hyperlink
tool
(c) Let us assume the user does not need the
Insert hyperlink
tool.
With the Customize window open, place the mouse pointer
over the
Insert hyperlink
tool in the Standard toolbar and,
holding down the left mouse button, drag the icon
off
the
toolbar.
To
restore the tool, select
Standard
in
the Toolbars tab
and click on the Reset button. Click on
Yes
when Excel asks
you to confirm the action. The same dragging method may be
used to reposition an icon on
a
toolbar.
12
A
Guide to Microsoft Excel
2002
for Scientists and Engineers
Figure
1.7
(d) To find even more tools, click on the Command tab
of
the
Customize window. Select a topic such as Web and move the
vertical slider to review the available tools.
To add a tool, drag
it onto the toolbar at the required position.
Try dragging the
Back
tool on the standard toolbar next to the
Insert hyperlink
tool. Use the Beset button on the Toolbars tab to restore Excel
to the default setting.
(e) Items on the menu bar and on popup menus may be dragged to
new positions in the same manner as tools. Items may be added
to the menu bar.
A
tool may be placed on the menu bar if
you
so
wish. To restore the menu bar, locate Worksheet Menu Bar
in the list of toolbars and click the Reset button. To have all
commands display immediately you open a menu bar item,
remove the check mark from the
Menus show recently used
commandsflrst
box
of
the Options tab.
Exercise
6:
Getting
In this exercise we briefly
look
at how to get help in Microsoft
Excel. Suppose we wish to know how to change the width of a
column. There is no need to type a complete question such as
How
do
I
change a column width?
You need enter only the key words;
so
in the case we could use
column width.
Help
@
The Help tool