QuarkXPress to Adobe InDesign CS4 Conversion Guide phần 2 potx
Bạn đang xem bản rút gọn của tài liệu. Xem và tải ngay bản đầy đủ của tài liệu tại đây (6.47 MB, 10 trang )
Selection tool
Direct Selection tool, Position tool
Pen tool, Add Anchor Point tool, Delete Anchor
Point tool, Convert Direction Point tool
Type tool, Type On A Path tool
Pencil tool, Smooth tool, Erase tool
Line tool
Rectangle Frame tool, Ellipse Frame tool,
Polygon Frame tool
Rectangle tool, Ellipse tool, Polygon tool
Rotate tool
Scissors tool
Free Transform tool
Eyedropper tool, Measure tool
Gradient Swatch tool
Gradient Feather tool
Scale tool, Shear tool
Hand tool
Zoom tool
Default Fill And Stroke
Formatting Aects Container/Text
Apply: None, Color, Gradient
View Modes: Normal, Preview, Bleed, Slug
Note tool
Fill and Stroke boxes
Swap Fill And Stroke
Master Page Objects
In QuarkXPress, any object on a
master page can immediately be
selected and changed on a document
page. InDesign protects master-page
objects from accidental changes.
Master-page objects have dotted,
rather than solid, edges.
To select a master object on a docu-
ment page, you must override it by
pressing Shi+Command (Mac OS)
or Shi+Ctrl (Windows), and then
clicking the object. You can also
choose Override All Master Page
Items from the Pages panel menu.
If you want to prevent a master
object from being selected on a doc-
ument page, select the object on the
master page, and then deselect Allow
Master Item Overrides On Selection
in the Pages panel menu.
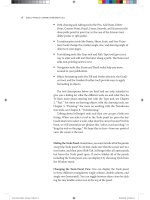
Text Leading
InDesign treats leading as a character
attribute, not a paragraph attribute.
Leading controls are displayed in the
Character panel (Type > Character)
and also in the Control panel when
Tip:
You can quickly choose any tool in the
Tools panel by pressing a single key,
such as P for the Pen tool or T for the
Type tool. (Be sure that you don’t have
an active insertion point in a text frame,
or you’ll simply type the letter.)
Top 10 Dierences You Need to Understand 11
Panel dock
(click to open or
close panels)
Choose a workspace.
Zoom levelAdobe Bridge
Drag this
handle to
move the
Control panel
elsewhere on
the screen.
The Application
Frame hides
distracting
elements on
your desktop.
The Application
bar makes
controls easily
accessible.
All panels are listed
in the Window menu.
Live Preight
feedback
Page controls
Search
Community Help.
Multiple
documents
appear as tabs
(drag any tab
to reposition
or undock it).
While at rst glance InDesign
may appear very dierent from
Quark XPress, many of the features
are actually similar. Take a moment
to get acquainted with the location
of panels, menus, and document
controls in the image below.
Here are some tips for managing
the panels you’ll be working with:
The Document Window
Workspaces remember the
location of each panel onscreen,
including whether it’s visible
or hidden. You can choose
among preset workspaces from
the Workspace menu on the
Application Bar or create your own.
You can dock a panel to the edge
of your screen by dragging its tab
to the left or right edge.
When the insertion point is not
blinking, press Tab to show or hide
all panels, or press Shift+Tab to
show or hide all panels except the
Tools panel and the Control panel.
Drag the resize bar toward the
edge of the screen to collapse a
stack and display icons. When you
widen a stack, icons and labels
are displayed.
12 Adobe InDesign CS4 | Conversion Guide
To thread one text frame to
another, choose the Selection
tool, click the in or the out port
of a frame, and then click
another text frame.
The story is
displayed as
a thumbnail
next to the
cursor.
Out port
Threaded frames
the Character Formatting Controls
icon is selected at the le side of
the Control panel. e largest leading
value on each line in a paragraph sets
the spacing for that line.
While this is a more traditional
approach to leading, it can be frustrat-
ing to those accustomed to the way
QuarkXPress works. If you prefer that
every character in a paragraph have
the same leading value, you can open
the Preferences dialog box, choose
the Type pane, and select the Apply
Leading To Entire Paragraphs option.
Text Threading
You won’t nd any tools for link-
ing and unlinking text frames in the
InDesign Tools panel. at’s because
linking and unlinking—or threading,
as it’s called in InDesign—is accom-
plished via the in and out ports on
text frames.
e in port of a text frame is a small
square just below the frame’s upper
le corner; the out port is just above
the lower right corner. If an out port
is displayed in red with a red plus
sign within, there is overset text. For
more on seeing or editing overset
text, see “Story Editor” on page 45.
To add a text frame aer an exist-
ing text frame, select the Selection
tool or the Direct Selection tool, click
the existing frame, and then click
the frame’s out port. A loaded icon
is displayed. At this point, you can:
Click or click and drag to create a
new text frame
Click within another existing text
frame to thread to that frame—the
frame you click may be empty or
contain text
Use the same process to add a text
frame in front of an existing frame,
except begin by clicking the frame’s
in port.
To unlink two threaded text frames,
double-click either the out port of the
rst frame or the in port of the sec-
ond frame. You can see how frames
are threaded together when the
Selection tool is selected by choosing
View > Show Text reads.
Stroke and Fill
QuarkXPress limits you in the kinds
of objects to which you can apply
a background color or frame. In
InDesign, you can select any text,
path, or frame, and apply a solid, tint,
or gradient ll color. First, ensure the
Fill icon is selected. You can nd this
icon at the bottom of the Tools panel
or at the top of the Swatches or Color
panel. en do one of the following:
Click a color swatch in the
Swatches panel.
Specify a color in the Color panel.
Dene a blend from one color to
another in the Gradient panel.
Choose Apply Color, Apply Gradi-
ent, or Apply None from the Apply
Color pop-up menu at the bottom
of the Tools panel.
Top 10 Dierences You Need to Understand 13
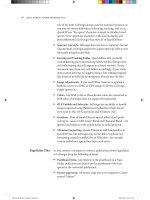
When you select an image inside a frame
with the Direct Selection tool, you can see
its bounding box and transform it
separately from the frame.
The Fill and Stroke icons (circled above)
appear, partially overlapping each other,
at the bottom of the Tools panel and the
top of the Swatches panel.
To apply a stroke to any selected
object(s) or text, ensure that the
Stroke icon is selected instead. Note
that you can apply a color, tint, or
gradient to the ll or stroke of text
characters without converting the
text to outlines. (If you do choose
Type > Create Outlines, the resulting
text is no longer editable.)
If you have one or more text frames
selected with the Selection tool, you
can apply a ll or stroke to the text
within each frame by rst clicking
the Formatting Aects Text icon in
the Tools panel, the Swatches panel,
or the Color panel. If you select the
Formatting Aects Container icon
instead, the ll or stroke is applied
to the selected frame rather than to
the text.
e Default Fill And Stroke icon
in the Tools panel lets you return the
Fill and Stroke icons to their default
settings. e Swap Fill And Stroke
icon reverses the colors of the
stroke and ll icons.
Selecting Images vs. Frames
In QuarkXPress, you must select the
Content tool before you can modify
either text or a graphic. InDesign
doesn’t have a single tool for modify-
ing both text and graphics. Instead, if
you want to modify a graphic with-
out aecting its frame, choose the
Position tool or the Direct Selection
tool, and then click the graphic.
For example—if you want to move an
image into another frame—select it
with the Direct Selection tool, choose
Edit > Cut, select the destination
frame, and choose Edit > Paste Into.
Similarly, you can change the color
of imported black-and-white and
grayscale graphics (but not of color
graphics) by rst selecting the
graphic with the Direct Selection
or Position tool, and then clicking
a color in the Swatches panel.
Which tool you use when scaling or
resizing a graphic also determines
the result. For more information
on scaling, resizing, and cropping,
see “Working with Graphics and
Frames” on page 23.
Ruler Guides Are Objects
To create a ruler guide, click the
horizontal or vertical ruler, and drag
the pointer onto a page or the paste-
board. If you release the pointer over
a page, the guideline extends across
the page. If you release the pointer
over the pasteboard, the guideline
spans the page and pasteboard. You
can also double-click a ruler to create
a guideline where you click. (Hold
down the Shi key while dragging or
double-clicking to add the guide at
the nearest ruler tick mark.)
Ruler guides behave much like
objects you create with the drawing
tools. You can select a ruler guide by
clicking it with the Selection, Direct
Selection, or Position tool, and you
can select multiple guides by Shi-
clicking or by clicking and dragging
over two or more guides.
You can reposition a selected guide
by dragging it, using the arrow keys
14 Adobe InDesign CS4 | Conversion Guide
Every power user knows that one of
the best ways to work eciently in
a program is to learn the keyboard
and mouse shortcuts. For example,
most people know that you can
create a new document by pressing
Command+N (Mac OS) or Ctrl+N
(Windows).
Here’s a handful of the most useful
shortcuts you should know when
using InDesign.
However, note that InDesign lets
you edit any keyboard shortcut, or
assign a shortcut to any of the sev-
eral hundred features that don’t
have a default shortcut. To edit or
assign a custom shortcut, choose
Edit > Keyboard Shortcuts.
In the Keyboard Shortcuts dialog
box, you can choose a dierent set
(such as Shortcuts For QuarkXPress
4.0) or dene your own set by click-
ing the New Set button.
To see a list of every shortcut in
InDesign, click the Show Set button
or see InDesign Help.
Feature Mac OS Windows
Place (text or image) Command+D Ctrl+D
Export Command+E Ctrl+E
General Preferences Command+K Ctrl+K
Add Page Command+Shift+P Ctrl+Shift+P
Paste Without
Formatting
Command+Shift+V Ctrl+Shift+V
Paste Into Command+Option+V Ctrl+Alt+V
Paste In Place Command+Option+Shift+V Ctrl+Alt+Shift+V
Select All Command+A Ctrl+A
Deselect All Command+Shift+A Ctrl+Shift+A
Undo Command+Z Ctrl+Z
Redo Command+Shift+Z Ctrl+Shift+Z
Show/Hide all panels Tab Tab
Jump to Control panel Command+6 Ctrl+6
Toggle character and
paragraph formatting
in Control panel
Command+Option+7 Ctrl+Alt+7
Selection tool* Esc Esc
Selection tool
†
V V
Text Frame Options Command+B Ctrl+B
Story Editor Command+Y Ctrl+Y
Toggle Normal and
Preview Mode
†
W W
Quick Apply Command+Return Ctrl+Enter
Fit Page In Window Command+0 Ctrl+0
Fit Spread In Window Command+Option+0 Ctrl+Alt+0
Show Hidden
Characters
Command+Option+I Ctrl+Alt+I
Temporary Hand tool Option+spacebar-drag Alt+spacebar-
drag
Preight panel Command+Option+Shift+F Ctrl+Alt+Shift+F
*Applies only when editing text in a text frame.
†
Applies only when not editing text in a text frame.
The Top 25 Shortcuts You Should Know
Top 10 Dierences You Need to Understand 15
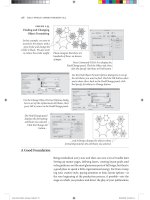
The Text Wrap panel lets you control how
text wraps around an object. Here, the text
wraps around the right side of the image’s
transparency mask.
You can edit the shape of the text wrap with
the Direct Selection tool.
on your keyboard, or entering an X
or Y value in the Control panel. You
can also delete, lock, cut, copy, or
paste guides like any other object.
e Grids & Guides menu (View >
Grids & Guides) provides several
commands for showing, hiding, lock-
ing, and snapping objects to gridlines
and guidelines.
InDesign also oers Smart Guides,
which appear automatically as you
drag, rotate, or resize objects on your
page. Smart Guides help you align
and distribute objects by giving you
real-time feedback about the object
you’re moving and its relation to
other objects on the page. You can
enable or disable Smart Guides by
choosing View > Grids & Guides >
Smart Guides.
Text Wrap
In QuarkXPress, you use the
Runaround controls in the Modify
dialog box to control the ow of text
around an object; in InDesign, you
use the Text Wrap panel (Window >
Text Wrap).
Select an icon at the top of the Text
Wrap panel to indicate how text
will ow when the selected object
overlaps a text frame: No Text Wrap,
Wrap Around Bounding Box, Wrap
Around Object Shape, Jump Object,
or Jump To Next Column.
Tip:
PREVENTING TEXT WRAP
To prevent text in a frame from wrap-
ping around an object with a text wrap,
select the text frame, choose Object >
Text Frame Options, and then select
Ignore Text Wrap.
If you choose Wrap Around Object
Shape, and the object is a graphic
with a transparent background, you
may want to choose Detect Edges,
Photoshop Path, Alpha Channel,
or Same As Clipping from the Type
pop-up menu in the panel. ese
allow the text wrap to ow around
the nonrectangular graphic.
InDesign normally allows text to
wrap on both sides of an object. You
can change this behavior in the Wrap
To pop-up menu. e options are
Right Side, Le Side, Both Right &
Le Sides, Side Towards Spine, Side
Away From Spine, and Largest Area.
The selected object is a native Photoshop
image with a transparent background. Note
that the text is on a layer above the image.
16 Adobe InDesign CS4 | Conversion Guide
While QuarkXPress limits you to
owing text around objects placed
above the text box, text wrap in
InDesign aects text frames above
and below an object. However, if
you prefer InDesign to limit its text
wrap behavior, open the Preferences
dialog box, choose the Composition
pane, and select the Text Wrap Only
Aects Text Beneath option.
Character, Paragraph, Table,
and Object Styles
Character and paragraph styles are
great time-savers for text-intensive
publications like newspapers, books,
magazines, and catalogs. InDesign
also includes object styles, which you
You can use the Open command
(File menu) in InDesign to open
documents and templates created
with QuarkXPress or QuarkXPress
Passport .–..
When you open a QuarkXPress le
in InDesign, a new, untitled docu-
ment is created. InDesign converts
the original le information to native
InDesign information. Most objects,
styles, and colors are translated prop-
erly, but text may reow dierently,
so proof the results carefully.
Before converting a QuarkXPress
document, you should store all
can apply to any InDesign object,
and table styles and cell styles, which
make document-wide changes to
table and cell formatting quickly and
painlessly.
However, note that character styles
are handled dierently in InDesign
than in QuarkXPress. You can dene
a character style in InDesign to be
as specic as you want. For example,
your character style could be dened
to apply only italic, ignoring any
other formatting already applied to
the text. You could then apply that
same italic character style to text set
in dierent fonts and sizes, and it
would always make it italic—except
in the case where a font doesn’t have
an italic style. (InDesign will never
apply a fake italic to text.)
Note that in general you should not
format an entire paragraph with a
single character style. Instead, use a
paragraph style, which applies both
paragraph and character formatting
to the selected text.
Character styles also allow for some
of the most powerful text format-
ting features in InDesign, including
nested styles, styles, line styles,
and drop cap styles. For more infor-
mation, see “Nested Styles” on page 42.
imported picture les in a single
folder, relink all pictures in the Pic-
tures tab of the Usage dialog box
(Utilities > Usage > Picture), and
then use File > Save As to save a
clean version of the document in
QuarkXPress. is ensures that all
links are preserved.
If your QuarkXPress document does
not convert, check the original le
and remove any objects that require
an XTension; then save and try to
convert the document again.
QuarkXPress .x, .x, and .x les
are stored in a proprietary format
that InDesign cannot directly open.
However, a third-party developer
called Markzware (www.markzware.
com) oers a conversion utility called
QID that can convert these les.
Opening a QuarkXPress document
may be ecient in the short run,
but it is oen better to re-create the
document, making use of the unique
features of InDesign, such as based-
on master pages, nested styles, and
object styles. Another option is to
export the QuarkXPress le as a
le and place each page of the
le inside the InDesign document as
a graphic.
Opening QuarkXPress Files
Opening QuarkXPress Files 17
Creating a New Document
In both QuarkXPress and InDesign,
choosing File > New > Document
or pressing Command+N in Mac OS
or Ctrl+N in Windows displays the
New Document dialog box. The
controls in these dialog boxes are
similar but not identical. Here are a
few things you should know about
creating a new InDesign document:
Facing Pages: If you’re creating a
book or magazine with a left and
right (verso and recto) page for-
mat, select this option.
Master Text Frame: This is similar
to the Automatic Text Box option
in QuarkXPress. While this feature
is not as important in InDesign as
it is in QuarkXPress, it is useful if
you will be using the Smart Text
Reow feature, which can add or
delete pages as you type or edit
text on your InDesign pages.
The maximum size of an InDesign
page is 216 inches by 216 inches
(that’s an 18-foot or 548-cm square)
compared to only 48 inches by 48
inches in QuarkXPress.
The Page Size menu lists common
screen resolution sizes—helpful
when making documents that will
be exported to PDF or SWF to be
viewed onscreen. Note that for all
intents and purposes, points and
pixels are equivalent measures.
If you later change your mind
about the nal page size, you can
choose File > Document Setup.
This also lets you convert a facing-
page document to a single-sided
document or vice versa.
You can later change the margin
and column settings by choosing
Layout > Margins And Columns.
While QuarkXPress lets you adjust
margins and columns only on a
master page, InDesign lets you
change them for a master page or
one or more individual document
pages—depending on what you
select in the Pages panel.
If your document opens vertically
(like a wall calendar) instead of
horizontally, you can later rotate
one or more spreads by select-
ing them in the Pages panel and
choosing Rotate Spread View
> 90°CW (or 90°CCW) from the
Pages panel menu.
Although you can create a single
document with as many as 9,999
pages, you’ll probably want to use
the Book feature (File > New >
Book) to manage your long docu-
ments. A book le is a collection
of InDesign les. You can use the
Synchronize feature to ensure the
documents use the same char-
acter and paragraph styles, table
and cell styles, object styles, color
swatches, and master pages.
You can also sequentially num-
ber pages in booked documents,
print all or selected documents in
a book, or export documents as
a single Adobe PDF le. InDesign
also lets you generate tables of
contents, cross-references, and
indexes for book les.
18 Adobe InDesign CS4 | Conversion Guide
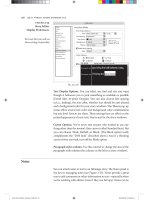
You can save any settings you
choose in the New Document
dialog box as presets. After
you create a preset, it’s
displayed in the Document
Preset menu in the New
Document dialog box.
You can create a new
document quickly based on
the last chosen document
preset by pressing
Command+Option+N
(Mac OS) or Ctrl+Alt+N
(Windows).
Enter the number of pages
for your new document if
you wish, but it is optional.
You can always add or
remove pages later.
Click the More Options
button to display controls
for creating bleed and slug
guides on the pasteboard.
Use the bleed area for
objects that you want to
extend all the way to the
trimline of the printed
document; use the slug
area for instructions to the
printer, sign-o forms, or
other information related
to a document.
You can modify any
document preset, including
the [Default] preset, by
choosing File > Document
Presets > Dene.
When this Link icon is
selected, InDesign ensures
that all the values in that
section are the same.
A new facing-pages document begins with
a right-hand page. If you need to start the
document with a left-hand page, select the rst
page in the Pages panel, choose Numbering &
Section Options from the panel menu, and set the
Start Page Numbering At eld to an even number.
Creating a New Document 19
Navigating Documents
InDesign oers many of the same methods for document navigation
you’ve become accustomed to in QuarkXPress. Even better, it includes several
features that let you navigate more quickly to the page you want to display,
zoom in more closely on the area you want to work on, and see more clearly
the objects you want to modify.
Navigating around a Page
Besides the scroll bars on the side
and bottom of each document win-
dow, there are several ways to pan
around a page, or even from one
page to another:
e Hand tool lets you adjust the
visible portion of the page within
the document window. You can
temporarily access the Hand tool
(and scroll the page) by pressing
Option+spacebar (Mac OS) or
Alt+spacebar (Windows).
Holding down the mouse button
with the Hand tool selected for
about one second invokes the
Power Zoom mode, zooming out
to show you the current spread.
e red rec tangle indicates the area
you will see when you release the
mouse button. Drag this rectangle
to a dierent location or use the
arrow keys on your keyboard (or
scroll wheel) to change its size.
You can also zoom in and out by
choosing one of the magnica-
tion commands in the View menu,
using the Zoom tool, or specifying a
percentage in the Zoom eld in the
Application Bar (if currently visible).
Navigating from Page to Page
Like QuarkXPress, InDesign pro-
vides a keyboard command—
Command+J in Mac OS or Ctrl+J in
Windows—that lets you quickly nav-
igate to a particular page. When you
use this keyboard shortcut, the Go
To Page dialog box is displayed. Type
20 Adobe InDesign CS4 | Conversion Guide