QuarkXPress to Adobe InDesign CS4 Conversion Guide phần 4 docx
Bạn đang xem bản rút gọn của tài liệu. Xem và tải ngay bản đầy đủ của tài liệu tại đây (6.47 MB, 11 trang )
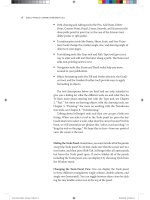
The Highlight menu in the Flattener
Preview panel provides several options for
displaying specic instances of transpar-
ency, including Transparent Objects, All
Aected Objects, and Outlined Text. The
Transparent Objects option highlights all
transparent objects in red.
Flattening Transparency
When you print an InDesign le
that contains transparent objects,
InDesign performs a process called
attening, which converts all areas
of transparency into a collection of
opaque vector and raster objects that
retains the appearance of the original
objects. Flattening also occurs when
you export a le with Adobe
Acrobat® compatibility (such as a
/-a or /- le) or an
le, using File > Export.
You can choose the attening quality
in the Transparency Flattener area
of the Advanced pane of the Print
dialog box or the Export Adobe
dialog box. By default, the Preset
menu includes three options: Low
Resolution, Medium Resolution, and
High Resolution. In general, Medium
Resolution is appropriate for proof-
ing, and High Resolution should be
used for all nal output.
Pages with transparent objects are
displayed with a checkerboard pattern
icon (circled above) in the Pages panel.
If you are printing to a device that
does not support PostScript® or you
are creating a le that you will
send to a client as a proof, you should
check Simulate Overprint in the Out-
put pane of the Print dialog box. is
way, the proof will look the same
as it looks onscreen with Overprint
Preview (View menu) enabled. is
is especially important when using
spot colors.
If none of the default presets meets
the requirements of your printer—or
your output provider’s printer—you
can create custom attener presets
by choosing Edit > Transparency
Flattener Presets and then clicking
New in the Transparency Flattener
Presets dialog box. For information
about creating attener presets, refer
to InDesign Help.
Note that attening is not necessary
when creating a /- le and
printing to an Adobe Print
Engine .
Managing Transparency
In a document that will be attened,
it is a good practice to place text on a
higher layer than transparent objects.
is removes the chance that some
text characters will become outlined
in the attening process.
e Flattener Preview panel (Win-
dow > Output > Flattener Preview)
helps designers and printers prevent
mistakes and ensure the highest
quality printed results by identifying
transparent objects or objects that
interact with transparent objects.
e Separations Preview panel
(Window > Output > Separations
Preview) lets you visually check
individual or multiple plates, pre-
view overprinting objects, and view
ink-limit warnings onscreen before
printing.
32 Adobe InDesign CS4 | Conversion Guide
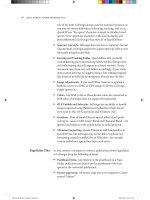
In this original layout, the images and the text don’t
stand out enough over the dark background.
Here, the graphic frames are given a
beveled stroke with a small shadow to
add dimensionality.
In the nal layout, the Fill of the text
frame is set to Paper, at 70% opacity.
The text frame object itself is also
given an angled Gradient Feather and
a Pillow Emboss eect.
When you expect to apply the same
object formatting more than once
in a document, consider making
an object style in the Object Styles
panel. This lets you quickly apply
and redene your formatting. Your
object style denition can include
transparency eects applied to the
object, its ll, its stroke, or (in the
case of a text frame) its contents.
Adding Creative Effects to Object Styles
Creative Eects 33
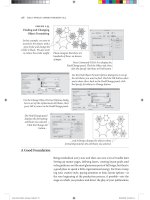
This area identies the problem
and recommends a solution.
Choose Dene Proles
from the Preight panel
menu to tell InDesign
which errors to look for.
The Preight Prole menu lets
you export or import proles.
Choose your
prole here.
New Preight Prole
Double-click to
jump to this object.
When a document has no
errors, the light turns green.
Whether printing your InDesign le
or outputting a SWF or an Adobe
PDF document for distribution on
the web, consumer electronics
devices, or phones, you’ll nd that
InDesign oers an array of options
for achieving the results you want.
You can see an accurate view of what
document pages will look like when
printed or exported as PDF les by
choosing View > Screen Mode >
Preview (or press W when not edit-
ing text). This hides nonprinting
page elements such as guides, the
pasteboard, and frame edges.
If you choose Overprint Preview
(View menu), InDesign displays an
onscreen ink preview that approxi-
mates how gradients, transparency,
and overprinting will appear in
color-separated output.
The Preight panel (Window >
Output > Preight) can warn you of
problems that may prevent a docu-
ment or book from printing cor-
rectly. Preighting is live—that is,
when it is enabled, InDesign checks
your document while you work and
displays a green or red dot in both
the lower left corner of the panel
and the document window.
You can control what the Preight
panel considers an error by choos-
ing Dene Proles from the Pre-
ight panel menu. Options include
minimum image resolution, color
model limitations, document size,
and more. After creating a new
preight prole, you can choose it
from the Prole menu in the Pre-
ight panel.
Note that when you select an error,
the Info area at the bottom of the
panel provides more details.
Preflight and Output
34 Adobe InDesign CS4 | Conversion Guide
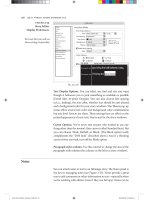
PDF Export
You can export a publication
as a single PDF le directly from
InDesign, without the need for
Acrobat Distiller®. This makes for
easier and more consistent PDF
creation, including support for
industry standards such as PDF/X.
To export an InDesign document as
a PDF le, choose File > Export, and
then choose Adobe PDF from the
Format menu. To export a book or
selected chapters in a book, choose
Export Book To PDF from the Book
panel menu.
Choosing PDF/X-1a from the Adobe
PDF Preset pop-up menu converts
all colors to CMYK plus spot colors.
Choosing PDF/X-3 maintains RGB
colors in the le and includes color
proles. Both options result in all
transparency being attened. Use
PDF/X-4 to maintain transparency
for Adobe PDF Print Engine output.
If objects bleed o the side of your
page, be sure that is accounted for
in the Marks And Bleeds pane of the
Export Adobe PDF dialog box. That
pane also lets you place print marks
(such as crop marks and page infor-
mation) around your page.
You can save the settings you make
in this dialog box by clicking Save
Preset. The presets you create can
also be used in other Creative Suite
applications. To create a PDF le
based on a preset without seeing
the dialog box, hold down the Shift
key while choosing the preset from
the File > Adobe PDF Presets menu.
You can navigate among the panes listed on the left side of the Print dialog box or the
Export Adobe PDF dialog box by holding down the Command (Mac OS) or Ctrl (Windows)
key and pressing numbers from one to seven.
If you prefer to create a PDF le
using Acrobat Distiller, you can do
that by choosing Adobe PDF from
the Printer pop-up menu in the
Print dialog box. However, PDF les
created with Acrobat Distiller do
not support transparency, layers, or
interactive elements.
Preight and Output 35
Important Techniques
e previous sections have helped you learn your way around
Adobe InDesign CS. Now here are some techniques that will get
you laying out pages faster and better than ever before. Whether you
need to create colors and gradients, format text automatically, anchor
an object inside a text ow, or just nd some tips for getting more
ecient with InDesign, you’ll nd the answers in this section.
Selection Tool Techniques
e Selection tool and the Direct
Selection tool are two of the most
important tools in InDesign, so it’s
helpful to know how to access them
quickly. Here are some tips:
You can temporarily access the
Selection tool or Direct Selection
tool (whichever was most recently
selected) by pressing Command
(Mac OS) or Ctrl (Windows) when
any other tool is selected.
When editing text with the Type
tool, you can switch to the Selec-
tion tool by pressing the Esc key.
You can double-click a text frame
with the Selection tool or the
Direct Selection tool to switch to
the Type tool. If the text frame
contains text, the blinking text
insertion point is displayed where
you double-click.
Double-click a graphic frame or an
unassigned frame or path to toggle
between the Selection tool and the
Direct Selection tool.
You can select through an
object—selecting a frame or path
behind another object—by holding
down Command (Mac OS) or Ctrl
(Windows) while clicking with the
Selection tool.
If you choose the Selection tool
and then click any object that’s
part of a group, the entire group
is selected. To select an individual
object that’s part of a group, click
the object with the Direct Selection
tool. To move an object that’s part
of a group aer selecting it, click
36 Adobe InDesign CS4 | Conversion Guide
The object on the far right is out of alignment. If we drag it to the left (shown here as an outline), the
cursor indicates the current position of the object. Green Smart Guides with arrowheads indicate the
three objects will have equal space between them when the mouse button is released. Horizontal
Smart Guides indicate the object is aligned along the top, center, and bottom of the frame to its left.
and drag the object’s center point,
or switch to the Selection tool and
drag a frame edge.
When you use the Edit > Paste Into
command to place a copied object
into another object, the pasted
object is nested within the frame
that contains it. To select a nested
object, click the object with the
Direct Selection tool.
Deselect All
Press Shi+Command+A (Mac
OS) or Shi+Ctrl+A (Windows)
to deselect all objects or text on a
spread. It is particularly helpful to do
this before creating or editing color
swatches or editing a paragraph or
character style, so that the swatch or
style is not accidentally applied to the
selected text or object.
Smart Guides
Smart Guides are temporary guides
that appear as you create, move,
rotate, resize, or scale an object or
group of objects on your page. ey
help you lay out objects on a page
quickly, without having to create
guides and grids manually.
You can turn Smart Guides on or o
in the View > Grids & Guides menu,
or by pressing Command+U (Mac
OS) or Ctrl+U (Windows).
For example, if you want two objects
to align along their le sides, you can
enable Smart Guides, and then start
dragging one of the objects with the
Selection tool. When the sides or
center points of the two objects are
aligned, InDesign displays a light
green guideline.
If you drag a third object near these
rst two, you will see a dierent kind
of Smart Guide—one with arrows on
each end—when the space between
all three objects matches exactly.
If you rotate an object with the
Rotate tool, InDesign shows the
current angle next to the cursor, and
displays a green Smart Guide when
the rotation matches the same angle
as any other rotated object visible on
the page.
Note that the Smart Guides feature
sees only the objects that you can
see at your current view. If you want
Smart Guides to ignore an object,
scroll the page so that you cannot see
it, or place it on a hidden layer.
Making New Color Swatches
By default, the Swatches panel con-
tains colors swatches for each of the
four process colors, plus process-
color equivalents of red, green, and
blue. To add a new color swatch,
choose New Color Swatch from the
panel menu, and then choose Pro-
cess or Spot from the Color Type
pop-up menu. You can choose preset
libraries of colors, such as Pantone
Solid Coated, from the Color Mode
pop-up menu.
Important Techniques 37
You can use
the Gradient
and Color
panels to
dene a
two-color
gradient.
Double-clicking the swatch in the
Swatches panel opens the Gradient
Options dialog box, where you can
name or edit the swatch.
The Kuler panel lets you explore
relationships between colors and build
custom color themes that you can use in
InDesign or upload to .
To add the gradient to
the Swatches panel,
choose New Gradient
Swatch from the
Swatches panel menu,
or drag the swatch icon
from the Gradient panel
into the Swatches panel
(shown here).
You can also create unnamed colors
with the Color panel. If you do this,
you can then add those colors to the
Swatches panel by choosing either
Add To Swatches from the Color
panel menu or Add Unnamed Colors
from the Swatches panel menu.
Note that you can rearrange named
colors in the Swatches panel by drag-
ging them up or down. Also, adding
or removing colors in the Swatches
panel while no documents are open
aects all new les you create.
e Kuler panel (which is now
directly accessible within InDesign
by choosing Window > Extensions
> Kuler) lets you download color
swatches from Adobe’s popular Kuler
website as well as create and edit your
own color themes.
Making and Applying Gradients
ere are several ways to dene and
apply a gradient from one color to
another. You can apply a gradient to
any selected object by opening the
Gradient panel (Window > Gradient)
and clicking the gradient swatch
icon. en you can choose Linear or
Radial from the Type pop-up menu,
and adjust its Location and Angle.
To change the colors, click the
gradient stops under the gradient
bar, and choose a color in the Color
panel. Alternatively, you can hold
down the Option (Mac OS) or Alt
(Windows) key and click a named
color in the Swatches panel. To add
new gradient stops, click a blank area
below the gradient bar.
You can add the current gradient to
the Swatches panel (or create a new
named gradient) by choosing New
Gradient Swatch from the Swatches
panel menu. Named gradients do
not include information about blend
angle or location.
e Gradient Swatch tool lets you
specify the start point, end point, and
38 Adobe InDesign CS4 | Conversion Guide
Double-click the Eyedropper
tool to tell InDesign what
formatting you want to copy.
When you click an object
or text, the Eyedropper
tool picks up that
formatting. After clicking,
you can change your mind
and pick up dierent
formatting by Option-
clicking (Mac OS) or
Alt-clicking (Windows).
Then click an object or drag over text to apply the formatting
that was loaded in the Eyedropper tool.
angle of a gradient. You can apply a
gradient to the ll or stroke of any
selected object or text.
Note that you cannot specify an
opacity for a gradient stop. To create
a gradient that changes from opaque
to transparent, use the Gradient
Feather tool or one of the Feather
features in the Eects panel.
Using the Eyedropper Tool
e Eyedropper tool lets you copy
character, paragraph, ll, stroke,
and transparency attributes from
any object, including an imported
graphic. Double-clicking the Eye-
dropper tool displays the Eyedropper
Options dialog box, which lets you
specify the attributes the Eyedropper
tool copies.
For example, you can set the current
ll color by selecting the Fill icon in
the Tools, Swatches, or Color panel
and then clicking on a bitmap image.
You can then save that color to the
Swatches panel by choosing Add
To Swatches from the Color panel
menu. If you click a vector graphic
with the Eyedropper tool, InDesign
reads the color from the
screen preview.
To transfer text formatting from one
range of text to another, select the
Eyedropper tool, click the source
text whose attributes you want to
transfer, and then click within a
target paragraph, or click and drag
the loaded Eyedropper icon over a
range of text.
Converting RGB and Spot
Colors to Process Colors
Whether you import an image
or specify a color as a spot color or
color, InDesign oers the option
to convert it to for process-
color printing.
When working with spot colors, it is
a good idea to choose Ink Manager
from the Swatches panel menu and
select the Use Standard Lab Values
Important Techniques 39
You can apply a corner eect to any path,
whether it is a frame or a Bézier line with
corner points.
For Spots option. is ensures you
get the best quality color for proong
and for conversion to . e Ink
Manager also lets you convert a spot
color to a process color by clicking
the spot color icon to the le of
the spot color name or by selecting
the All Spots To Process option.
To convert colors or images to
when you print, choose Com-
posite , Separations, or In-
Separations from the Color pop-up
menu in the Output pane of the Print
dialog box.
You can convert to while
exporting a le by choosing
Convert To Destination (Preserve
Numbers) from the Color Conver-
sion pop-up menu in the Output
pane of the Export Adobe dialog
box. Preserve Numbers indicates that
images and swatches already dened
with values will pass through
and not be changed.
Bézier Drawing
While Adobe Illustrator is the indus-
try’s premier drawing application,
InDesign oers many excellent draw-
ing features that work identically to
those in Illustrator, including a Pen
tool and a Convert Direction Point
tool. Note that when the Pen tool is
over a path, it automatically changes
to the Add Anchor Point tool; when
over an anchor point, it changes to
the Delete Anchor Point tool.
e Pathnder panel (in the Win-
dow > Object & Layout menu) lets
you merge and intersect paths. e
Object > Paths menu lets you com-
bine paths into compound paths.
You can also copy and paste editable
vector artwork between InDesign
and Illustrator (see “Copying Graph-
ics” on page 24).
Redrawing Frames with the Pencil Tool
e Pencil tool lets you draw paths
or frames free-form, by clicking and
dragging. To create a closed path,
hold down the Option (Mac OS) or
Alt (Windows) key aer you start
drawing, and hold it down until aer
you let go of the mouse button.
e Pencil tool not only draws, it
redraws: If you draw over part of a
path or frame edge, InDesign deletes
a section of the path and redraws
using the new path you drew. is
is helpful for converting rectangular
frames to irregular shapes.
To change the Pencil tool’s tolerance
settings, double-click the tool in the
Tools panel.
Corner Eects
InDesign lets you alter the look of
corner points in any frame or path.
For example, you may want to apply
rounded corners to a selected frame
or path. You can do this by choosing
Object > Corner Options, and then
choosing Rounded from the Eects
pop-up menu in the Corner Options
dialog box.
Anchoring Objects into Text
When you copy a path, frame, or
group with the Selection tool and
then paste it into text with the Type
tool, it’s called an anchored item. It
behaves like a single text character
that moves with the adjoining text as
you make edits to the text. You can
also create an anchored object by
inserting the text cursor in some text
and choosing File > Place or Object >
Anchored Object > Insert.
40 Adobe InDesign CS4 | Conversion Guide
Selecting a frame with the Selection tool
and pasting it into a story with the Type
tool creates an inline object.
Converting text (top) to outlines (bottom)
creates compound Bézier paths that can be
manipulated or lled with an image.
The Anchored Object Options dialog box lets you precisely adjust the position of an
anchored object—whether it is inside or outside a text frame.
You can adjust the anchored object’s
position by choosing Object >
Anchored Object > Options. From
the Position pop-up menu, choose
either Inline or Above Line to place
the anchored object within the text
frame. Choose Custom to place the
object inside or outside the frame.
When Prevent Manual Positioning
is selected in the Anchored Object
Options dialog box, you cannot drag
an anchored object with the Selec-
tion tool. When this option is not
selected, you can move an Inline or
an Above Line anchored object verti-
cally but not horizontally; you can
drag a custom anchored object in
any direction.
Use the Text Wrap panel options
to control how text wraps around
anchored objects. However, note
that text wrap aects only the lines
in a story aer the one in which the
object is anchored.
Converting Text to Outlines
You can convert text to outlines by
selecting it with the Type tool and
choosing Type > Create Outlines.
e original text is replaced with a
group of paths anchored in the text.
If you hold down the Option (Mac
OS) or Alt (Windows) key when
selecting Create Outlines, the origi-
nal text is preserved, and the path
group is not anchored.
You can also select one or more text
frames with the Selection or Direct
Selection tool and choose Create
Outlines. is converts all the text
in the frames, replacing the original
frames. Hold down Option (Mac OS)
or Alt (Windows) to create a copy,
leaving the original frames.
When you convert text to outlines,
some formatting may be lost, such
as paragraph rules, underscores,
and strikethroughs. erefore, it is
not a good practice to convert large
amounts of text to outlines in your
document. If you are sending a le
to an output provider who does
not have the necessary fonts, it is
better to send them a le, which
embeds the necessary character
outlines to print.
Important Techniques 41
To format the rst
paragraph of this
story, place the text
cursor in it and
open Quick Apply.
Type a few letters in
the style name, and
then press Return
or Enter.
The paragraph
style species the
font and uppercase
format. The nested
line style applies
bright blue to the
rst line. The
nested style applies
the darker blue to
the rst word.
Quick Apply
e Quick Apply feature lets you
quickly nd and apply charac-
ter, paragraph, table, and object
styles. It also allows you to choose
features, such as menu commands
and scripts, all while keeping your
hands on the keyboard.
To open the Quick Apply panel,
press Command+Return (Mac
OS) or Ctrl+Enter (Windows).
When the panel is displayed,
type a few letters of a style or
menu item name to select it,
and then press Return or Enter
to apply it and close the panel.
e letters do not need to be at
the beginning of the name. For
example, if you have a paragraph
style named “Heading ,” you can
select it in the Quick Apply panel
by typing “h.”
You can control which features
Quick Apply will list from the
menu in the Quick Apply panel.
Nested Styles
InDesign oers several methods
to automatically apply dierent
text styles to dierent parts of a
paragraph. For example, you can
apply dierent formatting to a
drop cap character by rst cre-
ating a character style with the
desired font, color, and so on; then
choose Drop Caps And Nested Styles
from the Control panel menu, and
pick that character style in the Drop
Cap section.
e Drop Caps And Nested Styles
dialog box (or, if you’re editing a
paragraph style, the Drop Caps And
Nested Styles pane of the Paragraph
Style Options dialog box) also lets
you apply nested styles and line
styles.
A nested style is a character style
applied to a specied range of text
inside the paragraph. For example,
you can apply one character style to
the rst word of the paragraph, and
another character style up to the rst
colon (:) character.
To create a nested style, you rst
create one or more character styles.
en, in the Drop Caps and Nested
Styles pane of the Paragraph Styles
Options dialog box, click New
Nested Style. In the Nested Styles
area, select a character style from the
pop-up menu, and then click the area
to the right of the character style, and
choose rough or Up To. Choosing
rough includes the character you
specify in the rightmost column;
choosing Up To formats only the text
that precedes this character. Click the
42 Adobe InDesign CS4 | Conversion Guide