The adobe photoshop layers book p2
Bạn đang xem bản rút gọn của tài liệu. Xem và tải ngay bản đầy đủ của tài liệu tại đây (2.56 MB, 30 trang )
The Adobe Photoshop Layers Book
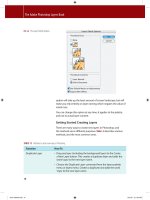
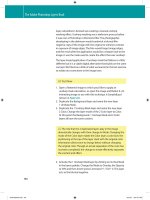
FIG 1.3 Separate layers appear merged
as a two-dimensional image on screen
and in print.
keeps changes and alterations more fluid and movable, allowing
you to finesse and sculpt the image result.
Layering allows you to work on distinct image areas while
retaining original image information in the layers and background
below. This ability to retain original image information is known as
non-destructive editing; you retain the original image information
undisturbed as you make changes by adding image layers. Each
change is incorporated as if they were made on transparent sheets
over your image that can be removed or re-ordered. The layers
are stored separately in the working image file and when saved
to layer-friendly formats (TIFF, PSD, PDF). During editing, layer
content can be viewed and managed using the Layers palette
(see Figure 1.4).
Layers can be created as needed and used for infinite adjustments
to your images, and they can be stored with the image, copied
both in the current image and to other images. They can be
adjusted and revisited for further changes at any time. Each layer is
a distinct visual object that can fill the entire image plane, though
the visibility of individual layers and layer content is affected by
4
The Basics of Layers: Layer Functions and Creation
FIG 1.4 To open the Layers palette,
choose Layers from the Window menu
or press F7 to toggle the Layer palette
view.
many other layer properties such as layer mode, layer opacity, layer
masking, layer clipping and layer visibility.
While the basic functionality of layers is simply allowing you to
keep image content and changes separate, the separation allows
you the advantage of customizing how image areas combine.
Control gives you advantages that allow you to achieve results
that would otherwise be impossible or extremely difficult in an
image without layer capabilities. Each of these capabilities will be
explored through the examples and exercises in this book.
Layer Palettes and Menus
One of the keys to making use of layers is knowing how to access
layer functions. Layer functionality can be found in several places
in Photoshop, with the bulk of layer functions found between the
layer palette, the layer palette menu, the Layers menu and Layer
Styles.
5
The Adobe Photoshop Layers Book
NOTE: Menus are listings of functions and features by name
that can be selected with a click. These menus may be on the
main program menu bar, but they may also be attached to
palettes or other menus as submenus. Palettes (and dialogs)
differ from menus in that they are floating windows that may
have buttons or other graphical interface options that go
beyond just a listing of features by name.
The layers palette (see Figure 1.5) is really a command center for
controlling layer views and how layers combine. Open the layers
palette by choosing Layers from the Windows palette.
FIG 1.5 The layers palette.
6
The Basics of Layers: Layer Functions and Creation
Simple buttons on the palette allow you to access many powerful
features at a click. For example, you can toggle the visibility for
individual layers on or off, you can add effects, create new layers,
duplicate layers and delete them. Other button features allow you
to lock layer transparency, color and transparency, position, or
the entire content of the layer (transparency, color and position)
(see Table 1.1).
TABLE 1.1 Features of buttons.
Icon
Button
Function
Minimize Palette
Toggles the view for the palette
expanded/collapsed.
Close Palette
Closes current palette, or hides
palette tab.
Blending Mode
Blending Mode allows you to
select how layers will react with
layers below by choosing a mode
type from the menu.
Layer Opacity
Opacity will allow you to
control the transparency
of the entire current layer
from 0% to 100%.
7
The Adobe Photoshop Layers Book
TABLE 1.1 (Continued)
Icon
8
Button
Function
Layer Fill
Similar to Opacity, however
changing fill will effect only
the content of the layer;
layer styles are not affected
by Fill, but can be controlled
separately with the Opacity.
Layer Palette Menu
Accesses the context sensitive
layers palette menu. Items on the
menu will vary depending on the
currently active layer(s).
Lock Transparent Pixels
Locks layer pixel transparency.
Allows change in color/tone.
Lock Image Pixels
Keeps layer pixel transparency
and color/tone from changes.
Lock Layer Position
Locks layer position.
Transparency and color/tone
can still be changed or adjusted.
Lock All
Locks transparency, color/tone,
and position of layer content.
Layer Visibility Toggle
Shows/Hides the content of the
associated layer.
The Basics of Layers: Layer Functions and Creation
TABLE 1.1 (Continued)
Icon
Button
Function
Link Layers
Allows layers to be linked so that
you can move or transform the
content of more than one layer at
a time and maintain alignment.
Add Layer Style
Allows users to add a layer style
to the active layer based on a
selection from the menu that
appears.
Add a Mask
Adds a layer mask to the active
layer if there is not one. If there is
already a layer mask, adds a
vector mask. If there are both or
the layer is a Background layer,
this is disabled.
New Adjustment
Layer
Adds a new adjustment layer
to the image based on
your selection from the menu
that appears.
9
The Adobe Photoshop Layers Book
TABLE 1.1 (Continued)
Icon
Button
Function
Create a New Group
Makes a new layer group. If
clicked it makes an empty group.
If layers are dragged to the
button, a new group is created
with those layers.
Create a New Layer
Adds a new layer above the
currently active layer.
Delete Layer
Deletes active/selected layer(s).
Deletes layers dragged to the
button.
Resize Palette
Click-and-drag on this to change
the size of the palette
Photoshop’s Layer Palette Menu and Layer menu share much of
the same functionality with a few exceptions depending on the
current editing task. Both menus are context sensitive, adjusting
functions and function availability depending on what features
can logically be applied. Options are grayed out when not
available. While functions on the menus represent the same things,
access to those functions may affect how layers are created and
handled in the image.
It is not necessary to memorize the functions and menus, there
will be layer functions you rarely use and those you will perhaps
never use. The graphic reference to the functions (Figure 1.5) will
prove to be a handy guide if you are not very familiar with layers.
What is more important than memorization is to know what type
of functions are available and generally where they can be found
and what type of access the program provides to those functions.
That way even if you don’t know the exact tool or function, you at
least know where it can be located. Rolling over tools and icons in
Photoshop will reveal tool tips that name the item/function, and
using these actively in the program as you edit will help you get
familiar with all the functions in context.
There will be occasional mention of version-specific features
in exercises (including features in newer Photoshop versions),
however, in most cases if you are using an older version, it will not
10
The Basics of Layers: Layer Functions and Creation
impact working with your images or completing the exercises
from this book or using the book’s technique.
Types of Layers
There are several distinct types of layers that can be created in
your images. All are visible in the layers palette, though some
(Adjustment Layers, for example) have no visible content though
they affect change in the image. The types of layers are listed in
Table 1.2.
TABLE 1.2 Types of layers.
Layer Type
Description
Comments
Background layer
Specialized content layer that is
the dedicated background for
the image. The bottommost
layer of an image; the result of
a flattened image. These layers
are always locked, have no
mode, and are always 100%
opaque. Can be converted to
a regular layer by double-clicking.
Background layers have little to
do with the photographic notion
of ‘background’ in that the
content is not necessarily just
image background information
and shouldn’t be assumed to
isolate this image area. Most
images start with just a
Background layer.
Type layer
Specialized content layer that
contains editable type. Type
layers are automatically added
by application of the Type tool
by clicking on the image or
clicking and dragging (to form
a type box). Type layers can be
masked, used with applied
blending modes and varied in
opacity/fill.
The editable type in a type layer
is what sets it apart. Once a
type layer is rasterized (turned
into a bit map) it becomes like
any other content layer – it just
happens to be in the shape of
type, type that isn’t editable, but
has other advantages.
Fill layer
Layers that apply color fills,
gradients or patterns. These
are created using the LayerϾNew
Fill Layer submenu. Fill layers can
be masked, used with applied
blending modes and varied in
opacity/fill. Because they contain
content, they can be converted
to a Background layer.
Fill layers are closely related to
Adjustment layers and type
layers. They have content (color,
gradient, pattern) which makes
them distinct from Adjustment
layers, yet the content can only
be edited through a dialog
which makes them much like
Adjustment layers.
11
The Adobe Photoshop Layers Book
TABLE 1.2 (Continued)
Layer Type
Description
Comments
Adjustment layer
A layer that applies a specific
function to underlying layers in
the layer stack. These are specific
functions created using the
LayerϾNew Adjustment Layer
submenu. Adjustment layers can
be masked, used with applied
modes and varied in opacity/fill.
They cannot be converted to a
Background.
Adjustment layers have no
content of their own beside
mask content. They are very
useful for applying nondestructive adjustments in the
form of Levels corrections, Color
Balance, Hue/Saturation, etc., all
of which can be adjusted or
undone at any time during
editing.
Layer Group (Set)
Layers that are grouped together
in a folder in the layers structure
(palette). Almost strictly an
organizational tool. Grouping
allows all layers to be treated like
a unit so that they can easily be
moved, viewed/hidden or masked
as one.
Originally introduced as layer
Sets with Photoshop 7, the name
was changed to Groups with
Photoshop CS. A Group is
nothing more than the content
of the layers that it contains.
Clipping Layer,
Clipping Group
The bottommost layer in a clipping
group. The solidity of the clipping
layer controls what is revealed in
the layers that are clipped (added to
the clipping group). These work like
cookie cutters where the bottom
layer is the mold.
One of the most useful quicktargeting features in Photoshop.
Allows users to instantly mask
any layer with the solidity of
another. Once you start thinking
in layers, this is an oft-used tool.
Smart object
Smart layers group together and
save selected layer(s) as another
image (PSB (Photoshop Object) file
type) that is referenced by the
image. This can reduce image file
size, but may be more useful for
updating groups of files at one time.
An interesting use of Smart
Objects is an example where you
are doing portraits for a littleleague team and you want to
make them all look like they have
their own team cards. You can
create the graphic card
component, then save and
import to multiple images.
Video Layer
Allows incorporation of video clips
into images. Works much like a
Smart Object referencing an
external video file.
New with Photoshop CS3. Not
terribly useful for image editing.
12
The Basics of Layers: Layer Functions and Creation
The distinction between Background and normal layers is an
important one. Background layers serve a distinct purpose as
the image background and lose a lot of the functionality of freefloating layers. Certain tools will behave differently when applied
to backgrounds and others cannot be applied at all. For example,
the Eraser tool will erase to the background swatch color rather
than transparency as it would in other layers. Similar masking issues
apply: you cannot apply a layer mask to the background layer.
The above reference is just a quick look at the vast capability of
layers. Hands-on experience with layers in realistic situations
will familiarize you better with how to look at and control layer
content and the advantages they provide for editing images.
Before getting into creating your first layers, let’s take a quick look
at controlling what you see on the layers palette using the Layer
Viewing Preferences, and then we’ll practice making a few layers.
Layer Viewing Preferences
Layer viewing preferences determine how you see thumbnails in
the layers palette. These preferences are set on the layer palette
menu. To get to the layer palette menu, you will need the layers
palette open; it may help to have an image open as well so you can
see the difference in the setting results.
Try It Now
1. Open any image in Photoshop.
2. If your Layers palette is not already in view, choose Layers from
the Window menu.
3. Click on the menu button at the upper right of the palette.
4. Choose Palette Options from the menu that appears. The Layers
Palette Options dialog will appear (see Figure 1.6).
5. Choose your preference for the size of the thumbnail that you
prefer to view.
Either the second or third option from the top is recommended
for thumbnail viewing. This will allow you to get an idea of layer
content without taking up too much of your screen. No view
will prove to be completely adequate when trying to distinguish
layers. While the largest thumbnail gives the best view of the layer
content, it may prove to be too large for many of the exercises in
this book as the layers will cascade off the screen. The ‘None’
13
The Adobe Photoshop Layers Book
FIG 1.6 The Layers Palette Options.
option will take up the least amount of screen landscape, but will
make you rely entirely on layer naming which negates the value of
visual cues.
You can change this option at any time; it applies to the palette,
and not to actual layer content.
Getting Started Creating Layers
There are many ways to create new layers in Photoshop, and
the methods serve different purposes. Table 1.3 describes various
methods, and the most common ones.
TABLE 1.3 Methods to create new layers in Photoshop.
Function
How To
Duplicate Layer
• Drag any layer (including the background layer) to the Create
a New Layer button. This creates a duplicate layer and adds the
word ‘copy’ to the new layer name.
• Choose the Duplicate Layer command from the layers palette
menu or layers menu. Creates a duplicate and adds the word
‘copy’ to the new layer name.
14
The Basics of Layers: Layer Functions and Creation
TABLE 1.3 (Continued)
Function
How To
• From the top menus choose Layer-ϾNew-ϾLayer Via Copy or
press CommandϩJ / CtrlϩJ with no selection active. Creates a
duplicate and adds the word ‘copy’ to the new layer name.
• With two images open, click on a layer in the layers palette and
drag to the currently inactive image. Hold the Shift key on the
keyboard while dragging to center the image in the image you
are dragging it to. Creates a new layer in the second document
with the same name as the layer in the originating document.
Blank layer
• Click the Create a New Layer button. Creates a new layer with
the default name Layer # (where the number is sequential,
starting with 1).
• Choose the Layer-ϾNew-Ͼ Layer command or New Layers from
the layers. Creates a new layer with the default name Layer #
(where the number is sequential, starting with 1).
Layer via copy
• Create a selection, then Copy (CommandϩC / CtrlϩC) and paste
(CommandϩV / CtrlϩV). Creates a duplicate of the selected area
in a new layer with the default name Layer # (where the number
is sequential, starting with 1).
• Choose Layer-ϾNew-ϾLayer Via Copy or press Commandϩ
J / CtrlϩJ with a selection active. Duplicates selected area to a
new layer with the default name Layer # (where the number is
sequential, starting with 1).
• Press CommandϩOptionϩShiftϩE / CtrlϩAltϩShiftϩE. Merges
visible layer content to a new layer with the default name Layer
# (where the number is sequential, starting with 1).
Layer from Background
• Double-click the background layer in the layers palette.
Converts Background to layer. The new layer will be created with
a default name of Layer 0. Does not add to the layer count.
New Background Layer
• Choose LayerϾNewϾBackground From Layer. This changes the
active layer to the Background layer. Does not add to the layer
count.
Adjustment Layer
• Choose any of the New Adjustment Layer submenu options
from the Layers menu (including Levels, Hue/Saturation, Invert,
etc.). A New Layer dialog will open allowing you to change
Name, Clipping, Color, Mode and Opacity. Once you accept the
New Layer option by clicking OK, a function dialog will appear
as appropriate.
15
The Adobe Photoshop Layers Book
TABLE 1.3 (Continued)
Function
How To
• Choose any of the adjustment layer options from the Create
New Adjustment or Fill Layer menu off the Layers palette. A
function dialog will appear as appropriate to the function
selected.
Fill Layer
• Choose any of the New Fill Layer submenu options from the
Layers menu (Solid Color, Gradient, Pattern). A New Layer dialog
will open allowing you to change Name, Clipping, Color, Mode
and Opacity. Once you accept the New Layer option by clicking
OK, a function dialog will appear as appropriate.
• Choose any of the fill layer options from the Create New
Adjustment or Fill Layer menu off the Layers palette. A function
dialog will appear as appropriate to the function selected.
• Choose the Shape tool, then be sure the Shape Layers option
is selected on the Option bar (use mouse tool tip to find the
button for the option). Click-and-drag on the image.
Type Layer
• Choose the type tool and click on the image. Use the keyboard
to enter text once the cursor appears. The type tool can be used
in combination with vectors to make type on a path and with
shapes to make text in a shape.
• Choose the type tool and Click-and-drag on the image. Makes
a text box that will contain the text that is entered. Use the
keyboard to enter text once the cursor appears.
Try It Now
If you take a moment and sit down in front of the computer
and run down the bullet list, you can test out creating all these
new layers. Of course there are reasons to create layers, but right
now gain some familiarity with the basic creation methods. This
will help you locate them later when you need them, and play is
a great way to become familiar and comfortable with creating
layers. It won’t be long till we are immersed in serious layer
work!
If you do go through the exercise of creating the layers, you’ll
notice that different layer types can be identified by different layer
icons in the layers palette. Table 1.4 shows icons and what they
mean.
16
The Basics of Layers: Layer Functions and Creation
TABLE 1.4 Identification of different layer icons.
Icon
Layer type
Black & White
Brightness/Contrast
Channel Mixer
Color Balance
Curves
Exposure
Solid Color
Gradient
Gradient Map
Hue/Saturation
Invert
Levels
Pattern
Photo Filter
Posterize
Selective Color
Threshold
Type
17
The Adobe Photoshop Layers Book
At this point we have dissected enough of the layers palette and
the things that you will see there to have a reasonable orientation
as to what to expect.
Exercise
Running through the bullet list and creating random layers in a
stack may be interesting, but not nearly as interesting as working
through a practical example. In this exercise, we will take an image,
add a copyright, burn in the frame, and add a drop shadow using
some simple layer creation and techniques. The exercise is a fairly
easy, more or less practical run-through of some layer creation
techniques that will take about 15 minutes and requires little or no
understanding of layers. This is meant to be a glimpse into layer
functionality; while there is some explanation of what is going
on during the exercise, better understanding of the features we
are looking at will come as we explore the possibilities of layers
throughout the rest of the book.
There is almost always more than one way to execute a
set of steps to accomplish a result in Photoshop. Though you
may usually use different methods, even for simple steps,
it is suggested that you follow the steps as written the first
time you run through any exercise in this book – especially
when a specific means of accessing a function is suggested.
Experimenting with other methods may yield somewhat
different or confusing results. If an option or function step is
not specifically mentioned, it is left up to you to choose.
Try it Now
1. Open any image and flatten if necessary (Layer>Flatten Image).
The image should have only a Background layer when viewed in
the Layers palette.
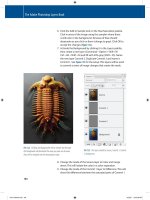
2. Double-click the Background layer. This will open the New Layer
dialog (see Figure 1.7).
FIG 1.7 The New Layer dialog.
18
The Basics of Layers: Layer Functions and Creation
3. Change the layer name of the Background Copy layer to ‘1
Original Background’ by typing in the Name field. Click OK to
accept the changes (Figure 1.8).
FIG 1.8 Change the layer Name.
4. Set the background swatch color to white. To do this press D
on the keyboard (sets default colors). This color selection will
affect the results of the next steps.
5. Create a new layer (click the Create a New Layer button on the
Layers palette). This creates a new layer above the 1 Original
Background layer.
6. Make the new layer into the background layer by choosing
Background From Layer (LayerϾNewϾBackground From Layer).
This will change the layer to a background and fill with white.
7. Choose Canvas Size from the Image menu. When the dialog
appears, choose the following options: New Size: Width:
120% (Choose from the menu in the dialog box), New Size:
Height: 120%, do not check the Relative box, leave the anchor
(White box in center) at the default, Canvas Extension Color:
Background. Click OK to accept the changes. This will create a
white border around your image.
Canvas Extension Color is new to Photoshop CS3.
‘Background’ is the default for earlier versions, so there is
nothing to change in CS2 and previous versions.
8. Choose the Type tool by pressing T on your keyboard.
9. With the type tool selected, choose a font and font color for
a copyright from the Options bar. If you don’t know what to
choose, pick Arial, Regular, 12pt and black. These options can
be found on the Options bar, just below the program menu.
10. Click on the 1 Original Background layer in the layers palette to
activate it and then click on the image with the type tool. This
will create a new type layer in the layers palette just above the
1 Original Background layer, and a blinking cursor will show on
the image.
19
The Adobe Photoshop Layers Book
11. Type in ‘Copyright © 2007 [your name]’, click the Commit Any
Current Edits button on the Type Options bar, and move the
copyright to a place in the image that seems suitable using the
Move tool. To choose the Move tool, click the Move tool on the
toolbar, or press V on your keyboard.
Commit Any Current Edits Button
Cancel Any Current Edits Button
To get the copyright symbol, press OptionϩG on a Mac; on
Windows, hold down the Alt key and press the following keys
on the number pad in order: 0, 1, 6, 9, then release the Alt key. If
this does not work immediately or if you have a keyboard with
no number pad, turn on the Numlock feature from the keyboard
(press the Numlock or similar button). For more information
about Numlock on PCs, consult your computer’s user manual.
12. Change the name of the type layer you just created by adding
a ‘2’ to the beginning of the name. To do this, choose Layer
Properties from the Layers menu or the Layers palette menu.
Once you have completed the name change click OK to accept
the changes. At this point your layers should look similar to
Figure 1.9.
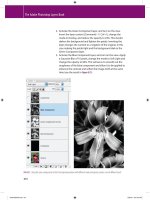
FIG 1.9 Layers after step 12.
13. Create a new layer at the top of the layer stack, and name the
layer ‘3 Frame Burn’.
14. Hold down the Command / Ctrl key [Mac/PC] and click directly
on the thumbnail for the 1 Original Background layer. This will
load the solid part of that layer as a selection.
20
The Basics of Layers: Layer Functions and Creation
Keystrokes will always be noted in the steps in the same
way, and a reminder of the order will appear once in each
exercise when the first keystroke appears. Mac keystrokes will
always be followed by PC keystrokes, separated by a slash.
15. Invert the selection (press CommandϩShiftϩI / CtrlϩShiftϩI).
16. Fill the selection with black on the 3 Frame Burn layer. To do
this, be sure the 3 Frame Burn layer is active, choose Fill from
the Edit menu, and when the Fill dialog appears choose these
options: Use: Black, Mode: Normal, Opacity: 100%, do not
check the Preserve Transparency checkbox. See the dialog in
Figure 1.10. Click OK to accept the changes. This will fill the frame
area with black.
FIG 1.10 Layers after step 16.
17. Deselect by pressing CommandϩD / CtrlϩD. Deselecting
assures you will apply the next changes to the whole image.
18. Move the layer down in the stack by pressing Commandϩ[ /
Ctrlϩ[ . This will switch the order of the 2 and 3 layers.
19. Apply a Gaussian Blur to the layer. Choose Gaussian Blur from
the Blur submenu on the Filter menu (FilterϾBlurϾGaussian
Blur). Set the Radius to 50, and click OK to accept the
changes.
20. Change the Opacity of the 3 Frame Burn layer to 40%, and
change the Mode to Multiply using the Mode drop list and
21
The Adobe Photoshop Layers Book
21.
22.
23.
24.
25.
26.
27.
FIG 1.11 Layers after step 27.
22
Opacity slider on the layers palette. Lowering the Opacity will
lessen the effect of the change.
Click on the Background layer to activate it.
Create a new layer, and name it ‘4 Drop Shadow’. Because you
activated the background before creating the layer, it will
appear in the layer stack just above the Background.
Hold down the Command / Ctrl key and click on the 1 Original
Background layer thumbnail to load it as a selection.
Fill the 4 Drop Shadow layer with 50% gray. Use the Fill
function from the Edit menu, and change the Use drop list
under Contents to 50% gray. This will fill in color under the
1 Original Background layer and no change should be
apparent in the image.
Deselect. CommandϩD / CtrlϩD. This will release the
selection.
Choose Gaussian Blur from the Filter menu (FilterϾBlurϾ
Gaussian Blur). When the Gaussian Blur dialog appears, use a
radius of 20 pixels, and click OK to accept the changes. This will
soften the edges of the 4 Drop Shadow layer.
Choose the Move tool (press V), and move the 4 Drop Shadow
by holding down the Shift key and pressing the right arrow
on the keyboard twice and then the left arrow twice. Release
the Shift key. This action will have moved the content of the
current layer 20 pixels down and 20 pixels right. At this point,
the layers should look like Figure 1.11.
The Basics of Layers: Layer Functions and Creation
28. Make a Hue/Saturation adjustment layer by choosing Hue/
Saturation from the New Adjustment Layer submenu on the
Layers menu (LayerϾNew Adjustment LayerϾHue/Saturation).
When the New Layer dialog appears, click the Use Previous
Layer to Create Clipping Mask checkbox and change the name
of the layer to 5 Shadow Color before clicking OK. The Hue/
Saturation dialog will appear. Click the Colorize box and adjust
the Hue, Saturation and Lightness sliders to adjust the color
of the drop shadow to something pleasing. Moving the Hue
slider (right or left) will change hues as if they are on a color
wheel. Moving the Saturation slider to the right will increase
saturation; moving it to the left will decrease saturation.
Moving the Lightness slider to the right will lighten the
shadow; moving the slider left will darken the shadow. Click
OK to accept the changes.
The use of Previous Layer to Create Clipping Mask
checkbox has been named different things in almost every
other versions of Photoshop. It is the only checkbox on the
New Layer dialog, and it always does the same thing: it creates
a clipping group from the layer you are creating. See the Types
of Layers Table 1.2 for more information.
FIG 1.12 Layers after step 28.
23
The Adobe Photoshop Layers Book
You should now have 6 layers: 1 Original Background, 2 Copyright
Text, 3 Frame Burn, 4 Drop Shadow, 5 Shadow Color and 6
Background (see Figure 1.12).
If you really want to test out your understanding of layers thus far
see if you can accomplish the following. Don’t worry if you can’t
complete all the items in this list, some of this will be discussed in
the coming chapter.
• Change the color position and face of the type in the copyright
layer. Hints: double click the type layer in the layers palette to
select all the type, use Hue/Saturation like you did in Step 28, or
use the Options on the Options bar.
• Make a Group (or Set) from the six layers you created.
• Activate the 5 Shadow Color Adjustment layer, and merge down.
Summary
We looked at a lot of things in this chapter, from the basics of
what a layer is, to how they are applied. You should have had the
opportunity to explore the palettes and menus where layers are
created and manipulated, and gained a more comprehensive
visual conception of what layer functions look like as part of the
palette. We’ve looked at the possibilities of adjusting how the
layers palette displays, and have explored the initial possibilities of
creating layers.
The core purpose of this chapter is introductory. Now that you
have seen some of what layers can do, let’s move on into learning
how they help you manage your workflow and form the basis of
your image editing process.
24
CHAPTER 2
Layer Management: Concepts
of a Layer-Based Workflow
T
he greatest benefit to using layers is that you get tremendous
flexibility in controlling image changes, and the ability to
revisit, adjust and view changes at any time later in the correction
process. You can also store the changes to see what you did,
and create techniques by examining your process. The biggest
drawback to layers – besides learning to harness t he tremendous
number of options – is bulking image file size, and organizing an
ever-lengthening layer stack. This chapter looks at how to use
layers as a means of managing your approach to correcting images
and keeping those changes organized by incorporating layers as
the core of your workflow.
Talking about managing layers before talking about using them
is really a chicken and egg scenario: it could be argued that it
is more important to know what to do with them than how to
manage them. However, my thought is simply this: start with good
25
The Adobe Photoshop Layers Book
fundamental practice in using layers, and it will be more natural to
use them in a way that is most beneficial to your images.
Managing layers starts with knowing how to create them – as we
looked at briefly in the previous chapter – and continues with
knowing how and when to combine them to save file size, and
group and arrange them to keep them and your image corrections
effective and organized. Making the effort to keep things organized
may take a little more time at first, but, like all maintenance and
organization, will help in the long haul to keep you on track, and
becomes more natural as you do it consistently. For example, when
you make a meal, you might follow a recipe. This can save you from
goofing up dinner entirely. Along the way you might make some
adjustments to taste depending on your level of confidence, or
depart from the recipe entirely once you are more sure of what you
are doing. The recipe acts like a fall-back or outline of a basic plan.
When you follow an organized plan for using layers, they end up
being not only a means of correction and an organizational tool for
those corrections, but a means of driving corrections, organizing
the correction workflow and acting as a history of image
correction. Effectively managing layers and layer content will help
keep your corrections on track, will allow you the flexibility to step
back and forward in corrections, and will keep your images from
bulking up to ridiculous size unnecessarily. Just like a recipe, layers
act as a plan for getting to where you want to go.
To look at layers as part of a total process, we’ll begin with an
outline of an approach to image editing and outline a basic tool
set that you will use in conjunction with layers. Then we’ll look at
more theoretical applications of Layers for organization and image
correction, and how layers factor into and direct the process of
correction.
The Outline for Image Editing
For the sake of putting layers in the context of process, we’ll look at
a complete outline for processing images from beginning to end.
Layers are crucial to every stage of correction. Our outline will look
a bit beyond just the process of correction to be sure the process is
considered from end-to-end: from monitor to print. Consider this
outline as your plan for editing images and use it as a roadmap in
making all your image corrections – especially if you do not have
your own plan in place.
26
Layer Management: Concepts of a Layer-Based Workflow
The steps to image editing are segmented into several distinct
parts: setup, capture, evaluation, editing/correction and purposing/
output. Setup encompasses all necessary steps for preparing
your equipment for capture, image editing and output. Capture is
gathering your digital source images to use in editing and output.
Evaluation is consideration of what you will be doing with the
image and the steps you will be taking in correction. Correction and
editing is manipulation of the source image captures according
to your evaluations and in preparation for output. Purposing and
output encompasses all manner of final use of images in display, in
print to different media and processes (inkjet, offset, light process),
or for a monitor (web pages, video). Though layers are only involved
directly in the editing stage, the other stages all affect the choices
you make in the correction and editing, so it is valuable to have a
quick look at the entire process in more detail.
Setup
Setup is everything you need to do to prepare for image editing.
Being sure your capture device, system and editing program are set
up correctly and that you have considered the purpose or use of the
image. This is important to ensure you will get the results you want.
• Be sure your computer system is ready for image editing with
Photoshop. You will need to consider the requirements for
running Photoshop, such as how much RAM your computer has
and the speed of the processor. Check the requirements (find
these on the packaging, or on the Adobe website). You will also
want to have significant free disk space, and establish a backup
routine (and have the appropriate media on hand). Concerns for
your computer setup may extend to having a firewall in place,
virus protection and image-editing input devices.
You are not limited to using a mouse when editing images,
and other devices may be more to your liking. Image-editing
input device possibilities include trackballs ( />trackball.html) and graphic pen/tablet combinations (http://
aps8.com/wacom.html). I rarely use a mouse for serious image
editing.
• Calibrate your monitor, and create a custom ICC profile. The custom
profile is usually made during the calibration process, and
helps Photoshop compensate for color display. Calibration is an
essential step in color management.
27
The Adobe Photoshop Layers Book
Calibration devices such as the ColorVision Spyder 2 Pro
( can simplify calibration, make
it more accurate, help manage ICC profiles and make color
management less of a chore.
• Set up Photoshop. This includes setting up color management
preferences, preferences for scratch disks/memory usage,
and testing output. Photoshop is a memory hog, and it is not
unheard of to dedicate a drive to the sole purpose of being a
Photoshop scratch disk. Giving Photoshop a lot of room to do
what it does ensures your best chance of getting the results you
intend consistently, and that your system functions optimally.
• Have a system for archiving. Be prepared to archive the
original image files safely when you download them from the
camera and before you begin work on them. This may require
consideration of archiving media and equipment. Archiving is
crucial to a safe workflow where you always work with a copy
of an image to do all of your image editing. If any step in the
editing goes awry, you will want to be able to return to the
original image to start over. Working on copies will also give you
the opportunity to repurpose the original in the future or take
advantage of new and emerging technologies that might help
you get more from the original image capture. DVD drives, CDROM, RAID arrays, tape backup, external drives and even online
storage can all be considered in keeping your images safe.
• Consider the final purpose of the image: resolution, size, color,
file type and purpose. This can affect your other choices in
setup. You may work at different resolutions and in different
color modes throughout the image-editing process for specific
purposes, but knowing what you need from the outset of
the project can help you work smarter, with less possibility of
getting into situations where you compromise image integrity.
• Be prepared to make the best use of your camera. Know your
camera settings and controls. Nothing will do more to help
you get the best shot than knowing how to work your camera.
This will include becoming familiar with your camara’s unique
settings. If you use accessories, knowing how they function
is important as well. One of the most important camera
accessories is the owner’s manual. Be sure to put yours to good
use, and read it several times from cover to cover – or at least
those sections written in your own language! Remember to
28