Mô hình lâu đài Himeji, Nhật Bản. P3
Bạn đang xem bản rút gọn của tài liệu. Xem và tải ngay bản đầy đủ của tài liệu tại đây (1.17 MB, 7 trang )
Himeji Castle, Japan : Assembly Instructions
/>
West face
South face
East face
North face
View of completed model
Japan Himeji Castle
Situated in Himeji City in Hyogo Prefecture, Himeji Castle is also known as the White Heron Castle because
of the way that its soaring, white stucco walls resemble a graceful heron taking flight.
The castle sits atop a hill called Himeyama, or Mt. Hime, at an altitude of 45.6m. The very top of the main
castle tower, with its five stories and six levels, is 92m above sea level.
The first castle at Himeyama was constructed in 1346. Hashiba Hideyoshi later added a three storey tower.
The castle in its current form was completed by Ikeda Terumasa in 1610. The castle is full of defensive
features, such as narrow passageways that prevent large numbers of attackers from entering en masse, and
loopholes through which bows and muskets could be used to repel invaders. However, in its four hundred
year history, the castle was never attacked and has survived to this day in its present state. The castle was
designated a World Heritage Site by UNESCO in 1993. height of approximately 150 meters above the sea.
Parts list (Pattern) : Thirteen A4 sheets (No.1 to No.13)
No. of Parts : 123
Assembly Instructions : Seven A4 sheets (No.1 to No.7)
* Build the model by carefully reading the Assembly Instructions , in the parts sheet page order.
Hint: Trace along the folds with a ruler
and a used pen (no ink) to get a sharper, easier fold.
* This model was designed for Papercraft and may differ from the original in some respects.
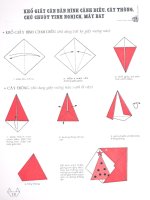
Assembly Instructions
Mountain fold (dotted line)
Make a mountain fold.
Valley fold (dashed and dotted line)
Make a valley fold.
Scissors line (solid line)
Cut along the line.
Cut in line (solid line)
Cut along the line.
Glue
The glue spot (colored dot)
shows where to apply the glue.
Glue spot(Red dot)
Glue parts with the same number together.
Tools and materials
Assembly tip
Before gluing, crease the paper along mountain
fold and valley fold lines and make sure
rounded sections are nice and stiff.
Caution
Glue, scissors and other tools may be dangerous
to young children so be sure to keep them out of
the reach of young children.
Glue spot(Green dot)
Glue within the same part.
Glue spot(Blue dot)
Glue to the rear of the other part.
-1-
Scissors, set square, glue (We recommend stick glue),
pencil, used ballpoint pen, toothpicks, tweezers,
(useful for handling small parts)
Himeji Castle, Japan : Assembly Instructions
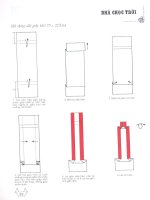
Before starting.
3
Sheet No.
There is a sheet number (No.1 to No.13) printed at the bottom center of each Pattern page.
Assemble the model in the order of the page numbers.(*Assembly parts are on sheets No. 2 to
No. 13.)
2
Sheet No.
* Parts sheet No.2
There are a total of 123 parts and each sheet carries a parts symbol.
The 'glue spot' on each part bears the number of the part to which it should be glued.
The numbers
, etc., on each part indicate the order in which they are to be glued.
Where there are multiple joints within a single part, or 'glue spots' where the part is to be
glued to another, there are colors
and numbers to give detailed instructions as to the
correct positions.
2
Sheet No.
-2-
2
Sheet No.
* Parts sheet No.2
Himeji Castle, Japan : Assembly Instructions
4
5
Sheet No.
Sheet No.
5
Sheet No.
* Parts sheet No.5
Sheet No.
5
* Parts sheet No.5
-3-
Himeji Castle, Japan : Assembly Instructions
4 5 6 7
7 8
Sheet No.
6
Sheet No.
6
Sheet No.
Sheet No.
Sheet No.
7
Sheet No.
7
6
Sheet No.
5
Sheet No.
7
Sheet No.
8
Sheet No.
ht
Rear side reinforcer
tp
://w
w
w.c
an
on
.c
om
/c
-p
ark
/e
n/
4
Sheet No.
6
Sheet No.
: Glue on glue spots (Blue star)
-4-
Himeji Castle, Japan : Assembly Instructions
8 9
Sheet No.
Sample A (Rear side reinforcer)
9
Sheet No.
8
Sheet No.
8
Sheet No.
9
Sheet No.
9
Sheet No.
-5-
Himeji Castle, Japan : Assembly Instructions
Rear side reinforcer
8
Sheet No.
10
Sheet No.
: Glue on glue spots
(Blue star)
Refer to Sample A (Rear side
reinforcer) of parts sheet No.5
(Assembly Instructions).
10 11 12
Sheet No.
Back
11
Sheet No.
10
Sheet No.
-6-
Himeji Castle, Japan : Assembly Instructions
12
Sheet No.
*The back flaps of
parts 12E, 12F, 12G
and 12H should be
glued in the same
way.
13
Sheet No.
-7-