TC001 18 01h 1 m MDS
Bạn đang xem bản rút gọn của tài liệu. Xem và tải ngay bản đầy đủ của tài liệu tại đây (2.13 MB, 67 trang )
Level 1
Introduction
to M-MDS
TC001-18-01H
Student Guide
Mazda Motor Corporation
Technical Service Training
INTRODUCTION TO M-MDS
SG00 - General
TC001-18-01H
Contents
SG00 General
Table of Contents
Foreword
Timetable
SG01 Introduction
M-MDS Components
Vehicle Diagnostic System
Portable Diagnostic Software
SG02 Tab-PDS
Activities
01 Installing ActiveSync Software
02 Installing PFM & PDS
03 PDA Navigation
04 Retrieving and Clearing DTCs
05 Reading and Printing Freeze Frame Data
06 Making DataLogger Recordings
07 Reprogramming/Updating a PCM
08 Verify/Change Programmable Parameters
09 Removing PFM & PDS from Laptop
10 Removing Microsoft ActiveSync
11 Updating PDS & PFM
Integrated Diagnostic System
SG03 Tab- IDS
Activities
12 Installing IDS on Laptop
13 Retrieving DTCs and Freeze Frame Data
14 PATS Key programming
15 Updating IDS
16 Removing IDS from Laptop
Appendix
AP01 Glossary
AP02 PDS Icons
AP03 IDS Icon Identification
AP04 Assembling PDS Components – Snap-on
AP05 M-MDS Service Information
SG00 Page- 1
INTRODUCTION TO M-MDS
SG00 - General
TC001-18-01H
FOREWORD
Advanced computer controlled systems and highly sophisticated computer-assisted
mechanisms on Mazda vehicles are now normal equipment. Computer-controlled
systems are used on more than 90% of the modern 21st century vehicle.
As customers come to have high expectations of their vehicles, technicians must
have sophisticated technical skills.
“Fix It Right the First Time” is the working philosophy of Mazda Corporation: Make
this your diagnostic approach to every Mazda!
Purpose
This activity-based, 2-day course is intended to familiarize you with Mazda’s new
diagnostic tool, Mazda Modular Diagnostic System (M-MDS). This class is intended
primarily for Mazda technicians who have competency with WDS, Mazda’s previous
scan tool.
Objectives
After completing this course, you will be able to diagnose control systems and
program programmable modules in current Mazda vehicles using M-MDS. This
course includes:
•
Identifying and connecting M-MDS hardware components
•
Installing and updating M-MDS software on a Mazda-supported laptop
•
Installing, updating, and removing M-MDS software on a Mazda-supported
Personal Digital Assistant (PDA)
•
Performing PDA navigation for using M-MDS
•
Using M-MDS to identify vehicles, read diagnostic trouble codes (DTCs),
read/print freeze frame data (FFD), and use DataLogger
•
Programming and updating programmable modules
•
Accessing and diagnosing passive antitheft systems (Immobilizer and PATS)
•
Defining M-MDS terms and describing the functions of frequently used
M-MDS icons
NOTE: This training course has been originally developed for North American Market.
Then, the course materials have been modified and edited to be suitable for other
markets. However, some particular markets may be required further modification.
SG00 Page- 2
INTRODUCTION TO M-MDS
SG00 - General
TC001-18-01H
Timetable
Day 1
Time
Session
8:30 – 9:00
Introductions
9:00 – 10:20
M-MDS Components
10:20 – 10:30
Morning Break
10:30 – 11:50
M-MDA Activities
12:00 – 13:00
Lunch
13:00 – 14:50
M-MDA Activities
14:50 – 15:00
Afternoon Break
15:00 – 17:00
M-MDA Activities
Remarks
PDA Owners Manual must be
available
Day 2
Time
Session
8:30 – 9:00
Review Day 1
9:00 – 10:20
M-MDA Activities
10:20 – 10:30
Morning Break
10:30 – 11:50
Introduction to IDS
12:00 – 13:00
Lunch
13:00 – 14:50
IDS Activities
14:50 – 15:00
Afternoon Break
15:00 – 17:00
IDS Activities/Evaluation
Remarks
This schedule is subject to change when necessary.
SG00 Page- 3
INTRODUCTION TO M-MDS
SG01 - Introduction
TC001-18-01H
M-MDS Components
M-MDS consists of new hardware and software to communicate with the vehicle’s
control modules via the Data Link Connector (DLC).
There are two diagnostic systems within M-MDS.
•
•
Integrated Diagnostic Software (IDS)
Portable Diagnostic Software (PDS)
Like WDS, both systems get updates via DVD every 6 to 8 weeks. In addition, both
systems get daily updates from the internet. These updates are similar to the
updates previously downloaded from ESI.
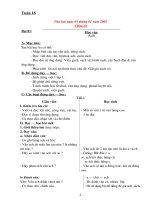
IDS uses a Mazda-approved laptop computer, a Vehicle Communication Module
(VCM), several cables, and IDS software.
IDS Components
>
>
>
>
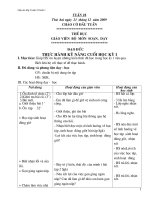
PDS uses a Mazda-approved Personal Digital Assistant (PDA), the same VCM as
IDS, several cables, ActiveSync, and PDS software. PDS also requires a host PC to
get data into and out of the PDA.
PDS Components
>
>
>
=
>
NOTE
Mazda PDS uses a PDA. In this class and in Mazda Service Information, the
PDA acronym is the same as Pocket PC (P-PC). M-MDS uses a PDA/Pocket PC
with Windows Mobile 2003 SE software. M-MDS will not run on a Palm Pilot.
Mazda PDS consists of two pieces of software, Portable Diagnostic Software (PDS)
and Portable File Manager (PFM). Together, this software is referred to as Portable
Diagnostic System (PDS).
SG01 Page- 1
INTRODUCTION TO M-MDS
SG01 - Introduction
TC001-18-01H
Vehicle Diagnostic System
All modules in vehicles with scan tool diagnostics connect to the DLC via one of
several communication methods:
These are the different forms of communication the scan tool must be able to
understand to communicate with the vehicle. These are:
•
•
•
ISO1941“K” line
J1850 SCP
ISO 11898 CAN
ISO 1941, also known as “K” line, is a single wire from the module to the DLC and
then to the scan tool. The only communication on the “K” line is module to scan tool.
The only diagnostic functions available are DTC retrieval, Data logger, and limited
programming ability. There is only one “K” line (single wire) in the DLC
J1850, also known as Standard Corporate Protocol (SCP), is a 2-wire system (Bus
+ and Bus -) allowing module to module communication. It also goes to the DLC to
allow communication with the scan tool. With SCP, the scan tool can retrieve DTC(s),
access data logger PID(s), and program/reprogram the modules. When connected,
the scan tool becomes another module on the SCP bus lines. There is only one Bus
+ and one Bus – in the DLC
ISO 11898 CAN (Controller Area Network) is a two-wire system (CAN + and CAN -)
that allows module-to-module communication. CAN also connects to the DLC to
allow communication with the scan tool. Like SCP, the scan tool becomes another
module on the network. With CAN, the scan tool can retrieve DTC(s), access data
logger PID(s), and program/reprogram modules. When connected, the scan tool
becomes another module on the CAN network(s). Currently there can be up to two
CAN networks on Mazda vehicles: High speed CAN (HS CAN, DLC pins 6 and 14)
and medium speed (MS CAN, DLC pins 3 and 11). All current Mazda’s have HS
CAN. MS CAN depends on the vehicle’s options or module content:
• HS CAN communicates at 500K per second
• MS CAN communicates at 125K per second.
Now let’s talk about information flow to the scan tool, starting at the DLC.
When you plug the data cable into the DLC, information goes to the VCM in
Controller Area Network, Standard Corporate Protocol, or “K” line. The VCM converts
this data into Universal Serial Bus (USB). Data in this format is then sent to the
laptop (IDS) or PDA (PDS).
NOTE
“Universal Serial Bus” is an external bus standard that supports data transfer rates
of 12 Mbps. A single USB port can be used to connect up to 127 peripheral
devices, such as a mouse, modems, and keyboards. USB also supports plug-andplay installation and hot plugging. (Source: www.webopedia.com).
SG01 Page- 2
INTRODUCTION TO M-MDS
SG01 - Introduction
TC001-18-01H
Vehicle Diagnostic System
(Cont’d)
The laptop or PDA then converts this data into text or images (i.e., graphics) for us to
use when diagnosing the vehicle.
IDS is very similar to WDS, using the same icons and functions to operate it. The
only difference to the operator is that the Mazda-approved laptop is not “touch
screen” like the WDS Portable Test Unit. This means you have to use the keyboard
and mouse or scratch pad.
Since you are already familiar with WDS, this class deals primarily with PDS. Let’s
get started with PDS activities.
SG01 Page- 3
INTRODUCTION TO M-MDS
01 - Installing ActiveSync Software
TC001-18-01H
Activity 01: Installing ActiveSync Software
Upon completing this activity you will be able to install Microsoft ActiveSync on your
laptop or PC so it communicates with the PDA for M-MDS.
What you need to complete this activity:
•
•
•
•
Mazda-approved laptop or PC with Windows XP or higher
Microsoft ActiveSync software
Mazda-approved PDA and cradle
Ask your Instructor to log in to the PC before you begin this activity
Procedure:
1. Before using the PDA the first time, did you charge its battery for at least 8 hours?
If no, charge the battery before continuing.
NOTES
Do not connect the PDA cradle or the PDA to the computer until step 14.
The ActiveSync installation screens may differ slightly from one PDA manufacturer
to another.
To do this activity, you must have Administrator rights to install and remove
software from the laptop or PC.
2. Put the Microsoft ActiveSync CD included with your PDA in the computer’s CD or
DVD drive.
3. Click Getting Started.
Activity 01- Page 1
INTRODUCTION TO M-MDS
01 - Installing ActiveSync Software
TC001-18-01H
Activity 01
(Continued)
4. Click Start Here.
5. Click Install ActiveSync in the left panel of the screen, under Overview.
Activity 01- Page 2
INTRODUCTION TO M-MDS
01 - Installing ActiveSync Software
TC001-18-01H
Activity 01
(Continued)
6. Click Install in the middle of the screen, under the ActiveSync icon.
7. The Installation Message pops up; click OK.
NOTE
If the only screen visible
during installation is the
Start Here screen, click
the first icon in the upper
right corner to minimize
the screen.
Activity 01- Page 3
INTRODUCTION TO M-MDS
01 - Installing ActiveSync Software
TC001-18-01H
Activity 01
(Continued)
8. Click Run.
NOTE
It will take about a minute for the next window to pop up.
9.
Click Run.
10. This window indicates the Install Shield wizard for ActiveSync is in progress.
Continue with step 11.
Activity 01- Page 4
INTRODUCTION TO M-MDS
01 - Installing ActiveSync Software
TC001-18-01H
Activity 01
(Continued)
11. Click Next.
12. Click Next.
Activity 01- Page 5
INTRODUCTION TO M-MDS
01 - Installing ActiveSync Software
TC001-18-01H
Activity 01
(Continued)
13. You may see several windows as ActiveSync is installed
14. Follow the instructions on the screen, and then click Next.
Activity 01- Page 6
INTRODUCTION TO M-MDS
01 - Installing ActiveSync Software
TC001-18-01H
Activity 01
(Continued)
15. You may see several windows similar to this. Click next to continue.
16. The PDA / Pocket PC will turn on. You should see this screen. Verify
Standard Partnership is selected, and then click Next.
Activity 01- Page 7
INTRODUCTION TO M-MDS
01 - Installing ActiveSync Software
TC001-18-01H
Activity 01
(Continued)
17. Verify Synchronize with this desktop computer is selected, then click Next.
18. Uncheck all of the boxes in the New Partnership window.
WARNING
You must uncheck all of the boxes in this window. Additional information left
checked will use the PDA’s memory, reducing the performance of PDS.
Activity 01- Page 8
INTRODUCTION TO M-MDS
01 - Installing ActiveSync Software
TC001-18-01H
Activity 1
(Continued)
19. Scroll down and make
sure that all the boxes are
unchecked.
20. When you have unchecked
all of the boxes, check Files.
The following pop-up message
will display.
21. The New Partnership
window should now look like
this. If does, click Next.
NOTE
Make sure the only box
checked is Files.
Activity 01- Page 9
INTRODUCTION TO M-MDS
01 - Installing ActiveSync Software
TC001-18-01H
Activity 01
(Continued)
22. Click Finish.
23. If the following window displays, click Unblock.
Activity 01- Page 10
INTRODUCTION TO M-MDS
01 - Installing ActiveSync Software
TC001-18-01H
Activity 01
(Continued)
24. The following window should display. If Synchronized is listed below
Connected like the example below, click the X in the upper right corner to close
the window.
If the window indicates one or more files are not ��������������������������������������������������������������������������������������������������������������������������������������������������������������������������������������������������������������������������������������������������������������������������������������������������������������������������������������������������������������������������������������������������������������������������������������������������������������������������������������������������������������������������������������������������������������������������������������������������������������������������������������������������������������������������������������������������������������������������������������������������������������������������������������������������������������������������������������������������������������������������������������������������������������������������������������������������������������������������������������������������������������������������������������������������������������������������������������������������������������������������������������������������������������������������������������������������������������������������������������������������������������������������������������������������������������������������������������������������������������������������������������������������������������������������������������������������������������������������������������������������������������������������������������������������������������������������������������������������������������������������������������������������������������������������������������������������������������������������������������������������������������������������������������������������������������������������������������������������������������������������������������������������������������������������������������������������������������������������������������������������������������������������������������������������������������������������������������������������������������������������������������������������������������������������������������������������������������������������������������������������������������������������������������������������������������������������������������������������������������������������������������������������������������������������������������������������������������������������������������������������������������������������������������������������������������������������������������������������������������������������������������������������������������������������������������������������������������������������������������������������������������������������������������������������������������������������������������������������������������������������������������������������������������������������������������������������������������������������������������������������������������������������������������������������������������������������������������������������������������������������������������������������������������������������������������������������������������������������������������������������������������������������������������������������������������������������������������������������������������������������������������������������������������������������������������������������������������������������������������������������������������������������������������������������������������������������������������������������������������������������������������������������������������������������������������������������������������������������������������������������������������������������������������������������������������������������������������������������������������������������������������������������������������������������������������������������������������������������������������������������������������������������������������������������������������������������������������������������������������������������������������������������������������������������������������������������������������������������������������������������������������������������������������������������������������������������������������������������������������������������������������������������������������������������������������������������������������������������������������������������������������������������������������������������������������������������������������������������������������������������������������������������������������������������������������������������������������������������������������������������������������������������������������������������������������������������������������������������������������������������������������������������������������������������������������������������������������������������������������������������������������������������������������������������������������������������������������������������������������������������������������������������������������������������������������������������������������������������������������������������������������������������������������������������������������������������������������������������������������������������������������������������������������������������������������������������������������������������������������������������������������������������������������������������������������������������������������������������������������������������������������������������������������������������������������������������������������������������������������������������������������������������������������������������������������������������������������������������������������������������������������������������������������������������������������������������������������������������������������������������������������������������������������������������������������������������������������������������������������������������������������������������������������������������������������������������������������������������������������������������������������������������������������������������������������������������������������������������������������������������������������������������������������������������������������������������������������������������������������������������������������������������������������������������������������������������������������������������������������������������������������������������������������������������������������������������������������������������������������������������������������������������������������������������������������������������������������������������������������������������������������������������������������������������������������������������������������������������������������������������������������������������������������������������������������������������������������������������������������������������������������������������������������������������������������������������������������������������������������������������������������������������������������������������������������������������������������������������������������������������������������������������������������������������������������������������������������������������������������������������������������������������������������������������������������������������������������������������������������������������������������������������������������������������������������������������������������������������������������������������������������������������������������������������������������������������������������������������������������������������������������������������������������������������������������������������������������������������������������������������������������������������������������������������������������������������������������������������������������������������������������������������������������������������������������������������������������������������������������������������������������������������������������������������������������������������������������������������������������������������������������������������������������������������������������������������������������������������������������������������������������������������������the right
Activity 03- Page 4
INTRODUCTION TO M-MDS
03 - PDA Navigation
TC001-18-01H
Activity 03
(Continued)
13. Tap the Battery Power tab.
14. Set Dim if device is idle for more than
to 5 minutes.
15. Tap OK to save your selection and exit
the screen.
Activity 03- Page 5
INTRODUCTION TO M-MDS
03 - PDA Navigation
TC001-18-01H
Activity 03
(Continued)
16. Tap X at the upper right corner to exit the
Settings screen.
Your PDA’s main screen
may look slightly
different than this
example.
The main screen displays when you have
saved your selections and exited the Settings screen.
Activity 03- Page 6
INTRODUCTION TO M-MDS
03 - PDA Navigation
TC001-18-01H
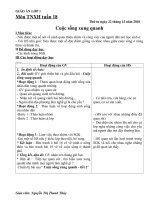
Now that you have mastered basic PDA navigation, perform a soft reset so the PDA
will be ready to use with M-MDS. The soft reset deletes data that has not been saved,
such as the current vehicle session, but saves data previously stored in the PDA’s
memory.
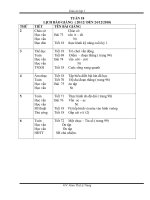
To perform a soft reset, use the stylus to press the reset button one time on the back
of the PDA, as shown in the picture below.
Reset button
NOTE
On an HP PDA, the reset button is in a different location. Ask your instructor if you
are not sure where the reset button is located.
Conclusion:
In this activity, you performed basic PDA navigation to view battery status, adjust
screen brightness, and adjust screen “on time.” You also learned “soft resetting”
the PDA.
Instructor Sign-off: ____________________________________
Activity 03- Page 7
INTRODUCTION TO M-MDS
04 - Retrieving and Clearing DTCs
TC001-18-01H
Activity 04: Retrieving and Clearing DTCs
Upon completing this activity you will be able to use M-MDS to:
•
•
•
Open a vehicle session
Retrieve and clear DTCs from a current Mazda vehicle
Close a vehicle session
What you need to complete this activity:
•
•
•
•
•
A current Mazda vehicle prepped by your instructor
Mazda-approved PDA with PDS installed
Mazda-approved laptop with ActiveSync installed
High-speed internet access if possible.
VCM
Procedure:
Initialize M-MDS and Open a Vehicle Session
1. Connect the M-MDS data cable to DLC 2 under the dash. The PDA will turn on
automatically.
Three USB pop-up messages quickly flash on and off the PDA. You may
not see the first two messages:
USB message 1
USB message 2
Activity 04- Page 1
INTRODUCTION TO M-MDS
04 - Retrieving and Clearing DTCs
TC001-18-01H
Activity 04
(Continued)
The third message, “Status: User
Authenticated,” is the most important
message.
USB message 3
2.
Tap Start on the main screen.
Your PDA’s main screen
may look slightly different
than this example.
3. A drop-down menu lists the frequently used
programs. Go to step 4 if PDS is listed on the
drop-down menu. Go to step 5 on page 3 if
PDS is not listed on the drop-down menu.
4. Tap PDS from the drop-down menu, then go
to step 6 on page 4..
Activity 04- Page 2
INTRODUCTION TO M-MDS
04 - Retrieving and Clearing DTCs
TC001-18-01H
Activity 04
(Continued)
5. If PDS is not listed on the drop-down menu,
you will need to access PDS from the
Programs screen.
USB message 3
NOTE
The following steps are required when PDS is newly installed on the PDA
or after conducting a hard reset on the PDA.
A. Select Programs from the drop-down menu.
B. The Programs screen displays either
PDS or PDS Tools.
Tap PDS if it is displayed.
Activity 04- Page 3
INTRODUCTION TO M-MDS
04 - Retrieving and Clearing DTCs
TC001-18-01H
Activity 04
(Continued)
- OR Tap PDS Tools if it is displayed, then tap PDS.
6. The PDS Establishing Communications screen
flashes on then off. This screen indicates the
PDA is connecting to the VCM via the USB
network.
7. Tap the
New Vehicle icon.
Activity 04- Page 4