Programming a Pivot Table
Bạn đang xem bản rút gọn của tài liệu. Xem và tải ngay bản đầy đủ của tài liệu tại đây (344.9 KB, 41 trang )
Programming a Pivot Table
A
lthough you can create complex pivot tables without programming, some pivot table set-
tings can only be changed by using programming. As a developer, you can use programming
to limit the ways users can manipulate your pivot tables, or to simplify a complex set of tasks.
For example, you can provide a button on the worksheet that users can click to format, refresh,
and preview a pivot table before printing.
This chapter addresses programming issues related to pivot tables and provides code
examples for macros that can’t be recorded. The chapter begins with a brief introduction to
using Excel’s macro recorder and the Visual Basic Editor (VBE), where you can view and edit
the code stored in the workbook’s modules. Many excellent books are available with instruc-
tions and examples for learning how to program in Excel. Also, extensive documentation is in
the VBE help files and Excel’s help files.
For an overview of the Excel 2007 object model, see “Excel Object Model Reference” on
the Microsoft web site at />Except where noted, the problems in this chapter are based on the Sales11.xlsm work-
book. The code, in text format, is also available in the file named Code.txt. You can copy the
code from the text file into your own workbooks, or experiment with the code in the sample
workbooks.
11.1. Using Sample Code
Problem
You’ve obtained sample code from this chapter, and you would like to use it in your workbook.
You aren’t sure where to store the code, or how to run it.
Solution
To use the code examples in this chapter, you can add them to your workbooks. Some code
may require modification, as described in Section 11.3, to match names and ranges in your
workbooks. You’d then run the code using one of the methods described here.
■
Note
When a workbook contains code, it must be saved as an Excel Macro-Enabled Workbook. This type
of file has an
xlsm
file extension, as you can see in the sample files for this chapter.
205
CHAPTER 11
Storing the Code
Most of the code samples are stored in a regular code module:
1. Download the sample files, and then copy the code you want to use.
2. Open the workbook in which you want to store the code.
3. On the keyboard, hold the Alt key, and then press the F11 key to open the Visual Basic
Editor.
4. Click the Insert menu, and then click Module.
5. Right-click where the cursor is flashing, and then click Paste.
■
Note
If an “Option Explicit” line of code is at the top of the worksheet, position the cursor below that line.
Some code is event code, and it runs automatically when something specific occurs in the
workbook. For example, if you type in a cell and press the Enter key, the worksheet is changed.
This could trigger the Worksheet_Change event. Worksheet event code is stored on a work-
sheet code module. To add the code to a worksheet, do the following:
1. Download the sample files, and then copy the code you want to use.
2. Select the worksheet in which you want to use the code.
3. Right-click the sheet tab and click View Code to open the Visual Basic Editor.
4. Right-click where the cursor is flashing, and then click Paste.
Running the Code
To run the macros you create, you can store the workbook that contains the macros in a
trusted location, or change your macro settings to enable macros. Follow these steps to enable
all macros:
1. Click the Microsoft Office button, and then click Excel Options.
2. Click the Trust Center category, and then click Trust Center Settings.
3. Click the Macro Settings category, and in the Macro Settings section, either click Dis-
able All Macros with Notification, or click Enable All Macros.
■
Note
If you click Disable All Macros with Notification, you are asked to enable or disable macros when-
ever you open a workbook that contains macros.
4. Click OK, twice, to close the dialog boxes.
CHAPTER 11
■
PROGRAMMING A PIVOT TABLE206
Macros can be run by using several methods. For example, you can use a shortcut key, a Rib-
bon command, or a button on the Quick Access Toolbar (QAT).
Using a Shortcut Key
When recording a macro, you can assign a shortcut key, as described in Section 11.2. To run
the macro, press the shortcut key combination.
Using a Ribbon Command
To run a macro, you can click the Macros command on the Ribbon’s View tab or the Developer
tab. If the Developer tab is not visible on the Ribbon, follow these steps to display it:
1. Click the Microsoft Office button, and then click Excel Options.
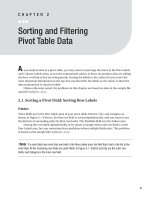
2. Click the Popular category, and in the Top Options For Working With Excel section, add
a check mark to Show Developer Tab in the Ribbon (see Figure 11-1).
Figure 11-1. Displaying the Developer tab in the Ribbon
3. Click OK, to close the Excel Options dialog box.
Follow these steps to run a macro from a Ribbon command:
1. On the Ribbon’s Developer tab, in the Code group, click Macros.
■
Tip
The Macros command is also available on the Ribbon’s View tab.
2. In the center of the Macro dialog box is a drop-down list with the caption, Macros In.
From that list, select the location in which you stored your macro.
3. In the list of macros, click your macro, and then click Run.
Using a Quick Access Toolbar (QAT) Button
To run a macro, you can add a button to the QAT:
1. At the right end of the QAT, click Customize Quick Access Toolbar, and then click More
Commands.
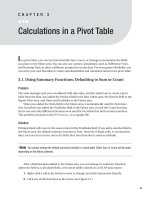
2. In the Excel Options dialog box, click the arrow on the Choose Commands From drop-
down list, and then click Macros (see Figure 11-2).
CHAPTER 11
■
PROGRAMMING A PIVOT TABLE 207
Figure 11-2. Selecting a macro to add to the QAT
3. In the list of macros, click the macro you want to add to the QAT.
4. Click the Add button, to move the macro to the QAT.
5. To change the macro’s icon, select the macro in the Customize Quick Access Toolbar
list. Click Modify and select a different icon, and then click OK.
6. Click OK to close the Excel Options dialog box.
7. To run the macro, click the macro’s button on the QAT.
11.2. Recording a Macro While Printing a Pivot Table
Problem
At the beginning of each work day, you format and print your pivot table, and several steps are
in the process. First, you apply a light PivotTable Style that you use when printing, and then
you refresh the data, and, finally, you preview the report. You’re not really a morning person,
so you’d like to create a macro that performs all these steps automatically, to make the process
easier and faster. This problem is based on the OrderDates pivot table in the Sales11.xlsm
workbook.
Solution
Excel programming is done in the Visual Basic for Applications (VBA) language. When manu-
ally changing or creating a pivot table, you can use Excel’s macro recorder to create code as
you work. Later, you can run the macro as recorded, or adjust the code to make it more flexi-
ble, enabling it to run correctly if the worksheet data or layout changes.
The macro recorder doesn’t create ideal code. It records what you do with the mouse and
keyboard as you manually perform a task but, occasionally, it’s unable to record one or more
steps, so the resulting code is incomplete. The macro recorder also includes many recorded
steps that may be unnecessary in the final code, such as multiple clicks on the scroll bar but-
ton to move down the worksheet. However, for simple tasks, or for learning about Excel’s
object model and programming syntax, the macro recorder is a useful tool.
Before You Begin Recording
When creating a macro, you can select a range as the first step in the macro and operate on
that range, or you can record steps that operate on the currently selected range. In this exam-
CHAPTER 11
■
PROGRAMMING A PIVOT TABLE208
ple, you want the macro to prepare a specific pivot table, so select a cell outside the pivot
table, and then select a different worksheet. In the Sales11.xlsm sample file, you can select the
Sales Data sheet before you begin recording. You select the OrderDates worksheet and a cell in
the pivot table after you begin recording, so those steps will be part of the recorded code.
Recording a Macro
1. On the Ribbon’s Developer tab, in the Code group, click Record Macro.
■
Tip
You can also click the Record Macro button at the left side of the Status bar.
2. Type a one-word name for the macro, for example, Prepare_Pivot.
3. If you want to run the macro by using a keyboard shortcut, type an upper- or lowercase
letter in the Shortcut Key box. In this example, uppercase P is used (see Figure 11-3).
This setting is optional; there are other ways to run the macro after you create it. To run
the macro later, using the shortcut, press the Ctrl key, and the Shift key, and then tap
the P key. If you use lowercase p as the shortcut, then you press Ctrl and tap the P key,
without pressing the Shift key.
Figure 11-3. Ctrl+Shift+P is entered as the macro’s shortcut key.
■
Caution
Don’t use a shortcut key that’s the same as the Excel shortcuts you like to use. For example,
Ctrl+c copies the selection in Excel. If you use Ctrl+c as your macro shortcut, it will overwrite Excel’s copy
shortcut while the workbook with the macro shortcut is open. However, the shortcut keys are case-
sensitive; you could hold the Shift key, and use an uppercase C as your shortcut, and it won’t overwrite
the Copy shortcut.
CHAPTER 11
■
PROGRAMMING A PIVOT TABLE 209
4. From the Store Macro In drop-down list, select a location in which to save the macro.
In this example, the macro is specific to the active workbook, so you would select This
Workbook. If it’s a macro you want to use in many workbooks, you could store it in
your Personal Macro Workbook. The third option is to store it in a new workbook.
5. To help you, or other users, understand what the macro does, you can enter a brief
message about the macro’s purpose in the Description box.
6. Click the OK button to start recording the macro.
7. Perform the steps you want to record. In the Sales11.xlsm example, select the Order-
Dates worksheet, where the pivot table named PT1 is located. Then, select a cell at the
top left of the pivot table. On the Ribbon’s Design tab, open the PivotTable Styles
gallery, and then click Pivot Style Light 1. Then, right-click a cell in the pivot table, and
click Refresh. Finally, click the Microsoft Office button, point to Print, click Print Pre-
view, and click the Close Print Preview button.
■
Note
While recording the macro, Live Preview is disabled, so you won’t see a preview when you select a
different PivotTable Style.
8. After you complete the steps you want to record, click the Stop Recording button at the
left side of the status bar (see Figure 11-4).
Figure 11-4. The Stop Recording button on the status bar
Viewing the Recorded Code
1. On Ribbon’s View tab, at the far right, click the top section of the Macros command, to
open the Macro dialog box.
2. From the Macros In drop-down list, select This Workbook, or the location in which you
stored your macro.
3. In the list of macros, select your macro, and then click Edit.
4. This opens the VBE, where you can see the recorded code.
5. At the left, you should see the Project Explorer, which lists the open Excel files. Your
active workbook is in the list, with its modules and Excel objects listed. The recorded
code was stored in a module, which is highlighted in the list (see Figure 11-5).
CHAPTER 11
■
PROGRAMMING A PIVOT TABLE210
Figure 11-5. The VBE shows the recorded code.
■
Note
If the Project Explorer is not visible, on the VBE menu, click View, and then click Project Explorer.
6. In the code window at the right, you can see the recorded code. The code is in a proce-
dure, which starts with a line that contains the word “Sub,” followed by the name you
gave the macro and a set of parentheses.
7. Following the Sub line are comment lines that start with a single quote mark. The com-
ments don’t affect the code, but they can make it easier to understand. Some
comments are added by the macro recorder, and you can add your own comments to
the code. Lines that don’t start with a single quote mark are the lines of code that con-
trol what steps are performed when you run the macro.
■
Note
Although the recorder was on when you closed the Print Preview window, that step was not
recorded. Some actions cannot be captured by the macro recorder.
8. In the code window, you can edit the existing code or type new code. In this example,
you leave the code as it is. To make changes later, you can follow the instructions in
Section 11.3.
9. To close the VBE and return to Excel, click the File menu, and then click Close and
Return to Microsoft Excel.
CHAPTER 11
■
PROGRAMMING A PIVOT TABLE 211
Running a Macro
When you’re ready to print the pivot table, you can run your macro to perform the preparation
steps:
1. On the Ribbon’s Developer tab, in the Code group, click Macros.
2. From the drop-down list for Macros In, select the location in which you stored your
macro.
3. In the list of macros, select your macro, and then click Run.
Changing a Macro Keyboard Shortcut
After creating a macro that runs from a keyboard shortcut, you may want to change the letter
used in the shortcut. Or, if you recorded a macro, and did not assign a keyboard shortcut to it,
you can use this technique to add a keyboard shortcut later. To add or change a shortcut, fol-
low these steps:
1. On the Ribbon’s Developer tab, in the Code group, click Macros.
2. From the Macros In drop-down list, select the location in which you stored your
macro.
3. In the list of macros, select your macro, and then click Options.
4. In the Shortcut key box, type a different uppercase or lowercase character.
5. Click OK to close the Macro Options dialog box.
6. Click Cancel to close the Macro dialog box.
11.3. Modifying Recorded Code
Problem
To make your morning tasks easier, you followed the steps in Section 11.2—you turned on the
macro recorder as you formatted the pivot table, refreshed the data, and previewed the work-
sheet. The following code was created in the Sales11.xlsm workbook:
Sub Prepare_Pivot()
'
' Prepare_Pivot Macro
' Format, refresh and Print Preview a pivot table
' Keyboard Shortcut: Ctrl+Shift+P
'
Sheets("OrderDates").Select
Range("A3").Select
ActiveSheet.PivotTables("PT1").TableStyle2="PivotStyleLight1"
ActiveSheet.PivotTables("PT1").PivotCache.Refresh
ActiveWindow.SelectedSheets.PrintPreview
End Sub
CHAPTER 11
■
PROGRAMMING A PIVOT TABLE212
Things were going well, and you ran the macro without problems every morning last
week. However, yesterday you changed the pivot table’s name from PT1 to OrderPivot, and
when you ran the macro this morning, an error message appeared that said, “Run-time error
‘1004’: Unable to get the PivotTables property of the Worksheet class.”
Solution
The recorded code includes the name of the pivot table at the time of the recording:
ActiveSheet.PivotTables("PT1").PivotCache.Refresh
You can replace the recorded name with the new name, and then the macro will run correctly.
1. To edit the code, open the VBE, as described in Section 11.2.
2. Because the pivot table’s new name is OrderPivot, change all occurrences of the
recorded name, PT1, to OrderPivot. For example:
ActiveSheet.PivotTables("OrderPivot").PivotCache.Refresh
3. Click the Save button, and then click the File menu, and click Close and Return to
Microsoft Excel.
11.4. Changing the Summary Function for All Value Fields
Problem
When you add fields to the Values area, sometimes they appear as Count of Field instead of
Sum of Field. You would like the Sum function to be the default for all Values fields. This prob-
lem is based on the Summary.xlsm workbook.
Workaround
You can’t change the default settings for the pivot table’s Values fields. If a field in the source
data contains blank cells, or cells with text, it defaults to Count; otherwise, it defaults to Sum.
After the Values fields are added, you can run a macro to change the summary function. The
following macro changes all the Values fields in the first pivot table on the active sheet to use
the Sum function. Store the code on a regular code module.
Sub SumAllValueFields()
Dim pt As PivotTable
Dim pf As PivotField
Dim ws As Worksheet
Set ws = ActiveSheet
Set pt = ws.PivotTables(1)
Application.ScreenUpdating = False
CHAPTER 11
■
PROGRAMMING A PIVOT TABLE 213
pt.ManualUpdate = True
For Each pf In pt.DataFields
pf.Function = xlSum
Next pf
pt.ManualUpdate = False
Application.ScreenUpdating = True
Set pf = Nothing
Set pt = Nothing
Set ws = Nothing
End Sub
To run the code, use one of the methods described in Section 11.1.
How It Works
The SumAllValueFields procedure changes the Function property for each field in the Values
area (pt.DataFields), setting it to xlSum. Because the ws variable is set to the ActiveSheet
instead of a specific worksheet, you can run the code on any worksheet that contains a pivot
table. The code refers to the pivot table by index number (1), instead of using a specific name
("PT1"), and that also makes it more flexible.
11.5. Naming and Formatting the Show Details Sheet
Problem
The sales manager frequently opens your workbook to check the results in the OrderDates
pivot table. To investigate the records included in a number in the Values area, he often
double-clicks a cell, and the underlying records are exported to a new sheet. This can occur
several times during each session, and you have to clear out all the extra sheets the next time
you open the workbook.
You’d like to automatically name the sheets created by the Show Details feature, so they’re
easy to identify. This problem is based on the SheetsName.xlsm workbook.
Solution
You can name the new sheet using an event procedure that runs automatically when a sheet is
added to the workbook.
1. In the VBE, click the Insert menu, and then click Module.
2. At the top of the module, where the cursor is flashing, type the following line of
code to create a public variable. This variable can be used by other procedures in
the workbook.
Public SheetType As String
CHAPTER 11
■
PROGRAMMING A PIVOT TABLE214
3. You want code to run when a cell is double-clicked on the OrderDates sheet, so you’ll
add event code to that sheet’s module. In Excel, right-click the OrderDates worksheet
tab, and then click View Code. Add the following code to the worksheet module, below
the Option Explicit line:
Private Sub Worksheet_BeforeDoubleClick(ByVal Target As Range, _
Cancel As Boolean)
Dim pt As PivotTable
If Me.PivotTables.Count = 0 Then Exit Sub
For Each pt In Me.PivotTables
If Not Intersect(Target, pt.DataBodyRange) Is Nothing Then
SheetType = "Show"
Exit For
End If
Next pt
Set pt = Nothing
End Sub
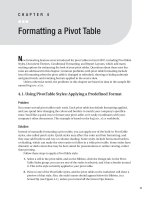
4. In the VBE, in the Project Explorer, double-click the ThisWorkbook object for the
SheetsName.xlsm workbook. Add the following code to its module, as shown in
Figure 11-6.
Figure 11-6. Add code to the ThisWorkbook module.
Private Sub Workbook_NewSheet(ByVal Sh As Object)
On Error GoTo err_Handler
Select Case SheetType
Case "Show" 'Show Details
Sh.Name = Left("XShow_" & Sh.Name, 31)
Case Else
'do nothing
End Select
SheetType = ""
CHAPTER 11
■
PROGRAMMING A PIVOT TABLE 215
err_Handler:
Exit Sub
End Sub
To run the event code, double-click a cell in the OrderDates pivot table’s Values area. A
worksheet is created with the extracted data, and a sheet name that starts with XShow_.
How It Works
When any cell on the pivot table’s sheet is double-clicked, the BeforeDoubleClick event is trig-
gered. If no pivot tables are on the worksheet, or if the double-clicked cell is not in the Values
area (pt.DataBodyRange) of a pivot table, the procedure is exited. Otherwise, the public vari-
able, SheetType, is set to a value of Show. If the double-click creates a new sheet, the workbook’s
NewSheet event code runs.
If SheetType is set to the value of Show, the sheet is given a name that starts with XShow_.
This makes the sheets easy to identify, and they can be deleted automatically when the work-
book closes. See Section 11.6 for sample code to delete the worksheets.
11.6. Automatically Deleting Worksheets When Closing
a Workbook
Problem
Once a week, you send a printed copy of the Region Pivot report to the manager of each
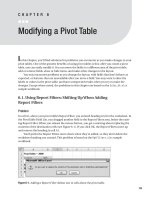
region. On the Ribbon’s Options tab, in the PivotTable group, you can click the Options drop-
down arrow, and then click Show Report Filter Pages, to create a worksheet with a copy of the
pivot table for each region in the Report Filter Field.
This command is useful for printing customized copies of the pivot table, but it adds extra
sheets to the workbook. You’d like these sheets to be automatically deleted when the work-
book is closed to prevent the buildup of sheets. This problem is based on the
SheetsDelete.xlsm sample workbook.
Solution
You can use an event procedure that runs when a sheet is added to the workbook to rename
the new sheets, so they’re easy to identify and delete when the workbook closes.
1. In the ThisWorkbook module, add the following two procedures:
Private Sub Workbook_NewSheet(ByVal Sh As Object)
If TypeName(Sh)="Worksheet" Then
If Sh.PivotTables.Count > 0 Then
If Sh.PivotTables(1).PageFields.Count > 0 Then
Sh.Name = Left("XShow_" & Sh.Name, 31)
End If
End If
End If
CHAPTER 11
■
PROGRAMMING A PIVOT TABLE216
End Sub
'
Private Sub Workbook_BeforeClose(Cancel As Boolean)
Dim ws As Worksheet
Dim Resp As Long
Dim ShowCount As Long
ShowCount = 0
For Each ws In ThisWorkbook.Worksheets
If UCase(Left(ws.Name, 5)) = "XSHOW" Then
ShowCount = ShowCount + 1
End If
Next ws
If ShowCount > 0 Then
Resp = MsgBox("Delete Show Report Filter Pages sheets?", _
vbYesNo, "Delete Sheets?")
If Resp = vbYes Then
Application.DisplayAlerts = False
For Each ws In ThisWorkbook.Worksheets
If UCase(Left(ws.Name, 5)) = "XSHOW" Then
ws.Delete
End If
Next ws
End If
End If
Set ws = Nothing
End Sub
2. To run the event code that names the sheets, select a cell in the pivot table and on the
Ribbon’s Options tab, in the PivotTable group, click the Options drop-down arrow, and
then click Show Report Filter Pages. Select a report filter in the list, and then click OK.
How It Works
If a new sheet is created, the workbook’s NewSheet event is triggered. If the new sheet contains
a pivot table, and that pivot table has a report filter, it’s assumed to be generated by the Show
Report Filter Pages command. The sheet is renamed by the NewSheet code, with XShow_ at
the start of the name.
When the workbook closes, the workbook’s BeforeClose event is triggered. The event code
asks the user if Show Report Filter Pages sheets should be deleted. If the user clicks Yes, the
sheets are deleted, and the workbook can be saved without the sheets.
Notes
The ThisWorkbook module can contain only one copy of each event, such as the
Workbook_NewSheet event. To use both the sample code from Section 11.5 and the sample
code in this section, you can combine the Workbook_NewSheet code into one procedure:
CHAPTER 11
■
PROGRAMMING A PIVOT TABLE 217
Private Sub Workbook_NewSheet(ByVal Sh As Object)
On Error GoTo err_Handler
Select Case SheetType
Case "Show" 'Show Details
Sh.Name = Left("XShow_" & Sh.Name, 31)
Case Else
'do nothing
End Select
SheetType = ""
If TypeName(Sh) = "Worksheet" Then
If Sh.PivotTables.Count > 0 Then
If Sh.PivotTables(1).PageFields.Count > 0 Then
Sh.Name = Left("XShow_" & Sh.Name, 31)
End If
End If
End If
err_Handler:
Exit Sub
End Sub
11.7. Changing the Report Filter Selection in Related Tables
Problem
In your workbook, three pivot tables are based on the same Excel Table, and the Product field
is in the Report Filter area for each pivot table. When you’re asked for the status of a specific
product, you select that product from the report filter in each pivot table, and you print all
three pivot tables.
It would be easier if you could change the Product Report Filters in all the pivot tables at
the same time, instead of going to each sheet and changing them individually. This problem is
based on the ChangeTwo.xlsm sample workbook.
Solution
You can use an event procedure to change the other pivot tables’ report filters when the Prod-
uct report filter is changed in the OrderDates pivot table.
1. Right-click the sheet tab for the OrderDates pivot table, and then click View Code.
2. Enter the following line of code in the General Declarations section at the top of the
module (see Figure 11-7). This is a module-level variable:
Dim mstrFilter As Variant
CHAPTER 11
■
PROGRAMMING A PIVOT TABLE218
Figure 11-7. Module-level variable in the General Declarations section
■
Tip
The Option Explicit setting ensures that all the variables you use are declared in the code. Using this
setting is good practice, as it can help you prevent errors when you write or edit code. You can type Option
Explicit at the top of each module, or you can change a setting, so it automatically appears in new modules.
In the VBE, click the Tools menu, and then click Options. On the Editor tab, add a check mark to Require
Variable Declaration.
3. Below the General Declarations section, add the following code, which includes the
sheet names where the other pivot tables are located, and the name of the report filter:
Private Sub Worksheet_PivotTableUpdate(ByVal Target As PivotTable)
Dim wsOther1 As Worksheet
Dim wsOther2 As Worksheet
Dim pt As PivotTable
Dim strFilter As String
On Error GoTo err_Handler
Set wsOther1 = Worksheets("Region Pivot") 'second PT sheet name
Set wsOther2 = Worksheets("CitySales") 'third PT sheet name
strFilter = "Product" 'Report Filter name
Application.EnableEvents = False
If UCase(Target.PivotFields(strFilter).CurrentPage) _
<> UCase(mstrFilter) Then
mstrFilter= Target.PivotFields(strFilter).CurrentPage
For Each pt In wsOther1.PivotTables
pt.PageFields(strFilter).CurrentPage = mstrFilter
Next pt
For Each pt In wsOther2.PivotTables
pt.PageFields(strFilter).CurrentPage = mstrFilter
Next pt
End If
CHAPTER 11
■
PROGRAMMING A PIVOT TABLE 219
err_Handler:
Application.EnableEvents = True
End Sub
To run the event code, change the selection in the OrderDates pivot table’s report filter.
How It Works
A variable within a procedure is stored only as long as the procedure that declared it is run-
ning. A module-level variable is used in this example, because it can store the current report
filter selection while the workbook is open. When the pivot table is updated, the variable
named mstrFilter is compared to the current selection in the Product Report Filter. If they’re
different, the new report filter value is stored in the variable, and the report filter in each
related pivot table is changed to match the report filter in the main pivot table.
11.8. Removing Filters in a Pivot Field
Problem
When you want to remove a filter from a pivot table field, you can manually check the Show
All box to show all items in that pivot table field. When you record this step, the code shows a
list of all the items in the pivot field, instead of using a Show All command. When you run the
code later, it can be very slow, if the list of items is long, such as in an OrderDate field. Also, if
you add new items to the field and run the macro, the new items aren’t made visible, because
the macro contains a list of the original items only. This problem is based on the Filters.xlsm
sample workbook.
Solution
Instead of using the recorded code, with its long list of items, you can use the
ClearManualFilter method. For example, the following code shows all items, in all visible
fields, in all tables on the active sheet. Store the code on a regular module.
Sub ClearFilters ()
Dim pt As PivotTable
Dim pf As PivotField
Dim ws As Worksheet
On Error GoTo err_Handler
Set ws = ActiveSheet
Application.ScreenUpdating = False
Application.DisplayAlerts = False
CHAPTER 11
■
PROGRAMMING A PIVOT TABLE220