Thiết kế flash với flash cs5 part 27
Bạn đang xem bản rút gọn của tài liệu. Xem và tải ngay bản đầy đủ của tài liệu tại đây (609.3 KB, 6 trang )
ptg
180
Chapter 5
When a line of text is created in Flash, it appears in a bounding box that
is editable. Sometimes you might need to adjust the characters sepa-
rately or you might want to modify the shape of the characters them-
selves to create new character styles. The Break Apart command
allows you to do this. There are two levels of breaking that you can uti-
lize. The first break will separate the text box into singular, editable
characters. This is useful if you want to reposition or align the letters of
a word independently. The second break severs the text from its font
reference: in essence it becomes a shape that you can edit with any of
the drawing tools or pen modifiers.
Using Break Apart to
Modify Characters
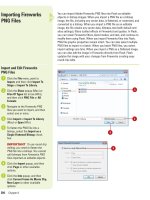
Break a Text Box into
Single Characters
Select the text box you want to
change with the Selection tool.
Click the Modify menu, and then
click Break Apart.
Each character appears in its own
editable box.
TIMESAVER
Press
A
+B
(Mac) or Ctrl+B (Win) to use the
Break Apart command.
2
1
2
1
The text box is broken into separate text boxes
that can be moved and edited separately.
Broken text box
From the Library of Wow! eBook
ptg
Chapter 5 Working with Text
181
Break a Text Box into Shapes
Select the text box you want to
change with the Selection tool.
Click the Modify menu, and then
click Break Apart.
The characters become individual
text boxes.
Click the Modify menu again, and
then click Break Apart.
The characters become simple
shapes that you can adjust with
Flash's drawing tools.
TIMESAVER
Press
A
+B
(Mac) or Ctrl+B (Win) twice to
break text into editable shapes.
3
2
1
2
Text boxes become
editable shapes.
See Also
See “Using the Free Transform Tool”
on page 118 for information on trans-
forming objects.
Transforming Text
You can use the Free Transform tool or the options on the Modify
menu under Transform to transform text boxes in the same ways you
transform other objects. You can scale, rotate, skew and flip text
boxes, but the text might become hard to read. However, you can still
edit it. Important: when you scale a text box as an object, the point
size in the Property Inspector may not be accurate. To restore a
transformed object, select the object, click the Modify menu, point to
Transform, and then click Remove Transform.
For Your Information
1
Characters become
individual text boxes.
From the Library of Wow! eBook
ptg
182
Chapter 5
Anti-aliasing affects the pixels on the edge of a shape by allowing
them to blend in with the background. It is a crucial feature when work-
ing with some text as it makes it appear smoother and more integrated.
Flash includes FlashType, a new text rendering feature that improves
anti-aliasing and readability for fonts. FlashType is enabled whenever
Flash Player 7 or later is the selected player, and anti-aliasing is set to
anti-aliasing for readability or custom. The drawback with anti-aliasing
is that at smaller font sizes the text can appear blurry. To avoid this
problem, use sans serif text, such as Helvetica or Arial, and don’t use
bold and italic. You can use anti-aliasing with static, dynamic, and input
text. You apply anti-aliasing to text boxes instead of characters.
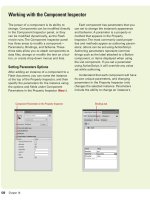
Using Anti-Alias Text
Set a Text Box to Anti-Alias Text
Select the text box you want to
change with the Selection tool.
In the Character section of the
Property Inspector (
New!
), click
the Anti-Alias list arrow, and then
select one of the following:
◆
Use Device Fonts. The SWF file
uses fonts installed on the local
computer to display fonts.
◆
Bitmap Text (No Anti-Alias)
(Classic). No text smoothing.
◆
Anti-Alias for Animation
(Classic) or Animation (TLF).
Smooths out animation.
◆
Anti-Alias for Readability
(Classic) or Readability (TLF).
Smooths out text.
◆
Custom Anti-Alias (Classic).
Modify font properties.
2
1
Anti-alias text
at small sizes
Alias text produces crisp
fonts at small sizes.
Alias text
Anti-aliasing blends the edge
pixels with the background.
2
Classic text
2
TLF
text
From the Library of Wow! eBook
ptg
Chapter 5 Working with Text
183
If you open a document with a missing font on a computer, a Missing
Font alert appears, asking you to choose a substitute font. You can
open and use the Font Mapping dialog box to map a substitute font to
the missing font, view the mapped fonts in the document, and delete a
font mapping. After you select a substitute font, text appears with the
correct font (if available) or the substitute font (if missing). When you
use a substitute font, the text box or attributes might need to be
adjusted.
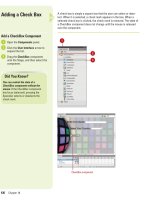
Using Font Mapping
Select Substitute Fonts
Open the document with the fonts
you want to map.
◆
To view all the font mappings
saved on your computer, close
all documents.
Click the Flash (Mac) or Edit (Win)
menu, and then click Font
Mapping.
Click a font in the Missing Fonts
column.
TIMESAVER
Press Shift+click
to select multiple missing fonts to
map to the same substitute font.
Click the Substitute Font list arrow,
and then click a font, or click
System Default.
Click OK.
5
4
3
2
1
54
3
Did You Know?
You can delete the font mapping.
Close
all documents, click the Flash (Mac) or
Edit (Win) menu, click Font Mapping,
select a font mapping, click Delete, and
then click OK.
You can turn off the Missing Font alert.
Click the Flash (Mac) or Edit (Win)
menu, click Font Mapping, select the
Don’t Show Again For This Document,
Always Use Substitute Fonts check
box, and then click OK.
From the Library of Wow! eBook
ptg
184
Chapter 5
When you include a font in your Flash document that is installed on
your computer, you can include the font into the exported Flash movie.
This is called an embedded font and it ensures that your fonts will look
consistent when displayed on other computers. This adds to the file
size, as each character from the selected font family has to be included
in the final SWF. If file size is an issue, and the exact character match-
ing is not important, you can choose to use device fonts. The Font
Embedding dialog allows you to add or remove the fonts (all or part)
you want to embed in the Flash document (
New!
). You can view a list
of all your embedded fonts in one place. When a font is set to device,
Flash will not embed the font information in the exported file. Instead
the Flash Player will substitute the closest resembling font by name on
the computer playing the Flash movie. The drawback is that you won't
be able to predict how the fonts will display on every computer. To
combat this uncertainty, Flash includes three device fonts. Each is
designed with characteristics of typical fonts usually found by default
on most computers. You can also choose device fonts when using small
font sizes because they are not anti-alias and display clearly.
Setting Device Fonts
Versus Embedded
Fonts
Embed Fonts
Select the text box with the fonts
you want to embed with the
Selection tool.
Click the Embed button in the
Property Inspector.
Click the Options tab, and then
specify a font name, family, style,
and character ranges you want.
To add or delete an embedded
font, do either of the following:
◆
Add New Font. Click Add New
Font button, and then specify
the font information in the
Options tab.
◆
Delete Font. Select a font from
the Font list, click the Delete
Selected Font button, and then
click OK.
Click the ActionScript tab, and
then select options to export font
information for ActionScript or to
share font information for runtime
sharing.
Click OK.
6
5
4
3
2
1
654
3
Embedded fonts
From the Library of Wow! eBook