Thiết kế flash với flash cs5 part 30
Bạn đang xem bản rút gọn của tài liệu. Xem và tải ngay bản đầy đủ của tài liệu tại đây (573.95 KB, 6 trang )
ptg
198
Chapter 6
Setting Photoshop
Import Preferences
Set Photoshop File Import
Preferences
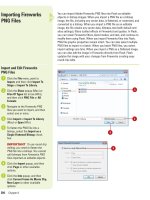
Click the Flash (Mac) or Edit (Win)
menu, and then click Preferences.
Click the PSD File Importer
category.
Select from the following options:
◆
Import Image Layers As.
◆
Bitmap Images With
Editable Layer Styles.
Create a movie clip with a
bitmap clipped inside.
◆
Flatten Bitmap Images.
Convert an image into a
bitmap; not editable.
◆
Create Movie Clips.
Imports an image into a
movie clip symbol in Flash.
◆
Import Text Layers As.
◆
Editable Text. Imports
Photoshop text from the
text layer as editable text
in Flash.
◆
Vector Outlines. Converts
text to vector paths; the
object is also converted to
a movie clip.
◆
Flattened Bitmap Images.
Converts text into a bitmap;
not editable.
3
2
1
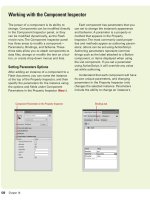
Flash allows you to set preferences to customize the way you import
Adobe Photoshop (.psd) files. You can set options for specific element
layer types you want to import, such as images, text, paths, shapes,
and groups. You can also set compression and quality publishing
options for the imported Photoshop files. The options you set are
applied to all Photoshop files when you import them into Flash.
However, you can change options in the Photoshop import dialog box.
2
3
From the Library of Wow! eBook
ptg
Chapter 6 Importing Graphics
199
◆
Create Movie Clips. Imports
the text layer into a movie
clip symbol.
◆
Import Shape Layers As.
◆
Editable Paths And Layer
Styles. Creates an editable
vector shape with a bitmap
clipped inside the vector
shape.
◆
Flatten Bitmap Images.
Converts an image into a
bitmap; not editable.
◆
Create Movie Clips. Imports
an image into a movie clip
symbol in Flash.
◆
Layer Groups. Select the Create
Move Clips check box to
convert all groups into a movie
clip in Flash.
◆
Merged Bitmaps. Select the
Create Movie Clips check box to
convert the shape layers into a
movie clip in Flash.
◆
Movie Clip Registration. Select
the global registration point for
movies and all other object
types.
◆
Publish Settings.
◆
Compression. Select the
Lossy (JPEG) or Lossless
(PNG/GIF) compression
mode you want.
◆
Quality. For the Lossy
compression, select the Use
Publish Setting or Custom
option; select the quality 1
to 100; the higher the
setting, the greater quality,
yet the larger the file size.
Click OK.
4
4
3
From the Library of Wow! eBook
ptg
200
Chapter 6
Flash includes support for importing Adobe Photoshop (.psd) files and
Adobe Illustrator files created in versions 6 through 10. When these
files are imported, there are a number of options you can choose from.
Before you import Photoshop and Illustrator files, you need to set
import options in the Preferences dialog box. For Illustrator files, you
can also specify whether you want to show an import dialog box where
you can set import settings for specific parts of an Illustrator file. The
options you set are applied to all Illustrator and Photoshop files when
you import them into Flash. However, you can change options in the
import dialog box. Some options in the Import dialog box are context-
sensitive; that is, they only appear if they are relevant to the imported
file. The import options are similar between Illustrator and Photoshop;
when they differ, the options are noted.
Importing Photoshop
and Illustrator Files
Import a Photoshop or
Illustrator File
Click the File menu, point to
Import, and then click Import To
Stage or Import To Library.
◆
Open and select the library
where you want to import files.
Click the Show popup (Mac) or
Files Of Type (Win), and then
select Photoshop, Adobe
Illustrator or All Image Formats.
Navigate to the drive or folder
where the file is located.
Select the Photoshop or Illustrator
file you want to import.
Click Import (Mac) or Open (Win).
Flash inserts the image file or
displays an import dialog box for
files, where you can specify
options for the specific files. If the
Import dialog box opens, continue.
5
4
3
2
1
5
3
2
4
Did You Know?
You can import an Illustrator EPS or
PDF using Illustrator CS4 or later.
Open
the file in Adobe Illustrator CS4 or later,
save it as a CS4-compatible AI file, and
then import into Flash as an AI file.
From the Library of Wow! eBook
ptg
Chapter 6 Importing Graphics
201
To generate a list of items from
Illustrator now compatible with
Flash, click Incompatibility Report.
Select the check boxes with the
elements you want to import,
select each element and set the
related options you want; you may
need to ungroup elements.
Click the Convert Layers To list
arrow, and then click.
◆
Flash Layers. Click this option
to convert the layers in the
imported file into corresponding
layers in the Flash Timeline.
◆
Keyframes. Click this option to
convert the layers in the
imported file into consecutive
keyframes.
◆
Single Flash Layer. Click this
option to flatten the layers in
the imported file onto a single
layer in Flash.
Select from the following options:
◆
Place At Original Position.
Select to maintain the same
positions from Illustrator or
Photoshop to Flash.
◆
Set Stage Size To Same Size
As. Select to set the Flash
Stage to the same size as the
Illustrator artboard or
Photoshop canvas.
◆
Import As Unused Symbols (AI).
Select to import AI symbols not
used as instances as unused
symbols in Flash.
◆
Import As A Single Bitmap
Image (AI). Select to convert
into a bitmap.
Specify the compression and
quality settings you want (PSD).
Click OK.
11
10
9
8
7
6
11
7
9
8
10
From the Library of Wow! eBook
ptg
202
Chapter 6
You can import bitmaps of several file types directly into Flash to use in
your Flash movie. It is important to remember that even though you can
edit and resize bitmaps in Flash, the original bitmap will always be
embedded in the exported Flash file. If file size is an issue, it is best to
bring your bitmapped art in at the size you want to export it. For exam-
ple, if your image is going to be 160 pixels by 160 pixels in the final
movie, it is best to import it at this size and not resize it up or down in
Flash. You will end up with higher-quality images and smaller files if you
do this. You can import files using the Import To Stage or Import To
Library methods. The Import To Stage method stores the bitmap in the
Library and places a copy on the Stage, while the Import To Library
method stores the bitmap in the Library and doesn't place a copy on
the Stage.
Importing Bitmaps
Import a Bitmap to the Stage
Click the File menu, point to
Import, and then click Import
To Stage.
Click the Show popup (Mac) or
Files Of Types list arrow (Win),
and then select the format of the
file you want to import.
Navigate to the drive or folder
where the file is located.
Select the file you want to import.
Click Import (Mac) or Open (Win).
5
4
3
2
1
5
4
3
2
Did You Know?
You may not be able to see the images
you've imported to the Stage at certain
magnification levels.
Flash aligns the
top left-hand corner of the image at the
0,0 coordinate. If you are zoomed in,
the image may have appeared outside
the viewable area. Use the Hand tool
to navigate around, zoom out, or press
Shift+
A
+W (Mac) or Ctrl+Shift+W
(Win) to toggle the Work Area off. This
sets the zoom level to 100% and hides
the Work Area.
Scaling Image Before Importing
Scaling bitmaps reduces the quality of the image, so it’s best to
import an image into Flash at the size you want it to be. If you need
to scale an image in Flash, it’s a good idea to import the image at a
slightly larger size, so when you scale it down, loss of quality is mini-
mized.
For Your Information
From the Library of Wow! eBook