Creative Photoshop: Digital Illustration and Art Techniques Photoshop Cs4- P8
Bạn đang xem bản rút gọn của tài liệu. Xem và tải ngay bản đầy đủ của tài liệu tại đây (6.93 MB, 50 trang )
338
Part Four: Illustrative Photography
17
20 Add a layer mask to the original grid layer.
Create radial, black to transparent gradients
within the mask. Use this same method to mask
one of your grid copy layers. Then, while holding
down the Alt(PC)/Option(Mac) key, click on
the mask and drag it onto another grid copy
layer in the Layers palette to add an identical
mask to that layer. Repeat this process with the
remaining unmasked grid layer. Add the grid
layers to a new group. Add a mask to the group
and then use the same methods to edit the
group’s mask. Select the Magic Wand tool and
deactivate the Sample All Layers function.
21 Ensure that the Contiguous and Anti-alias options are enabled and leave the tolerance set to the
def
ault value of 32. T
arget your original grid layer in the Layers palette. Use the Magic Wand tool to
click on an area that is enclosed on all sides by grid lines. Hold down the Shift key and click on other
enclosed areas on this layer to add them to the selection. Be careful not to click on areas that are not
completely contained within grid lines or you’ll end up selecting the entire background.
Because this facial grid is constructed
of path components, it is entirely
editable. You can use the Direct
Selection tool to select and edit any
point, line segment, or Bezier handle.
You can fiddle until your heart’s
content. However, be certain that you’re
happy with the appearance of your grid
before you go ahead and stroke the
path with a brush. Once you do this,
the pixels on your targeted layer are
painted with the brush and editing the
path from this point on won’t do you any
good. So be certain that you’re satisfied
before you select the Stroke option.
Path editing
Please purchase PDF Split-Merge on www.verypdf.com to remove this watermark.
339
Chapter 17: The Third Dimension
17
PART FIVE: Texture and holes
22 Open up the texture.jpg file. Choose
SelectϾ All and then Edit Ͼ Copy from the menu.
Return to your working file and, with the new
selection active, choose Edit Ͼ Paste Into from
the menu. This will paste the copied image into
your file as a new, masked layer. The mask is
dictated by the active selection. Drag the new
texture layer out, and on top, of your grid group
in the Layers palette. However, ensure that your
layer remains within the main group. Change the
layer blending mode to luminosity and reduce
the opacity to 76%. Duplicate this layer and
change the blending mode to overlay.
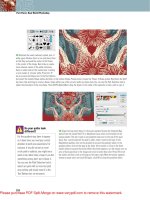
Altering the grid
Now that you know how to select squares from the grid, there’s much more you can do to embellish the face.
1
As you did previously, use the Magic
Wand to select a number of different
square areas that are contained within
the grid. Create a new layer, drag it to
the top within the group, and on that
layer, use the Gradient tool to create a
number of brown to transparent radial
gradients within the selection.
3
Again, use the Magic Wand to select
a number of random squares from
the grid layer. Target the top layer
in the group and then create a new
hue/saturation adjustment layer. Adjust
the hue and saturation, altering the
color of the selected areas.
2
Deselect and add a layer mask. Use
the Gradient tool to edit the mask,
softening the effect, as you’ve done
previously. Change the layer blending
mode to linear burn and then use the
Wand to select some different squares
from the grid layer.
Please purchase PDF Split-Merge on www.verypdf.com to remove this watermark.
340
Part Four: Illustrative Photography
17
23 Repeat the process of randomly selecting
squares from the grid layer; then, while the
selection is active, create another hue/
saturation layer and alter the colors within those
areas. Repeat this process again, but this time
use a brightness/contrast adjustment layer to
create some bright areas. And finally, create a
levels adjustment layer while there is no current
selection active. Use the CMYK input levels
sliders to lighten the midtones and highlights
of the underlying layers. To accentuate the
line work, select your grid group in the Layers
palette and drag it above all of the other layers
within the main group.
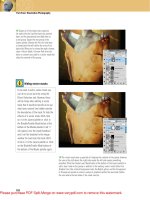
Masking the group
In addition to the existing vector mask, there are other ways to control what parts of the group are hidden and what parts are visible.
1
Finally, return to your original
grid layer. Again use the Wand tool
to select a number of square areas
from that layer. With the selection
active, target the main group in
the Layers palette and choose
Layer Ͼ Layer mask Ͼ Hide Selection
from the menu.
3
Target the group’s vector mask
and, using the grid as a visual
guide, trace over sections along
the edges of the ribbons. Because
the Pen is set to subtract, as you
create closed shapes with the
vector mask targeted, they’ll be
removed from visibility.
2
As you can see, it is possible
to use a layer mask and a vector
mask at the same time. Select the
Pen tool. This time, enable the
Subtract from Path Area option
in the Tool Options bar and target
the layer mask. Zoom in close on
the image.
Please purchase PDF Split-Merge on www.verypdf.com to remove this watermark.
341
Chapter 17: The Third Dimension
17
PART SIX: Adding dimension
24 Collapse the layer group in the Layers palette to hide the contents as we are now
finally finished with this group. Create a new layer and drag it beneath the group in
the Layers palette and ensure that it remains targeted. Select the Pen tool and choose
the Add to Path Area option. Draw a number of closed shapes to represent the areas
of the face that we would see behind it as the ribbon effect spirals in 3d space. Now,
select the Subtract from Path Area function and draw a number of squares to punch
holes in your new path components.
Creating the inside
Now we’ll use a number of familiar methods to add depth and texture to the inside of the spiral.
1
Generate a selection from your new
path. Use the Eyedropper to sample a
brownish gray color from the image and
then fill the active selection with it on
your new layer. Keep the selection active
and open up the texture.jpg file.
2
Copy the texture image and then
return to your working file. With the
selection active, choose Edit Ͼ Paste Into
from the menu to add it as a masked
layer. Change the layer blending mode to
multiply and reduce the opacity to 35%.
3 Duplicate the layer, change the mode
to overlay, and increase the opacity to
100%. Use this same paste into method
to add the contents of the texture1.psd
file into your file as a masked layer.
Change the mode to soft light, duplicate
the layer, and change the duplicate layer
mode to pin light.
Please purchase PDF Split-Merge on www.verypdf.com to remove this watermark.
342
Part Four: Illustrative Photography
17
25 Generate a selection from your newest path
again and create a new layer. With this layer
targeted, select the Radial Gradient tool. Use
the foreground to transparent method with a
black foreground color to add gradients into
the active selection on the current layer. Focus
on the outer edges to add shadow. Change
the blending mode of the layer to multiply and
reduce the opacity to 68%. With the selection
still active, create another new layer, this time
add some white gradients into the selection on
the new layer. Create them just left of the center,
near his forehead, to add highlights. Deselect
and reduce the layer opacity slightly.
The illusion of thickness
Again, the same methods are used, but this time to add some depth to the spiraling ribbon that makes up his face.
1
By now you’re familiar with the process
of creating paths. Use the Pen tool to draw
a series of path components indicating the
thickness of our spiraling ribbon. Also, add
path components to create thickness within
the holes in the front areas of the face.
2
Generate a selection from the
path and create a new layer. Fill
the active selection on the new
layer with a pink color sampled
via the Eyedropper tool from his
skin. Deselect and enable the
transparency lock for this layer.
3
Use the Radial Gradient tool with
previous settings to create some
brown to transparent gradients around
the edges on this layer. Use the
Polygonal Lasso to create sharp-
edged selections over the areas where
thickness was added to each square
hole. This allows you to add gradients
within each selection, creating the
illusion of inner walls on the edges of
each hole, adding depth via shading.
Please purchase PDF Split-Merge on www.verypdf.com to remove this watermark.
343
Chapter 17: The Third Dimension
17
26 Now that you’ve created the illusion of
thickness for the spiraling ribbon and the
holes in the front of the face, it is time to also
add some thickness to the holes in the back
areas. Use the Pen tool to draw a series of
path components to form the outline for the
hole thicknesses. Ensure that the Add to Path
Area option is enabled as you work and then
generate a selection from the entire path. With
the selection active, create a new layer and
drag it beneath all of the other layers in the
Layers palette. Fill the active selection with skin
color on the new layer. Deselect, and enable the
transparency lock for this layer.
27 Again, as you did previously with the areas in the front of the face, use the
Polygonal Lasso to create sharp-edged selections for each new inner wall. One by
one, draw a selection in the appropriate area, add a brown to transparent gradient,
deselect, and then move on to the next area. Continue in this manner until all areas
of thickness have some shading on them and all the corners of interior holes are
clearly indicated by shading within sharp-edged selections.
To generate a selection from an entire
path, meaning all of the separate
path components within that path, you
must ensure that no components are
selected. If a component or multiple
components are selected, the selection
you generate will be based upon the
selected components only, disregarding
all other path components. If you have
a path component selected, you can
deselect it by clicking on an area of the
canvas that has no path component with
either the Path Selection tool or the
Direct Selection tool.
Selections, paths, and
components
Please purchase PDF Split-Merge on www.verypdf.com to remove this watermark.
344
Part Four: Illustrative Photography
17
PART SEVEN: A 3d background
28 Open up the background.psd file. This file
contains a background image similar to the
textures we’ve been using so far, and it also
contains a layer named “ lines. ” This layer is
included within the file to act as a template. One
of the things that makes the work of Escher so
powerful is his ability to create optical illusions.
Here we’re going to create a bit of an optical
illusion of our own by creating shaded and
textured planes that don’t match the perspective
of the imagery. Things will look normal at first
glance, but upon further inspection, the viewer
will notice that this is an impossibility.
29 Select the Pen tool. Ensure that the Add to Path Area option is enabled. Using
the lines la
yer as your guide, you’r
e going to create three separate paths in the
Paths palette. Because the shapes you need to create have no curves, this should
go quick. First, trace all of the top planes that are indicated by the lines layer. Draw
as many closed path components as required. Name this path “ tops. ” Create a new
path, trace all of the left-facing planes, and name it “ lefts. ” Then do the same for
the right-facing planes until you have three separate paths.
When you draw a path component with
the Pen tool, a path is automatically
created in the Paths palette. Any
components you draw while this path is
targeted will be added to that path. By
clicking in the empty space in the Paths
palette, you are ensuring that no path
is targeted. When no path is targeted,
a new path is automatically created as
soon as you begin to draw with the Pen
tool. Another way to create a new path is
to simply click on the Create New Path
button at the bottom of the Paths palette.
This will create an empty path and target
it; then any components you create with
the Pen tool will be added to that path.
Creating paths
Please purchase PDF Split-Merge on www.verypdf.com to remove this watermark.
345
Chapter 17: The Third Dimension
17
30 Open up the sky.jpg file. Use the Move
tool to drag the sky into your working file as
a new layer. Hold down the Shift key while you
drag to ensure accurate positioning. Change
the blending mode of the layer to hard light
and reduce the opacity to 70%. Generate a
selection from the “ lefts ” path in the Paths
palette. With your sky layer targeted and the
current selection active, choose Layer Ͼ Layer
MaskϾ Hide Selection from the menu. Next, load
the “ tops ” path as a selection. With your layer
mask targeted, choose Edit Ͼ Fill from the menu
to fill the selected area on the mask with black.
Deselect.
Repeat the process
Continue to use your paths as the basis for selections, which will mask your layers as you add sky imagery to the other background
planes.
1
Disable the visibility of the “ lines ”
layer, you don’t need it anymore. Shift-
drag the sky.jpg file into your working
file as a new layer again. Generate a
selection from your “ rights ” path and
then click the Add Layer Mask button
in the Layers palette.
2
Reduce the opacity of the layer to
70% and generate a selection from
the “ rights ” path again. Create a new
selective color adjustment layer while
the selection is active. Select cyan
from the Colors menu and use the
sliders to alter the cyans within the
selection.
3 Again, drag the sky image into the
file as a new layer. Click on the “ lefts ”
path to load it as a selection. With
your new layer targeted, click on the
Add Layer Mask button in the Layers
palette. Change the blending mode
to color burn and reduce the opacity
to 73%.
Please purchase PDF Split-Merge on www.verypdf.com to remove this watermark.
346
Part Four: Illustrative Photography
17
31 At the moment in Photoshop, you have
two files open. There is the head file and
the background file you just created. For the
moment, we’re going to need to create another
temporary file. Create a new file in RGB mode
that is approximately 3 inches high and 3 inches
wide, using the same resolution as your other
two files. Create a new layer in this file and with
that layer targeted choose Filter Ͼ Vanishing
Point from the menu.
Create a cube shape
The vanishing point filter proves useful for creating shapes in perfect perspective.
1
Use the Create Plane tool to create
the first plane. Click in each of the
four corners to create the plane. You
can adjust the shape of your plane by
moving the corner paints around with
this tool.
2
While you still have the Create Plane
tool selected, click on the middle
handle of the left line segment and
drag to create a perpendicular plane.
Use the same tool to click and drag
the corners to reshape this plane too.
3
Now do the same thing to create
a top plane. Click on the top middle
handle of both the planes and drag
with the Create Plane tool to create
a top plane. Once you create the top
plane, your cube is complete. Click OK.
Please purchase PDF Split-Merge on www.verypdf.com to remove this watermark.
347
Chapter 17: The Third Dimension
17
32 When you exit the vanishing point filter and return to your empty file, you’ll
notice nothing. That is because we just created the planes within the vanishing
point filter, not any sort of artwork. We’re now going to return to that filter a number
of times to add an image to each plane that matches the perspective of the cube
we just created. Open up the top.jpg file, select all, and copy. Return to your empty
file and then launch the vanishing point filter again.
Adding texture to cube
Add texture by pasting a different image onto each plane within the vanishing point filter.
1
Inside the vanishing point filter,
you’ll see the planes you just created.
Type Control(PC)/Command(Mac)-v
to paste the copied image. Use the
Marquee tool to click on your
selected image and drag it onto the
top of the cube.
2
You’ll see a thick blue line appear
around the plane to indicate that your
image will be placed there. Choose the
Transform tool and resize the image
by dragging the corner points of the
selection. Click OK and witness the
results on your previously empty layer.
3
Open up the left.jpg file and use
the same method to copy, launch
vanishing point, and then paste onto
the left plane. Exit vanishing point and
then repeat the entire process with the
right.jpg file. Paste it onto the right
plane.
Please purchase PDF Split-Merge on www.verypdf.com to remove this watermark.
348
Part Four: Illustrative Photography
17
33 Use the Move tool to drag your cube layer
from this file into your background image file
as a new layer. Duplicate the layer a number
of times and use the Move tool to scatter the
cube layers around the background. Use varying
opacity settings from layer to layer, making
some less prominent than the others. Also try
varying the layer blending modes of a few
cube layers. Blending modes like pin light, hard
light, and linear light produce interesting yet
understated blending effects and work well with
the colors in this image. Target a single cube
layer and choose Edit Ͼ Free-Transform from
the menu.
34 Hold down the Shift key and drag the corner handle in or out, depending upon
whether you wish to incr
ease or decrease the size of the cube.
To rotate, move
the mouse pointer slightly outside of the box until it changes to indicate rotation.
When this happens, click and drag to rotate. When you are finished rotating
and/or scaling, press the Enter key. You can also alter the perspective of any
cube by targeting the layer and then choosing Edit Ͼ Transform Ͼ Perspective
from the menu. After doing this, dragging the corner points will allow you to alter
the perspective of the targeted cube. Again, pressing the Enter key will apply the
transformation.
You may be wondering why we went to
the trouble of creating a new file for
the cube only. Although it would have
been less effort to simply create a
cube on a new layer in the background
file, this wasn’t an option and I’ll tell
you why. You have probably noticed by
now that for this chapter we’ve been
working in the CMYK mode for both
the head file and the background file.
Vanishing point works only in the RGB
mode. So in order to create the cube
using vanishing point, we had to do
it in a separate file using RGB mode.
Once the layer is dragged from the
RGB file to the CMYK file, the colors are
automatically converted to CMYK.
Vanishing point mode
Please purchase PDF Split-Merge on www.verypdf.com to remove this watermark.
349
Chapter 17: The Third Dimension
17
PART EIGHT: Butterflies and clouds
35 Open the three butterfly images included
with the downloaded project files. Use the Move
tool to drag them into the background working
file as individual layers. Scatter them around
on the canvas and use the Free-Transform
methods you’ve used previously to alter the
size and rotation of different butterflies on
different layers. Feel free to duplicate butterfly
layers and move them around until you think
there are enough of them within the scene.
Go ahead and add layer masks to some of the
butterfly layers. And as you’ve done numerous
times by now, use the Gradient tool to add black
to transparent gradients within individual layer
masks, blending some of the butterflies into the
background.
Stacking up butterflies
Create duplicate butterfly layers, alter layer blending modes and opacity, and then edit individual layer masks to gently blend your
butterflies into the background.
1
Target one of your butterfly layers and
convert the blending mode to luminosity;
then duplicate this layer and change the
blending mode to overlay. Add a mask to
one of the layers and use the Gradient
tool to edit the mask.
2
Use this method to duplicate other
butterfly layers, building up stacks
with differing blending modes and
mask the layers. Remember, you can
also group the layers and edit the
group’s mask to affect all the layers
within the group.
3
Use this method to add interest to
a number of the butterflies within the
scene. In some instances, try simply
changing the blending mode and not
duplicating the layer. Vary opacity
settings and blending modes as you see
fit. Have a bit of fun experimenting here.
Please purchase PDF Split-Merge on www.verypdf.com to remove this watermark.
350
Part Four: Illustrative Photography
17
36 Open up the clouds.jpg file, select all, and
copy. Return to your background file. In the
Channels palette, click the Create New Channel
button to create a new alpha channel. With this
channel targeted, choose Edit Ͼ Paste from the
menu to paste the copied clouds image into
your new channel. Ensure that your new channel
remains targeted in the palette and click on
the Load Channel as a Selection to generate
a selection from the white areas of the pasted
image within the channel.
37 With your new alpha channel – based selection active, return to the Layers
palette
. Create a new layer and dr
ag it to the top of the layer stack. Choose
EditϾ Fill from the menu to fill the active selection with white on the new layer.
Deselect. Create a number of duplicates of this layer and use the Move tool to move
the layers around the canvas, scattering clouds across the image. Use the Free-
Transform tool to increase or decrease the contents of individual layers as you see
fit. If you wish to increase the intensity of a certain layer, simply duplicate it and
leave it in the same place on the canvas.
When you open up the clouds.jpg
image, you will notice that it is a very
dark sky with a few white clouds within
it. It is not exactly what you expect to
see when you open up a sky image. This
image was carefully prepared ahead
of time and yes, it did originally start
out as a nice blue sky with fluffy white
clouds. Because it was destined for an
alpha channel, it was altered ahead
of time so that the resulting selection
could be controlled before pasting into
the channel. Drastic tonal adjustments
were performed to ensure that the
only white areas visible would remain
within the cloud areas, not within the
sky. Doing this ensures that when the
channel is converted to a selection,
the entire background will lie outside
of the selection border because it is
100% black.
Black sky?
Please purchase PDF Split-Merge on www.verypdf.com to remove this watermark.
351
Chapter 17: The Third Dimension
17
PART NINE: Putting it all together
38 Return to the file that contains the head
you were working on previously. Target all
of the contents in the Layers palette: the
groups and all the layers. Make sure that
you’ve got everything. Choose Layer Ͼ Smart
ObjectsϾ Convert to Smart Object from the
menu. This will create a smart object that
contains everything within the file. Now, use the
Move tool to drag your smart object into the
background file you’ve been working on. Drag it
to the top of the stack in the Layers palette and
use the Move tool to position it just left of the
center on the canvas.
Add the floating bits
Some floating pieces of the face are all that is required to complete this scene.
1
Select the Pen tool and ensure
that the Add to Path Area function
is enabled in the Tool Options bar.
Use the Pen tool to carefully draw
a number of path components that
resemble rectangles and curved
rectangles. Vary the angle from
component to component.
2
Create a new layer at the top of the
layer stack. Generate a selection from
the path and fill it with skin color.
Use the Radial Gradient tool, with the
Foreground to Transparent preset, to
add shading to individual pieces in a
variety of colors.
3
With your current selection active,
open up the texture.jpg file again and
copy it. Use Edit Ͼ Paste Into to paste
it into your active selection. Change
the layer blending mode to linear
burn and reduce the opacity to 29%.
Duplicate this layer and change the
mode to overlay.
Please purchase PDF Split-Merge on www.verypdf.com to remove this watermark.
352
Part Four: Illustrative Photography
17
39 Create one final new layer and place it just
above your smart object in the Layers palette
so that all of the floating pieces layer sit above
it. Use the Pen tool to draw a number of closed
path components to add thickness to your
floating pieces. Generate a selection from the
path and then fill it with a sampled skin color
on your new layer. Enable the transparency lock
for this layer and then add some shading to the
thickness you’ve just created. Use exactly the
same methods of introducing gradients into
polygonal selections that you used previously
to add shading to each piece. You are now
essentially finished. However, feel free to use
everything you’ve learned so far to embellish
the image further.
Head examination
Now that the composition is complete, let’s take a final look at the tricks and techniques used to give the head a spiral 3d
appearance.
a
b
c
e
d
a
b
c
e
d
a
By working within a group that had a vector
mask applied to it, we were able to concentrate
on making the head itself look good, knowing
that layers and paint effects weren’t going to
stray beyond the dictated shape and onto the
background.
b
Adding line work via stroked paths allowed us to
give the face a 3d wire – mesh look. By dividing the
face into sections, we were able to remove sections
via mask editing to create the illusion of holes.
c
Drawing the thickness of the spiral may be a little
time consuming at first, but once you fill it with
color and add shading with gradients it looks quite
convincing.
d
Building up texture on the inside of the spiral
helps to make things look less flat. This sense
of depth is aided again by adding gradients to
simulate areas of highlight and shadow.
e
Because his iris areas have been altered by using adjustment layers, the colors can be changed at any point by simply editing
the adjustment layers. Double-click any adjustment layer to edit it.
Please purchase PDF Split-Merge on www.verypdf.com to remove this watermark.
353
Chapter 17: The Third Dimension
17
Try a simpler approach
You can take a simpler approach to creating the ribbon effect in other images. It doesn’t have to be a complicated spiral
at all actually. Here you can see how a similar, yet simpler, effect was applied to the head. The thickness is still prevalent,
yet on a whole, it is less complicated. Here you can also see how this is an ideal technique for combining photographs
and rendered 3d models in a cohesive manner.
Please purchase PDF Split-Merge on www.verypdf.com to remove this watermark.
Please purchase PDF Split-Merge on www.verypdf.com to remove this watermark.
Chapter 18: Aging Effects
18
Chapter 18
Aging
Effects
T
here is no way around it; our culture is obsessed with age and
beauty. We are bombarded with advertisements and television
commercials filled with young, beautiful people, and are trained
to think that age is unattractive. However, if you can snap
yourself out of this media-influenced tunnel vision and objectively look at
the face of an older person, there is a certain majestic beauty to it. Wrinkles
accentuate features, hair turns gray, and a sense of wisdom tends to come
across. There is a certain beauty in the aging process that far too many people
ignore.
Any photographer who has worked in advertising or magazine publishing
is no stranger to battling age. When an image ends up in Photoshop, skin is
often smoothed, and pores and wrinkles are removed alongside any evident
gray hairs. In general, the aging process is reversed. However, it was after I
received a commission from a Canadian women’s magazine that I was asked
to create the exact opposite as well. They wanted to show a woman both
young and old. Granted, the left side of her face has all of the retouching
and perfecting the Western World has come to expect, but the right side is
something else entirely. It shows the same woman but many years older.
The challenge when creating something like this is authenticity; it’s got
to look real and the best way to achieve that is to start with the real thing. So
not only did I photograph the beautiful young model you see here, but I also
photographed the elderly, adjusting the lighting to accentuate every wrinkle
and porous area of the skin. A method was developed for introducing sections
of the aged face into the beautiful model’s face, and as you can see here, the
results are rather convincing.
In addition to the Photoshop face effects, the overall image needs to
convey the juxtaposition between young and old. That is why one-half of
the background is in full color, whereas the other half is desaturated, gray,
and contains distressed, aged surface texture effects. As a result of this, the
concept is evident at a glance, and after you follow along with this chapter’s
step-by-step instructions, the process of creating an aging effect will become
just as evident.
Some familiarity with all things layers, masks, and adjustment layers will
be benefi cial as you work your way through this chapter. We’ll delve a
little deeper into alpha channel editing and explore smart fi lters and their
accompanying masks. Perhaps the most taxing part of working your way
through this chapter will be the effort required to carefully incorporate
each element of age into the face. This may prove time consuming.
355
Please purchase PDF Split-Merge on www.verypdf.com to remove this watermark.
356
Part Four: Illustrative Photography
18
What you’ll learn in this chapter
Creative Techniques and Working Methods
Blending and enhancing features
Transferring selected areas of age from one face to another is not as simple as cloning
them from one image to the other or copying and pasting. In this chapter, you’ll develop
an understanding of what to look for in your aged faces. Then you’ll learn exactly what to
isolate and how to incorporate it into your youthful face. As you work your way through,
you’ll come to realize that each tiny piece of aged skin placed on the youthful model
is carefully aligned, resized, positioned, and transformed wherever necessary. You’ll
smoothly blend the sections into the underlying imagery via soft-edged layer masks, and
you’ll learn how to use selection tools alongside layering techniques to deepen wrinkles
and pores even further.
Create selections from imagery
Sometimes everything you need to create a precise selection within an image exists already
in that very image. I’ll show you how to paste your image into an alpha channel and then
adjust and edit the results to carefully craft a custom selection that lines up perfectly with
your image. You’ll be amazed at the amazingly complex and accurate results that you can
achieve via this method. Need proof? Simply take a look at how realistic the gray hair effect
within this image is.
Photoshop Tools, Features, and Functions
Color range
This excellent and flexible method for
generating selections based upon ranges
of color is an essential tool in this chapter,
especially when it comes to targeting the
whites of her eyes, deepening wrinkles and
pores, and isolating the figure from her
photographed background.
Smart filters
By applying these nonlinear filters to smart objects within the image, we ensure maximum
flexibility and future editing opportunities. At any point within the process, you can double-click
a smart filter in the Layers palette and edit that filter effect. This method is much more flexible than affecting pixels directly. Smart
filters also come equipped with their very own mask, allowing you to hide selected portions of the filter effect by editing the mask.
Please purchase PDF Split-Merge on www.verypdf.com to remove this watermark.
Chapter 18: Aging Effects
18
357
PART ONE: Create the background
1 Before we get started with the face or any aging techniques,
we first need to create a background for the image, giving
our model an environment to reside within. Open up the sky.
jpg file. Select the Gradient tool. In the Tool Options bar, select
the Foreground to Transparent option from the list of presets
in the Gradient picker. Select the linear gradient method and
then press the “ d ” key on your keyboard to set the foreground
color to black.
2 Choose Layer Ͼ New Ͼ
Layer from the menu to cr
eate a new la
yer. Change the
blending mode of the layer to multiply in the Layers palette. Reduce the gradient
opacity to 25% and then, while holding down the Shift key, click and drag from the
top of the canvas down a little. Do this from the bottom up, and then in from the left
and right sides so that the sky is surrounded by light gradients.
Project files
All of the files needed to follow
along with this chapter and create
the featured image are available for
download on the accompanying Web
site in the project files section. Visit
www.creativephotoshopthebook.com.
Constraining gradients
Holding down the Shift key while you
create a linear gradient will constrain
the resulting gradient to either 90 ° ,
180 ° , or 45 ° . This means that it will be
straight up and down, perfectly straight
from left to right, or on a perfect
diagonal.
Please purchase PDF Split-Merge on www.verypdf.com to remove this watermark.
