Creative Photoshop: Digital Illustration and Art Techniques Photoshop Cs4- P9
Bạn đang xem bản rút gọn của tài liệu. Xem và tải ngay bản đầy đủ của tài liệu tại đây (2.97 MB, 35 trang )
388
Part Four: Illustrative Photography
19
18 Target all of the layers that comprise
his right side: the liquified layer, the painted
layer, and the adjustment layer. Add them to
a new group. Target the new group in the
Layers palette. Choose the Pen tool and draw
a closed path that will define the area of his
right side. When you’ve closed the path, choose
Layer Ͼ Vector Mask Ͼ Current Path from the
menu to convert your path to a vector mask that
clips the contents of the group.
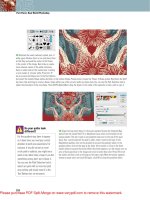
19 The vector mask does a good job of clipping the contents of the group; however,
the area at the left where the right side meets the left side needs something
smoother. Click the Create Layer Mask button at the bottom of the Layers palette to
add a layer mask to the group in addition to the existing vector mask. Select the
Gradient tool. Use a black foreground color, the Radial option, and the Foreground
to Transparent preset to create a series of gradients within the new mask. Soften
the area where the two sides of his chest overlap.
If you wish to edit a vector mask, you
can do so at any point by using the
Direct Selection tool. However, there
will be times when editing a vector
mask that it would be beneficial to see
what layer content lies hidden outside
the boundaries of the mask. To hide the
effects of a vector mask, Shift-click
on it in the Layers palette or click in
the Disable/Enable Mask button at the
bottom of the Masks palette. A red “ x ”
will appear over the mask thumbnail
and it will be disabled in the image
window. To reactivate the mask, Shift-
click on it in the Layers palette or click
on the Disable/Enable Mask button at
the bottom of the Masks palette again.
Hiding vector masks
Please purchase PDF Split-Merge on www.verypdf.com to remove this watermark.
389
Chapter 19: Representational Surrealism
19
PART FOUR: Enhancing the central figure
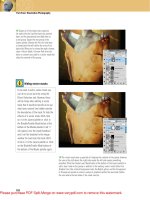
20 Target all of the layers that make up his left side and add them to a new
group as well. This will help to keep things in a logical order within the Layers
palette. Control(PC)/Command(Mac)-click on an adjustment layer mask or
vector mask thumbnail attached to any of your middle-figure layers in the
Layers palette. This will generate a selection from the contents of the mask.
Create a new layer and move it below the left- and right-side groups in the
Layers palette. Choose lighten from the list of blending modes in the Layer
palette’s blending mode pop-up menu.
21 Select the Brush tool. Choose a large, soft, round Brush Tip
preset. Disable any dynamic functions but be certain to leave the
Smoothness option enabled. Set the opacity very low to around
15 – 20%. With the new layer targeted, sample a light color from the
middle figure’s skin by holding down the Alt(PC)/Option(Mac) key to
temporarily access the Eyedropper, and then clicking. Let go of the
key and begin to paint over a darker area within the selection. Use
this method to sample a variety of light colors and paint over dark
regions, primarily the head and right arm, within the selection. Vary
brush size and opacity as needed.
When painting over dark areas like
this, working within a selection border
is essential in ensuring that you don’t
stray onto the background. However,
staring at the marching ants while
you work can get distracting. Typing
Control(PC)/Command(Mac)-h will
hide your selection border. When the
selection border is hidden, the same
keyboard command will reveal it again.
Hiding selection borders
Please purchase PDF Split-Merge on www.verypdf.com to remove this watermark.
390
Part Four: Illustrative Photography
19
22 Create a new layer and select the Blur tool. Ensure that the new
layer is targeted and set the strength of the Blur tool to 100%. In
the Tool Options bar, enable the Sample All Layers option. Use a soft,
round Brush Tip preset and paint over areas within the currently
active selection on the new layer that, although already smoothed
somewhat by paint on the underlying layer, still shows some of the
grain from the original photograph. Now switch to the Smudge tool,
set the strength to around 25%, and enable the Sample All Layers
option. Use a similar Brush Tip preset to gently smudge areas within
the active selection. Use numerous small strokes to resemble oil
painting techniques.
23 With the current selection active, create a new levels
adjustment layer by clicking on the Levels button in the
Adjustments palette. Leave the channel set to RGB and
then drag the left and right input levels sliders toward
the center of the histogram to increase the contrast. Now
target the adjustment layer’s mask and use the Radial
Gradient tool to draw black to transparent gradients within
the mask to soften the effect in areas where the contrast is
too drastic. Duplicate the layer to intensify the adjustment,
and continue to mask even more areas of this adjustment
layer with similar gradients.
When you are painting over areas of
his face, neck, and shoulders with the
Smudge tool, you must be willing to
vary the tool options as you go. Reduce
the size of your brush in areas like
those around his eyes, so that you don’t
paint over areas that provide essential
details. Also, if things are looking too
fluid, try reducing the strength of the
tool. You want to gently build up the
effect by using multiple, gentle strokes.
Working in this manner is what will
allow you to simulate the blended
quality of oil painting.
Smudge painting
Please purchase PDF Split-Merge on www.verypdf.com to remove this watermark.
391
Chapter 19: Representational Surrealism
19
24 Open up the sky.jpg file, select all, and copy.
Paste the copied sky image into your working
file as a new layer. Position the sky layer on
the canvas so that it overlaps his head and
shoulders entirely. Reduce the opacity of the
layer to 40% and change the blending mode to
overlay. Duplicate the layer, return the blending
mode to normal, and reduce the opacity of
the duplicate layer to 11%. Now duplicate this
layer, and then change the blending mode to
luminosity. Again, duplicate this layer and then
change the blending mode to soft light and
increase the layer opacity to 40%.
25 This may seem like a lot of duplication, but
you’ll certainly see the results take shape as
you follow along. Finally, duplicate the top sky
layer one last time. Change the blending mode
to color and reduce the opacity to 27%. Feel
free to add masks to individual sky layers and
edit them as you’ve edited previous layer masks,
using the Gradient tool to remove areas that are
too prominent. Create a new layer with a color
blending mode, and sample a light yellow color
from within the image. Create a series of radial,
foreground to transparent gradients overlapping
his chest area.
As you create the effect of the sky
overlapping his head and shoulders, it
may seem like an awful lot of duplicate
layers. However, working in this manner
is a very intuitive and artistic way to
get the results you’re after. It really is
as simple as trying different modes
and opacity settings, one at a time, until
you’ve found the combination of layers
that works best. Also, remember that by
keeping all of the layers separate, you
can tweak individual layers at any point
later on.
Duplicating and altering
Please purchase PDF Split-Merge on www.verypdf.com to remove this watermark.
392
Part Four: Illustrative Photography
19
26 Create a new selective color adjustment layer. Increase
the amount of cyan and black in both the neutral and black
color components. Create a new layer and change the
blending mode to multiply. Use the Brush tool to paint a
soft, black brush stroke on this layer in the area where his stretched skin overlaps his chest,
creating a shadow effect. Use an extremely low opacity setting so that the result is very slight.
If your shadow still appears too prominent, reduce the layer opacity.
Add some internal texture
Use the first source image as your resource to make the inside of his skin look at home within this highly textured scene.
1 Use the Pen tool, set to create paths, with
the Add to Path Area option enabled, to create
a series of closed path components within a
single path. Carefully trace all of the areas
where you can see the inside of his skin.
3
Change your layer blending mode to darken and
reduce the opacity to 30%. Duplicate the layer and
change the blending mode to color. Increase the
opacity to 35% and Control(PC)/Command(Mac)-
click the layer mask thumbnail to generate a
selection from the mask contents.
2
Load the path as a selection and then open up the background.psd file again. Use
the Rectangular Marquee to select a section of the painting and copy it. Return to your
working file and choose Edit Ͼ Paste Into to paste it into your selection.
Please purchase PDF Split-Merge on www.verypdf.com to remove this watermark.
393
Chapter 19: Representational Surrealism
19
27 With your current selection active, create a
new layer. Target this layer, set the foreground
color to black, and select the Brush tool. Paint
some very faint black shadows inside of the
selection border where it needs to be darker
to look realistic. Use a similar Brush Tip preset
and opacity setting as you did when you created
the previous shadow against his chest. With
your current layer targeted, hold down the
Shift key and also target the bottom sky layer.
This also targets all of the layers in-between.
Choose Layer Ͼ N e w Ͼ Group From Layers from
the menu.
PART FIVE: Creating secondary elements
28 Hold down the Control(PC)/Command(Mac) key and click on an adjustment
layer mask or vector mask thumbnail belonging to any of the middle-figure
layers in the Layers palette. This will generate a selection from the contents
of the mask. With the current selection active, target your new group in the
Layers palette and then click on the Create Layer Mask button at the bottom of
the Layers palette. This will mask the group so that nothing extends onto the
background. Target this group as well as all of the other groups and layers that
work together to create the main figure.
When you have a number of layers
targeted within the Layers palette, a
quick way to add them to a group is to
type Control(PC)/Command(Mac)-g on
the keyboard.
Grouping layers
Please purchase PDF Split-Merge on www.verypdf.com to remove this watermark.
394
Part Four: Illustrative Photography
19
29 When you’ve targeted the layers and groups within
the Layers palette, right-click(PC)/Control-click(Mac) on
the area to the right of any targeted layer’s thumbnails.
A pop-up menu will appear. Choose Convert to Smart
Object from the pop-up menu. Ensure that you are not
clicking on a layer thumbnail or a layer mask thumbnail,
or you will access a different pop-up menu that does not
offer this function.
Adding texture
Paste imagery into alpha channels and channel-based selections to build up textured areas within the background of the image.
1 Open up the torn1.jpg file.
Copy the contents of the file and
then create a new alpha channel
in the Channels palette of your
working file. Paste the copied
image into your new channel and
load it as a selection.
2 Keep this selection active and
then open up the texture.jpg file.
Copy the contents of this file and
return to the working file. With the
current selection active, choose
Paste Into from the Edit menu.
Use the Move tool to reposition
the layer within the mask.
3 Change the layer blending mode
to multiply and drag it beneath the
main figure smart object in the
Layers palette. Duplicate the layer
and change the blending mode to
overlay. Duplicate this duplicated
layer and change the blending
mode to color.
Please purchase PDF Split-Merge on www.verypdf.com to remove this watermark.
395
Chapter 19: Representational Surrealism
19
30 Add these three texture layers to a new
group. Add a mask to the group and then edit
the mask by adding radial, black to transparent
gradients into the mask. Create the gradients
in the area where the texture falls behind his
hand to blend it into the background. Now open
up the man.psd file. Use the Move tool to drag
the layer into your working file as a new layer
and place it over your new textured background
on the canvas. Position him close to the main
figure’s hand.
31 Enable the transparency lock for this layer in the Layers palette and then
select the Smudge tool. Use the Smudge tool to paint over the figure on this layer,
smoothing him and giving him a painted appearance. Use similar methods and tool
options as you did when you painted over the main figure’s head and shoulders
earlier. Drag this layer into the textured layers group so that this layer is masked by
the group’s mask as well.
One of the main advantages to using
smart objects is that they always
remain editable. Right now, there are
two smart objects in this file. One is
the background object and the other is
the main figure object. A quick way to
edit either object is to simply double-
click on the smart object thumbnail
in the Layers palette. This will open a
new document window containing the
layered version of the smart object.
Make any changes and then save.
Close the file and you’ll see the smart
object in your working file is updated
automatically.
Smart objects
Please purchase PDF Split-Merge on www.verypdf.com to remove this watermark.
396
Part Four: Illustrative Photography
19
32 Open up the sky.jpg file, use the Rectangular
Marquee to select a small section of the sky,
and copy it. Paste the copied section of sky into
your working file as a new layer. Drag it into
the texture group, beneath the figure layer in
the Layers palette. Position it so that it shows
through the hole in the figure. If there are any
areas that extend beyond the edge of the figure,
erase them, or select and delete them. Use the
Pen tool to draw a path that indicates thickness,
defining the inner sides of the opening.
Adding dimension
Create visible, inner sides of the opening, giving the figure a sense of thickness and depth.
1 Load your path as a selection and
create a new layer. Drag the new
layer above the man layer within the
group. Sample a gray color from
the figure via the Eyedropper tool
and then type Alt(PC)/Option(Mac)-
Delete to fill the selection.
2 Enable the transparency lock for
the layer and use the Polygonal
Lasso to draw a selection border
around the inner side wall, isolating
it from the inner bottom wall. Use
the Brush tool to paint black into
areas that require shading.
3 Choose Select Ͼ Inverse from the menu. Now paint some black shading onto the
bottom area within the inverted selection. Deselect and then use the Smudge tool
on this layer to smudge the painted areas so they look similar to the figure in terms
of style.
Please purchase PDF Split-Merge on www.verypdf.com to remove this watermark.
397
Chapter 19: Representational Surrealism
19
33 Open up the rust.psd file. Use the Move tool
to drag the rusty image into the working file as
a new layer. Because the layer currently
targeted in your working file is within the
texture group, the new layer will be placed
on top of it within the group. Position the
contents of the layer to the left side of the
canvas. Add a mask to the layer and create a
series of black to transparent radial gradients
within the mask to hide any hard edges.
34 Open up the eye.psd file. Drag the layer into your working file and position it on the canvas in the
upper left-hand corner. Add a mask to the layer and create a number of black to transparent radial
gradients within the mask to hide the hard edges of the image. Change the layer blending mode to
hard light and reduce the opacity to 61%. Duplicate the layer, change the blending mode to luminosity,
and increase the opacity a little. Duplicate this layer too, and then change the blending mode to
screen. Increase the opacity to 100%.
As you add black to transparent
gradients within your layer masks, there
are bound to be occasions when you
mask more of a layer than you want
to. A quick way to unmask areas is to
press the “ d ” key. When a layer mask
is targeted, this will set the foreground
color to white. Click and drag to create
white to transparent gradients within
the mask to gently reveal masked areas
that were accidentally hidden by black
to transparent gradients.
Unmasking layer content
Please purchase PDF Split-Merge on www.verypdf.com to remove this watermark.
398
Part Four: Illustrative Photography
19
35 Target the layer’s mask in
the Layers palette and create
more black to transparent radial
gradients within the mask until
the only visible part of the layer is
the eye and the area immediately
surrounding it. Duplicate this layer
and change the blending mode to
overlay. Target your new duplicate
layer (not the mask) and choose
Image Ͼ AdjustmentsϾ Levels from
the menu. Drag the left and right
input levels sliders toward the
center of the histogram to increase
the contrast. Then drag the left
(black) output levels slider to the
right to lighten the darkest areas.
PART SIX: Finishing touches
Paste in a painting
Create a custom alpha channel to use as the basis for a selection, which will mask a previously completed painting.
1 Open up the torn2.jpg file. Select and copy the contents of this
file, then create a new alpha channel in your working file. Paste
the copied image into your channel and then load the channel as a
selection. Return to the Layers palette.
2 Open up the painting.jpg file, select all, and copy. Return to your working
file. Ensure that your selection is still active and then choose Edit Ͼ Paste
Into from the menu to paste the image into your file as a masked layer.
3 Target your new layer (not the mask) in the Layers palette and use the Move tool to
reposition the layer content within the mask on the canvas area. Target the mask and add
gradients, producing a soft blending effect.
Please purchase PDF Split-Merge on www.verypdf.com to remove this watermark.
399
Chapter 19: Representational Surrealism
19
36 In the Layers palette, Control(PC)/
Command(Mac)-click on the main figure smart
object to generate a selection from its contents.
Choose Select Ͼ Inverse from the menu and
target the aforementioned smart object. Open
up the fence.jpg file and copy it. Return to the
working file. With the inverted selection still
active, and the figure smart object targeted in
the Layers palette, choose Edit Ͼ Paste Into from
the menu. After pasting, move the new layer’s
contents down within the layer mask. Target the
new layer’s mask in the Layers palette and then
draw a linear, black to transparent gradient
within the mask, from the middle of the canvas
downward, to create a soft fade effect.
Adding final surface textures
Create an aged and tactile feeling by adding some hand-written text alongside scanned, distressed paper texture.
1 Open up the quotes.jpg file. Select
all and copy. Return to your working
file. Create a new alpha channel and
paste the copied contents into it. Load
the new channel as a selection. Create
a new layer in the Layers palette.
2 Fill the active selection on your new layer with
white. Change the blending mode to hard light
and reduce the opacity considerably. Deselect,
add a layer mask, and create a number of radial,
black to transparent gradients within the mask to
fade certain areas.
3 Open up the folds.jpg file and repeat the
same process. Paste it into a new channel
and load it as a selection. Fill the selection
with white on a new layer. Mask it and then
edit the mask, to mask out where folds
overlap key images. Change the blending
mode to color dodge.
Please purchase PDF Split-Merge on www.verypdf.com to remove this watermark.
400
Part Four: Illustrative Photography
19
37 Duplicate this layer and change the blending
mode of the duplicate layer to hard light.
Reduce the opacity of the layer to 33%. Now,
navigate down to the bottom layers in the Layers
palette. Sitting above the bottom smart object,
an adjustment layer, and a solid color layer is
the white torn paper texture layer you created
earlier in this chapter. You previously loaded a
channel as a selection and filled it with white on
this layer. Duplicate this layer and drag it to the
top of the stack in the Layers palette. Reduce
the opacity of the layer to 33%.
38 Now, add one last element to the image. Open up the head.psd file and use the Move tool to drag
it into your working file as a new layer. Position it over the face of the painting at the upper right and
change the blending mode to hard light. Add a layer mask and use the Gradient tool to edit the mask,
gently blending the layer contents into the imagery beneath it. Move this head layer below the top four
layers in the Layers palette so that the surface texture and quotes reside above it.
If you find that the edges of your figure
look too sharp, there is a way to soften
them. Create a new layer above your
head layer, but beneath the top four
texture layers in the Layers palette.
Target your new layer and disable the
visibility of the four texture layers above
it. Use the Blur tool, with the Sample All
Layers option enabled, to paint over any
sharp areas on your new layer. When
you’re finished, enable the visibility of
the texture layers once again.
Removing sharp edges
Please purchase PDF Split-Merge on www.verypdf.com to remove this watermark.
401
Chapter 19: Representational Surrealism
19
Now that you’re finished, take a moment and look at some of the photographs that were used. These really are quite
amateurish in terms of lighting, exposure, and focus. But what makes them valuable resources is that they provide
excellent gesture, overall detail, contrast, and, in the case of the fence, texture. As a Photoshop artist, you need to be
able to see beyond the traditional photographer’s approach to capturing things. You need to plan and be able to spot the
potential within your images, bearing in mind that each photo is a valuable starting point rather than an end in itself. Less
than perfect images can be excellent resources when used as building blocks for photographic illustrations .
Please purchase PDF Split-Merge on www.verypdf.com to remove this watermark.
