Thiết kế flash với flash cs5 part 75
Bạn đang xem bản rút gọn của tài liệu. Xem và tải ngay bản đầy đủ của tài liệu tại đây (674.77 KB, 5 trang )
ptg
460
Chapter 18
Once you create a binding between two components or between a
component, such as a DataGrid, and an external file, you can control
the binding through the binding options. For example, you may not want
the exchange of data either way, or you may wish to control what type
of data is entered or received. The Binding options, located on the
Bindings tab, give you several author-controllable options.
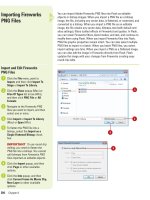
Modifying Bindings
Modify Bindings
Open the Components panel.
Click the User Interface arrow to
expand the list.
Drag the NumericStepper
component onto the Stage, and
then select the component.
Give the NumericStepper a unique
instance name in the Property
Inspector.
Drag a TextInput component onto
the Stage, and then give it a
unique instance name.
Select the NumericStepper
component.
Open the Component Inspector
panel, and then click the
Bindings tab.
Click the Add Binding (+) button to
add a binding.
In the Add Binding dialog box,
select Value.
Click OK.
10
9
8
7
6
5
4
3
2
1
7
10
9
8
1
2
3
5
From the Library of Wow! eBook
ptg
Chapter 18 Adding and Modifying Components
461
Move to the Name/Value section,
located at the bottom of the
Bindings tab.
Click the Bound To item under
Name, and then click the
Magnifying Glass icon.
In the Bound To dialog box, select
the TextInput component.
Click OK.
Click the Control menu, point to
Test Movie, and then click Test.
If you click the up and down
arrows on the NumericStepper,
the value in the TextInput field
changes. If you enter a value into
the TextInput field and press
Return or Tab, the value in the
NumericStepper changes.
Close the Flash movie, and then
select the NumericStepper.
Select Value at the top of the
Component Inspector panel, click
the Directions option, and then
change the value from in/out to
out.
Click the Control menu, point to
Test Movie, and then click Test.
If you click the up and down
arrows on the NumericStepper,
the value in the TextInput field
changes. If you enter a value into
the TextInput field and press
Return or Tab, the value in the
NumericStepper no longer
changes.
IMPORTANT
Data binding is
supported only between
components that exist in Frame 1
of the main Timeline, Frame 1 of a
movie clip, or Frame 1 of a screen.
18
17
16
15
14
13
12
11
13
12
11
14
15
17
From the Library of Wow! eBook
ptg
462
Chapter 18
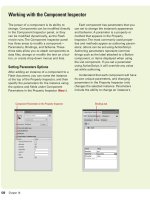
To modify the schema of a component, you must first select an instance
of the component. For example, if you want to modify the schema of a
DataGrid component panel, you first select the component, open the
Component Inspector panel, click the Schema tab, and then make the
changes. Each component has its own unique schema, and changing
parameters in the Component Inspector panel only changes the
selected instance.
Modifying Schema
Modify Schema
Select a unique instance of a
component on the Stage.
Open the Component Inspector
panel.
Click the Schema tab.
Click the Add A Component
Property (+) button to add
additional fields to the schema list.
Click the Add A Field Under The
Selected Field (+) button to add an
additional field that's nested within
the selected field.
Click the Delete The Selected
Field Or Property (-) button to
remove the selected field or
property from the schema.
Select an item in the upper portion
of the Schema tab, and then
modify its options in the lower
portion of the Schema tab.
7
6
5
4
3
2
1
1
4
3
6
7
5
New field
Did You Know?
The Schema tab displays data based
on the selected component.
Although
all components have properties, by
default, the Schema tab only displays
properties that contain dynamic data.
Dynamic data properties are called
bindable properties. Flash lets you bind
to any property by adding it to the
schema panel yourself (using the Add
Field (+) button), or using ActionScript
code.
2
From the Library of Wow! eBook
ptg
Chapter 18 Adding and Modifying Components
463
You can write ActionScript code to change the properties for any Flash
component instance. For example, you can change the color of text of a
label instance named myLabel using the following code:
myLabel.setStyle("color", "0x990000")
The preceding code would instruct Flash to change the color of the text
used in the Label component instance named
myLabel
to red. Changes
to the properties of a component can be attached to the instance on
the Stage (influences only the one instance), or they can be used to
globally change all instances, by placing the script in Frame 1 on the
Timeline.
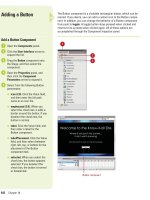
Modifying Component
Attributes
Modify Component Attributes
Open the Actions panel.
Select an instance or Frame 1 on
the Timeline.
Enter the script as shown in the
illustration.
Click the Control menu, point to
Test Movie, and then click Test.
The following table is a list of the
available ActionScript options for
changing the attributes of a
component instance.
4
3
2
1
3
backgroundColor marginLeft
borderColor marginRight
borderStyle scrollTrackColor
buttonColor shadowColor
color symbolBackgroundColor
disabledColor symbolBackgroundDisabledColor
fontFamily symbolBackgroundPressedColor
fontSize symbolColor
fontStyle symbolDisabledColor
fontWeight textDecoration
highlightColor textIndent
Available Flash Attributes
1
Did You Know?
You can customize a component.
Some
of the components, such as Scroll
bars, include a skin, or look and feel,
which you can customize to suit your
own artistic nature. See Project 1,
“Creating and Customizing Scrollable
Text,” in the Workshops (available on
the Web at
www.perspection.com
) for
a step by step example.
From the Library of Wow! eBook
ptg
464
Chapter 18
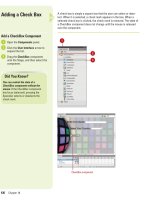
Using Components to Build a Form
When you create a form, you're incorporating all the various Flash components onto the Stage.
Flash components make creating a form easy; however, there are still design considerations to
be made. For example, what information do you need to extract from your visitors, and how
will you receive it? Does your audience primarily speak and read English, or do you need to
make the form multi-lingual (that's possible by creating label components that display text in a
language selected by the visitor). And what about handicap and accessibility standards, how do
you handle them? Yes, Flash does make the creation of a form easy, but you are still responsi-
ble for the overall design, and that includes images, backgrounds, colors, fonts and sizes, read-
ability, and accessibility. The following Flash document is an example of incorporating multiple
components to create an interactive form.
When you create a form, it is a good programming practice to isolate components onto sep-
arate layers. That way, they're easier to locate and edit, and you can always lock the compo-
nent’s layer to prevent accidental tampering.
ComboBox
component
CheckBox
component
Button
component
TextArea
component
List
component
RadioButton
component
From the Library of Wow! eBook