Fix your own computer for seniors for dummies- P9
Bạn đang xem bản rút gọn của tài liệu. Xem và tải ngay bản đầy đủ của tài liệu tại đây (1.2 MB, 30 trang )
➟
225
Chapter 13: Taking Care of Your Mouse (or Trackball) and Keyboard
3.
Use a soft cloth dampened with a weak plastic cleaner
or a small amount of isopropyl alcohol to polish the
keys and the surrounding case. The most fastidious
among you may want to use the same solution on a
cotton swab to clean between the keys.
If it’s absolutely necessary, you can remove individ-
ual keys with a special tool that’s supplied with many
keyboards; a technician’s tweezers with hooked ends
will also work. Work very carefully to avoid breaking
the plastic keycaps or the somewhat delicate switches
beneath them.
4.
Let the keyboard dry for a half an hour or so.
You can use a hairdryer on low heat to speed the
drying process. Just keep the air stream moving,
and don’t get the nozzle too close to sensitive
plastic parts.
5.
When the keyboard is nice and dry, reattach it to your
computer.
You can plug in a USB keyboard while the computer
is on. If your mouse is an older model with a PS/2
connector, reattach it before you turn on the power.
Diagnose a Troubled Keyboard
1.
If the keyboard completely stops responding, check to see
whether the device is connected properly at the computer
end, and look for any cuts or crimps in the cable. Fix any
loose connections and straighten any kinks; if the cable is
cut, replace it.
Please purchase PDF Split-Merge on www.verypdf.com to remove this watermark.
➟
226
Part III: Fixing Sick Hardware
2.
If the connections and cable are fine, try rebooting the
computer to see whether the keyboard comes back to life.
With luck, you were experiencing a once-in-a-blue-moon
system lockup.
If the keyboard freezes more frequently than a blue
moon, or if the intervals between freeze-ups begin to
shorten, you may be seeing early symptoms of the
impending failure of a major component, such as the
motherboard or the power supply. Run a diagnostic
program such as the one that ships with many com-
puters, or take the computer to a repair shop for a
good once-over.
3.
Check the connection between the PC and the keyboard,
as well as the status of the keyboard’s device driver, as
follows:
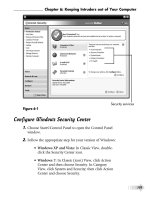
a. Choose Start➪Control Panel➪Keyboard (XP) to open
the Keyboard Properties dialog box. In Windows 7
and Vista this direct path is available from the icon
view of the control panel.
b. Click the Hardware tab. You should see the name or
type of keyboard (listed in the Devices list), as well as
the manufacturer and the means of communicating
with the system.
c. Check the Device Status entry to see whether the com-
puter is communicating with the keyboard properly
(see Figure 13-3).
d. Click the Properties button to display another
Properties dialog box; then click the Driver tab to
examine the details of the driver and make any
Please purchase PDF Split-Merge on www.verypdf.com to remove this watermark.
➟
227
Chapter 13: Taking Care of Your Mouse (or Trackball) and Keyboard
necessary changes or updates. (For details, see “Revive
a Dead Mouse, Trackball, or Keyboard,” later in this
chapter.)
You rarely have to make driver changes for a basic
component such as a keyboard unless there’s been
some sort of electrical corruption of the device or the
driver has been deleted or changed.
Click for error messages in
the Device Properties section.
Figure 13-3
e. While you’re in the neighborhood, you can close the
second Properties dialog box and click the Speed tab
of the Keyboard Properties dialog box (see Figure
13-4) to make a few adjustments in the response of
Please purchase PDF Split-Merge on www.verypdf.com to remove this watermark.
➟
228
Part III: Fixing Sick Hardware
the keyboard, such as the repeat rate (how quickly the
keyboard produces a string of repeated characters
when a key is held down).
These settings tell your keyboard
how quickly to respond.
Figure 13-4
You can also set the cursor’s blink rate in this tab.
This function really isn’t related to the keyboard, but
technicians had to put the control somewhere.
f. Click OK to save your settings and close the dialog
box.
4.
Every few months (to be especially conscientious), run
the keyboard test that’s part of most diagnostic programs
to test the electronic logic of the keyboard and the moth-
erboard’s keyboard controller. The test also forces you to
Please purchase PDF Split-Merge on www.verypdf.com to remove this watermark.
➟
229
Chapter 13: Taking Care of Your Mouse (or Trackball) and Keyboard
run through all the keys on the board, including a few
that you may not ordinarily use. Follow any instructions
that the program gives you.
If you’re still having problems, turn to “Revive a
Dead Mouse, Trackball, or Keyboard,” later in this
chapter.
Practice Good Mousekeeping
Much of what I say about mice in this chapter also
applies to trackballs and other pointing devices (see
Chapter 1). Also, except where I indicate otherwise,
these tips apply to both mechanical and optical mice.
➟
Keep your desktop clean. Your mouse travels miles
and miles, sliding back and forth on your desktop.
Along the way, it picks up dust, pollen, oils, cookie
crumbs, and whatever else is floating around your
office. Sooner or later, the going is going to get a bit
sticky. To give your mouse a clear path, wipe off your
desktop — and your mouse pad, if you use one —
once a month or more often if you notice any kind
of buildup on your mouse pad.
➟
Give your mouse a bath. If your mouse seems to
have lost its way, the first thing to do is give it a
good cleaning, like so:
• Mechanical mouse: Unplug the mouse from the
computer, turn it over, and (on most mice) rotate
the plastic or rubber ring to release the rubber
roller ball (see Figure 13-5). Use a can of com-
pressed air or the crevice-tool attachment of a
vacuum cleaner to remove debris from the cavity.
Then clean the ball (and rollers, if any) with mild
soap and water or alcohol, using a lint-free cloth.
Please purchase PDF Split-Merge on www.verypdf.com to remove this watermark.
➟
230
Part III: Fixing Sick Hardware
Twist this ring to free the roller ball.
Figure 13-5
• Trackball: A trackball is essentially an upside-
down mechanical mouse with its roller ball built
into a mouse body or even into a keyboard (see
Figure 13-6). The ball rests loosely in a cavity,
where sensors track horizontal and vertical move-
ment. Instead of moving the hardware across the
desk, you use your hand to spin the ball in place.
You clean a trackball the same way that you clean
a mechanical mouse. (See the manual for direc-
tions on how to remove the roller ball on your
particular model.)
Please purchase PDF Split-Merge on www.verypdf.com to remove this watermark.
➟
231
Chapter 13: Taking Care of Your Mouse (or Trackball) and Keyboard
Spin this ball to move the mouse pointer.
Figure 13-6
You should clean a mechanical mouse or trackball
every few months, whether or not you think it needs
cleaning. Check the manual that came with your
mouse for any specific instructions.
• Optical mouse: Cleaning an optical mouse is sim-
ple because it contains no moving parts. Use an
alcohol cleaner or a small spray of window cleaner
on a rag to remove any buildup from the sensor
on its bottom.
Please purchase PDF Split-Merge on www.verypdf.com to remove this watermark.
➟
232
Part III: Fixing Sick Hardware
Vet Your Mouse
1.
If your mouse or other pointing device is acting peculiar,
first make sure that it’s connected to the computer prop-
erly. Fix any loose connections, and adjust or replace any
twisted or damaged cable.
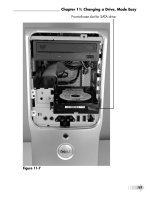
2.
If the connection is fine, choose Start➪Control Panel➪
Mouse (in Classic View in Vista and Windows 7) to open
the Mouse Properties dialog box. Click the Hardware tab
and then click Properties (see Figure 13-7) to see whether
Windows is reporting a failure of a USB port (or a PS/2
serial port, if you have an older mouse that uses that type
of port, such as the one shown in Figure 13-8).
Check location and device status.
Figure 13-7
Please purchase PDF Split-Merge on www.verypdf.com to remove this watermark.
➟
233
Chapter 13: Taking Care of Your Mouse (or Trackball) and Keyboard
PS/2 serial port connection for older mouse
Figure 13-8
3.
If you see no report of a problem with a port, click the
Driver tab of this dialog box to check for conflicts or
problems with device drivers (see “Revive a Dead Mouse,
Trackball, or Keyboard,” later in this chapter).
You should also consult the manufacturer’s Web site
to see whether updated or corrected device drivers
have been released for your mouse.
Please purchase PDF Split-Merge on www.verypdf.com to remove this watermark.
➟
234
Part III: Fixing Sick Hardware
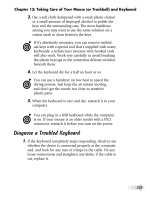
4.
To adjust the ways in which your mouse responds, click
the other tabs of the Mouse Properties dialog box (such
as the Buttons tab, shown in Figure 13-9), and make any
changes you want. Each manufacturer offers different
types of adjustments for its mouse device, so the tabs in
your dialog box may differ from those in the figure.
Move this slider to adjust click speed
Figure 13-9
5.
Click OK to save your changes and close the dialog box.
6.
If your mouse or trackball came with a control program
for setting up special features, the same program usually
offers basic test software. Run this software to see how
your mouse is performing, and follow any onscreen
instructions.
If you’re still having problems, read on; the next sec-
tion of this chapter may help.
Please purchase PDF Split-Merge on www.verypdf.com to remove this watermark.
➟
235
Chapter 13: Taking Care of Your Mouse (or Trackball) and Keyboard
Revive a Dead Mouse, Trackball, or Keyboard
1.
If your mouse, trackball, or keyboard isn’t functioning at
all, restart the computer in safe mode (see Chapter 17).
Restarting in safe mode is also the thing to do if you
somehow disabled the keyboard or pointing device
and can’t use either to get where you need to go to
set matters right.
2.
Working in safe mode, you should be able to repair or rest
the device’s driver in Device Manager (see Chapter 18).
3.
If the hardware itself has failed — which eventually will
be the case with mechanical devices like these — the
solution is to unplug the old and plug in the new, as I
describe in the next section.
If you’ve decided that your keyboard or mouse is
beyond repair, you can try a radical approach: Put it
in the dishwasher. Although no hardware manufac-
turer officially sanctions this sort of repair, people do
it, and I’ve done it myself. Use a gentle cycle, cool
dry, with little or no soap, and let the device dry out
for a week or so before you plug it in again. You have
nothing to lose, and this method does work
sometimes.
Replace a Dead Mouse, Trackball, or Keyboard
1.
Remove the deceased device from your computer.
• USB devices: You can leave the computer on while
you disconnect (see Figure 13-10).
• PS/2 devices: Turn the computer off before you
disconnect.
Please purchase PDF Split-Merge on www.verypdf.com to remove this watermark.
➟
236
Part III: Fixing Sick Hardware
You can attach and detach a USB keyboard while your PC is running.
Figure 13-10
2.
Plug in the replacement keyboard or pointing device.
3.
If you turned the computer off in Step 1, turn it back on.
4.
Follow all instructions from the maker of the replace-
ment device to install the new device’s driver or utility
program.
I recommend that you always have a replacement
mouse or trackball and keyboard on hand. Like hard
drives and other mechanical elements of a PC, these
devices are bound to fail sooner or later. Keeping
replacements in your supply closet (they won’t go
stale) can save you time and aggravation.
Please purchase PDF Split-Merge on www.verypdf.com to remove this watermark.