Fix your own computer for seniors for dummies- P6
Bạn đang xem bản rút gọn của tài liệu. Xem và tải ngay bản đầy đủ của tài liệu tại đây (2.21 MB, 30 trang )
➟
135
Chapter 7: Getting Help When Prevention Fails
The 50 percent rule should also apply to extended
warranties and support. I wouldn’t consider it ratio-
nal to pay more than half the cost of a new PC for
technical support.
3.
Consider one very important exception to the 50 percent
rule: If your hard disk drive fails, and you don’t have
backups of your irreplaceable data, it may make sense to
pay hundreds of dollars to a professional disk-rescue
company, which often (but not always) can extract data
from failed drives.
To find a hard-disk rescue company, search the
Internet for hard disk data recovery. Typical fees are
$200–$400.
Please purchase PDF Split-Merge on www.verypdf.com to remove this watermark.
➟
136
Part II: Keeping Your PC Healthy with Preventive Maintenance
Please purchase PDF Split-Merge on www.verypdf.com to remove this watermark.
Part III
Fixing Sick
Hardware
Please purchase PDF Split-Merge on www.verypdf.com to remove this watermark.
Please purchase PDF Split-Merge on www.verypdf.com to remove this watermark.
Repairing the
Monitor
W
ith the birth of the personal computer,
we’ve all come to use the monitor (or dis-
play) as the window into the hard electronic soul
of the device. A monitor lets us read words, look
at images, and (together with a graphical user
interface such as the Windows operating system)
move things around or issue commands.
In Chapter 1, I explain the distinction between
the two main kinds of computer monitors:
➟
CRT (cathode ray tube), which is like an
old-style television set
➟
LCD (liquid crystal display), which is
used in most flat-panel TVs and laptop
computers
Though LCDs have just about completely
replaced CRTs, there’s no good reason to change
the terms you use for them. You can call these
devices either monitors or displays, as I do in this
book; people will get the picture either way.
I don’t need to get very technical here. After a
monitor is connected to your computer, there’s
very little to do with it other than sit back and
watch it work.
8
Get ready to . . .
➟
Check the Display ............. 140
➟
Troubleshoot the Display .... 143
➟
Beat the Blue Screen
of Death .......................... 144
➟
Check and Change Display
Settings in Windows XP
and Vista ......................... 146
➟
Check and Change Display
Settings in Windows 7 ...... 147
➟
Troubleshoot a Video
Adapter in Windows XP
and Vista ......................... 150
➟
Troubleshoot a Video
Adapter in Windows 7 ...... 152
➟
Reset a Video Driver ......... 153
➟
Prevent Future Picture
Problems .......................... 154
➟
Chapter
Please purchase PDF Split-Merge on www.verypdf.com to remove this watermark.
➟
140
Part III: Fixing Sick Hardware
But what do you do when the lights won’t go on? In this chapter, I
show you how to fix some common problems with monitors.
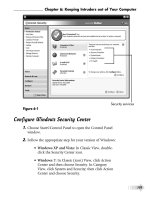
Check the Display
1.
If your display won’t display, make sure that it’s turned
on. Nearly all units have an indicator light to show that
they’re receiving power. Sometimes the light glows one
color when the power is on but no signal is being
received (amber or red, usually) and another color when
it is getting a signal (probably green or blue).
2.
If the monitor is turned on but the indicator light isn’t
lit, examine the power cord to make sure that it’s con-
nected to both the monitor and its source of power. (If
you have an LCD screen, you may have to check three or
four plugs connecting the wall outlet, the power adapter,
and the display.)
3.
Make certain that power is flowing through the wall out-
let. The best test is to plug in a radio or lamp that you
know is working. If the outlet isn’t supplying power, it
may be connected to a turned-off wall switch (a connec-
tion you should avoid for computers and monitors), or
the circuit may be dead because of a blown circuit
breaker or other electrical problem.
4.
If you have an older CRT, check the brightness, contrast,
and other manual controls. Someone — any children or
mischievous coworkers in the vicinity? — may have
turned those dials or buttons all the way off. (Newer
CRTs and all modern LCDs make their adjustments
through onscreen utilities accessible from the keyboard.)
5.
If everything so far is fine, check for the following problems:
Please purchase PDF Split-Merge on www.verypdf.com to remove this watermark.
➟
141
Chapter 8: Repairing the Monitor
• Monitor failure (CRT): A CRT monitor uses high
voltage and somewhat delicate transformers and
other parts. Its electronics eventually wear out —
or can be fried by electrical surges or undervoltage
(brownouts).
Turn your monitor off and wait about 30 seconds;
then turn the monitor back on. Watch and listen
carefully. Did you see any hint of light as the power
came on? Did you hear the high voltage energizing
the CRT tube? Also, place the back of your hand
close to the screen to feel for static electricity. If the
monitor passes one or more of these tests, the power
supply is working, the monitor has high voltage, and
your problem probably is in the cable or the computer.
• Monitor failure (LCD): An LCD display requires
lower voltage than a CRT does and usually has a
longer life. The components that are most likely to
fail are the backlight (a tiny fluorescent lamp that
produces light that shines through the screen) and
the thin LCD panel itself, which can get scratched,
cut, cracked, or warped.
With the monitor turned on, press one of the moni-
tor configuration buttons, probably on the front, on
the side, or covered by a trap door. (You may need to
find your monitor manual to find out which button
to push for various adjustments.) You should see a
pop-up menu. If you do, the monitor has power, and
the screen is working. The problem must be in the
cable connection or in your computer.
• Trouble with video output from your computer:
I cover this situation in “Troubleshoot a Video
Adapter” and “Reset a Video Driver,” later in this
chapter.
Please purchase PDF Split-Merge on www.verypdf.com to remove this watermark.
➟
142
Part III: Fixing Sick Hardware
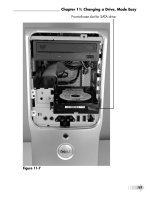
• Trouble with the video connections: You may
find a crimp, break, or other fault in the connec-
tors on the PC or the display, or in the cable that
runs between them (see Figure 8-1). Video cables
should be carefully screwed into place when con-
nector posts are available, and you should make
sure that the cables aren’t bent, left on top of heat
registers, or otherwise endangered.
Check for bent or broken pins at both ends or the coble.
Figure 8-1
One possible indicator of a problem with a cable or
connector on an analog link is the loss of one or two
of the primary colors (red, green, and blue) that are
combined to produce other hues.
Please purchase PDF Split-Merge on www.verypdf.com to remove this watermark.
➟
143
Chapter 8: Repairing the Monitor
Troubleshoot the Display
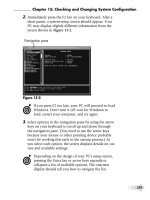
1.
One way to determine the likely source of problems with
a display is to watch carefully as your computer starts up.
If the opening screen (see Figure 8-2 for Vista’s) suddenly
goes blank or is replaced by an error message, the moni-
tor and its connecting cable are likely working properly.
The problem may be either the video adapter on the
motherboard or a setting that you changed in the video
adapter’s driver or in Windows.
If you see a startup screen in your version of Windows,
your monitor and cable probably work.
Figure 8-2
If you see a blue screen on startup — a condition
called the Blue Screen of Death (or Doom) — you
have a different problem. See “Beat the Blue Screen
of Death,” later in this chapter.
Please purchase PDF Split-Merge on www.verypdf.com to remove this watermark.
➟
144
Part III: Fixing Sick Hardware
2.
Restart your computer in safe mode, which automatically
uses a very basic video setting. When Windows is loaded,
choose Start➪Control Panel, and change the video set-
tings back to an acceptable set of parameters (see “Check
and Change Display Settings,” later in this chapter). I
explain how to use safe mode in Chapter 17.
3.
If Step 2 doesn’t help, try attaching the suspect monitor
to a computer that you know to be working. (Maybe you
have another computer in your home or can take your
monitor to a friend’s house.) If the monitor delivers the
proper image, you know to concentrate your attention on
your computer.
4.
If your monitor uses a cable that detaches at both ends,
swap it with a substitute for a second test. (Some cables,
though, are attached permanently at the monitor end.)
Never attach a cable to a computer that’s powered
up. A slight misalignment of the plug can produce a
short that could damage the video adapter, monitor,
motherboard, or all three devices. Turn off both the
monitor and the computer before making any
cabling changes.
Beat the Blue Screen of Death
1.
Start the computer again. If the problem doesn’t recur,
consider yourself lucky — for the moment. Make backup
copies of all your important data files and then check out
the computer by using Device Manager and any diagnos-
tics programs provided by the manufacturer. For details
on Device Manager, see Chapter 18.
2.
Use the Last Known Good Configuration option (see
Figure 8-3) to restart the PC with settings that were suc-
cessful recently. See Chapter 16 for details.
Please purchase PDF Split-Merge on www.verypdf.com to remove this watermark.
➟
145
Chapter 8: Repairing the Monitor
Last Known Good Configuration option
Figure 8-3
3.
Try to repair Windows. The files for your computer’s
installation of Windows may have been damaged (in
technical terms, corrupted) as the result of a problem with
the hard disk, an electrical spike that got past your surge
protector and into the computer, or a computer virus (see
Chapter 6). For directions on repairing Windows, see
Chapter 14.
4.
Reinstall Windows, which essentially refreshes all your
system files and leaves your data and software programs
intact. In the worst-case scenario, you may have to per-
form a clean install, which requires electrically wiping the
disk clean, reformatting it, and installing Windows all
over again. For details, see Chapter 14.
Please purchase PDF Split-Merge on www.verypdf.com to remove this watermark.
➟
146
Part III: Fixing Sick Hardware
Check and Change Display Settings
in Windows XP and Vista
1.
Right-click anywhere on the desktop and choose
Properties from the shortcut menu, or choose
Start➪Control Panel and double-click the Display icon.
The Display Properties dialog box opens.
Some advanced video adapters add their own control
panels to computer systems. You may find some
more advanced customization settings in these con-
trol panels, as well as diagnostic tools specific to your
PC’s hardware.
2.
Click the Settings tab. You see the screen resolution
and color quality that your video adapter is using (see
Figure 8-4).
Slide to change the display’s configuration.
Choose a new setting from this drop-down menu.
Figure 8-4
Please purchase PDF Split-Merge on www.verypdf.com to remove this watermark.