Fix your own computer for seniors for dummies- P10
Bạn đang xem bản rút gọn của tài liệu. Xem và tải ngay bản đầy đủ của tài liệu tại đây (1.55 MB, 30 trang )
➟
255
Chapter 15: Checking and Changing System Configuration
2.
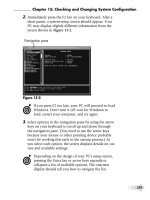
Immediately press the F2 key on your keyboard. After a
short pause, a system-setup screen sho uld appear. Your
PC may display slightly different information from the
screen shown in Figure 15-2.
Navigation pane
Figure 15-2
If you press F2 too late, your PC will proceed to load
Windows. Don’t turn it off; wait for Windows to
load, restart your computer, and try again.
3.
Select options in the navigation pane by using the arrow
keys on your keyboard to scroll up and down through
the navigation pane. (You need to use the arrow keys
because your mouse or other pointing device probably
won’t be working this early in the startup process.) As
you select each option, the screen displays details on cur-
rent and available settings.
Depending on the design of your PC’s setup screen,
pressing the Enter key or arrow keys expands or
collapses a list of available options. The onscreen
display should tell you how to navigate the list.
Please purchase PDF Split-Merge on www.verypdf.com to remove this watermark.
➟
256
Part IV: Resetting the Operating System
4.
Write down all the settings you see in each screen.
Some people use a digital camera to take close-up
images of setup screens. If you go this route, make
sure that you can read all the information in the
images.
5.
Consult the instruction manual or online support pages
for your computer model to find a list of your computer’s
standard (default) settings, and identify the process for
restoring all the settings to their original default condi-
tion. You may not want or need to use this emergency
parachute, but someday, it may be the way to get out of
an otherwise-unresolvable technical bind.
Store all the information you’ve gathered — including
handwritten notes or digital photographs — with the
rest of your computer documentation so that it’s
available if you need it later to solve a configuration
problem.
6.
Press the Esc key one or more times until you see a
prompt that asks whether you want to exit this utility
or save the data and exit. You should not have changed
anything during this inspection tour, so select the exit
option. Your system should resume the normal startup
process and return you to Windows.
View System Configuration in Windows XP
1.
Choose Start➪Run to open the Run dialog box.
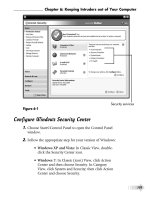
2.
Type msconfig in the Open text box, and click OK. The
System Configuration Utility dialog box appears (see
Figure 15-3), displaying seven tabs:
Please purchase PDF Split-Merge on www.verypdf.com to remove this watermark.
➟
257
Chapter 15: Checking and Changing System Configuration
Tabs
Figure 15-3
• General
• SYSTEM.INI
• WIN.INI
• BOOT.INI
• Services
• Startup
• Tools
Each of these tabs contains settings for various elements
of your PC. In the following steps, I cover the ones that
you may want to investigate.
It’s best to stay away from all the .INI tabs. You
can’t change much on those tabs to help solve
problems, and changing some settings could really
mess things up.
Please purchase PDF Split-Merge on www.verypdf.com to remove this watermark.
➟
258
Part IV: Resetting the Operating System
3.
Click the Services tab, which displays a long list of the
current software services running in Windows. Most of
these services won’t mean a whole lot to you, but it’s
interesting and surprising to see what’s loaded on your
computer. If you’re using this utility to solve a problem,
see “Select Diagnostic Startup,” later in this chapter.
4.
Click the Startup tab, which lists the programs that
launch every time you start your machine. You’ll recog-
nize some applications that you use regularly, such as
Microsoft Office or your antivirus program. The ones you
don’t recognize are launchers or helpers for other hard-
ware and software that help improve performance or are
required for some operations.
5.
Click the Tools tab, which lists the software tools you can
use to inspect or troubleshoot your system. (Interestingly,
Microsoft’s help-desk technicians may use the same tools
to help you uncover and repair a problem with your
computer.)
You can experiment with these tools, but use caution.
Tools such as Registry Editor can cause some serious
system ills if they’re used incorrectly.
6.
When you’re ready to get on with other computer tasks,
click the OK button to close the System Configuration
Utility dialog box.
Select Diagnostic Startup in Windows XP
It certainly is interesting to poke around inside the
System Configuration Utility (see the preceding sec-
tion), but you also can use it as a serious diagnostic
tool.
Please purchase PDF Split-Merge on www.verypdf.com to remove this watermark.
➟
259
Chapter 15: Checking and Changing System Configuration
1.
Choose Start➪Run to open the Run dialog box, type
msconfig in the Open text box, and click OK to open the
System Configuration Utility dialog box.
2.
On the General tab, select Diagnostic Startup, and click
OK. The utility takes a few seconds to disable all but the
most essential startup programs and services.
3.
When the Restart/Exit prompt appears, click Restart.
4.
When the diagnostics notification appears, click OK.
Windows displays the System Configuration Utility
dialog box again.
5.
Click the Startup tab, scan the list for a program that’s a
likely troublemaker, and check its check box.
You recognize a troublemaker through a process of
elimination and good guessing. Analyze the problem
that you’re experiencing, and try to find an applica-
tion that may have something to do with it. I suggest
starting with anything that isn’t a Microsoft product
and, therefore, may be incompatible with Windows.
6.
Click OK to restart your computer in Selective Startup
mode.
7.
If the problem recurs, proceed to Step 8. If the problem
doesn’t occur, repeat the steps until you locate the
offending application.
8.
Reinstall the problem program or contact the software
manufacturer for help.
9.
Follow the steps in the next section to return your system
to normal startup.
Please purchase PDF Split-Merge on www.verypdf.com to remove this watermark.
➟
260
Part IV: Resetting the Operating System
Return to Normal Startup in Windows XP
1.
Choose Start➪Run to open the Run dialog box.
2.
Type msconfig in the Open text box, and click OK. The
System Configuration Utility dialog box opens.
3.
On the General tab, select Normal Startup, and click OK.
Your computer restarts with all its programs enabled.
View System Configuration in Vista and Windows 7
1.
Click the Start button and then click inside the Search
Programs and Files field (Start Search in Vista) at the bot-
tom of the screen. The msconfig program appears at the
top of the search box.
2.
Click msconfig to display the System Configuration
dialog box. Vista displays a UserAccount Control notice.
3.
Investigate the Services, Startup, and Tools tabs, which are
essentially the same as those in the System Configuration
Utility dialog box in Windows XP (see “View System
Configuration in Windows XP,” earlier in this chapter).
Missing from the System Configuration dialog box,
however, are the .INI tabs from Windows XP — which
is probably a good thing, because you shouldn’t change
those settings anyway.
4.
Click the Boot tab to display the dialog box shown in
Figure 15-4.
Please purchase PDF Split-Merge on www.verypdf.com to remove this watermark.
➟
261
Chapter 15: Checking and Changing System Configuration
Select Safe Boot and then experiment with
different settings for troubleshooting.
Figure 15-4
5.
Click the General tab, choose Diagnostic Startup, and
click OK to test your system with minimal applications
loaded (see “Select Diagnostic Startup in Windows XP,”
earlier in this chapter).
6.
When your testing is complete, select Normal Startup on
the General tab, and click OK to return to normal startup
mode. Your computer restarts with all its applications
enabled.
Please purchase PDF Split-Merge on www.verypdf.com to remove this watermark.
➟
262
Part IV: Resetting the Operating System
Please purchase PDF Split-Merge on www.verypdf.com to remove this watermark.
Restoring Your
Computer’s
Settings
I
f your PC ran fine yesterday (or just a few
minutes ago), but all of a sudden it won’t
load Windows, ask yourself this essential ques-
tion: What has changed since the last time this
computer performed properly? Here are a few
possible answers:
➟
You installed new software.
➟
You uninstalled or deleted software.
➟
Microsoft or another software company
delivered a major update to your
computer.
➟
You installed new or updated device
drivers.
➟
You recently changed the settings or con-
figuration of Windows.
➟
You deleted or changed one of the system
files of Windows or another program.
➟
The lights just dimmed or the power
went out, perhaps because of an electrical
storm.
16
Get ready to . . .
➟
Undo Something You
Just Did ............................ 264
➟
Uninstall a Problematic
Program ........................... 264
➟
Choose the Right Utility
to Solve Your Problem ....... 267
➟
Reset Your PC with System
Restore ............................ 267
➟
Create a Restore Point
Manually in Windows XP... 275
➟
Create a Restore Point
Manually in Vista .............. 275
➟
Create a Restore Point
Manually in Windows 7 .... 275
➟
Revert to the Last Known
Good Configuration .......... 276
➟
Chapter
Please purchase PDF Split-Merge on www.verypdf.com to remove this watermark.
➟
264
Part IV: Resetting the Operating System
Any of these events could result in unexpected, unwanted changes in
critical files on your computer. Fortunately, you may be able to turn
back the clock to resolve problems. I show you how in this chapter.
If you recently installed new hardware inside your
PC, or if an existing piece of hardware has failed, you
should start by troubleshooting the equipment, not
the software.
Undo Something You Just Did
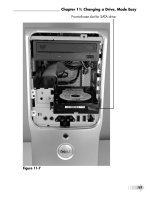
1.
Start Windows in safe mode. This mode loads only the
most basic functionality for things like the keyboard and
mouse, and displays a different screen from what you’re
used to seeing. Figure 16-1 provides additional informa-
tion. For details, see Chapter 17.
2.
When you have Windows running in this limited mode,
undo the changes you just made.
3.
Restart the computer.
Uninstall a Problematic Program
1.
Follow the appropriate step for your version of Windows:
• Windows XP: Choose Start➪Control Panel to
open the Control Panel window; then double-click
the Add or Remove Programs icon to open the
Add or Remove Programs window.
• Vista and Windows 7: Choose Start➪Control
Panel to open the Control Panel window. Then (in
Classic View) select Programs and Features or (in
Please purchase PDF Split-Merge on www.verypdf.com to remove this watermark.
➟
265
Chapter 16: Restoring Your Computer’s Settings
Category View) select Uninstall a Program in the
Programs category. Either action opens the
Uninstall or Change a Program window.
Use Windows Help at any time to learn more about Windows topics.
Figure 16-1
2.
Select the program that you want to remove.
If you’re not certain that this program is causing the
problem, you could try the repair option in Windows
7 first. If that doesn’t work, proceed with the
uninstallation.
Please purchase PDF Split-Merge on www.verypdf.com to remove this watermark.
➟
266
Part IV: Resetting the Operating System
3.
Click the button titled something like Change/Remove,
Uninstall/Change, or Uninstall. The name of this button
or option may differ from program to program. Some
programs provide a Change button that opens a separate
utility in which you can modify or remove the program;
others offer a Remove button that does just that. Still
other programs have a single button called Change/
Remove that offers a more complex set of options. Figure
16-2 shows one program’s response after the Uninstall/
Change button is clicked.
Click Uninstall to start the process.
Figure 16-2
4.
Follow the onscreen instructions to remove the program.
When the selected program is removed, you should see a
confirmation dialog box like the one shown in Figure 16-3.
Click OK to close the confirmation dialog box.
Figure 16-3
Also see Chapter 4 for more information on trouble-
shooting and uninstalling misbehaving software.
Please purchase PDF Split-Merge on www.verypdf.com to remove this watermark.