Tài liệu Module 10: Managing the Exchange 2000 Information Store docx
Bạn đang xem bản rút gọn của tài liệu. Xem và tải ngay bản đầy đủ của tài liệu tại đây (1.45 MB, 56 trang )
&RQWHQWV##
2YHUYLHZ#4#
6WRUDJH#*URXSV#5#
/DE#$=#&UHDWLQJ#6WRUDJH#*URXSV#DQG##
0XOWLSOH#([FKDQJH#5333#'DWDEDVHV# 48#
6WRUH#%DFNXS#DQG#5HVWRUH#6WUDWHJLHV# 57#
)XOO07H[W#,QGH[LQJ# 65#
/DE#%=#&UHDWLQJ#D#)XOO07H[W#,QGH[# 78#
5HYLHZ# 84#
#
Module 10: Managing
the Exchange 2000
Information Store
Information in this document is subject to change without notice. The names of companies,
products, people, characters, and/or data mentioned herein are fictitious and are in no way intended
to represent any real individual, company, product, or event, unless otherwise noted. Complying
with all applicable copyright laws is the responsibility of the user. No part of this document may
be reproduced or transmitted in any form or by any means, electronic or mechanical, for any
purpose, without the express written permission of Microsoft Corporation. If, however, your only
means of access is electronic, permission to print one copy is hereby granted.
Microsoft may have patents, patent applications, trademarks, copyrights, or other intellectual
property rights covering subject matter in this document. Except as expressly provided in any
written license agreement from Microsoft, the furnishing of this document does not give you any
license to these patents, trademarks, copyrights, or other intellectual property.
2000 Microsoft Corporation. All rights reserved.
Microsoft, MS-DOS, MS, Windows, Windows NT, Active Directory directory service, ActiveX,
BackOffice, FrontPage, Hotmail, MSN, Outlook, PowerPoint, SQL Server, Visual Studios, and
Win32, are either registered trademarks or trademarks of Microsoft Corporation in the U.S.A.
and/or other countries.
The names of companies, products, people, characters, and/or data mentioned herein are fictitious
and are in no way intended to represent any real individual, company, product, or event, unless
otherwise noted.
Other product and company names mentioned herein may be the trademarks of their respective
owners.
Project Lead:
David Phillips
Instructional Designers:
Lance Morrison (Wasser), Janet Sheperdigian, Steve Thues
Lead Program Manager:
Mark Adcock
Program Manager:
Lyle Curry, Scott Hay, Janice Howd, Steve Schwartz (Implement.Com),
Bill Wade (Wadeware LLC)
Graphic Artist:
Kimberly Jackson, Andrea Heuston (Artitudes Layout and Design)
Editing Manager:
Lynette Skinner
Editor:
Elizabeth Reese (Write Stuff)
Copy Editor:
Ed Casper (S&T Consulting), Carolyn Emory (S&T Consulting), Patricia Neff
(S&T Consulting), Noelle Robertson (S&T Consulting)
Online Program Manager:
Debbi Conger
Online Publications Manager:
Arlo Emerson (Aquent Partners)
Online Support:
Eric Brandt
Multimedia Developer
: Kelly Renner (Entex)
Compact Disc Testing:
Data Dimensions, Inc.
Production Support:
Ed Casper (S&T Consulting)
Manufacturing Manager:
Bo Galford
Manufacturing Support:
Rick Terek
Lead Product Manager, Development Services:
Lead Product Manager:
David Bramble
Group Product Manager:
Robert Stewart
# 0RGXOH#43=#0DQDJLQJ#WKH#([FKDQJH#5333#,QIRUPDWLRQ#6WRUH##LLL#
,QVWUXFWRU#1RWHV##
This module discusses the major enhancements made to the Microsoft
®
Exchange 2000 information store. These include storage groups, changes in
backup and restore procedures, and full-text indexing.
At the end of this module, students will create storage groups, mailbox stores,
and public folder stores. They will configure a full index of a mailbox store and
use System Monitor to view index attributes.
0DWHULDOV#DQG#3UHSDUDWLRQ#
This section provides you with the required materials and preparation tasks that
are needed to teach this module.
5HTXLUHG#0DWHULDOV#
To teach this module, you need the following materials:
•
Microsoft PowerPoint
®
file 1569A_10.ppt
3UHSDUDWLRQ#7DVNV#
To prepare for this module, you should:
„#
Read all the materials for this module.
„#
Complete the labs.
„#
Practice your demonstrations.
3UHVHQWDWLRQ=##
93#0LQXWHV#
#
/DEV=#
<3#0LQXWHV#
LY##0RGXOH#43=#0DQDJLQJ#WKH#([FKDQJH#5333#,QIRUPDWLRQ#6WRUH#
0RGXOH#6WUDWHJ\#
Use the following strategy to present this module:
„#
Storage Groups
List the benefits of storage groups, explain the purpose of the architecture,
and demonstrate how to create and manage storage groups and stores.
„#
Backup and Restore Strategies
List and describe the files that need to be backed up, in addition to backup
methods. Focus on changes between previous versions of Exchange and
Exchange 2000.
„#
Full-Text Indexing
Describe full-text indexing. Give the benefits and costs. Demonstrate how to
enable and manage full-text indexing on a public store.
# 0RGXOH#43=#0DQDJLQJ#WKH#([FKDQJH#5333#,QIRUPDWLRQ#6WRUH##4#
2YHUYLHZ#
„
6WRUDJH#*URXSV
„
6WRUH#%DFNXS#DQG#5HVWRUH#6WUDWHJLHV
„
)XOO07H[W#,QGH[LQJ
This module discusses the major changes to the information store in Microsoft
®
Exchange 2000. The reliability and scalability of the information store has been
greatly improved. Storage groups make room for more data to be stored and
managed per server. The architecture of the storage groups produces additional
enhancements and changes in the backup and restore processes. Full-text
indexing provides faster searches that include attachments in addition to
message body text.
At the end of this module, you will be able to:
„#
Design, create, and manage storage groups.
„#
Backup and restore Microsoft
Exchange 2000.
„#
Configure full-text indexing.
6OLGH#2EMHFWLYH#
7R#SURYLGH#DQ#RYHUYLHZ#RI#
WKH#PRGXOH#WRSLFV#DQG#
REMHFWLYHV1#
/HDG0LQ#
,Q#WKLV#PRGXOH/#\RX#ZLOO#OHDUQ#
DERXW#VWRUDJH#JURXSV/#
VWUDWHJLHV#IRU#EDFNLQJ#XS#
DQG#UHVWRULQJ#D#0LFURVRIW#
([FKDQJH#5333#VHUYHU/#DQG#
KRZ#WR#XVH#IXOO0WH[W#LQGH[LQJ1#
5# # 0RGXOH#43=#0DQDJLQJ#WKH#([FKDQJH#5333#,QIRUPDWLRQ#6WRUH#
‹‹
#
6WRUDJH#*URXSV#
„
%HQHILWV#RI#8VLQJ#D#6WRUDJH#*URXS
„
6WRUDJH#*URXS#$UFKLWHFWXUH
„
3ODQQLQJ#0XOWLSOH#6WRUHV#DQG#6WRUDJH#*URXSV
„
/RFDWLQJ#6WRUH#)LOHV
„
&UHDWLQJ#6WRUDJH#*URXSV
„
&UHDWLQJ#D#6WRUH
„
0RYLQJ#7UDQVDFWLRQ#/RJV#DQG#WKH#'DWDEDVH#)LOHV
„
'HOHWLQJ#D#6WRUH#RU#6WRUDJH#*URXS
A storage group is a set of databases, called stores, that share the same set of
transaction log files and can be managed either as a group or independently by
the administrator.
6OLGH#2EMHFWLYH#
7R#SURYLGH#DQ#RYHUYLHZ#RI#
WKLV#WRSLF1#
/HDG0LQ#
$#VWRUDJH#JURXS#LV#D#VHW#RI#
GDWDEDVHV/#RU#VWRUHV/#WKDW#
VKDUH#WKH#VDPH#VHW#RI#
WUDQVDFWLRQ#ORJ#ILOHV#DQG#FDQ#
EH#PDQDJHG#HLWKHU#DV#D#
JURXS#RU#LQGHSHQGHQWO\#E\#
WKH#DGPLQLVWUDWRU1#
# 0RGXOH#43=#0DQDJLQJ#WKH#([FKDQJH#5333#,QIRUPDWLRQ#6WRUH##6#
%HQHILWV#RI#8VLQJ#D#6WRUDJH#*URXS#
„
6XSSRUWV#0RUH#8VHUV#RQ#D#6LQJOH#6HUYHU
„
%DFNV#8S#DQG#5HVWRUHV#,QGLYLGXDO#6WRUHV#:KLOH#WKH#
2WKHUV#&RQWLQXH#WR#5XQ
„
+RVWV#0XOWLSOH#%XVLQHVVHV#RQ#2QH#6HUYHU
„
6XSSRUWV#6SHFLDO#0DLOER[HV
„
(QDEOHV#&LUFXODU#/RJJLQJ#IRU#D#6LQJOH#6WRUDJH#*URXS
In Microsoft Exchange Server version 5.5, if a database became too large to
back up or restore in a timely fashion, then mailboxes had to be moved to
another server.
Exchange 2000 allows you to create multiple databases, or stores, on a single
server. However, to reduce the overhead of multiple sets of transaction log files,
Exchange 2000 uses storage groups. A storage group contains up to six stores
that use one set of transaction log files. Several benefits result from this feature:
„#
A storage group allows a business to support more users on each server
because multiple smaller stores can be created.
„#
Backup and restore activities can be performed on a single store while other
stores in the storage group remain in operation.
„#
Multiple businesses can be hosted on a single server. If you need to host
several companies on a single server, each company can have its own store
or storage group. Each storage group can be configured and maintained per
the requirements of the associated company.
„#
Special mailboxes can receive individual support. You may have one or
more critical mailboxes that must be recovered individually as quickly as
possible in the event of an emergency or disaster. Each mailbox could be
housed in a dedicated store, allowing for individual backup and recovery. In
this scenario the administrator must implement additional resource
requirements, and so you should use it only for absolutely critical
mailboxes.
„#
Circular logging can be enabled for a specific storage group. You may have
a store that generates a volume of transactions that do not need to be
recovered, such as a public information store that receives a newsfeed. If
you place this store in its own storage group, then it can use circular
logging. The other storage group(s) should have circular logging disabled.
6OLGH#2EMHFWLYH#
7R#H[SODLQ#WKH#EHQHILWV#RI#
XVLQJ#VWRUDJH#JURXSV#UDWKHU#
WKDQ#D#VLQJOH#ODUJH#
GDWDEDVH1#
/HDG0LQ#
7KH#PDLQ#SUREOHP#ZLWK#
XVLQJ#D#VLQJOH#ODUJH#
GDWDEDVH#LV#WKH#WLPH#QHHGHG#
WR#EDFN#XS#DQG#UHVWRUH#GDWD1#
7# # 0RGXOH#43=#0DQDJLQJ#WKH#([FKDQJH#5333#,QIRUPDWLRQ#6WRUH#
6WRUDJH#*URXS#$UFKLWHFWXUH#
)LIWHHQWK 6WRUDJH#*URXS
)LUVW 6WRUDJH#*URXS
HGE1ORJ
HGE1ORJ
/RQGRQ#6HUYHU
0DLOER[
6WRUH
0DLOER[
6WRUH
0DLOER[
6WRUH
0DLOER[
6WRUH
0DLOER[
6WRUH
0DLOER[
6WRUH
0DLOER[
6WRUH
0DLOER[
6WRUH
0DLOER[
6WRUH
0DLOER[
6WRUH
0DLOER[
6WRUH
0DLOER[
6WRUH
0DLOER[
6WRUH
0DLOER[
6WRUH
3XEOLF#6WRUH
WUHH=#$OO#3XEOLF#)ROGHUV
3XEOLF#6WRUH
WUHH=#$OO#3XEOLF#)ROGHUV
3XEOLF#6WRUH
WUHH=#(QJLQHHULQJ
3XEOLF#6WRUH
WUHH=#(QJLQHHULQJ
3XEOLF#6WRUH
WUHH=#+XPDQ#5HVRXUFHV
3XEOLF#6WRUH
WUHH=#+XPDQ#5HVRXUFHV
7UDQVDFWLRQ
7UDQVDFWLRQ
7UDQVDFWLRQ
7UDQVDFWLRQ
7UDQVDFWLRQ
7UDQVDFWLRQ
3XEOLF#6WRUH
WUHH=#$OO#3XEOLF#)ROGHUV
3XEOLF#6WRUH
WUHH=#$OO#3XEOLF#)ROGHUV
3XEOLF#6WRUH
WUHH=#+XPDQ#5HVRXUFHV
3XEOLF#6WRUH
WUHH=#+XPDQ#5HVRXUFHV
Storage groups give the administrator flexibility in organizing and managing
Exchange 2000 data. However, with the flexibility comes added administrative
responsibility.
6WRUDJH#*URXS#/LPLWV#
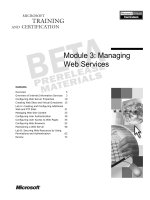
Exchange 2000 allows the administrator to create up to 15 storage groups per
server. Exchange 2000 will also create an additional temporary storage group
during restore operations. Each storage group can support six stores. Stores do
not have a size limit, although users should limit their size so that they can
easily back up or restore the stores in a timely fashion.
You can create two types of stores. A mailbox store holds user data and public
stores hold public folder data. Each store has an associated streaming store file
that contains native Internet content.
When the information store service is running, stores can be individually
mounted and dismounted. A mounted store is in operation. A dismounted store
is available for offline maintenance, and users cannot access it.
6OLGH#2EMHFWLYH#
7R#GHVFULEH#WKH#DUFKLWHFWXUH#
XVHG#WR#FUHDWH#VWRUDJH#
JURXSV1#
/HDG0LQ#
$OWKRXJK#WKH#VWRUH#VL]H#
UHPDLQV#XQOLPLWHG/#
([FKDQJH#5333#KDV#OLPLWV#
RQ#WKH#QXPEHUV#RI#VWRUDJH#
JURXSV#SHU#VHUYHU#DQG#KRZ#
WKH\#FDQ#EH#XVHG1#
'HOLYHU\#7LS#
7KH#JUDSKLF#GHSLFWV#VL[#
VWRUHV#SHU#VWRUDJH#JURXS/#
HDFK#ZULWLQJ#WUDQVDFWLRQV#WR#
D#VLQJOH#VHW#RI#WUDQVDFWLRQ#
ORJ#ILOHV1#
# 0RGXOH#43=#0DQDJLQJ#WKH#([FKDQJH#5333#,QIRUPDWLRQ#6WRUH##8#
7UDQVDFWLRQ#/RJ#)LOHV#
Each storage group uses its own set of transaction log files. That is, if there are
six stores in a storage group, all transactions for all six stores are recorded in a
single series of transaction log files. The administrator can determine the
location of the transaction log files per storage group and should place the log
files on separate hard disks if they configure multiple storage groups.
As in Exchange Server 5.5, all Exchange 2000 transaction logs are 5 megabytes
(MB) in size.
5HTXLUHG#5HVRXUFHV##
For each mounted store, Exchange 2000 Beta 3 allocates 10 MB of RAM. As
the stores are used and become larger, that amount increases. Dismounted stores
do not require system resources.
9# # 0RGXOH#43=#0DQDJLQJ#WKH#([FKDQJH#5333#,QIRUPDWLRQ#6WRUH#
3ODQQLQJ#0XOWLSOH#6WRUHV#DQG#6WRUDJH#*URXSV#
„
$GGHG#)OH[LELOLW\/#$GGHG#2YHUKHDG
„
0XOWLSOH#6WRUHV#² 8VHUV#/RFDWLRQ
z
6LQJOH#PHVVDJH#GHOLYHU\#
z
6LQJOH0FRS\#PHVVDJH#VWRUDJH
„
0XOWLSOH#6WRUDJH#*URXSV
z
'LIIHUHQW#PDQDJHPHQW#UHTXLUHPHQWV
z
0RUH#WKDQ#VL[#VWRUHV
Multiple stores and multiple storage groups provide flexibility, but also add
overhead.
3ODQQLQJ#0XOWLSOH#6WRUHV#
Generally, you will plan multiple stores so that each store is a manageable size.
A manageable size means that you can back up and restore the stores in a timely
manner. When planning for multiple stores, you need to take into consideration
where to locate individual mailboxes.
Place users that communicate with each other in the same store. This allows
them to take advantage of single-message delivery and storage.
3ODQQLQJ#0XOWLSOH#6WRUDJH#*URXSV#
Generally, you will plan additional storage groups only when the existing
storage group contains six stores.
However, stores within a storage group are best managed as a unit. Therefore, if
you have a store that will be managed differently than other stores, it should be
located in a separate storage group. For example, you may have a store with
special mailboxes that need to be restored differently, or you may have a store
that should use circular logging. In these scenarios, consider placing this store
within its own storage group.
In Exchange Server 5.5, you can find out how much space is saved with the
single-copy message storage feature. If you are saving a large amount of space,
then you may not want to change to using multiple databases, or you may want
to plan more carefully which users should be stored in which databases.
6OLGH#2EMHFWLYH#
7R#GLVFXVV#GHVLJQ#
FRQVLGHUDWLRQV#IRU#FUHDWLQJ#
PXOWLSOH#VWRUHV#DQG#VWRUDJH#
JURXSV1#
/HDG0LQ#
:KLOH#\RX#FDQ#DGG#VWRUHV#
DQG#VWRUDJH#JURXSV#DW#DQ\#
WLPH/#SODQQLQJ#FDQ#LPSURYH#
SHUIRUPDQFH#DQG#GHFUHDVH#
DGPLQLVWUDWLRQ#RYHUKHDG1#
# 0RGXOH#43=#0DQDJLQJ#WKH#([FKDQJH#5333#,QIRUPDWLRQ#6WRUH##:#
/RFDWLQJ#6WRUH#)LOHV#
6\VWHP#3DUWLWLRQ#DQG
%RRW#3DUWLWLRQ
6\VWHP#3DUWLWLRQ#DQG
%RRW#3DUWLWLRQ
0LUURU#6HW
C:\
6WRUDJH#*URXS#4
7UDQVDFWLRQ#/RJV
6WRUDJH#*URXS#4
7UDQVDFWLRQ#/RJV
0LUURU#6HW
E:\
6WRUDJH#*URXS#5
7UDQVDFWLRQ#/RJV
6WRUDJH#*URXS#5
7UDQVDFWLRQ#/RJV
0LUURU#6HW
F:\
3DJH#)LOH
3DJH#)LOH
D:\
$OO#'DWDEDVH#)LOHV#)RU#
%RWK#6WRUDJH#*URXSV
$OO#'DWDEDVH#)LOHV#)RU#
%RWK#6WRUDJH#*URXSV
6WULSH#6HW#ZLWK#3DULW\
G:\
Exchange 2000 performance can be optimized by carefully planning your store
and storage group needs, in addition to locating heavily accessed files on fast
hard disks.
The Performance Optimizer utility included with Exchange Server 5.5 is
not included and is not compatible with Exchange 2000.
Each storage group should use a separate, fast hard disk for transaction log
files. The following list gives suggestions to increase performance:
„#
Format each transaction log and database drive with the NTFS file system in
Microsoft Windows
®
2000.
„#
Use hardware redundant array of independent disks (RAID) to protect the
database drive array, and keep hot spares available if supported by your
RAID controller.
„#
Distribute the database drives across many small computer system interface
(SCSI) channels or controllers, but configure them as a single logical drive
to minimize SCSI bus saturation.
An example disk configuration follows:
„#
C:\ system and boot (mirror set)
„#
D:\ Page file
„#
E:\ Transaction logs for storage group 1 (mirror set)
„#
F:\ Transaction logs for storage group 2 (mirror set)
„#
G:\ Database files for both storage groups (multiple drives configured as
hardware stripe set with parity).
6OLGH#2EMHFWLYH#
7R#GLVFXVV#PHWKRGV#IRU#
RSWLPL]LQJ#VHUYHU#
SHUIRUPDQFH1#
/HDG0LQ#
3URSHU#SODFHPHQW#RI#
WUDQVDFWLRQ#ORJ#ILOHV#DQG#
GDWDEDVH#ILOHV#FDQ#LPSURYH#
V\VWHP#SHUIRUPDQFH1#
1RWH#
;# # 0RGXOH#43=#0DQDJLQJ#WKH#([FKDQJH#5333#,QIRUPDWLRQ#6WRUH#
&UHDWLQJ#6WRUDJH#*URXSV#
Properties
OK
N
ame:
Cancel
Help
B
rowse…
B
rowse…
General
Details
T
ransaction log location:
System path location:
Z
ero out deleted database pages
E
nable circular logging
A
pply
A
pply
Storage Group Two
C:\Exchsrvr\Storage Group Two
C:\Exchsrvr\Storage Group Two
When you create a new storage group, you provide the name of the storage
group, the location for the transaction log files, and the system directory in
which to store the checkpoint file.
Ç#
To create a new storage group
1. From the Exchange System Manager snap-in, expand the appropriate
Administrative Group and then the Servers container to locate the server
upon which a new storage group is to be added.
2. Expand that server, and then right-click Information Store.
3. Click New, and then click Storage Group.
Options available include:
„#
Zero out deleted database pages box. This option automatically writes
zeroes (0) to deleted 4 kilobyte (KB) pages within all stores in the storage
group. This occurs during online backup. Select this if you want to be sure
deleted data cannot be recovered. However, this function will affect the
performance of the server during backup.
„#
Enable circular logging check box. This allows circular logging to be
enabled for those storage groups that do not contain data of any importance
to you. Circular logging reduces hard disk space requirements by limiting
the number of transaction log files, while eliminating the ability to recover
transactions.
Use the Details tab to enter in additional information, such as who the creator
of the storage group is or the purpose of the storage group.
6OLGH#2EMHFWLYH#
7R#GHPRQVWUDWH#KRZ#WR#
FUHDWH#D#VWRUDJH#JURXS#DQG#
VKRZ#WKH#YDULRXV#RSWLRQV1#
/HDG0LQ#
<RX#FUHDWH#QHZ#VWRUDJH#
JURXSV#ZLWK#([FKDQJH#
6\VWHP#0DQDJHU1#
'HOLYHU\#7LS#
'HPRQVWUDWH#KRZ#WR#FUHDWH#
D#QHZ#VWRUDJH#JURXS1#
# 0RGXOH#43=#0DQDJLQJ#WKH#([FKDQJH#5333#,QIRUPDWLRQ#6WRUH##<#
&UHDWLQJ#D#6WRUH#
Properties
OK
N
ame:
Cancel
Help
Browse…
B
rowse…
*HQHUDO
'DWDEDVH
D
efault public store:
Offline address list:
C
lients support S/MIME signatures
Con
vert inbound internet messages to fixed font
Apply
Mailbox Store Two
«?/21'21?)LUVW#6WRUDJH#*URXS?3XEOLF#)ROGHU
Default Offline Address Book
/LPLWV )XOO07H[W#,QGH[LQJ 'HWDLOV 3ROLFLHV
You can create one public store per public folder tree per server. You can create
multiple mailbox stores per server, up to the storage group limits.
Ç#
To create a new store
„#
Right-click the storage group under which you want the new store to be
created and select New Public Store or New Mailbox Store.
You will be prompted with a series of tabs that allow you to configure
various features under each tab:
„#
General. For public folder stores, you can define the public store name and
associated public folder tree. For mailbox stores define the mailbox name,
the associated public store, and the offline address book. For both store
types define whether the clients that will connect to this store, support
S/MIME signatures, and whether you want all incoming Internet messages
to be converted to a fixed-width font.
„#
Database. You can specify the associated storage group, database file
locations, and online maintenance schedule (the time at which online
maintenance will start). You can also choose not to mount this store at
startup.
„#
Replication (Public Store only). You can configure the frequency at which
you want public folder changes initiated on this server to be replicated to
other servers. You can also configure the replication interval for always
(default is 30 minutes), in addition to the maximum size of the system
messages used to replicate public folder content.
In Exchange 2000 Beta 3, you cannot change the default replication
interval.
6OLGH#2EMHFWLYH#
7R#GHPRQVWUDWH#KRZ#WR#
FUHDWH#D#VWRUH#DQG#VKRZ#WKH#
YDULRXV#FRQILJXUDWLRQ#
RSWLRQV1#
/HDG0LQ#
$IWHU#\RX#KDYH#D#VWRUDJH#
JURXS#\RX#FDQ#FUHDWH#DQG#
PDQDJH#LQGLYLGXDO#VWRUHV1#
'HOLYHU\#7LS#
'HPRQVWUDWH#KRZ#WR#FUHDWH#
D#QHZ#PDLOER[#VWRUH1#
1RWH#
43# # 0RGXOH#43=#0DQDJLQJ#WKH#([FKDQJH#5333#,QIRUPDWLRQ#6WRUH#
„#
Limits. You can define the size at which deleted items are actually purged
from the server and whether they must be backed up before purging. Define
when storage warning messages are sent to the folder or mailbox owner,
when the folder or mailbox will be prohibited from sending mail, in addition
to how often you want the warning message to be sent. Use the following
policies to define a broader scope.
•
For mailbox stores, define when a mailbox will be prohibited from sending
and receiving. Also, an option exists called Keep deleted mailboxes for
(days) where you can define the number of days you want to retain deleted
mailboxes on the server. This provides a simple means for recovering a
user’s mailbox after the user has been deleted.
•
For public stores, identify the length of time any document is allowed to be
housed in a public folder residing on this server. This must be configured
per public store. You should consider using policies to define this across
the organization.
„#
Full-text Indexing. You can enable indexing on this store. You can then
configure whether you want the index to be updated automatically.
„#
Details. You can enter any administrative notes about the store under the
Details tab. The Details tab also provides a summary defining the creation
and modification dates and times for the store, in addition to indexing
statistics, such as catalog size, state, and location, and the date of the last
time the contents were indexed.
„#
Policies. Identifies which policies have been applied to the store.
„#
Security. Views or defines the accounts that have permissions on this
object, and the level of permissions granted them. You can use the
Advanced button to configure auditing and allocate a new object owner.
# 0RGXOH#43=#0DQDJLQJ#WKH#([FKDQJH#5333#,QIRUPDWLRQ#6WRUH# # 44#
0RYLQJ#7UDQVDFWLRQ#/RJ#)LOHV#DQG#WKH#'DWDEDVH#)LOHV#
„
0RYH#7UDQVDFWLRQ#/RJ#)LOHV
„
0RYH#WKH#'DWDEDVH#)LOH
„
0RXQW#RU#'LVPRXQW#'DWDEDVHV
It is just as important in Exchange 2000 as it was in Exchange Server 5.5 to
properly move transaction log files and databases. Use Exchange System
Manager to make sure that changes are performed properly.
0RYH#7UDQVDFWLRQ#/RJ#)LOHV#
You can relocate transaction log files using Storage Group Properties on the
General tab. When you change the location of the transaction log files, all
stores in the storage group are dismounted, the transaction log files are moved,
and then the stores are remounted.
Exchange 2000 Beta 3 does not support moving a store to another server.
0RYH#WKH#'DWDEDVH#)LOH#
You can move the database file corresponding with any public store or mailbox
store to another location on the server. Expand the appropriate storage group
and obtain the properties of the store. The Database tab allows you to move
either the database file (.edb), the streaming store (.stm), or both. When you
change the database file location, you will receive a warning that this action
will invalidate any incremental or differential backups that you have performed
and that you should perform a full backup upon completion of the move.
You must dismount the store before you can move database files.
6OLGH#2EMHFWLYH#
7R#H[SODLQ#KRZ#WR#PRYH#
WUDQVDFWLRQ#ORJ#ILOHV#DQG#
GDWDEDVH#ILOHV1#
/HDG0LQ#
8VH#([FKDQJH#6\VWHP#
0DQDJHU#WR#PRYH#
WUDQVDFWLRQ#ORJ#ILOHV#RU#
GDWDEDVH#ILOHV1#
'HOLYHU\#7LS#
'HPRQVWUDWH#KRZ#WR#PRYH#D#
GDWDEDVH#ILOH1#
1RWH#
45# # 0RGXOH#43=#0DQDJLQJ#WKH#([FKDQJH#5333#,QIRUPDWLRQ#6WRUH#
0RXQW#RU#'LVPRXQW#6WRUHV#
You can choose Mount Store or Dismount Store commands to bring the store
online or take it offline. This is a toggle option that only displays the available
action. That is, if the selected store is currently mounted, the Dismount Store
command is displayed. The store must be mounted before the client can access
it. You must dismount a store before moving its transaction log files and
database files, or before restoring it from backup.
Users are not automatically warned the server is dismounting the
store. You will see a warning when you select this option stating that
dismounting the database will disconnect all users. Use the mailboxes snap-shot
view in MMC to see what users have mailboxes in the store.
In Exchange 2000 Beta 3, you cannot mount or dismount databases from the
command line.
:DUQLQJ#
# 0RGXOH#43=#0DQDJLQJ#WKH#([FKDQJH#5333#,QIRUPDWLRQ#6WRUH# # 46#
'HOHWLQJ#D#6WRUH#RU#6WRUDJH#*URXS#
„
'HOHWLQJ#D#0DLOER[#6WRUH
z
$OO#PDLOER[HV#PXVW#EH#PRYHG#RU#GHOHWHG
„
'HOHWLQJ#D#3XEOLF#6WRUH
z
3XEOLF#IROGHU#WUHH#PXVW#EH#PRYHG
z
0XVW#QRW#EH#D#GHIDXOW#SXEOLF#VWRUH
„
'HOHWLQJ#D#6WRUDJH#*URXS
z
$OO#GDWDEDVHV#PXVW#EH#GHOHWHG
Before a store or storage group can be deleted, its contents must be removed.
'HOHWLQJ#D#0DLOER[#6WRUH#
Prior to deleting any mailbox store you must move any mailboxes defined in
that store to another store. If the store to be removed has queued messages
awaiting delivery to another server you will receive an error alerting you that
the deletion of this store will cause the loss of all mail messages in the queue
and the Simple Mail Transfer Protocol (SMTP) service will have to be
restarted. If you choose to delete anyway, you will be prompted with the option
to select a new store to be used as the inbound queue for SMTP messages.
Additionally, you will be unable to delete any store that the Key Manager uses.
If you try to delete a store that the Key Manager uses, you will receive an error
directing you to reconfigure Key Manager to use a different mailbox store.
'HOHWLQJ#WKH#3XEOLF#6WRUH#
There are several restrictions to deleting the public store:
„#
This store must not be the only store that contains the public folder tree.
„#
This store must not be the default public store for any mailbox stores or
users.
„#
Prior to removing the public store used for system folders, you will need to
select a new public store to house the system folders.
„#
If the public store to be deleted maintains the only replica of one or more
folders, you will receive a warning that all data will be lost if you do not
first replicate the data to another store. You can have one public store per
public folder tree on each server, and you cannot delete the last public store
that hosts a public folder tree.
6OLGH#2EMHFWLYH#
7R#H[SODLQ#KRZ#WR#GHOHWH#D#
VWRUH#RU#VWRUDJH#JURXS1#
/HDG0LQ#
%HIRUH#\RX#FDQ#GHOHWH#D#
VWRUH#RU#VWRUDJH#JURXS/#\RX#
QHHG#WR#UHPRYH#LWV#FRQWHQWV1#
'HOLYHU\#7LS#
'HPRQVWUDWH#GHOHWLQJ#D#
PDLOER[#VWRUH/#D#SXEOLF#
VWRUH/#DQG#D#VWRUDJH#JURXS1#
6KRZ#VWXGHQWV#WKH#HUURU#
PHVVDJHV#UHFHLYHG1#
47# # 0RGXOH#43=#0DQDJLQJ#WKH#([FKDQJH#5333#,QIRUPDWLRQ#6WRUH#
'HOHWLQJ#D#6WRUDJH#*URXS#
You can delete any storage group by selecting it and then clicking Delete. You
can only delete a storage group if it does not have any stores associated with it.
# 0RGXOH#43=#0DQDJLQJ#WKH#([FKDQJH#5333#,QIRUPDWLRQ#6WRUH# # 48#
/DE#$=#&UHDWLQJ#6WRUDJH#*URXSV#DQG#0XOWLSOH#
([FKDQJH#5333#'DWDEDVHV#
2EMHFWLYHV#
After completing this lab, you will be able to:
„#
Create multiple Exchange 2000 storage groups.
„#
Create multiple Exchange 2000 databases.
„#
Create an offline backup of data files.
3UHUHTXLVLWHV#
Before working on this lab you should be familiar with:
„#
Windows 2000.
„#
Exchange 2000 System Manager.
6HWXS##
To complete this lab, you will need the following:
„#
To be logged on to Windows 2000 as your_username.
„#
At least one computer running Windows 2000 Advanced Server and
Exchange 2000.
(VWLPDWHG#WLPH#WR#FRPSOHWH#WKLV#ODE=#63#PLQXWHV#
6OLGH#2EMHFWLYH#
7R#LQWURGXFH#WKH#ODE1#
/HDG0LQ#
,Q#WKLV#ODE/#\RX#ZLOO#FUHDWH#
VWRUDJH#JURXSV#DQG#PXOWLSOH#
VWRUHV#DV#ZHOO#DV#SHUIRUP#DQ#
RIIOLQH#EDFNXS#RI#GDWD#ILOHV1#
([SODLQ#WKH#ODE#REMHFWLYHV1#
49# # 0RGXOH#43=#0DQDJLQJ#WKH#([FKDQJH#5333#,QIRUPDWLRQ#6WRUH#
([HUFLVH#4##
&UHDWLQJ#D#6WRUDJH#*URXS#DQG#6HUYHU#'DWDEDVH#
6FHQDULR#
You want to create a second storage group to test the possibility of dedicated stores for executive
users in your organization.
*RDO#
In this exercise, you create a second storage group on your server, then create a second mailbox
store. After the second mailbox store is created, you verify the creation of the associated database
files by using Windows Explorer.
Tasks Detailed Steps
1.
Use Exchange System
Manager to create a storage
group on your server called
Second Storage Group.
a.
Switch to your_firstname's
Console
.
b.
Expand
Northwind Traders (Exchange)
,
Administrative Groups
,
and
First Administrative Group
.
c.
Expand
Servers
.
d.
Expand your_servername.
e.
Expand
Information Store
.
f.
Right-click
Information Store
, point to
New
, and then click
Storage
Group
.
g.
In the
Name
box, type
Second Storage Group
Note:
Notice how the transaction log location and system path locations are automatically created based on
your entry.
1.
(continued)
h.
Click
OK
.
Note:
Notice that the new storage group has been added below the information store.
2.
Use Exchange System
Manager to create a mailbox
store called
your_servername 2nd SG –
Mailbox Store.
a.
Right-click
Second Storage Group
, point to
New
, and then click
Mailbox Store
.
b.
In the
Mailbox store
name
box, type
your_servername
2nd SG –
Mailbox Store
c.
Next to
Default Public Store
, click
Browse
, click
Public Folder Store
your_servername, and then click
OK
.
d.
Click
OK
, and then click
Yes
to mount the database.
Note:
The server will automatically create the necessary files and after a few moments mount the mailbox
store.
# 0RGXOH#43=#0DQDJLQJ#WKH#([FKDQJH#5333#,QIRUPDWLRQ#6WRUH# # 4:#
Tasks Detailed Steps
2.
(continued)
e.
Click
OK
to close the information store message.
3.
Use Windows Explorer to
verify the creation of the
storage group and mailbox
database.
a.
On the desktop, right-click
My Computer
, and then click
Explore
.
b.
Expand
CDRIVE (C:)
.
c.
Expand
Exchsrvr
.
d.
Notice the folder called Second Storage Group.
e.
Click
Second Storage Group
.
Note:
Notice that the Second Storage Group contains the database files for the mailbox Store and the log
files for the storage group. By default Windows Explorer will display the files in icon view. You may find it
easier to view this window in details view.
Why are there two database files in the Second Storage Group folder? What is the purpose of the file that
does not have the .edb extension? To answer this question, you may need to configure Windows Explorer to
show the extension of known file types by clicking
Tools
, clicking
Folders Options
, and then clicking the
View
tab.
The .edb file is the Messaging Application Programming Interface (MAPI) store and maintains the
content for messages sent by using MAPI clients. The second file has an .stm extension and is the
Streaming Media Store; it contains the content for messages sent and received by using most Internet
protocols.
4;# # 0RGXOH#43=#0DQDJLQJ#WKH#([FKDQJH#5333#,QIRUPDWLRQ#6WRUH#
([HUFLVH#5##
0RYLQJ#<RXU#7HVW#8VHU·V#0DLOER[#WR#D#'LIIHUHQW#0DLOER[#6WRUH#
6FHQDULR#
To test the operation of the new mailbox store, you must have a test account with a mailbox that is
defined on that store. To minimize the test accounts that you create, you want to move the mailbox
of the account that you created in an earlier lab.
*RDO#
In this exercise, you will move the mailbox of the your_servername User account to the database
associated with the Second Storage Group.
Tasks Detailed Steps
1.
Use Active Directory Users
and Computers to move the
mailbox for
your_servername User to
your second mailbox store.
a.
Switch to your_firstname's
Console
.
b.
Expand
Active Directory Users and Computers
and
nwtraders.msft
.
c.
Click
Users
.
d.
In the details pane, right-click your_servername
User
and then click
Move Exchange Mailbox
.
e.
Verify that the mailbox store box is set to the mailbox store located in
Second Storage Group on your server.
f.
Click
OK
.
2.
Use Active Directory Users
and Computers to assign the
Administrator mailbox
permissions on the test
mailbox that you just
moved.
a.
In the console tree, click
Users
.
b.
Click
View
, and then verify that
Advanced Features
is enabled.
c.
In the details pane, right-click your_servername
User
, and then click
Properties
.
d.
Click the
Exchange Advanced
tab, and then click
Mailbox Rights
.
e.
Click
Add
.
f.
In the Name column, click your_username, click
Add
, and then click
OK
.
g.
Click your_username.
h.
In the
Permissions
box, allow the following permissions:
Read
permissions
,
Mailbox owner
,
Send as
, and then click
OK
.
i.
Click
OK
to close the
Properties
dialog box.
# 0RGXOH#43=#0DQDJLQJ#WKH#([FKDQJH#5333#,QIRUPDWLRQ#6WRUH# # 4<#
(continued)
Tasks Detailed Steps
3.
Create an Outlook profile to
log on to the newly created
account, and then log on.
a.
Exit and log off from Outlook.
b.
On the desktop, right-click
Microsoft Outlook
, and then click
Properties
.
c.
Click
Show Profiles
, and then click
Add
.
d.
In the
Use the following information services box
, click
Microsoft
Exchange Server
, and then click
Next
.
e.
In the
Profile Name
box, type your_servername
User
, and then click
Next
.
f.
In the
Microsoft Exchange
Server
box, type your_servername
g.
In the
Mailbox
box, type your_servername
User
and then click
Next
.
h.
Verify that the
Do you travel with this computer?
option is set to
No
,
and then click
Next
.
i.
Verify that Exchange Server and Outlook Address Book are listed as
information services, and then click
Finish
.
j.
In the
When starting Microsoft Outlook, use this profile
drop-down
box, click your_servername
User
.
k.
Click
Close
to close the window.
l.
On the desktop, double-click
Microsoft Outlook
, and then wait while
Outlook logs on to the server.
53# # 0RGXOH#43=#0DQDJLQJ#WKH#([FKDQJH#5333#,QIRUPDWLRQ#6WRUH#
([HUFLVH#6##
'LVPRXQWLQJ#D#6WRUH/#ZLWK#$FWLYH#8VHUV#RQ#2WKHU#6WRUHV/#WR#
3HUIRUP#DQ#2IIOLQH#%DFNXS#
6FHQDULR#
To determine the level of impact an offline store will have on an entire server, you want to test the
effects of dismounting a store while users with mailboxes on other stores are still logged on.
*RDO#
In this exercise, you will use Outlook to send a test message to your primary account to verify that
the store is functioning correctly. After this is verified, dismount the store that your primary account
is associated with, send a second message, and observe the functionality. Mount the store and
observe the results.
Tasks Detailed Steps
1.
Use Outlook to send a
message to your primary
account. Verify its delivery
by enabling a delivery
receipt and ensuring that the
message has left the Outbox
of your test account.
a.
On the Outlook toolbar, click
New
.
b.
Click
To
, and in the
Names
list, double-click your personal mail
account. (The account with the mailbox on the store in First Storage
Group).
c.
Click
OK
to close the
Select Names
dialog box.
d.
In the
Subject
box, type
Storage Group Test #1
e.
Click
Options
, and then click to enable the
Request a delivery receipt
for this message
check box.
f.
Click
Close
to close the window.
g.
Click
Send
and wait a few moments.
h.
Verify that the message has left your Outbox.
i.
Verify that you have received a delivery status notification in your Inbox.
2.
Use the Exchange System
Manager to dismount the
mailbox store in the First
Storage Group and make a
backup copy of the database
files to a different drive.
a.
Switch to the your_firstname's Console.
b.
Move to the First Storage Group on your server.
c.
Right-click
Mailbox Store
, point to
All Tasks
, and then click
Dismount
Store
.
d.
Click
Yes
to confirm your action.
Note:
Wait while the server dismounts the store. This may take a few minutes. When the store is
dismounted, the icon will change to reflect that the store is no longer mounted.
# 0RGXOH#43=#0DQDJLQJ#WKH#([FKDQJH#5333#,QIRUPDWLRQ#6WRUH# # 54#
(continued)
Tasks Detailed Steps
2.
(continued)
e.
On the desktop, right-click
My Computer
, and then click
Explore
.
f.
Expand
CDRIVE (C:)
, expand
Exchsrvr
, and then click
MDBDATA
.
g.
Copy the two PRIV1 files to another drive or directory to make an offline
backup of them.
Note:
It is always best to perform an online backup, even if you are backing up to a hard disk. The offline
backup is performed here for illustrative purposes only.
3.
Use Outlook to send mail to
your test account, or
alternatively have a partner
send you a message to verify
the operation of your test
mailbox store.
a.
Switch to Outlook.
b.
On the Outlook toolbar, click
New Message
.
c.
Click
To
, and then in the
Names
list, double-click your_servername
User
(the account whose mailbox is located on the mailbox store in
Second Storage Group).
d.
Click
OK
to close the window.
e.
In the
Subject
box, type
Storage Group Test #2
f.
Click
Send
and wait a few moments.
Note:
The message should be delivered to your own Inbox. This indicates that the store your mailbox is
associated with is functioning correctly.
4.
Use Outlook to attempt
sending a message to your
primary account while that
account’s mailbox store is
dismounted.
a.
On the Outlook toolbar, click
New
.
b.
Click
To
, and in the
Names
list, double-click your_username (the
account whose mailbox is located on the mailbox store in First Storage
Group).
c.
Click
OK
to close the
Select Names
dialog box.
d.
In the
Subject
box, type
Storage Group Test #3
e.
Click
Options
, and then select the
Request a delivery receipt for this
message
check box.
f.
Click
Close
to close the window.
g.
Click
Send
and wait a few moments.
Has the message left your Outbox?
No. The message should queue in the Outbox and be listed in italic type, much like if you had deferred
message delivery until a later time.
Note:
In the current build you will be unable to open the message while it is in the Outbox. If you attempt to
do this, Outlook will display an error message.