Tài liệu Excel 2010 part 16 pptx
Bạn đang xem bản rút gọn của tài liệu. Xem và tải ngay bản đầy đủ của tài liệu tại đây (988.59 KB, 10 trang )
150
22
33
11
2
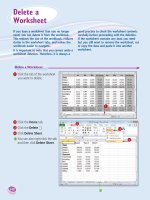
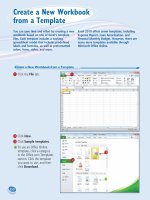
Click New.
3
Click Sample templates.
•
To use an Office Online
template, click a category
in the Office.com Templates
section. Click the template
you want to use, and then
click Download.
1
Click the File tab.
Create a New Workbook from a Template
You can save time and effort by creating a new
workbook based on one of Excel’s template
files. Each template includes a working
spreadsheet model that includes predefined
labels and formulas, as well as preformatted
colors, fonts, styles, and more.
Excel 2010 offers seven templates, including
Expense Report, Loan Amortization, and
Personal Monthly Budget. However, there are
many more templates available through
Microsoft Office Online.
Create a New Workbook
from a Template
10_577639-ch08.indd 15010_577639-ch08.indd 150 3/15/10 2:45 PM3/15/10 2:45 PM
151
Dealing with Excel Workbooks
CHAPTER
8
44
55
•
Excel creates the new
workbook and displays it
in the Excel window.
4
Click the template you want to
use.
•
A preview of the template
appears here.
5
Click Create.
Can I create my own template?
Yes. If you have a specific workbook structure
that you use frequently, you should save it as a
template so that you do not have to re-create the
same structure from scratch each time. Open the
workbook, click File, and then click Save As. In
the Save As dialog box, click the Save as type
and then click Excel Template. Type a File
name and then click Save. To use the template,
click File, click New, and then click My
Templates.
Can I create a new workbook based
on an existing workbook?
Yes. This is useful if you want to create a
new workbook that is the same or similar
to an existing file. Click File, click New,
and then click New from Existing. In the
New from Existing Workbook dialog box,
click the existing workbook and then click
Open.
10_577639-ch08.indd 15110_577639-ch08.indd 151 3/15/10 2:45 PM3/15/10 2:45 PM
152
22
33
44
11
55
1
Click the File tab.
2
Click Save ( ).
You can also click in the
Quick Access Toolbar, or you
can press
+ .
If you have saved the document
previously, your changes are
now preserved, and you can
skip the rest of these steps.
The Save As dialog box
appears.
If this is a new document that
you have never saved before,
the Save dialog box appears.
3
Click in the File name text box
and type the name that you
want to use for the document.
4
Select a folder in which to
store the file.
5
Click Save.
Excel saves the file.
Note: To learn how to save a
workbook in an older Excel
format, see Chapter 13.
Save a Workbook
After you create a workbook in Excel and make
changes to it, you can save the document to
preserve your work.
When you edit a workbook, Excel stores the
changes in your computer’s memory, which is
erased each time you shut down your
computer. Saving the document preserves your
changes on your computer’s hard drive, so to
avoid losing your work, you should save a
workbook as often as is practical.
Save a
Workbook
10_577639-ch08.indd 15210_577639-ch08.indd 152 3/15/10 2:45 PM3/15/10 2:45 PM
153
CHAPTER
8
22
33
11
55
44
The Open dialog box appears.
3
Select the folder that contains
the workbook you want to
open.
4
Click the workbook.
5
Click Open.
The workbook appears in a
window.
1
Click the File tab.
•
You can click Recent to see
a list of your recently used
workbooks. If you see the file
you want, click it and then skip
the rest of these steps.
2
Click Open ( ).
You can also press + .
Open a Workbook
To view or make changes to an Excel workbook
that you have saved in the past, you can open
the workbook in Excel.
If you have used the workbook recently, you
can save time by opening the workbook from
Excel’s Recent menu, which displays the most
recent 22 files you worked with in Excel.
Open a
Workbook
10_577639-ch08.indd 15310_577639-ch08.indd 153 3/15/10 2:45 PM3/15/10 2:45 PM
154
22
33
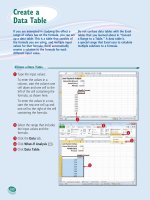
3
Click Arrange All ( ).
The Arrange Windows dialog
box appears.
1
Open the workbooks you want
to view.
2
Click the View tab.
Arrange Workbook Windows
You can view two or more workbooks at once
by arranging the workbook windows within the
main Excel window. This enables you to easily
compare the contents of the workbooks.
Arranging workbook windows also enables you
to more easily copy or move data among
workbooks.
Excel offers four view modes for arranging
workbook windows: Tiled, Horizontal, Vertical,
and Cascade.
Arrange Workbook
Windows
10_577639-ch08.indd 15410_577639-ch08.indd 154 3/15/10 2:45 PM3/15/10 2:45 PM