Wile Adobe dreamweaver CS5 Bible phần 10 ppt
Bạn đang xem bản rút gọn của tài liệu. Xem và tải ngay bản đầy đủ của tài liệu tại đây (6.32 MB, 132 trang )
1178
Part VII: Extending Dreamweaver
Caution
Adobe strongly cautions programmers against using documentEdited() and selectionChanged()
unless these functions are absolutely necessary. Because they constantly monitor the document, both func-
tions can have an adverse effect on performance if implemented. Adobe suggests that programmers incor-
porate the setTimeout() method to temporarily pause these functions so that the user can continue to
interact with the program.
n
Within the Dreamweaver API are two pairs of methods and a single function that relate
L
to floating panels as follows:getHideAllFloaters(): Reads the state of the Show/
Hide Floating Panel menu option to determine if all floating panels should be hidden
(
true) or shown (false)
setHideAllFloaters()
L
: Sets the Show/Hide Floating panel to a particular state, to
Hide (
true) or Show (false)
getFloaterVisibility(floaterName)
L
: Reads whether the given floating panel is
currently displayed and frontmost (
true) or hidden (false)
setFloaterVisibility(floaterName,isVisible)
L
: Brings the named floating
panel forward if the
isVisible argument is true
toggleFloater(floaterName)
L
: Toggles the visibility state of the given floating panel
between hiding and bringing to the front
Floating panels have a great deal of potential with their flexible interface and constant onscreen
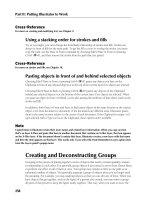
presence. The example shown in Figure 33-7, PalettePicker from WebAssist, interfaces with
Adobe Kuler to access color themes.
Figure33-7
The custom floater, PalettePicker by WebAssist, displays color themes created for Adobe Kuler.
1179
Chapter 33: Customizing Dreamweaver
Developing Translators
For any markup tag to be depicted in the Document window — whether it’s <b> for bold or a cus-
tom third-party tag such as Tango’s
<@cols> — it must be translated. Dreamweaver’s built-in ren-
dering system translates all the standard HTML code, along with a few special custom tags such as
those for ASP and ColdFusion. However, to display any other custom tags, or those that perform
special functions such as server-side includes, the tag developer must build a custom translator.
As part of its expansion efforts, Dreamweaver supports custom translators. This enhancement
enables programs that output nonstandard HTML to be displayed onscreen integrated with the regu-
lar code. One of Dreamweaver’s main claims to fame is its capability to accept code without rewriting
it. With Dreamweaver translators, you can visually insert, show, and edit your custom code.
Here’s a brief overview of how translators work:
1. When Dreamweaver starts, all the properly coded translators in the Dreamweaver CS5\
Configuration\Translators folder are initialized.
2. If a document is loaded with nonstandard HTML, the code is checked against the
installed translators.
3. The translators are enabled.
Note
With the exception of the SSI translator, all translators are automatically active all the time — no preference
setting determines their availability.
n
4. The code is processed with the translator and temporarily converted to a format accept-
able to Dreamweaver.
5. Dreamweaver renders the code onscreen.
6. If a change is made to the page, Dreamweaver retranslates the document and refreshes
the screen.
7. When the page is saved, the temporary translation is discarded, and the original code,
with any modifications, is stored.
Developers continue to break new ground with the use of translators. Some translators that have
been developed so far include those for the following:
Server-side includes:
L
Standard with Dreamweaver, the SSI translator effortlessly
inserts, at design time, files that you normally don’t see until delivered by the Web
server. (To learn more about SSI, see Chapter 29.)
XSSI:
L
The Extended Server-Side Include (XSSI) extension, developed by Webmonkey
authors Alx Ladygo, Nadav Savio, and Taylor for Adobe, includes a translator that brings
the Apache-served code right into the Document window.
Tango:
L
Developed by Pervasive Software, the Tango translator compensates for dif-
ferences between database-oriented code and standard HTML. Additionally, Tango
includes a manually controlled Sample Data translator that enables the Web designer
to view the page complete with an example database.
1180
Part VII: Extending Dreamweaver
Translator functions
Like other Dreamweaver extensions, such as behaviors and commands, translators are HTML
files with JavaScript. Translators have no user interface. Other than deciding when to invoke it,
you have no parameters to set or options from which to choose. All the pertinent code is in a
script located in the
<head> of the translator, which, along with any necessary support routines,
includes two essential JavaScript functions:
getTranslatorInfo() and translateMarkup().
Any other Dreamweaver JavaScript API functions not specific to behaviors can be used in a trans-
lator as well.
Note
Because of the limitations of JavaScript, much of the heart of custom translation is handled by specially writ-
ten C-level extensions. These compiled code libraries enhance Dreamweaver’s capabilities so that new data
types can be integrated. C-level extensions are covered in the “Extending C-Level Libraries” section later in
this chapter.
n
The getTranslatorInfo() function
The getTranslatorInfo() function simply sets up and returns an array of text strings that are
read by Dreamweaver during initialization.
The structure of the array is relatively rigid. The number of array elements is specified when the
Array variable is declared, and a particular text string must correspond to the proper array ele-
ment. The array order is as follows:
translatorClass:
L
The translator’s unique name used in JavaScript functions. The name
has to begin with a letter and can contain alphanumeric characters as well as hyphens
or underscores.
title:
L
The title listed in the menu and the Translation category. This text string can be
no longer than 40 characters.
nExtensions:
L
The number of file extensions, such as .cfml, to follow. This declaration
tells Dreamweaver how to read the next portion of the array. If this value is set to
0, all
files are acceptable.
extension:
L
The actual file extension without the leading period.
nRegExps:
L
The number of regular expressions to be declared. Should this value be
equal to
0, the array is closed.
RegExps:
L
The regular expression to be searched for by Dreamweaver.
runDefault:
L
Specifies when the translator executes (always, never, or conditionally).
1181
Chapter 33: Customizing Dreamweaver
The number of array elements — and thus, the detail of the function — depends entirely on the
translator. Here, for example, is the code for
getTranslatorInfo() from Live Picture’s transla-
tor, where a file must have a particular
<meta> tag to be translated:
function getTranslatorInfo(){
returnArray = new Array( 5 );
returnArray[0] = “FPX”; // translatorClass
returnArray[1] = “Flashpix Image Translator”; // title
returnArray[2] = “0”; // number of extensions
returnArray[3] = “1”; // number of expressions
returnArray[4] = “<meta http-equiv=\”refresh\” content=\”0;url=http://”;
return returnArray;
}
By comparison, the standard SSI translator’s getTranslatorInfo() function has 10 array ele-
ments, and Webmonkey’s XSSI has 17.
The translateMarkup() function
Although the getTranslatorInfo() function initializes the translator, the translateMarkup()
function actually does the work. As noted earlier, most translators rely on a custom C-level
extension to handle the inner workings of the function, but
translateMarkup() provides the
JavaScript shell.
The
translateMarkup() function takes three arguments, which must be declared, but whose
actual values are provided by Dreamweaver:
docName
L
: The file URL for the file to be translated.
siteRoot
L
: The site root of the file to be translated. Should the file be outside the cur-
rent site, the value would be empty.
docContent
L
: A text string with the code for the page to be translated.
Typically, the docContent text string is parsed using either JavaScript or a C-level extension
within the
translateMarkup() function that returns the translated document. Dreamweaver
then displays this translated document.
Here’s an excerpt of the
translateMarkup() function from the ColdFusion translator:
function translateMarkup(docNameStr, siteRootStr, inStr) {
var outStr = “”;
// translate
if (inStr.indexOf(“<cf”) != -1 || inStr.indexOf(“<CF”) != -1) {
var TM =
new TranslationManager(TRANSLATOR_CLASS, SERVER_MODEL_FOLDER, “”);
TM.serverModelAlwaysCheckTag = myAlwaysCheckTag;
TM.serverModelAlwaysCheckAttribute = myAlwaysCheckAttribute;
1182
Part VII: Extending Dreamweaver
var split = TranslationManager.splitBody(inStr);
outStr = TM.translate(split.inStr);
if (outStr != “”)
outStr = split.preInStr + outStr + split.postInStr;
}
return outStr;
}
In this example, notice that the translated document in the form of outStr is built by creating
a
TranslationManager object named TM and then calling this object’s translate() method:
TM.translate(split.inStr).
Locking code
Translations are generally intended for onscreen presentation only. Although there’s no rule pro-
hibiting translated content from being written out to disk, most applications need the original
content to run. To protect the original content, Dreamweaver includes a special locking tag. This
XML tag pair,
<MM:BeginLock> <MM:EndLock>, stops the enclosed content (the translation)
from being edited, while simultaneously storing a copy of the original content in a special format.
The
<MM:BeginLock> tag has several attributes:
translatorClass
L
: The identifying name of the translator as specified in
getTranslatorInfo().
type
L
: The type or tag name for the markup to be translated.
depFiles
L
: A comma-separated list of any files on which the locked content depends. If
any of these dependent files are altered, the page is retranslated.
orig
L
: A text string with the original markup before translation. The text string is
encoded to include four standard HTML characters:
<
L
becomes %3C;
>
L
becomes %3E;
“
L
becomes %22;
%
L
becomes %25;
To see how the special locking tag works, look at an example taken from the Tango Sample
Data translator. Tango uses what are called meta tags, which begin with an @ sign, such as the
<@TOTALROWS> tag. The Tango Sample Data translator replaces a result drawn from a database
with a specified sample value. The original code is:
<@TOTALROWS samptotalrows=23>
1183
Chapter 33: Customizing Dreamweaver
After the code is translated, Dreamweaver refreshes the screen with the following code:
<MM:BeginLock translatorClass=”TANGO_SAMPLEDATA” type =”@TOTALROWS”
orig=”%3C@TOTALROWS samptotalrows=23%3E”>23<MM:EndLock>
The 23 in bold is the actual translated content that appears in Dreamweaver’s Document window.
Note
You don’t actually see the locking code, even if you open the Code inspector when a page is translated. To
view the code, select the translated item, copy it, and then paste it in another text application, or use the
Paste As HTML feature to see the results in Dreamweaver.
n
Extending C-Level Libraries
All programs have their limits. Most limitations are intentional and serve to focus the tool for
a particular use. Some limitations are accepted because of programming budgets — for both
money and time — with the hope that the boundaries can be exceeded in the next version.
With Dreamweaver, one small section of those high, sharply defined walls has been replaced
with a doorway: C-level extensions. With the proper programming acumen, you can customize
Dreamweaver to add the capabilities you need.
As with most modern computer programs, the core of Dreamweaver is coded in C and C++, both
low-level languages that execute much faster than any noncompiled language, such as JavaScript.
Because C is a compiled language, you can’t just drop in a function with a few lines of code and
expect it to work — it has to be integrated into the program. The only possible way to add sig-
nificant functionality is through another compiled component called a library. With the C-level
extensions capability, Dreamweaver enables the incorporation of these libraries, known as DLLs
(Dynamic Link Libraries) on Windows systems and as CFMs (Code Fragment Managers) on
Macintosh systems.
One excellent example of the extended library is
DWfile. This C-level extension is used by sev-
eral Dreamweaver partners, including RealNetworks and iCat, to perform tasks outside the capa-
bilities of JavaScript — namely, reading and writing external text files. By adding that one library,
Dreamweaver can now work with the support files necessary to power a wide range of associated
programs.
DWfile is described in detail in the following section.
C-level extensions are also used in combination with Dreamweaver’s translator feature. As dis-
cussed earlier in this chapter, translators handle the chore of temporarily converting nonstandard
code to HTML that Dreamweaver can present onscreen — while maintaining the original code
in the file. Much of this functionality isn’t impossible for JavaScript; the conversion would be too
slow to be effective. C-level extensions are definitely the way to go when looking for a powerful
solution.
1184
Part VII: Extending Dreamweaver
Note
A discussion of programming in C or C++, as required by C-level extensions, is beyond the scope of this book.
Developers are encouraged to scour the Dreamweaver Support Center for relevant information: www.adobe
.com/support/dreamweaver/.
n
Calling C-level extensions
C-level extensions, properly stored in the Dreamweaver CS5\Configuration\JSExtensions folder,
are read into Dreamweaver during initialization when the program first starts. The routines
contained within the custom libraries are accessed through JavaScript functions in commands,
behaviors, objects, translators, and other Dreamweaver extensions.
Take a look at how Adobe’s C-level extension
DWfile is used. DWfile has 14 main functions:
copy()
L
: Copies a file from one file URL (the first argument) to another (the second
argument).
DWfile.copy() can be used to copy any type of file, not just text files.
createFolder()
L
: Creates a folder, given a file URL.
listFolder()
L
: Lists the contents of a specified folder in an array. This function takes
two arguments: the file URL of the desired folder (required) and a keyword, either
“files” (which returns just filenames) or “directories” (which returns just direc-
tory names). If the keyword argument is not used, you get both files and directories.
exists()
L
: Checks to see if a specified filename exists. This function takes one argu-
ment, the filename.
getAttributes()
L
: Returns the attributes of a specified file or folder. Possible attri-
butes are
R (read-only), D (directory), H (hidden), and S (system file or folder).
setAttributes()
L
: Sets the attributes of a specified file.
getCreationDate()
L
: Returns the date when the file was initially created.
getCreationDateObj()
L
: Returns the JavaScript object that represents the date when
the file was initially created.
getModificationDate()
L
: Returns the date a specified file or folder was last modified.
getModificationDateObj()
L
: Returns the JavaScript object that represents the date a
specified file or folder was last modified.
getSize()
L
: Gets the size of a specified file.
read()
L
: Reads a text file into a string for examination. This function also takes one
argument, the filename.
write()
L
: Outputs a string to a text file. This function has three arguments; the first
two — the name of the file to be created and the string to be written — are required.
The third, the mode, must be the word
append. This argument, if used, causes the
string to be added to the end of the existing text file; otherwise, the file is overwritten.
remove()
L
: Places the referenced file in the Recycling Bin (Windows) or Trash
(Macintosh) without requesting confirmation.
1185
Chapter 33: Customizing Dreamweaver
The following JavaScript function, which could be included in any Dreamweaver extension, uses
DWfile to determine whether theFile, named in a passed argument, exists. If it does, the con-
tents are read and presented in an alert box; if
theFile doesn’t exist, the function creates it and
outputs a brief message.
function fileWork(theFile) {
var isFile = DWfile.exists(theFile); // does theFile exist?
if (isFile) {
alert(DWfile.read(theFile)); // yes: display it in an alert box
}
else { // no: create it and display msg
DWfile.write(theFile,”File Created by DWfile”);
}
}
Note how the C-level extension name, DWfile, is used to call the library and its internal func-
tions. After the library has been initialized, it can be addressed as any other internal function,
and its routines are simply called as methods of the function using JavaScript dot notation, such
as
DWfile.exists(theFile).
Building C-level extensions
You must follow strict guidelines to enable Dreamweaver to recognize a C-level extension.
Specifically, you must include two files in the library, and you must declare each function for cor-
rect interpretation by Dreamweaver’s JavaScript interpreter.
Adobe engineers have developed a C-Level Extension API in the form of a C header,
mm_jsapi.h,
that contains definitions for more than 20 data types and functions. To insert
mm_jsapi.h in
your custom library, add the following statement:
#include “mm_jsapi.h”
Tip
You can find the latest version of mm_jsapi.h on the Dreamweaver Exchange, which you can get to by
choosing Help
➪ Dreamweaver Exchange in Dreamweaver or by loading the URL www.adobe.com/
exchange/dreamweaver in your browser.
n
After you’ve included the JavaScript API header, you declare a specific macro, MM_STATE. This
macro, contained within the
mm_jsapi.h header, holds definitions necessary for the integration of
the C-level extension into Dreamweaver’s JavaScript API. You must define
MM_STATE only once.
Each library can be composed of numerous functions available to be called from within
Dreamweaver. For Dreamweaver’s JavaScript interpreter to recognize the functions, each one
must be declared in a special function,
JS_DefineFunction(), defined in the library. All
the
JS_DefineFunction() functions are contained in the MM_Init() function. The syntax
for
JS_DefineFunction() is as follows:
JS_DefineFunction(jsName, call, nArgs)
1186
Part VII: Extending Dreamweaver
where jsName is the JavaScript name for the function, call is a pointer to a C-level function,
and
nArgs is the number of arguments that the function can expect. For example, the MM_
Init()
function for DWfile might appear as follows:
void
MM_Init() {
JS_DefineFunction(“exist”, exist, 1);
JS_DefineFunction(“read”, exist, 1);
JS_DefineFunction(“write”, exist, 2);
}
Because MM_Init() depends on definitions included in the C header mm_jsapi.h, it must be
called after the header is included.
Tip
If you’re building cross-platform C-level extensions, consider using Metrowerks’ CodeWarrior integrated
development environment. CodeWarrior can edit, compile, and debug C, C++, and even Java or Pascal
for both Windows and Macintosh operating systems. Perhaps most important, Adobe engineers used
CodeWarrior to test C-level extensions.
n
Customizing Your Tag Libraries
Previous versions of Dreamweaver required you to manually edit the sourceformat.txt
file to change code formatting, including tag case, attributes, indentation, and line wrapping.
Dreamweaver gives you a well-designed dialog box called the Tag Library editor to make all those
changes for you. You can use that editor to customize every single tag you place in Dreamweaver,
and you can even add additional tags if you’re using a proprietary server or design XML files with
commonly used tag sets.
All tag-related attributes and color code settings are stored in a tag database (the Tag Library),
which is manipulated through the Tag Library Editor. Click the Tag Library Editor link in
Preferences or choose Edit ➪ Tag Libraries.
Editing tag libraries, tags, and attributes
To edit the properties for a tag library, follow these steps:
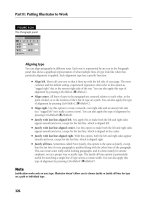
1. Choose Edit ➪ Tag Libraries to open the Tag Library Editor dialog box, and select the
tag library whose properties you want to set, as shown in Figure 33-8.
2. In the Used In list box, choose every type of document that should use the selected
tag library. Note that the tags in the selected library are available only in the document
types you’ve chosen.
1187
Chapter 33: Customizing Dreamweaver
Figure33-8
You use the Tag Library Editor to customize Dreamweaver’s tag libraries.
3. If the tags in the selected tag library require a prefix, enter this prefix in the Tag Prefix
field. The Tag Prefix box enables you to add a prefix to the beginning of every tag in that
particular library. For example, if you developed a tag library for XSL documents, you
add
xsl: as the tag prefix to add the prefix to the beginning of every tag.
4. When you are finished, click OK to close the Tag Library Editor dialog box.
To edit a tag in a tag library, follow these steps:
1. Choose Edit ➪ Tag Libraries. In the Tag Library Editor dialog box, open a tag library
and select the tag you want to edit.
2. Set your desired Tag Format options:
Line Breaks:
L
Changing the line breaks option changes where Dreamweaver places
line breaks in your code. Choose between four options: No Line Breaks; Before And
After Tag; Before, Inside, After; and After Tag Only. This option is great for prevent-
ing line breaks after
<td> tags and before </td> tags to ensure that no unwanted
whitespace shows up in your code.
1188
Part VII: Extending Dreamweaver
Contents:
L
This setting affects how the content inside your tags is formatted. The
indentation settings are based on your code format preferences. Choose between Not
Formatted, Formatted But Not Indented, and Formatted And Indented.
Case:
L
The case settings affect how the tag and its attributes are capitalized. XHTML,
for example, requires that everything be lowercase. Options are Default, Lowercase,
Uppercase, and Mixed Case. Choosing Mixed Case gives you a prompt to type in
exactly how you want the tag to appear. Clicking Set Default enables you to set the
default for all tags, which is the same as changing your tag case preferences in Edit ➪
Preferences ➪ Code Format (Dreamweaver ➪ Preferences ➪ Code Format).
The Preview area below the Tag Format options enables you to see exactly how your tag
will be written to the page.
Tip
I recommend setting your default case to lowercase to comply with XML/XHTML standards.
n
To edit an attribute for a tag, follow these steps:
1. Choose Edit ➪ Tag Libraries. In the Tag Library Editor dialog box, open a tag library
and select the attribute you want to edit.
2. Set your desired attribute options:
Attribute Case:
L
This option sets the case of your attribute. Attribute Case is com-
pletely independent of the tag. Options are Default, Lowercase, Uppercase, or Mixed
Case. Choosing Mixed Case enables you to enter exactly how you want the attribute
formatted. Clicking Set Default alerts you to return to the Code Format category of
Preferences.
Attribute Type:
L
There are ten different attribute types for your tag — Text,
Enumerated, Color, Directory, File Name, File Path, Flag, Font, Relative Path, and
Style. Setting the type affects how Dreamweaver asks for information when using
Code Hints in Code view or the Quick Tag Editor. Choosing Color for an attribute
causes a color palette to appear if you add the attribute in Code view. Setting the
Type to Relative Path gives you a Select File dialog box.
Values:
L
The Values field is used only for the enumerated attribute type and gives you
a list of valid values for a particular attribute.
3. Click OK.
Creating and deleting tag libraries, tags,
and attributes
The following sets of steps show you how to create a new tag library, add a tag to an existing
library, or add an attribute to an existing tag.
1189
Chapter 33: Customizing Dreamweaver
To add a new tag library, follow these steps:
1. Choose Edit ➪ Tag Libraries.
2. Click the Add (+) button and choose New Tag Library.
3. Enter a name for your new tag library and click OK.
4. Your new tag library is now shown at the bottom of the list. You’re ready to start adding
new tags.
To add new tags to one of your tag libraries, follow these steps:
1. Choose Edit ➪ Tag Libraries.
2. Click the Add (+) button and choose New Tags.
3. Choose the Tag Library to add to in the list menu.
4. Enter one or more tags to add. To add several tags at one time, simply enter a comma-
separated list of tags into the dialog. This method enables you to add a large number of
tags very quickly.
5. Choose whether your tag requires matching end tags. Choosing matching end tags gives
you tags like
<a>text</a>. Choosing not to have matching end tags gives you tags like
<br> and <img>.
To add a new attribute to an existing tag, follow these steps:
1. Choose Edit ➪ Tag Libraries.
2. Click the Add (+) button and choose New Attributes.
3. Choose the Tag Library that contains the tag you want to add attributes to from the first
list menu.
4. Choose the tag you want to add attributes to from the second list menu.
5. Enter one or more attributes to add. If you want to add several attributes at one time,
simply enter a comma-separated list of attributes into the dialog. This enables you to
add a large number of attributes very quickly.
To delete a tag library, tag, or attribute, follow these steps:
1. Choose Edit ➪ Tag Libraries.
2. In the Tag Library Editor dialog box, select the tag library, tag, or attribute you want to
delete.
3. Click the Remove (–) button. If you are asked to confirm the deletion, do so.
4. To make your deletions permanent, click OK. To discard your deletions, click Cancel.
1190
Part VII: Extending Dreamweaver
Caution
After you click that OK button, your deletions are permanent. You cannot undo them, so ponder deeply
before clicking that mouse or you could be forced to reinstall!
n
Importing a DTD or schema to create a new tag library
Dreamweaver enables you to create a new tag library by importing tags from an existing XML
Document Type Definition (DTD) file or schema. In many instances, you may want to add a
new tag library. If you’re working on a proprietary server or a language that’s not supported by
Dreamweaver, you can add all the necessary tags into a new tag library.
To create a new tag library by importing a DTD file or schema, follow these steps:
1. Choose Edit ➪ Tag Libraries.
2. In the Tag Library Editor dialog box, click the Add (+) button and choose DTDSchema ➪
Import XML DTD or Schema File.
3. In the File Or Remote URL field, enter the file or URL of the DTD or schema file.
4. In the Tag Prefix field, enter the prefix to be used with the tags you’re importing, to
identify the tags as part of this tag library.
5. When you’re finished, click OK to create your new tag library.
Summary
Dreamweaver’s commitment to professional Web site authoring is most evident when you exam-
ine the program’s customization capabilities. Virtually every Web site production house can
benefit from some degree of personalization — and some clients absolutely require it. As you
examine the ways in which you can make your productive life easier by extending Dreamweaver,
keep the following points in mind:
Dreamweaver includes a full range of customizable features: objects, behaviors, com-
L
mands, third-party tags, Property inspectors, and translators. You can even extend the
program’s core feature set with the C-Level Extensibility option.
You can use commands to affect any part of your HTML page and automate repeti-
L
tive tasks.
In addition to accessing custom commands through the Commands menu, you can con-
L
figure them as objects for inclusion in the Insert panel. You can also make a command
appear in any other standard Dreamweaver menu by altering the
menus.xml file.
To make it easy to work with XML and other non-HTML tags, Dreamweaver enables
L
you to create custom tags complete with individual icons or highlighted content.
1191
Chapter 33: Customizing Dreamweaver
Attributes for third-party tags are viewable — and modifiable — by creating a custom
L
Property inspector.
Dreamweaver’s C-Level Extensibility feature enables C and C++ programmers to add
L
new core functionality to a program.
Tags from server-side applications can be viewed in the Document window, just as they
L
can be when browsed online, when a custom translator is used. A custom translator
often requires a C-level extension.
You can use the Tag Library Editor to customize your Dreamweaver tag libraries.
L
In the next chapter, you learn how to create and use Dreamweaver server behaviors.
1193
Handling
Server Behaviors
IN THIS CHAPTER
Using server behaviors
Altering applied server
behaviors
Working with Dreamweaver’s
server behaviors
Adding new server behaviors
Crafting custom server
behaviors
S
erver behaviors are the heart of Dreamweaver, the essential engine
that puts the dynamic in dynamic Web applications. Server behaviors
insert server-model–specific code that handles everything from dis-
playing dynamic data to authenticating users. Even the basic data source
connection and the establishment of a recordset are, in reality, server
behaviors. Without server behaviors, no dynamic capabilities would be
possible in Dreamweaver.
Server behaviors are valuable for novices and veteran coders alike. They
enable designers who have never heard of an ASP Request collection to gather
information from a form — a procedure that utilizes the ASP Request
collection — with point-and-click ease. Even serious code jockeys can
appreciate the productivity potential of server behaviors, especially the
capability to create their own. With the Server Behavior Builder, program-
mers can build a library of their custom functions, complete with fully
functional dialog boxes for maximum flexibility. After these functions are
crafted, you can drop any of the custom server behaviors directly onto the
page — and, if need be, easily alter the parameters.
This chapter includes an overview of server behaviors as well as basic infor-
mation about their use and management. For your reference, you also find a
detailed description of each of the standard Dreamweaver server behaviors.
Finally, you look at ways to extend Dreamweaver’s core functionality with
the Server Behavior Builder.
1194
Part VII: Extending Dreamweaver
Understanding Server Behaviors
In contrast to Dreamweaver’s JavaScript behaviors — with their numerous required functions
and many more optional ones — a server behavior may be as simple as one line of code. The dif-
ference, and it’s a key one, is that the code is intended to be executed by the application server,
not the browser.
Another difference between server behaviors and JavaScript behaviors is that server behavior
code may exist outside the bounds of the HTML page. Any page with a recordset has a section of
code before the opening
<html> tag, and a smaller block of code after the closing </html> tag.
Dreamweaver automatically places the code in the proper place — and code placement is very
important on the server side — when any of its standard server behaviors are used. Dreamweaver
includes more than 25 standard server behaviors; the exact number varies for each server model.
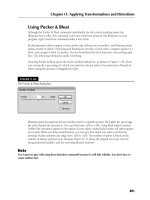
Figure 34-1 displays the available server behaviors for ASP.
Figure34-1
Apply any server behavior from the Server Behaviors panel.
1195
Chapter 34: Handling Server Behaviors
The Server Behaviors panel is the focal point for inserting, removing, and managing server
behaviors. Unlike the Behaviors panel, which displays only the JavaScript behaviors attached
to the selected tag, the Server Behaviors panel displays all the server behaviors included in the
current page, in the order in which they were applied. Selecting a specific server behavior listed
in the Server Behaviors panel highlights the attached page element, if visible in the Document
window. Some server behaviors, such as Recordset, have their own Property inspector, whereas
others display dynamic code as an attribute in a text or other Property inspector.
Although the simplest server behaviors can insert code without any additional user input, each
built-in server behavior has a dialog box for specifying parameters. These vary in complexity
from a single drop-down list to multiple-section dialog boxes with every type of input element
available. As you learn in the next section, after you have inserted a server behavior, you can eas-
ily modify its parameters.
Applying and Managing Server Behaviors
If you have ever completed any Web applications in Dreamweaver, you’ve likely already discov-
ered how to apply and update a server behavior. The Server Behaviors panel is the primary tool
for inserting, modifying, and removing server behaviors. You can display the Server Behaviors
panel in several ways:
Choose Window
L
➪ Server Behaviors.
Select the Server Behaviors tab from the Application panel.
L
Use the keyboard shortcut, Ctrl+F9 (Command+F9).
L
The Server Behaviors panel remains available regardless of whether you are in Design view, Code
view, or the split-screen Code and Design view.
Inserting and removing server behaviors
To add a particular server behavior to your page, click the Add (+) button in the Server Behaviors
panel and select the desired behavior from the list. Many of the server behaviors have prerequisites —
such as a recordset, form, or selected element — that must be in place before they can be installed,
but these requirements vary from server behavior to server behavior. If you attempt to insert a server
behavior and some precondition has not been met, Dreamweaver alerts you to the missing element;
you are prevented from inserting the server behavior until all the required pieces are in place.
After you select the server behavior from the Add drop-down list, a dialog box appears to enable
you to select or enter the needed parameters. Each dialog box is specific to the chosen server
behavior, and they vary widely in terms of parameters offered and complexity. For information
about a specific server behavior, see the corresponding section for that server behavior later in
this chapter. Each section provides step-by-step explanations about completing the pertinent
dialog box.
1196
Part VII: Extending Dreamweaver
Removing an existing server behavior is simple. Select the entry for the server behavior in the
Server Behaviors panel and click the Remove (–) button. Dreamweaver immediately removes all
the associated code without requesting confirmation.
Caution
With JavaScript behaviors, if you delete a page element that has a client-side behavior attached, you automat-
ically delete that behavior. This is not always the case with server behaviors, and it’s best to always use the
Server Behaviors panel’s Remove (–) button before deleting any associated text, graphics, or form elements.
n
Editing the parameters
To modify the attributes or parameters of an inserted server behavior, double-click its entry
in the Server Behaviors panel. You can differentiate between multiple applications of the same
server behavior in two ways. First, the entry for each server behavior lists one or two of its key
attributes in parentheses. For example, a Dynamic Text server behavior applied to the
LastName
column in the
rsMaillist recordset is displayed as follows:
Dynamic Text(rsMaillist.LastName)
Second, you can tell which server behavior is associated with which page element by select-
ing the server behavior — the associated text, graphic, or other page element is also selected in
Design or Code view.
When the dialog box for a server behavior reopens, you can alter any of the parameters that
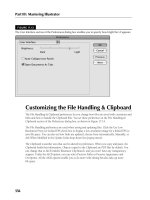
remain active. In some situations, as with the Go To Detail Page server behavior shown in
Figure 34-2, one or more fields may be disabled and so rendered unable to be changed. If you
need to alter a disabled parameter, delete the server behavior and reapply it.
Figure34-2
When modifying certain server behaviors, some fields, such as the Link field in this Go To Detail Page dia-
log box, are disabled and cannot be changed.
1197
Chapter 34: Handling Server Behaviors
Standard Server Behaviors
Dreamweaver ships with more than 25 server behaviors, and it offers the option to add many
more. The default server behaviors are geared toward handling basic Web application tasks such
as repeating an area and inserting records in a data source.
In the following sections, each server behavior is briefly described, along with any prerequisites.
Step-by-step instructions for including the server behavior are provided; for more contextual
information on using the particular server behavior, see the cross-referenced chapter.
Recordset (Query)
To create a simple recordset, follow these steps:
1. From the Server Behaviors panel, click the Add (+) button and choose Recordset (Query)
from the drop-down list. The Recordset dialog box, shown in Figure 34-3, is displayed.
Figure34-3
You can add recordsets from either the Server Behaviors panel or the Bindings panel through two different
dialogs; the Simple Recordset dialog is shown here.
2. In the Recordset dialog box, enter an identifying label for your recordset in the Name
field. It’s considered good practice to prefix your recordset name with
rs — as in rsDBA.
This prefix quickly identifies the recordset in the code.
3. Select a connection from the drop-down list of that name.
4. If the desired connection has not been declared, click Define to open the Connections
dialog box. After a connection has been selected, the available tables are shown.
1198
Part VII: Extending Dreamweaver
5. Select a table to work with from the Tables drop-down list. The chosen table’s fields are
displayed in the Columns list.
6. By default, all the columns are included in the recordset. To specify certain columns,
choose the Selected option and select any desired field. Shift+click to select contiguous
columns, and Ctrl+click (Command+click) to select noncontiguous columns.
7. By default, all the records in the selected columns are available. To limit the recordset
further, use the four Filter drop-down lists as follows:
Choose the field on which you want to base your filter from the first drop-down list.
L
This list changes dynamically according to which table you’ve selected.
From the second drop-down list, select the expression with which to compare the
L
data from the selected column in the first drop-down list. Available expressions are
=, >, <, >=, <=, <>, Begins With, Ends With, and Contains.
Choose the type of value to compare to the selected field from the third drop-down
L
list. Available types are URL Parameter, Form Variable, Cookie, Session Variable,
Application Variable, and Entered Value.
In the fourth input field, enter the value to compare to the selected field. Values
L
entered are not case-sensitive.
8. To sort the data, select a column from the first drop-down list under Sort and choose
either Ascending or Descending from the second list.
9. At any time, you can see what results will be returned for the recordset by clicking Test.
Tip
To see how your simple recordset translates into SQL, click the Advanced button. You can return to the origi-
nal dialog box by clicking Simple on the advanced Recordset dialog box.
n
10. Click OK when you’re finished.
Cross-Reference
For more information on defining recordsets, see Chapter 18.
n
Repeat Region
The Repeat Region server behavior replicates a selected page area as many times as specified. If the
Repeat Region surrounds dynamic data, the record pointer advances for each repetition. A tab
and highlight note the boundaries of the Repeat Region when the Invisible Elements option
is enabled.
Requirements: One or more selected page elements, such as a table row or a line ending
in a line break tag (
<br>).
1199
Chapter 34: Handling Server Behaviors
To implement a Repeat Region, follow these steps:
1. Select the dynamic data and the surrounding code you’d like to repeat.
2. From the Server Behaviors panel, click the Add (+) button and select Repeat Region
from the list.
The Repeat Region dialog box, shown in Figure 34-4, appears.
Figure34-4
With the Repeat Region server behavior, you can show some or all of the records in the chosen recordset.
3. From the Repeat Region dialog box, choose the recordset you want to work with from
the Recordset list.
4. If you want to display a subset of the recordset, enter the number of records you’d like
to display in the Show Records field.
5. If you want every record in the recordset to be displayed, choose the Show All Records
option.
6. Click OK when you’re done.
Cross-Reference
For more information on the Repeat Region server behavior, see Chapter 20.
n
Recordset Paging
The Recordset Paging server behaviors move the record pointer to the indicated data record in a
given recordset. They are frequently used in combination to navigate through a recordset. In all,
five Recordset Paging server behaviors exist; however, you insert the following four in an identi-
cal fashion:
Move To First Record
L
Move To Previous Record
L
Move To Next Record
L
Move To Last Record
L
1200
Part VII: Extending Dreamweaver
The fifth server behavior in this category, Move To Specific Record, uses a different procedure,
which is covered in the following section.
Requirements: A selected page element and at least one recordset with more than one
returned row.
To use any of the four basic Recordset Paging server behaviors, follow these steps:
1. Select the text or image to which you’d like to attach the server behavior.
2. From the Server Behaviors panel, click the Add (+) button and choose the desired
behavior from the Recordset Paging submenu. The appropriate Recordset Paging dialog
box appears. Your selection is highlighted in the Link list, as shown in Figure 34-5.
Figure34-5
The Recordset Paging server behaviors (such as Move To Last Record) identify your selected target, which
may be an image or text.
3. Make sure that the link selected is one of those showing in the Link list.
4. Choose the recordset you want to work with from the Recordset drop-down list.
5. Click OK when you’re finished.
Cross-Reference
For more information on these Recordset Paging server behaviors, see Chapter 20.
n
Move To Specific Record
The Move To Specific Record server behavior is used after a recordset has been created to navi-
gate through the records. To use the Move To Specific Record server behavior (not available in
ColdFusion or PHP), follow these steps:
1. Select the text or image to which you’d like to attach the server behavior.
2. From the Server Behaviors panel, choose Move To Specific Record from the Recordset
Paging submenu. The Move To Specific Record dialog box is displayed, as shown in
Figure 34-6.
1201
Chapter 34: Handling Server Behaviors
Figure34-6
An alternative method for creating a detail page uses the Move To Specific Record server behavior.
3. Select the desired recordset from the list labeled Move To Record In.
4. Choose the field referenced in the URL parameter from the Where Column field.
5. Enter the variable in the URL parameter in the Matches URL Parameter field.
6. Click OK when you’re finished.
Cross-Reference
For more information on the Move To Specific Record server behavior, see Chapter 22.
n
Show Region
The Show Region server behavior displays an area of the screen if a particular condition is true.
These are often called conditional regions. A different set of server behaviors applies for each
server model.
ColdFusion and PHP:
Show If Recordset Is Empty
L
Show If Recordset Is Not Empty
L
Show If First Page
L
Show If Not First Page
L
Show If Last Page
L
Show If Not Last Page
L
ASP VBScript:
Show Region If Recordset Is Empty
L
Show Region If Recordset Is Not Empty
L
Show Region If First Record
L
1202
Part VII: Extending Dreamweaver
Show Region If Not First Record
L
Show Region If Last Record
L
Show Region If Not Last Record
L
Requirements: One or more selected page elements and at least one recordset.
Applying a Show Region server behavior is straightforward. Just follow these steps:
1. Select the page area you’d like to show conditionally.
2. From the Server Behaviors panel, click the Add (+) button and select one of the server
behaviors from the Show Region submenu. The dialog box for the specific Show Region
server behavior you chose is displayed, like the one shown in Figure 34-7. The dialog
boxes for all the Show Region server behaviors are identical.
Figure34-7
To use any of the Show Region server behaviors, just choose a recordset.
3. Select the recordset on which to base the Show Region condition from the Recordset list.
4. Click OK when you’re finished.
Cross-Reference
For more information on the Show Region server behavior, see Chapter 20.
n
Go To Detail Page
The Go To Detail Page server behavior is used in master-detail Web applications to navigate
from a chosen link on the master page to a designated detail page. This server behavior passes
a unique record ID via the URL query string method. The Go To Detail Page server behavior is
only available with ASP VBScript.
Cross-Reference
For more on master-detail Web applications, see Chapter 23.
n
Requirements: A selected page element and at least one recordset.