css web sites with dreamweaver mx 2004 - Phần 8 pptx
Bạn đang xem bản rút gọn của tài liệu. Xem và tải ngay bản đầy đủ của tài liệu tại đây (1.26 MB, 22 trang )
#mainbox {
width: 595px;
height: 200px;
border: 1px solid black;
margin-right: auto;
margin-left: auto;
}
body {
text-align: center;
}
</style>
</head>
<body>
<div id="mainbox"></div>
</body>
</html>
But now, of course, everything in the document is going to be centered. Here, I've added
some content without styling it:
Everything gets centered.
As a result, you'll have to be very careful to now create styles for your paragraphs,
headers, and other content to ensure everything is aligned properly.
154
The Good News
Fortunately, even though using a hack is an ugly thing by nature, this hack isn't terribly
harmful and we're able to get the effect we're after—a design that is neatly centered on
the page. What's more, the compatibility factor at this point is very high, we're able to
display this in all kinds of browsers, including Netscape 4.x, which is pretty cool.
155
12. Styling forms with CSS
In this chapter, we will look at the variety of ways in which we can make attractive forms
for our sites and web applications by using CSS. Forms are an important but unglamorous
part of many sites and for web application design, much of the client-side development
can be taken up with creating usable forms. CSS makes it easier to create attractive forms
quickly, because once you have developed a default look for forms then you can
reproduce that for every form on the site.
Styling form elements – what can we change?
Using CSS , we can change many things about the appearance of our forms and the
elements within them - either by redefining the html tag that controls these elements, or by
applying custom classes to them.
The form tag
In a new document in Dreamweaver, insert a form using the Insert toolbar. By default, a
form doesn't render in any visible way in the web browser – in the Design View in
Dreamweaver it displays with a red dashed line so that you can see where the form is on
your page.
Creating a style that will apply to all forms
If you want to create a style that will apply to all forms on any pages that have this style
sheet linked to it, create a new CSS Style (in the CSS panel click the New CSS Style) and
choose to 'Redefine HTML Tag'.
Select 'form' in the selection box for Tag. If this is a new document then define this in a new
stylesheet file – in a site in progress you can choose to add them to the existing style sheet
for the site.
Redefining the form tag
156
Click OK and in the CSS Style Definition dialog set a background color for the form.
Setting the background color
And a border.
Setting the border
Click OK. In Dreamweaver you should see your form change to reflect the styles for the
form.
157
To see anything other than a thin line in the web browser you will need to add some text
to the form before previewing it.
The form in a web browser
Creating a style that will apply only to certain forms
If you want to create several different form styles for your site – perhaps one style for a
login form, another for a longer, complex questionnaire and yet another for your contact
form then you will need to use custom classes.
Using the same page and form create a new CSS Style, this time select to Make Custom
Style (Class) and name it '.greenform'.
Make Custom Style
Click OK and then set a green background and darker green border for this class. Click OK
out of the CSS Style Definition Dialog and return to the Design View of Dreamweaver. Your
form will still be blue as it is still taking the general form definition. To change it to use the
special form definition '.greenform' select your form. In the CSS Styles Panel switch the radio
buttons at the top of the panel to 'Apply Styles'.
158
Then, with your form still selected click on the class name 'greenform'. You should see your
form take on the colors of this class in the Design View Window.
Applying a Style using the CSS Styles Panel
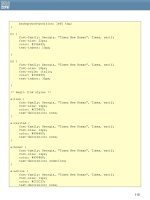
The CSS we have created
If you double click on the CSS style sheet name in the Site Panel it will open up in
Dreamweaver and you can see the CSS that we have just created:
form {
background-color: #6699CC;
border: 1px solid #003366;
}
.greenform {
background-color: #009966;
border: 1px solid #003300;
}
form (note no period before the word) is the rules that apply to all forms on the site
.greenform (note the period that shows it is a class) is the special green form style that we
have created.
Switch to Code View and you can see how this relates to our form. The form currently has
the class greenform applied to it:
<form action="" method="post" name="form1" class="greenform" id="form1">
<p>This is my form</p>
</form>
159
To return to the generic form style you can simply remove that class:
<form action="" method="post" name="form1" id="form1">
<p>This is my form</p>
</form>
The input tag
Many form elements – text, radiobuttons, checkboxes, buttons – are all types of the input
tag. Therefore if you simply redefine the input tag you will affect all of these different
elements.
Redefining the input tag
As an example of what happens when you redefine the input tag, take the following form
elements inserted into our generic form style.
Form with various elements in Dreamweaver MX
Create a New CSS Style and select to redefine the input tag.
Redefining the input tag
Give the input tag a background color (a different one to the background color of the
form) and a border, then click OK.
160
These changes will not show up in Dreamweaver - as it does not render styles on form
elements - so you will need to preview in a browser to see the results.
Form with styled input tag
As you can see, styling the input tag will apply the same style to all of these elements – if
you only have a very simple form on your site then this may be all you need, however it is
likely that you would rather have some more control over the individual elements and so,
once again, to do this custom classes are needed.
Creating classes for the input tag
When I start work on a new site, I usually create my generic form classes right at the start.
That way, I can always apply them to the new forms that I create as I create them and
then if I decide later in the development that I want the form to look slightly different I only
need to change the style sheet and not revisit each form. At this point I will normally
create classes for text, smalltext and buttons.
Text input
Create a New CSS Style, select to Make Custom Style and call this class '.text'.
Creating a text input class
Click OK.
161
You can change most things about text fields:
• give them a border;
Setting the border
• set the width, the padding (space inside) and margin (space outside the field);
Setting width, padding and margins in the Box category
162
• change the background color;
Setting the background color change the color, font and size of the text that is entered
when someone completes the field.
Setting the type
163
From a usability point of view you should always bear in mind that people will need to be
able to complete the fields – tiny boxes with minute text may look nice but can be difficult
to complete, particularly where you are asking people to add a lot of information.
After setting the styles for this form, click OK. You will then need to apply the class to your
default text field.
Dreamweaver will display the width changes but to see all of your changes preview in the
browser.
Text field with a class applied
The small text input would be used for anywhere you don't want a great big field – for
instance where you are asking people to type in a short password or their Zip Code. For
this field I would use the same styles apart from the width, which I would set to half of the
value of the original field – in this case 100 pixels. This class I call '.smalltext' and here it is
applied to a field in the form:
The form now with classes for text and smalltext
164
Buttons
You can change all of the elements of your buttons as well, when doing this however,
make sure that your users are still aware that this is the button! It is possible to make a
button look just like normal text by setting borders to 0, and the text to look like the body
text of your page, however people are used to seeing the default button 'look' so be very
careful when changing the button style too extensively. I have simply created a class
called '.button' to make the text slightly smaller and given the button a background color
and color to fit in with the rest of my form.
The form with the button class applied
Styling the label tag
As I have used the label tag for the labels to the left of these form elements, I can style this
tag by redefining it.
Redefining the label tag
165
I have simply set some styles for the type of any text that is marked up with this tag, and
my form now looks like this:
The form after redefining the label tag
Select menus
You can also change the text and background color of select menus. Once again you
can achieve this by redefining the select tag or by creating a custom class. As there are
fewer things that you can alter about a select menu then simply redefining the tag is
appropriate in a lot of cases.
Redefining the select tag
166
For the select tag, changes that will display in browsers include:
• Changing the type;
Setting the type for the select tag
• Setting a width, padding and margin;
Setting width, padding and margin for the input tag
167
• Setting a background color
Setting the background color for the input tag
The form after adding select elements and redefining the select tag
168
You can, of course, create custom classes for these elements in the same way that we
created the classes for the input tag.
Textarea
Textareas – large text input elements can also be styled in much the same way, in addition
to the changes that you can make to a regular text field which uses the input tag, you
can set the height of a textarea. Although we can change the height and width of a
textarea using CSS, valid (x)html requires that you also set the size of it in the html using cols
and rows. You set the size in Dreamweaver by selecting the element and then setting the
properties in the Property Inspector.
Setting Char Width (cols) and Num Lines (rows) of a textarea in Dreamweaver
169
You can then redefine the textarea element and/or create custom classes for it. You will
often find that you need different sizes of textarea. If all of them are going to look the
same but you need two different sizes, you can combine redefining textarea with creating
custom classes to save you having to enter all of the color and type information for each
field.
First, redefine textarea – set the background color, color and type just as we did for text.
The form after redefining textarea
Now create two custom classes – one named '.smalltextarea' the other '.largetextarea'.
Give them different heights and/or widths. I have set both to be 200px wide but give the
small a height of 100px and the large a height of 300px.
170
Setting the height and width for .largetextarea
Then apply these classes to your textarea elements:
Form with the two textarea classes applied
171
What about old browsers?
Form elements styled with CSS are admittedly a problem when it comes to everyone's
favorite old browser – Netscape 4.*. Even with a site laid out using tables, if you use form
elements styled with CSS then you need to be aware that Netscape 4 doesn't support this
styling and may display the form in such a way as to make the form unusable.
The simplest way around this problem is to add your forms stylesheet using the @import
method that I describe in the '
old browsers' chapter. If the rest of your CSS works fine for
Netscape 4, then you could simply have a separate style sheet that is just for the form
elements. Then attach it to your page using the @import method. To do this in
Dreamweaver, select the Attach Style Sheet button on the CSS Panel and instead of
selecting the default Link radio button on the Link External Style Sheet dialog, select
import.
Attaching a style sheet using the @import method
As the styles would not show up for Netscape 4 anyway, using this method will ensure that
users of this browser will be able to complete the form as the elements will simply display in
their default manner.
172
173
13. Using Design-Time Stylesheets to Create a Print
Stylesheet
Despite the promised utopia of a paperless office, you are likely to find that users will print
out your web pages for reference, or to read away from the computer. As we know, what
looks good on the web does not necessarily look good in print and if your site uses many
graphics, the user is going to be using up much unnecessary printer ink in getting their
copy, as your navigation buttons aren't of much interest once the application is printed!
Many sites link to 'printer friendly' versions of their pages. These versions usually are
separate versions of the document, created either by hand (which means you have to
maintain 2 versions of the document) or by a script, and the printable document will be
formatted for print and contain no navigation or irrelevant graphics. While this method
works well, you probably don’t have the additional development time of creating the new
pages or writing the script to create the printable page, and you need to have a link on
each page that launches this special version.
A print stylesheet gets around all of these problems. The print stylesheet comes into play
when the user prints any document to which it is linked. You can define any element on
your page differently in the print stylesheet and these are the styles that will be used when
the document is printed. You can use the print stylesheet to hide areas of the page, such
as navigation, graphics-intensive headers or unnecessary pictures; you can change the
font styles, colors and sizes in order that the page is readable when printed; you can
ensure that the contrast between colors works well even if the document is printed in
black and white, and you can even add to the document areas that will only display on
printing – such as page related information, to make it obvious where the document
came from.
You can create a print stylesheet for an existing web site just as easily as you can for a new
site, and many of the changes can be made without editing your document at all, other
than to add the link to the new stylesheet file.
You can either follow this chapter using your own existing site – or use the files that I have
using which are included as a code download.
Getting Started
When I create a print stylesheet, I usually do it as one of the final stages of development of
the site. Once I have created a design I simply save a copy of my existing stylesheet as
'print.css'. That way I have a document that contains all of the styles defined for the web
and I can simply alter them for print.
174
Saving the existing stylesheet as print.css
Using Design-time Stylesheets while creating a stylesheet
When working with your print stylesheet it will be helpful for you to be able to view it in
Dreamweaver as you work. You can do this by using a Design Time Stylesheet. A Design
Time Stylesheet is applied by Dreamweaver just so that you can see the effect of this
stylesheet, it does not affect the way that the stylesheets are displayed once you upload
your site to the web. In this case, our stylesheet will only display when the document is
printed so by using it as a Design Time Stylesheet we can see how it will look as we work on
it.
175