Excel 2010 part 7
Bạn đang xem bản rút gọn của tài liệu. Xem và tải ngay bản đầy đủ của tài liệu tại đây (1007.47 KB, 10 trang )
60
22
33
44
11
2
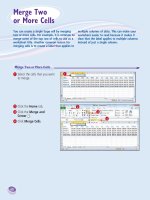
Click the Home tab.
3
Click the Merge and
Center
.
4
Click Merge Cells.
1
Select the cells that you want
to merge.
Merge Two or More Cells
You can create a single large cell by merging
two or more cells. For example, it is common to
merge some of the top row of cells to use as a
worksheet title. Another common reason for
merging cells is to create a label that applies to
multiple columns of data. This can make your
worksheet easier to read because it makes it
clear that the label applies to multiple columns
instead of just a single column.
Merge Two
or More Cells
05_577639-ch03.indd 6005_577639-ch03.indd 60 3/15/10 2:38 PM3/15/10 2:38 PM
61
Working with Excel Ranges
CHAPTER
3
55
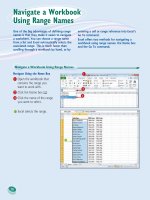
How do I center text across multiple columns?
This is a useful technique for your worksheet titles or headings. You can center a
title across the entire worksheet, or you can center a heading across the columns
that it refers to. Follow Steps 1 to 3 and then click Merge & Center. Excel
creates the merged cell and formats the cell with the Center alignment option.
Any text you enter into the merged cell appears centered within the cell.
5
Type your text in the
merged cell.
•
Excel merges the selected cells
into a single cell.
05_577639-ch03.indd 6105_577639-ch03.indd 61 3/15/10 2:38 PM3/15/10 2:38 PM
62
11
22
33
2
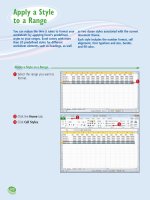
Click the Home tab.
3
Click Copy ( ).
1
Select the range that includes
the data you want to
transpose.
Transpose Rows and Columns
You can use Excel’s Transpose command to
easily turn a row of data into a column of data,
or a column of data into a row of data. You can
also transpose rows and columns together in a
single command, which is handy when you
need to restructure a worksheet.
Transpose Rows
and Columns
05_577639-ch03.indd 6205_577639-ch03.indd 62 3/15/10 2:38 PM3/15/10 2:38 PM
63
Working with Excel Ranges
CHAPTER
3
44
66
55
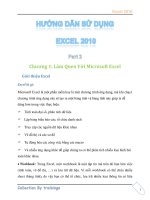
How do I know which cells to select?
The range you select before copying
depends on what you want to transpose.
If you want to transpose a single
horizontal or vertical range of cells, then
select just that range. If you want to
transpose a horizontal range of cells and
a vertical range of cells at the same time,
select the range that includes all the cells,
as shown in this section’s example.
Can I transpose range values as well
as range labels?
Yes, Excel’s Transpose command works
with text, numbers, dates, formulas, and
any other data that you can add to a cell.
So if you have a rectangular region of
data that includes row labels, column
labels, and cell values within each row
and column, you can select the entire
range and transpose it.
•
Excel transposes the data and
then pastes it to the worksheet.
4
Click where you want the
transposed range to appear.
5
Click the Paste .
6
Click Transpose ( ).
05_577639-ch03.indd 6305_577639-ch03.indd 63 3/15/10 2:38 PM3/15/10 2:38 PM
Chapter
Chapter
4
44
4
Working with
Range Names
Y ou can make it easier to
navigate Excel worksheets and
build Excel formulas by
applying names to your ranges.
A range name is a text label that
you apply to a single cell or to
a range of cells. Once you have
defined a name for a range,
you can use that name in place
of the range coordinates, which
has several benefits. For
example, range names are
more intuitive than range coordinates, particularly in formulas; range names are
more accurate than range coordinates; range names are easier to remember than
range coordinates; and range names make it easier to navigate a worksheet.
This chapter explains range names and shows you how to define, edit, and use
range names.
06_577639-ch04.indd 6406_577639-ch04.indd 64 3/15/10 2:41 PM3/15/10 2:41 PM