Fix your own computer for seniors for dummies- P8
Bạn đang xem bản rút gọn của tài liệu. Xem và tải ngay bản đầy đủ của tài liệu tại đây (2.5 MB, 30 trang )
➟
195
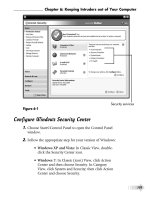
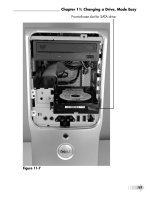
Chapter 11: Changing a Drive, Made Easy
Front-of-case slot for SATA drive
Figure 11-7
Please purchase PDF Split-Merge on www.verypdf.com to remove this watermark.
➟
196
Part III: Fixing Sick Hardware
12.
Reattach the cables and power cord, and turn on the
computer.
13.
Skip to “Partition the Drive,” later in this chapter.
Install a New External Drive
Most external drives connect to a computer’s USB
port, so I cover that type in this section. For details
on installing a different type, consult the instruction
manual or my book Fix Your Own PC (Wiley
Publishing).
1.
Plug the drive’s USB cable into a free USB port on your
computer.
Your PC can be on or off when you plug in a USB
device.
2.
Plug the other end of the USB cable into the external
drive’s USB connector (see Figure 11-8).
3.
Attach the power cord to the drive, and plug it into
wall current or — better yet — a surge protector (see
Chapter 1).
4.
Turn on the power to the external drive (and to your
computer, if you turned it off before installing the
new drive).
Nearly all devices proceed to install any necessary drivers
or utilities automatically when you turn them on. Follow
any onscreen instructions.
Please purchase PDF Split-Merge on www.verypdf.com to remove this watermark.
➟
197
Chapter 11: Changing a Drive, Made Easy
If Windows or your antivirus software displays a
security alert during installation, click Accept or
Continue. If you can’t get past this warning, you can
disable your firewall or other security software (see
Chapter 6) before continuing with the installation.
5.
Proceed to the next section, “Partition the Drive.”
Power connector USB connector
Figure 11-8
Please purchase PDF Split-Merge on www.verypdf.com to remove this watermark.
➟
198
Part III: Fixing Sick Hardware
Partition the Drive
The next step in preparing a new disk is partitioning, which assigns
logical units and file systems to the hard drive. Partitions are the basic
containers for data. Each partition exists in a specified physical loca-
tion on the hard drive and functions almost like a separate drive.
1.
Decide how many partitions you want to have on your
hard drive. Depending on the size of the drive and the
version of Windows you’re using, you may be able to use
a single huge partition. This configuration is the easiest
and (in my opinion) best one to use, if your computer
supports it. If not, you have to create two or more
smaller partitions. A 250GB drive, for example, could be
set up as two logical drives of 125GB each, or as one
50GB drive and two 100GB drives.
Even if your computer can support one large parti-
tion, you may want to create at least two partitions.
Some professionals recommend creating a relatively
small partition — 20MB or so — to hold only
Windows and using the rest of the drive for all other
programs and data.
2.
Use the manufacturer’s utility to create the partitions.
Hard drive manufacturers usually provide a utility that
automates the creation of partitions; this utility (such as
the Western Digital example shown in Figure 11-9)
comes on the drive itself or on an accompanying CD or
DVD. Follow the instructions faithfully, and accept the
utility’s recommendations on what partitions to create.
Most external drives come preformatted and ready to
run immediately in Windows. For information on
reformatting, see the next section, “Format the Drive.”
Please purchase PDF Split-Merge on www.verypdf.com to remove this watermark.
➟
199
Chapter 11: Changing a Drive, Made Easy
Follow the utility’s instructions to partition your new drive.
Figure 11-9
Format the Drive
Formatting a drive applies a set of magnetic markers to the disk plat-
ters, allowing your computer to set up a file system that indexes what
data is placed where.
1.
Use the formatting utility included with the hard drive
(such as the example shown in Figure 11-10) to format
the device. For most users, the best practice is to accept
the manufacturer’s recommended (default) settings. The
program may create one of the following types of file
systems:
Please purchase PDF Split-Merge on www.verypdf.com to remove this watermark.
➟
200
Part III: Fixing Sick Hardware
Make any required changes
before you start the process.
Figure 11-10
• FAT (File Attribute Table): You would use FAT or
FAT32 (see the next paragraph) only if you need to
maintain compatibility with older equipment or if
you intend to load and switch between a current
version of Windows (XP, Vista, or 7) and an older
one (such as Windows 95, 98, or ME). That situa-
tion isn’t likely to apply to most readers of this
book.
• FAT32: Like FAT, FAT32 is an older file system.
Generally, it’s unable to deal with drives (or parti-
tions within drives) larger than 32GB.
Please purchase PDF Split-Merge on www.verypdf.com to remove this watermark.
➟
201
Chapter 11: Changing a Drive, Made Easy
• NTFS (Windows NT File System): If you’re using
Windows XP, Vista, or 7, the preferred file system
is NTFS, which is more efficient than FAT and
FAT32, and also more capable of recovering from
certain types of disk errors. NTFS is essential for
use with large disk drives.
On most new external drives, the standard setup
provides a single FAT32 partition, which means that
Windows will use the entire capacity of the new
drive as a single volume. If you choose to reparti-
tion the drive so that it appears to Windows to be
two or more drives, you can do so — but doing so
will erase any preloaded software or utilities that
came with the drive.
2.
If you intend to use the new hard drive as your boot
drive, install special boot tracks and Windows itself on
that drive. You accomplish this task by using a utility
provided with the operating system. In most instances,
you turn off your computer, place the Windows DVD in
your CD/DVD drive, and then turn the computer on
again. The computer recognizes the presence of the DVD
and gives you the option of installing the operating sys-
tem on your hard disk drive (see Figure 11-11).
Follow the instructions carefully, and be prepared for a
lengthy process; most installations require several hours
to complete.
Early PCs had one or two floppy disk drives, which
were called A and B. To maintain compatibility with
older hardware and software, those two letters are not
available to identify hard drives in a standard setup.
Drive C usually is the boot drive, followed by drives
D through Z. (Special utilities are available for rare
and unusual configurations with dozens of drives, but
that topic is well beyond the scope of this book.)
Please purchase PDF Split-Merge on www.verypdf.com to remove this watermark.
➟
202
Part III: Fixing Sick Hardware
Press Enter to start a new Windows installation.
Figure 11-11
Troubleshoot a New Internal Drive
1.
Make sure that you’ve connected the PATA or SATA data
cable securely to the proper port on the motherboard, as
described in “Install a New Internal Drive,” earlier in this
chapter. (For a refresher on the cables themselves, see
“Determine What You Need,” earlier in this chapter.)
2.
Check the power-cable connection (also described in
“Install a New Internal Drive,” earlier in this chapter).
3.
Open the case (see Chapter 2), plug in the PC’s power
cord, and turn the computer on. Listen for hard drive
activity (you should hear the heads moving on an active
drive), and check the disk activity light on the front of
the case. If the power supply or other internal electronics
may have failed; contact the manufacturer for advice on a
possible repair.
Please purchase PDF Split-Merge on www.verypdf.com to remove this watermark.
➟
203
Chapter 11: Changing a Drive, Made Easy
4.
Open Device Manager (see Chapter 18), or open the My
Computer or Computer window, as follows:
• Windows XP: Choose Start➪My Computer.
• Vista and Windows 7: Choose Start➪Computer.
The easiest way to access Device Manager in Vista
and Windows 7 is to click the Start button and then
type device manager in the Search Programs and
Files text box.
5.
View the Disk Drives list. If the drive is in the list, you
can double-click it to display a Properties dialog box like
the one shown in Figure 11-12.
Click the tabs to review hardware and driver status.
Figure 11-12
Please purchase PDF Split-Merge on www.verypdf.com to remove this watermark.
➟
204
Part III: Fixing Sick Hardware
6.
If the drive doesn’t show up in the Computer/My
Computer window or in Device Manager, it’s not com-
municating with the computer. Recheck all cables.
7.
If the drive still doesn’t respond or appear in the My
Computer/Computer window or in Device Manager, call
the manufacturer for technical support.
Troubleshoot a New External Drive
1.
Make sure that the external drive is plugged into a live
electrical outlet, turned on, and receiving power. Nearly
all external drives use an adapter that transforms AC wall
voltage to DC voltage; check to see that all plugs are
seated properly in their receptacles.
2.
Listen for any activity. I have yet to find a completely
silent disk drive. You should be able to hear the drive
motor, an internal cooling fan, or both. If the device is
switched on and receiving power, but you detect no signs
of life, the new drive’s power supply or other internal
electronics may have failed. Contact the manufacturer for
advice on a possible repair.
3.
Open Device Manager (see Chapter 18), or open the My
Computer or Computer window, as follows:
• Windows XP: Choose Start➪My Computer.
• Vista and Windows 7: Choose Start➪Computer.
The easiest way to access Device Manager in Vista
and Windows 7 is to click the Start button and then
type device manager in the Search Programs and
Files text box.
Please purchase PDF Split-Merge on www.verypdf.com to remove this watermark.
➟
205
Chapter 11: Changing a Drive, Made Easy
4.
Pull down the Disk Drives list to see whether the new
drive is displayed.
5.
If the drive doesn’t show up in the Computer/My
Computer window or in Device Manager, it’s not com-
municating with the computer. Recheck all cables.
6.
If the drive still doesn’t respond or appear in the My
Computer/Computer window or in Device Manager, call
the manufacturer for technical support.
7.
Try reinstalling the drive’s software and device drivers
(see Chapter 4).
8.
Run a diagnostics program (see Chapter 5) to find out
whether the computer’s ports are functioning properly.
Follow any onscreen instructions.
9.
Take advantage of the external drive’s portability by test-
ing it on another PC. You could try plugging it into a
friend’s computer to see whether it recognizes the drive,
or maybe a local computer repair shop will allow you to
make the same test on its equipment. Don’t forget to
take — and use — the AC adapter and data cable that
came with the drive.
Install a New Internal CD/DVD Drive
You can use either an internal or an external
CD/DVD drive. External drives simply plug into
your computer, so I discuss installing an internal
drive in this section.
1.
Prepare your workspace, assemble your tools, and ground
yourself properly (see Chapter 2).
Please purchase PDF Split-Merge on www.verypdf.com to remove this watermark.
➟
206
Part III: Fixing Sick Hardware
2.
Make sure that the computer is turned off, and unplug
the power cord and cables.
3.
Place the computer on a sturdy, well-lighted surface, and
open its case (see Chapter 2) after you’ve grounded
yourself.
4.
If your new drive needs rails to mount inside the case,
install the rails that should have come with it.
5.
Prepare the location for the new drive. You probably
need to remove a cover on the front of your case where
the new drive will go. This cover may snap off and on, or
it may be attached by small screws that you’ll need to
remove. (Put the screws aside so that you can use them
to secure the new drive.)
6.
Slide the new drive into the mounting slot. Depending
on your case design, you may need to slide the new
drive in from the front or (more likely) insert the drive
from inside the case so that it sits flush with the front
of the case.
Depending on the design of your computer, it may
be easier to connect the data and power cables (Steps
7–8) before you slide the drive into place.
7.
Find an available data cable and connector near the loca-
tion where you’ll be installing the new drive, and plug
this cable into the data port on your new hard drive (see
“Install a New Internal Drive,” earlier in this chapter).
8.
Locate an appropriate power cable, again choosing one
near where the new drive will be installed, and plug it
into the power connector on the new drive.
Please purchase PDF Split-Merge on www.verypdf.com to remove this watermark.