Excel 2010 part 11
Bạn đang xem bản rút gọn của tài liệu. Xem và tải ngay bản đầy đủ của tài liệu tại đây (998.08 KB, 10 trang )
100
22
11
33
2
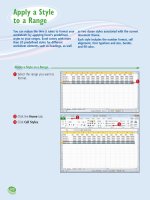
Click the Home tab.
3
Click Cell Styles.
1
Select the range you want to
format.
Apply a Style to a Range
You can reduce the time it takes to format your
worksheets by applying Excel’s predefined
styles to your ranges. Excel comes with more
than 20 predefined styles for different
worksheet elements such as headings, as well
as two dozen styles associated with the current
document theme.
Each style includes the number format, cell
alignment, font typeface and size, border,
and fill color.
Apply a Style
to a Range
07_577639-ch05.indd 10007_577639-ch05.indd 100 3/15/10 2:42 PM3/15/10 2:42 PM
101
Formatting Excel Ranges
CHAPTER
5
44
Are there styles I can use to
format tabular data?
Yes. Excel comes with a gallery of
table styles that offer formatting
options that highlight the first
row, apply different formats to
alternating rows, and so on. Select
the range that includes your data,
click the Home tab, and then click
Format as Table. In the gallery
that appears, click the table format
you want to apply.
•
Excel applies the style to the
range.
Excel displays the Cell Styles
gallery.
4
Click the style you want to
apply.
Note: If the style is not exactly
the way you want, you can right-
click the style, click Modify, and
then click Format to customize
the style.
Can I create my own style?
Yes. This is useful if you find yourself
applying the same set of formatting
options over and over. By saving those
options as a custom style, you can apply
it by following Steps 1 to 4. Apply your
formatting to a cell or range, and then
select that cell or range. Click Home,
click Cell Styles, and then click New
Cell Style. In the Style dialog box,
type a name for your style, and then
click OK.
07_577639-ch05.indd 10107_577639-ch05.indd 101 3/15/10 2:42 PM3/15/10 2:42 PM
102
22
11
33
44
2
Click the Home tab.
3
Click Format.
4
Click Column Width.
1
Click in any cell in the column
you want to resize.
Change the Column Width
You can make a column of data easier to read
by adjusting the column width. For example, if
you have a large number or a long line of text
in a cell, Excel may display only part of the cell
value. To avoid this, you can increase the width
of the column.
Similarly, if a column only contains a few
characters in each cell, you can decrease the
width to fit more columns on the screen.
Change the
Column Width
07_577639-ch05.indd 10207_577639-ch05.indd 102 3/15/10 2:42 PM3/15/10 2:42 PM
103
Formatting Excel Ranges
CHAPTER
5
55
66
Is there an easier way to
adjust the column width to fit
the contents of a column?
Yes. You can use Excel’s AutoFit
feature, which automatically
adjusts the column width to fit the
widest item in a column. Click any
cell in the column, click Home,
click Format, and then click
AutoFit Column Width.
Alternatively, move
over the
right edge of the column heading
(
changes to ) and then
double-click.
The Column Width dialog box
appears.
5
In the Column width text
box, type the width you
want to use.
6
Click OK.
•
Excel adjusts the column
width.
•
You can also move over
the right edge of the column
heading (
changes to )
and then click and drag the
edge to set the width.
Is there a way to change all the column
widths at once?
Yes. Click (or press + ) to select
the entire worksheet, and then follow the
steps in this section to set the width you
prefer. If you have already adjusted some
column widths and you want to change all
the other widths, click Home, click Format,
and then click Default Width to open the
Standard Width
dialog box. Type
the new standard
column width, and
then click OK.
07_577639-ch05.indd 10307_577639-ch05.indd 103 3/15/10 2:42 PM3/15/10 2:42 PM
104
11
22
33
44
2
Click the Home tab.
3
Click Format.
4
Click Row Height.
1
Select a range that includes at
least one cell in every row you
want to resize.
Change the Row Height
You can make your worksheet more visually
appealing by increasing the row heights to
create more space. This is particularly useful in
worksheets that are crowded with text. By
increasing the row heights, you add white
space above each cell, which makes the text
easier to read.
If you want to change the row height to
display multiline text within a cell, you must
also turn on text wrapping within the cell. See
“Wrap Text Within a Cell” later in this chapter.
Change the
Row Height
07_577639-ch05.indd 10407_577639-ch05.indd 104 3/15/10 2:42 PM3/15/10 2:42 PM