MCSE Windows server 2003- P2
Bạn đang xem bản rút gọn của tài liệu. Xem và tải ngay bản đầy đủ của tài liệu tại đây (3.7 MB, 50 trang )
Lesson 2 Installation and Configuration of Windows Server 2003 and Active Directory
1
-
19
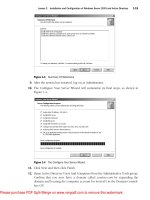
Figure 1-3 Summary Of Selections
9. After the system has restarted, log on as Administrator.
10. The Configure Your Server Wizard will summarize its final steps, as shown in
Figure 1-4.
Figure 1-4 The Configure Your Server Wizard
11. Click Next and then click Finish.
12. Open Active Directory Users And Computers from the Administrative Tools group.
Confirm that you now have a domain called contoso.com by expanding the
domain and locating the computer account for Server01 in the Domain Control-
lers OU.
Please purchase PDF Split-Merge on www.verypdf.com to remove this watermark.
1-20
Chapter 1 Introducing Microsoft Windows Server 2003
Lesson Review
1. Which of the following versions of Windows Server 2003 require product activa-
tion? (Select all that apply.)
a. Windows Server 2003, Standard Edition, retail version
b. Windows Server 2003, Enterprise Edition, evaluation version
c. Windows Server 2003, Enterprise Edition, Open License version
d. Windows Server 2003, Standard Edition, Volume License version
2. What are the distinctions among a domain, a tree, and a forest in Active Directory?
3. Which of the following is true about setup in Windows Server 2003? (Select all that
apply.)
a. Setup can be launched by booting to the CD-ROM.
b. Setup can be launched by booting to setup floppies.
c. Setup requires a non-blank password to meet complexity requirements.
d. Setup will allow you to enter all 1’s for the Product ID.
Lesson Summary
■
Windows Server 2003 retail and evaluation versions require product activation.
■
The Manage Your Server page and the Configure Your Server Wizard provide
helpful guidance to the installation and configuration of additional services based
on the desired server role.
■
Active Directory—the Windows Server 2003 directory service—is installed on a
server using the Active Directory Installation Wizard, which is launched using the
Configure Your Server Wizard or by running DCPROMO from the command line.
Please purchase PDF Split-Merge on www.verypdf.com to remove this watermark.
Questions and Answers
1
-
21
Questions and Answers
Page
1-6
Lesson 1 Review
1. You are planning the deployment of Windows Server 2003 computers for a depart-
ment of 250 employees. The server will host the home directories and shared fold-
ers for the department, and it will serve several printers to which departmental
documents are sent. Which edition of Windows Server 2003 will provide the most
cost-effective solution for the department?
Windows Server 2003, Standard Edition, is a robust platform for file and print services in a
small- to medium-sized enterprise or department.
2. You are planning the deployment of Windows Server 2003 computers for a new
Active Directory domain in a large corporation that includes multiple separate
Active Directories maintained by each of the corporation’s subsidiaries. The com-
pany has decided to roll out Exchange Server 2003 as a unified messaging plat-
form for all the subsidiaries, and plans to use Microsoft Metadirectory Services
(MMS) to synchronize appropriate properties of objects throughout the organiza-
tion. Which edition of Windows Server 2003 will provide the most cost-effective
solution for this deployment?
Windows Server 2003, Enterprise Edition, is the most cost-effective solution that supports
MMS. Standard and Web editions do not support MMS.
3. You are rolling out servers to provide Internet access to your company’s e-com-
merce application. You anticipate four servers dedicated to the front-end Web
application and one server for a robust, active SQL database. Which editions will
provide the most cost-effective solution?
Windows Server 2003, Web Edition, provides a cost-effective platform for the four Web applica
tion servers. However, Web Edition will not support enterprise applications like SQL Server; the
edition of MSDE included with Web Edition allows only 25 concurrent connections. Therefore,
Windows Server 2003, Standard Edition, provides the most cost-effective platform for a SQL
Server.
Please purchase PDF Split-Merge on www.verypdf.com to remove this watermark.
1-22
Chapter 1 Introducing Microsoft Windows Server 2003
Page
Lesson 2 Review
1-20
1. Which of the following versions of Windows Server 2003 require product activa-
tion? (Select all that apply.)
a. Windows Server 2003, Standard Edition, retail version
b. Windows Server 2003, Enterprise Edition, evaluation version
c. Windows Server 2003, Enterprise Edition, Open License version
d. Windows Server 2003, Standard Edition, Volume License version
The correct answers are a and b.
2. What are the distinctions among a domain, a tree, and a forest in Active Directory?
A domain is the core administrative unit in Active Directory. A forest is the scope of Active Direc
tory. A forest must contain at least one domain. If a forest contains more than one domain,
domains that share a contiguous DNS namespace—meaning domains that have a common
root domain—create a tree. Domains that do not share contiguous DNS namespace create dis
tinct trees within the forest.
3. Which of the following is true about setup in Windows Server 2003? (Select all that
apply.)
a. Setup can be launched by booting to the CD-ROM.
b. Setup can be launched by booting to setup floppies.
c. Setup requires a non-blank password to meet complexity requirements.
d. Setup will allow you to enter all 1’s for the Product ID.
The correct answers are a and c.
Please purchase PDF Split-Merge on www.verypdf.com to remove this watermark.
2 Administering Microsoft
Windows Server 2003
Exam Objectives in this Chapter:
■
Manage servers remotely
❑
Manage a server by using Remote Assistance
❑
Manage a server by using Terminal Services remote administration mode
❑
Manage a server by using available support tools
■
Troubleshoot Terminal Services
❑
Diagnose and resolve issues related to Terminal Services security
❑
Diagnose and resolve issues related to client access to Terminal Services
Why This Chapter Matters
In the daily work of a systems administrator, you frequently use tools to configure
user accounts, modify computer software and service settings, install new hard-
ware, and perform many other tasks. As the computing environment expands to
include more computers, so expands the amount of work to be done. The
Microsoft Management Console (MMC) allows for the consolidation and organi-
zation of some of the tools used most often. In addition, MMC consoles can be
customized and tailored to fit the exact needs of the worker and the task at hand, so
tasks can be delegated to more junior administrators with fewer chances for error.
When more global control of a remote computer is required, beyond what can be
done remotely through the MMC, two key tools make administration of remote
computers possible: Remote Desktop for Administration and Remote Assistance.
Generally, you can regard Remote Desktop for Administration as a client-server
application that allows for a window on your desktop computer to show the local
console of a server computer, giving you the ability to control the keyboard and
mouse functions as if you were logged on locally at the console of the server.
Remote Assistance is similar in function, but is scoped for desktop computers running
an operating system from the Microsoft Windows Server 2003 or Windows XP
family. A user at that computer makes a request for assistance, and a remote con-
nection can be established from a remote computer to that desktop.
2-1
Please purchase PDF Split-Merge on www.verypdf.com to remove this watermark.
2-2
Chapter 2 Administering Microsoft Windows Server 2003
Lessons in this Chapter:
■
Lesson 1: The Microsoft Management Console . . . . . . . . . . . . . . . . . . . . . . . 2-3
■
Lesson 2: Managing Computers Remotely with the MMC. . . . . . . . . . . . . . . . 2-9
■
Lesson 3: Managing Servers with Remote Desktop for Administration . . . . . 2-12
■
Lesson 4: Using Remote Assistance . . . . . . . . . . . . . . . . . . . . . . . . . . . . . . 2-19
Before You Begin
To perform the practices related to the objectives in this chapter, you must have
■
A computer that has Windows Server 2003 installed and operating. To follow the
examples directly, your server should be named Server01 and function as a
domain controller in the contoso.com domain.
■
Remote Desktop for Administration installed on Server01, with Remote Desktop
and Remote Assistance enabled.
■
A configured and functioning Transmission Control Protocol/Internet Protocol
(TCP/IP) network to which your console and remote administrative target comput-
ers can connect (for administration of remote computers).
Please purchase PDF Split-Merge on www.verypdf.com to remove this watermark.
Lesson 1 The Microsoft Management Console
2
-
3
Lesson 1: The Microsoft Management Console
The primary administrative tool for managing Windows Server 2003 is the MMC. The
MMC provides a standardized, common interface for one or more of the applications,
called snap-ins, that you use to configure the elements of your environment. These
snap-ins are individualized to specific tasks, and can be ordered and grouped within
the MMC to your administrative preference.
The primary administrative tools in Windows Server 2003 are MMC consoles with col-
lections of snap-ins suited to a specific purpose. The Active Directory Users and Com-
puters administrative tool, for example, is specifically designed to administer the
security principals (Users, Groups, and Computers) in a domain. The snap-ins within
the MMC—not the MMC itself—are the administrative tools that you use.
Note
MMC consoles will run on Windows Server 2003, Windows 2000, Windows NT 4,
Windows XP, and Windows 98.
After this lesson, you will be able to
■
Configure an MMC with individual snap-ins
■
Configure an MMC with multiple snap-ins
■
Save an MMC in Author or User mode
Estimated lesson time:
15 minutes
The MMC
The MMC looks very much like a version of Windows Explorer, only with fewer but-
tons. The functional components of an MMC are contained within what are called
snap-ins: Menus and a toolbar provide commands for manipulating the parent and
child windows, and the console itself (which contains the snap-ins) allows targeted
functionality. In addition, an MMC can be saved with and the various options and
modes appropriate to the situation.
Navigating the MMC
An empty MMC is shown in Figure 2-1. Note that the console has a name, and that
there is a Console Root. It is this Console Root that will contain any snap-ins that you
choose to include.
Please purchase PDF Split-Merge on www.verypdf.com to remove this watermark.
2-4
Chapter 2 Administering Microsoft Windows Server 2003
Figure 2-1 An empty MMC
Each console includes a console tree, console menu and toolbars, and the detail pane.
The contents of these will vary, depending upon the design and features of the snap-
in use. Figure 2-2 shows a populated MMC with two snap-ins loaded, and a child win-
dow of the Device Manager snap-in.
Figure 2-2 A populated MMC
Using the MMC Menus and Toolbar
Although each snap-in will add its unique menu and toolbar items, there are several
key menus and commands that you will use in many situations that are common to
most snap-ins, as shown in Table 2-1.
Please purchase PDF Split-Merge on www.verypdf.com to remove this watermark.
Lesson 1 The Microsoft Management Console
2
-
5
Table 2-1
Common MMC Menus and Commands
Menu Commands
File Create a new console, open an existing console, add or remove snap-ins from
a console, set options for saving a console, the recent console file list, and an
exit command
Action Varies by snap-in, but generally includes export, output, configuration, and
help features specific to the snap-in
View Varies by snap-in, but includes a customize option to change general console
characteristics
Favorites Allows for adding and organizing saved consoles
Window Open a new window, cascade, tile, and switch between open child windows
in this console
Help General help menu for the MMC as well as loaded snap-in help modules
Building a Customized MMC
Each MMC contains a collection of one or more tools called snap-ins. A snap-in
extends the MMC by adding specific management capability and functionality. There
are two types of snap-ins: stand-alone and extension.
You can combine one or more snap-ins or parts of snap-ins to create customized
MMCs, which can then be used to centralize and combine administrative tasks.
Although you can use many of the preconfigured consoles for administrative tasks,
customized consoles allow for individualization to your needs and standardization
within your environment.
Tip
By creating a custom MMC, you do not have to switch between different programs or
individual consoles.
Stand-Alone Snap-Ins
Stand-alone snap-ins are provided by the developer of an application. All Administra-
tive Tools for Windows Server 2003, for example, are either single snap-in consoles or
preconfigured combinations of snap-ins useful to a particular category of tasks. The
Computer Management snap-in, for example, is a collection of individual snap-ins use-
ful to a unit.
Extension Snap-Ins
Extension snap-ins, or extensions, are designed to work with one or more stand-alone
snap-ins, based on the functionality of the stand-alone. When you add an extension,
Windows Server 2003 places the extension into the appropriate location within the
stand-alone snap-in.
Please purchase PDF Split-Merge on www.verypdf.com to remove this watermark.
2-6
Chapter 2 Administering Microsoft Windows Server 2003
Many snap-ins offer stand-alone functionality and extend the functionality of other
snap-ins. For example, the Event Viewer snap-in reads the event logs of computers. If
the Computer Management object exists in the console, Event Viewer automatically
extends each instance of a Computer Management object and provides the event logs
for the computer. Alternatively, the Event Viewer can also operate in stand-alone mode,
in which case it does not appear as a node below the Computer Management node.
Off the Record
Spend a few minutes analyzing your daily tasks, and group them by type of
function and frequency of use. Build two or three customized consoles that contain the tools
that you use most often. You will save quite a bit of time not needing to open, switch among,
and close tools as often.
Console Options
Console options determine how an MMC operates in terms of what nodes in the con-
sole tree may be opened, what snap-ins may be added, and what windows may be
created.
Author Mode
When you save a console in Author mode, which is the default, you enable full access
to all of the MMC functionality, including:
■
Adding or removing snap-ins
■
Creating windows
■
Creating taskpad views and tasks
■
Viewing portions of the console tree
■
Changing the options on the console
■
Saving the console
User Modes
If you plan to distribute an MMC with specific functions, you can set the desired user
mode, then save the console. By default, consoles will be saved in the Administrative
Tools folder in the users’ profile. Table 2-2 describes the user modes that are available
for saving the MMC.
Please purchase PDF Split-Merge on www.verypdf.com to remove this watermark.
Lesson 1 The Microsoft Management Console
2
-
7
Table 2-2
MMC User Modes
Type of User Mode Description
Full Access Allows users to navigate between snap-ins, open windows, and
access all portions of the console tree.
Limited Access, Prevents users from opening new windows or accessing a portion of
Multiple Windows the console tree, but allows them to view multiple windows in the
console.
Limited Access,
Single Window
Prevents users from opening new windows or accessing a portion of
the console tree, and allows them to view only one window in the
console.
Note
MMCs, when saved, have an *.msc extension. Active Directory Users And Computers,
for example, is named Dsa.msc (Directory Services Administrator.Microsoft Saved Console).
Practice: Building and Saving Consoles
In this practice you will create, configure, and save an MMC console.
Exercise 1: An Event Viewer Console
1. Click Start, and then click Run.
2. In the Open text box, type mmc, and then click OK.
3. Maximize the Console1 and Console Root windows.
4. From the File menu, choose Options to view the configured console mode.
In what mode is the console running?
5. Verify that the Console Mode drop-down list box is in Author mode, and then
click OK.
6. From the File menu, click Add/Remove Snap-In.
The Add/Remove Snap-In dialog appears with the Standalone tab active. Notice
that there are no snap-ins loaded.
7. In the Add/Remove Snap-In dialog box, click Add to display the Add Standalone
Snap-In dialog box.
8. Locate the Event Viewer snap-in, and then click Add.
The Select Computer dialog box appears, allowing you to specify the computer
you want to administer. You can add the Event Viewer snap-in for the local com-
puter on which you are working, or if your local computer is part of a network,
you can add Event Viewer for a remote computer.
Please purchase PDF Split-Merge on www.verypdf.com to remove this watermark.
2-8
Chapter 2 Administering Microsoft Windows Server 2003
9. In the Select Computer dialog box, select Local Computer, and then click Finish.
10. In the Add Standalone Snap-In dialog box, click Close, and then in the Add/
Remove Snap-Ins dialog box, click OK.
Event Viewer (Local) now appears in the console tree. You may adjust the width
of the console tree pane and expand any nodes that you want to view.
11. On your own, add a snap-in for Device Manager (local).
12. Save the MMC as MyEvents.
Lesson Review
The following questions are intended to reinforce key information presented in this
lesson. If you are unable to answer a question, review the lesson materials and try the
question again. You can find answers to the questions in the “Questions and Answers”
section at the end of this chapter.
1. What is the default mode when creating an MMC?
2. Can a snap-in have focus on both the local computer and a remote computer
simultaneously?
3. If you want to limit the access of a snap-in, how do you construct the MMC that
contains the snap-in?
Lesson Summary
The MMC is a useful tool for organizing and consolidating snap-ins, or small programs
that are used for network and computer system administrative tasks. The hierarchical
display, similar to that of Windows Explorer, offers a familiar view of snap-in features
in a folder-based paradigm. There are two types of snap-ins, stand-alone and extension,
with extensions appearing and behaving within the MMC based on the context of their
placement. Any console can be configured to work in either of two modes, Author or
User, with the User mode offering some restricted functionality in the saved console.
Please purchase PDF Split-Merge on www.verypdf.com to remove this watermark.
Lesson 2 Managing Computers Remotely with the MMC
2
-
9
Lesson 2: Managing Computers Remotely with the MMC
Perhaps you work in a peer-to-peer network and need to help other users create user
accounts or groups on their computers to share local folders. You can save yourself a
trip to your coworkers’ offices by connecting to the users’ computers with your Com-
puter Management console (as shown in Figure 2-3). Or perhaps you need to format
drives or perform other tasks on a remote computer. You can perform almost any task
on a remote computer that you can perform locally.
Figure 2-3 Connecting to a user’s computer with the Computer Management console
After this lesson, you will be able to
■
Construct an MMC to manage a computer remotely
Estimated lesson time:
10 minutes
Setting Up the Snap-In for Remote Use
To connect to and manage another system using the Computer Management console,
you must launch the console with an account that has administrative credentials on the
remote computer. If your credentials do not have elevated privileges on the target com-
puter, you will be able to load the snap-in, but will not be able to read information
from the target computer.
Please purchase PDF Split-Merge on www.verypdf.com to remove this watermark.
2-10
Chapter 2 Administering Microsoft Windows Server 2003
Tip
You can use Run As, or secondary logon, to launch a console with credentials other
than those with which you are currently logged on.
When you’re ready to manage the remote system, you may open an existing console
with the snap-in loaded, or configure a new MMC with a snap-in that you configure for
remote connection when you build the console. If you configure an existing Computer
Management console, for example, follow these steps:
1. Open the Computer Management console by right-clicking My Computer and
choosing Manage from the shortcut menu.
2. Right-click Computer Management in the tree pane and choose Connect To
Another Computer.
3. In the dialog box shown in Figure 2-4, type the name or IP address of the com-
puter or browse the network for it, and then click OK to connect.
Figure 2-4 Setting the Local/Remote Context for a snap-in
Once connected, you can perform administrative tasks on the remote computer.
Practice: Adding a Remote Computer for Management (Optional)
Note
This practice requires that you have a computer available for remote connection, and
that you have administrative privileges on that computer.
Exercise 1: Connecting Remotely with the MMC
In this exercise, you will modify an existing MMC to connect to a remote computer.
1. Open the saved MMC from the exercise in Lesson 1 (MyEvents).
2. From the File menu, click Add/Remove Snap-In.
3. In the Add/Remove Snap-In dialog box, click Add to display the Add Standalone
Snap-In dialog box.
Please purchase PDF Split-Merge on www.verypdf.com to remove this watermark.
Lesson 2 Managing Computers Remotely with the MMC
2
-
11
4. Locate the Computer Management snap-in, and then click Add.
5. In the Computer Management dialog box, select Another Computer.
6. Type the name or IP address of the computer, or browse the network for it, and
then click Finish to connect.
7. Click Close in the Add Standalone Snap-In dialog box, then click OK to load the
Computer Management snap-in to your MyEvents console.
You can now use the management tools to administer the remote computer.
Lesson Review
The following questions are intended to reinforce key information presented in this
lesson. If you are unable to answer a question, review the lesson materials and try the
question again. You can find answers to the questions in the “Questions and Answers”
section at the end of this chapter.
1. What credentials are required for administration of a remote computer using
the MMC?
2. Can an existing MMC snap-in be changed from local to remote context, or must a
snap-in of the same type be loaded into the MMC for remote connection?
3. Are all functions within a snap-in used on a local computer usable when con-
nected remotely?
Lesson Summary
The MMC is able to load many different tools in the form of snap-ins. Some of these
snap-ins are programmed with the ability to connect either to the local computer or to
remote computers. The connection to a remote computer can be established when the
snap-in is loaded, or after loading by right-clicking the snap-in and choosing Connect.
You must have administrative privileges on the remote computer to use any tools
affecting the configuration of the remote computer.
Please purchase PDF Split-Merge on www.verypdf.com to remove this watermark.
2-12
Chapter 2 Administering Microsoft Windows Server 2003
Lesson 3: Managing Servers with Remote
Desktop for Administration
The Windows 2000 Server family introduced a tightly integrated suite of tools and tech-
nologies that enabled Terminal Services for both remote administration and application
sharing. The evolution has continued: Terminal Services is now an integral, default
component of the Windows Server 2003 family, and Remote Desktop has been
improved and positioned as an out-of-the-box capability, so that with one click, a
Windows Server 2003 computer will allow two concurrent connections for remote
administration. By adding the Terminal Server component and configuring appropriate
licensing, an administrator can further extend the technologies to allow multiple users
to run applications on the server. In this lesson, you will learn how to enable Remote
Desktop for Administration.
After this lesson, you will be able to
■
Configure a server to enable Remote Desktop for Administration
■
Assign users to the appropriate group to allow them to administer servers remotely
■
Connect to a server using Remote Desktop for Administration Connection
Estimated lesson time:
15 minutes
Enabling and Configuring Remote Desktop for Administration
The Terminal Services service enables Remote Desktop, Remote Assistance, and Termi-
nal Server for application sharing. The service is installed by default on Windows
Server 2003, configured in Remote Desktop for remote administration mode. Remote
Desktop mode allows only two concurrent remote connections, and does not include
the application sharing components of Terminal Server. Therefore, Remote Desktop
operates with very little overhead on the system, and with no additional licensing
requirements.
Note
Because Terminal Services and its dependent Remote Desktop capability are default
components of Windows Server 2003, every server has the capability to provide remote
connections to its console. The term “terminal server” now therefore refers specifically to a
Windows Server 2003 computer that provides application sharing to multiple users through
addition of the Terminal Server component.
Other components—Terminal Server and the Terminal Server Licensing service—must
be added using Add Or Remove Programs. However, all of the administrative tools
required to configure and support client connections and to manage Terminal Server
Please purchase PDF Split-Merge on www.verypdf.com to remove this watermark.
Lesson 3 Managing Servers with Remote Desktop for Administration
2
-
13
are installed by default on every Windows Server 2003 computer. Each of the tools and
their functions are described in Table 2-3.
Table 2-3
Default Components of Terminal Server and Remote Desktop
Installed Software Purpose
Terminal Services
Configuration
Terminal Services
Manager
Remote Desktop Client
Installation Files
Terminal Services
Licensing
Setting properties on the Terminal Server, including session, net-
work, client desktop, and client remote control settings
Sending messages to connected Terminal Server clients, disconnect-
ing or logging off sessions, and establishing remote control or shad-
owing of sessions
Installation of the Windows Server 2003 or Windows XP Remote
Desktop Client application. The 32-bit Remote Desktop client soft-
ware is installed in %Systemroot%\System32\Clients\Tsclient\Win32
of the Terminal Server.
Configuraiton of licenses for client connections to a terminal server.
This tool is not applicable for environments which utilize only
Remote Desktop for Administration.
To enable Remote Desktop connections on a Windows Server 2003 computer, open
the System properties from Control Panel. On the Remote tab, select Allow Users To
Connect Remotely To This Computer.
Note
If the Terminal Server is a Domain Controller, you must also configure the Group Pol-
icy on the Domain Controller to allow connection through Terminal Services to the Remote
Desktop Users group. By default, Non-Domain Controller servers will allow Terminal Services
connections by this group.
Remote Desktop Connection
Remote Desktop Connection is the client-side software used to connect to a server in
the context of either Remote Desktop or Terminal Server modes. There is no functional
difference from the client perspective between the two server configurations.
On Windows XP and Windows Server 2003 computers, Remote Desktop Connec-
tion is installed by default, though it is not easy to find in its default location in the
All Programs\Accessories\Communications program group on the Start menu.
For other platforms, Remote Desktop Connection can be installed from the Windows
Server 2003 CD or from the client installation folder (%Systemroot%\System32\Clients
\Tsclient\Win32) on any Windows Server 2003 computer. The .msi-based Remote
Desktop Connection installation package can be distributed to Windows 2000 systems
using Group Policy or SMS.
Please purchase PDF Split-Merge on www.verypdf.com to remove this watermark.
2-14
Chapter 2 Administering Microsoft Windows Server 2003
Tip
It is recommended to update previous versions of the Terminal Services client to the
latest version of Remote Desktop Connection to provide the most efficient, secure and stable
environment possible, through improvements such as a revised user interface, 128-bit
encryption and alternate port selection.
Figure 2-5 shows the Remote Desktop client configured to connect to Server01 in the
contoso.com domain.
Figure 2-5 Remote Desktop client
Configuring the Remote Desktop Client
You can control many aspects of the Remote Desktop connection from both the client
and server sides. Table 2-4 lists configuration settings and their use.
Table 2-4
Remote Desktop Settings
Setting Function
Client Settings
General Options for the selection of the computer to which connection should be
made, the setting of static log on credentials, and the saving of settings
for this connection.
Display Controls the size of the Remote Desktop client window, color depth, and
whether control-bar functions are available in full-screen mode.
Local Resources Options to bring sound events to your local computer, in addition to
standard mouse, keyboard, and screen output. How the Windows key
combinations are to be interpreted by the remote computer (for exam-
ple, ALT+TAB), and whether local disk, printer, and serial port connec-
tions should be available to the remote session.
Please purchase PDF Split-Merge on www.verypdf.com to remove this watermark.
Lesson 3 Managing Servers with Remote Desktop for Administration
2
-
15
Table 2-4
Remote Desktop Settings (Continued)
Setting Function
Programs Set the path and target folder for any program you want to start, once the
connection is made.
Experience Categories of display functions can be enabled or disabled based on
available bandwith between the remote and local computers. Items
include showing desktop background, showing the contents of the win-
dow while dragging, menu and window animation, themes, and whether
bitmap caching should be enabled (this transmits only the changes in the
screen rather than repainting the entire screen on each refresh period).
Server Settings
Logon Settings Static credentials can be set for the connection rather than using those
provided by the client.
Sessions Settings for ending a disconnected session, session limits and idle time-
out, and reconnection allowance can be made here to override the client
settings.
Environment Overrides the settings from the user’s profile for this connection for start-
ing a program upon connection. Path and target settings set here over-
ride those set by the Remote Desktop Connection.
Permissions Allows for additional permissions to be set on this connection.
Remote Control Specifies whether remote control of a Remote Desktop Connection ses-
sion is possible, and if it is, whether the user must grant permission at
the initiation of the remote control session. Additional settings can
restrict the remote control session to viewing only, or allow full interac-
tivity with the Remote Desktop client session.
Client Settings Override settings from the client configuration, control color depth, and
disable various communication (I/O) ports.
Network Adapters Specifies which network cards on the server will accept Remote Desktop
for Administration connections.
General Set the encryption level and authentication mechanism for connections
to the server.
Terminal Services Troubleshooting
When using Remote Desktop for Administration, you are creating a connection to a
server’s console. There are several potential causes of failed connections or problem-
atic sessions:
■
Network failures Errors in standard TCP/IP networking can cause a Remote
Desktop connection to fail or be interrupted. If DNS is not functioning, a client
may not be able to locate the server by name. If routing is not functioning, or the
Terminal Services port (by default, port 3389) misconfigured on either the client or
the server, the connection will not be established.
Please purchase PDF Split-Merge on www.verypdf.com to remove this watermark.
2-16
Chapter 2 Administering Microsoft Windows Server 2003
■
Credentials Users must belong to the Administrators or Remote Desktop Users
group to successfully connect to the server using Remote Desktop for Administration.
■
Policy Domain controllers will only allow connections via Remote Desktop to
administrators. You must configure the domain controller security policy to allow
connections for all other remote user connections.
■
Too many concurrent connections If sessions have been disconnected with-
out being logged off, the server may consider its concurrent connection limit
reached even though there are not two human users connected at the time. An
administrator might, for example, close a remote session without logging off. If
two more administrators attempt to connect to the server, only one will be allowed
to connect before the limit of two concurrent connections is reached.
See Also
For more on Terminal Services and the latest developments in Remote Desktop
client functionality, see
/prodtechnol/windowsserver2003/proddocs standard/sag_Server_Trouble_Topnode.asp.
Practice: Installing Terminal Services and
Running Remote Administration
In this practice, you will configure Server01 to enable Remote Desktop for Administra-
tion connections. You will then optimize Server01 to ensure availablity of the connec-
tion when the connection is not in use, and you will limit the number of simultaneous
connections to one. You then run a remote administration session from Server02 (or
another remote computer).
If you are limited to one computer for this practice, you can use the Remote Desktop
client to connect to Terminal Services on the same computer. Adjust references to a
remote computer in this practice to that of the local computer.
Exercise 1: Configure the Server for Remote Desktop
In this exercise, you will enable Remote Desktop connections, change the number of
simultaneous connections allowed to the server, and configure the disconnection set-
tings for the connection.
!
Exam Tip
Watch for group membership if access is denied when establishing a Remote
Desktop for Administration connection. In earlier versions of Terminal Server, you had to be a
member of the Administrators group to connect to the server, although special permissions
could be established manually. Having only two remote connections to the Terminal Server is
a fixed limit, and cannot be increased.
Please purchase PDF Split-Merge on www.verypdf.com to remove this watermark.