Fix your own computer for seniors for dummies- P11
Bạn đang xem bản rút gọn của tài liệu. Xem và tải ngay bản đầy đủ của tài liệu tại đây (1.41 MB, 30 trang )
➟
285
Chapter 17: Working in Safe Mode
➟
Plug and play: The availability of plug and play
means that the computer can recognize most devices
that are plugged in during or after start-up. Not all
device drivers are available in safe mode, however.
For more information on working with device
drivers, see Chapter 4.
➟
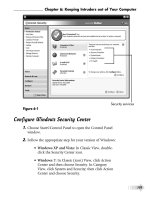
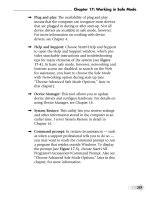
Help and Support: Choose Start➪Help and Support
to open the Help and Support window, which pro-
vides searchable instructions and troubleshooting
tips for many elements of the system (see Figure
17-4). In basic safe mode, however, networking and
Internet access are disabled; to search on the Web
for assistance, you have to choose the Safe Mode
with Networking option during start-up (see
“Choose Advanced Safe Mode Options,” later in
this chapter).
➟
Device Manager: This tool allows you to update
device drivers and configure hardware. For details on
using Device Manager, see Chapter 18.
➟
System Restore: This utility lets you retrieve settings
and other information stored in the computer at an
earlier time. I cover System Restore in detail in
Chapter 16.
➟
Command prompt: In certain circumstances — such
as when a support professional tells you to do so —
you may want to reach the command prompt to run
a program that resides outside Windows. To display
the prompt (see Figure 17-5), choose Start➪All
Programs➪Accessories➪Command Prompt. Also see
“Choose Advanced Safe Mode Options,” later in this
chapter, for more information.
Please purchase PDF Split-Merge on www.verypdf.com to remove this watermark.
➟
286
Part IV: Resetting the Operating System
Safe mode indicators
Help window
Figure 17-4
➟
Registry Editor: This tool is not for inexperienced or
unguided users. You may need to use it, however, if
a support professional directs you to make changes
in your Windows Registry files. Follow his or her
instructions carefully.
Don’t make changes without backing up the previous
set of files and without getting specific instructions
about changes. A mistake in a critical section can ren-
der Windows unusable, requiring you to reinstall it.
Please purchase PDF Split-Merge on www.verypdf.com to remove this watermark.
➟
287
Chapter 17: Working in Safe Mode
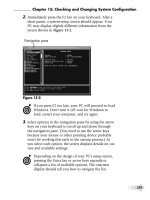
Type commands at the command prompt.
Figure 17-5
Test New Hardware in Safe Mode
1.
Start your computer in safe mode, as described earlier in
this chapter.
2.
Uninstall any drivers or other software that you installed
for the new hardware. (See Chapter 4 for information on
uninstalling programs and working with drivers.)
3.
Choose Start➪Shut Down to shut down the computer.
4.
Uninstall the new hardware.
Please purchase PDF Split-Merge on www.verypdf.com to remove this watermark.
➟
288
Part IV: Resetting the Operating System
5.
Restart the computer in normal mode.
6.
If the problem goes away, you’ve isolated its source.
Contact the manufacturer of the new hardware for
assistance.
Test Settings in Safe Mode
1.
Follow the appropriate step for your version of Windows:
➟
Windows XP: Choose Start➪Control Panel to open
the Control Panel window, and double-click the
Display icon to open the Display Properties dialog
box.
➟
Vista and Windows 7: Choose Start➪Control Panel
to open the Control Panel window. Then (in Classic
View) click Display or (in Category View) select
Appearance and Personalization and then click
Display to open the Display dialog box.
2.
Again, follow the appropriate step for your version of
Windows:
➟
Windows XP: On the Settings tab, restore the resolu-
tion and color settings that were in effect before you
started having problems, and click OK.
➟
Vista and Windows 7: Click Adjust Resolution,
make the necessary changes, and click OK.
In Windows 7, you can’t adjust color settings in safe
mode, but you can adjust screen resolution.
Other system settings, such as network and sound-
card configuration, aren’t available in standard safe
mode. See the next section for more options.
Please purchase PDF Split-Merge on www.verypdf.com to remove this watermark.
➟
289
Chapter 17: Working in Safe Mode
Choose Advanced Safe Mode Options
1.
Follow Steps 1–4 of “Start Your Computer in Safe Mode,”
earlier in this chapter. In Windows XP and Vista, you see the
Windows Advanced Options Menu screen; in Windows 7,
you see the Advanced Boot Options Menu screen.
2.
Use the arrow keys to select the option you want to use:
In Windows 7 and Vista, a brief description appears
at the bottom of the screen as you select each option.
• Repair Your Computer (Vista and Windows 7
only): This option displays a list of system-recovery
options, including tools you can use to diagnose
your current problems. You’ll be asked to log in,
after which you see a dialog box.
If you don’t see this dialog box, it may mean that
your computer’s manufacturer has supplied tools to
replace these Microsoft utilities. Also, you may find
these tools on your Windows CD but not on your
hard drive.
• Safe Mode: This option (covered earlier in this
chapter) loads Windows with a minimal set of
drivers and services, permitting access to Control
Panel and certain other utilities.
• Safe Mode with Networking: This option loads
Windows in safe mode and also includes the stan-
dard set of drivers and services that you need to
access the Internet or other computers on a network.
• Safe Mode with Command Prompt: This option
loads Windows in safe mode but displays the
command-prompt window instead of the usual
Windows interface, permitting direct use of utili-
ties that run outside Windows.
Please purchase PDF Split-Merge on www.verypdf.com to remove this watermark.
➟
290
Part IV: Resetting the Operating System
• Enable Boot Logging: During the start-up process,
this option creates a file listing all the drivers that
load during start-up. Examining the file, which is
called ntbtlog.txt, may offer clues for
advanced troubleshooting.
• Enable VGA Mode (Windows XP and Vista) or
Enable Low Resolution Video (Windows 7): This
option loads Windows with the current video
driver but with low-resolution, minimal settings.
This option allows you to reset the display settings
if they were intentionally or accidentally set out-
side the acceptable range for your hardware.
• Last Known Good Configuration: This option
loads Windows with the last configuration that
worked successfully. I cover it in detail in
Chapter 16.
• Directory Services Restore Mode: This advanced
option is for system administrators and advanced
users, but a support professional may direct you to
choose it. This option loads the Windows domain
controller running Active Directory so that the
directory service can be restored. You wouldn’t
choose this option except under the direction of a
Windows support professional.
• Debugging Mode: This option loads another
advanced troubleshooting mode that lets you
change certain elements of the Windows code
itself. A support professional may direct you to
choose this option, but don’t enter this mode by
yourself.
• Disable Automatic Restart on System Failure:
This option (see Figure 17-6) allows you to specify
whether Windows will restart automatically if an
error causes it to fail. Microsoft recommends that
Please purchase PDF Split-Merge on www.verypdf.com to remove this watermark.
➟
291
Chapter 17: Working in Safe Mode
you disable automatic restart if Windows is stuck
in a loop in which it fails, attempts to restart, and
fails again repeatedly.
• Disable Driver Signature Enforcement (Vista and
Windows 7 only): This option allows drivers that
contain improper or unverified signatures to be
loaded.
• Start Windows Normally: This option, unlike the
others in this menu, starts Windows in normal
mode.
• Recovery Console (Windows XP) or View System
Recovery Options (Vista): Choose this option to
display a menu of recovery options that can help
you solve problems related to start-up.
Disable automatic restart if Windows
cycles and won’t start up properly.
Figure 17-6
Please purchase PDF Split-Merge on www.verypdf.com to remove this watermark.
➟
292
Part IV: Resetting the Operating System
System Recovery Options is a suite of recovery and
repair tools. You see this option only if these utilities
have been installed on your hard drive. Otherwise,
you can find them on your Vista CD. Depending on
your computer brand, the manufacturer may have
substituted another utility for this one.
• Reboot: This option lets you restart the system.
Unless you press the F8 key to start in safe mode,
this option restarts the computer normally.
• Return to OS Choices Menu: If your computer
contains more than one version of Windows, this
option returns you to the start-up menu so you
can choose which version you want to launch.
3.
Press Enter to start Windows in the selected mode.
Exit Safe Mode
1.
Restart the computer from the Start menu.
2.
Allow Windows to load normally.
Please purchase PDF Split-Merge on www.verypdf.com to remove this watermark.
Part V
Troubleshooting
Your PC
Please purchase PDF Split-Merge on www.verypdf.com to remove this watermark.
Please purchase PDF Split-Merge on www.verypdf.com to remove this watermark.
Managing and
Troubleshooting
Devices
D
evice Manager, a key component of the
System utility in Control Panel, is a full-
time, officially licensed internal snoop and
reporter. As its name tells you, its assignment is
to manage the devices that do the work.
In addition, this utility gives you a window on
the various hardware components that make
up your computer. Here, devices are grouped
according to their function. You can retrieve
device names, view driver information, find
out whether a device is working properly,
enable or disable a device, and more. Device
Manager is a valuable tool that helps you
understand more about your computer system
and troubleshoot hardware problems.
In this chapter, I show you how to use Device
Manager to keep your system running
smoothly — and how to troubleshoot device
problems if you need more help.
18
Get ready to . . .
➟
See What You Can Do
with Device Manager ........ 296
➟
Open Device Manager ...... 297
➟
Resolve a Conflict ............. 300
➟
Disable a Device .............. 302
➟
Use a Windows Trouble-
shooting Wizard ............... 304
➟
Update a Device Driver ..... 306
➟
Chapter
Please purchase PDF Split-Merge on www.verypdf.com to remove this watermark.
➟
296
Part V: Troubleshooting Your PC
See What You Can Do with Device Manager
➟
View a list of the devices installed in your computer
system. Figure 18-1 shows a sample list in Device
Manager. (Your computer’s list will be similar but
certainly not the same.)
Click a plus sign (+) to expand any device category.
Figure 18-1
➟
Temporarily disable any listed device to help with a
troubleshooting process (see “Disable a Device,”
later in this chapter). If your PC works properly with
a single device disabled, either that device is causing
the problem, or it’s in conflict with another device
(see “Resolve a Conflict,” later in this chapter).
➟
See at a glance whether the system has found prob-
lems, such as malfunctioning hardware or intermit-
tent device conflicts.
Please purchase PDF Split-Merge on www.verypdf.com to remove this watermark.