Tài liệu Windows Server 2008 Inside Out- P21 ppt
Bạn đang xem bản rút gọn của tài liệu. Xem và tải ngay bản đầy đủ của tài liệu tại đây (1.92 MB, 50 trang )
Figure 28-25 Specify the programs to configure as RemoteApps.
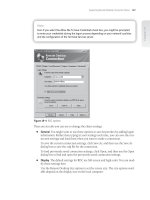
4. To confi gure the properties for a RemoteApp, select the application name and
then click Properties. Then using the following options in the RemoteApp
Properties dialog box, shown in Figure 28-26, you can confi gure the way the
application can be used:
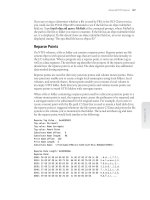
RemoteApp Program Name
Sets the program name that will be displayed
to users. To change the name, type a new name in the RemoteApp Program
Name box.
Location
Sets the path of the program executable fi le. To change the path,
type the new path in the Location box, or click Browse to locate the .exe fi le.
Although you can use system environment variables in the path, you cannot
use per-user environment variables.
Alias
Sets a unique identifi er for the program that defaults to the program’s
fi le name without the fi le extension. In most cases, you will not need to
change this name.
RemoteApp Program Is Available Through TS Web Access
Determines
whether the program is available through TS Web Access as per the default
setting. To disable TS Web Access of the RemoteApp, clear the check box.
Command-Line Arguments
Determines whether command-line arguments
are allowed, not allowed, or whether to always use the same command-line
arguments.
Change Icon
Sets the program icon that will be associated with the
application.
Configuring RemoteApps 967
Chapter 28
Please purchase PDF Split-Merge on www.verypdf.com to remove this watermark.
When you are fi nished confi guring program properties, click OK, and then
click Next.
Figure 28-26 Optionally, set configuration properties for individual programs.
5. On the Review Settings page, review the settings, and then click Finish. The
programs that you selected should appear in the RemoteApp Programs list in the
lower portion of the TS RemoteApp Manager main window, as shown in Figure
28-27.
Figure 28-27 Review the list of available RemoteApps.
Deploying RemoteApps
RemoteApps appear as if they are running on the end user’s local computer. Instead of
being presented to the user on the desktop of the remote terminal server, RemoteApps
run in their own resizable window and have their own entry on the taskbar. If a user is
running more than one RemoteApp on the same terminal server, the RemoteApps will
share the same Terminal Services session.
Chapter 28
968 Chapter 28 Deploying Terminal Services
Please purchase PDF Split-Merge on www.verypdf.com to remove this watermark.
Users can access RemoteApps in several ways. They can:
Access a link to the program on a Web site by using TS Web Access.
Double-click a program icon on their desktop or Start menu that has been created
and distributed by an administrator with a Windows Installer (.msi) package.
Double-click a fi le where the fi le name extension is associated with a RemoteApp
program. This can be confi gured by an administrator with a Windows Installer
package.
Double-click a Remote Desktop Protocol (.rdp) fi le that has been created and dis-
tributed by their administrator.
As a Terminal Services administrator, you’ll need to confi gure related options to make
these access techniques possible.
Accessing RemoteApps Using TS Web Access
With TS Web Access, you provide users with the Web address of the IIS server con-
fi gured with TS Web Access and then they see a list of available RemoteApps that
they can click to start, as shown in Figure 28-28. The default TS Web Access link is
http://ServerID/ts/, where ServerID is the host name or IP address of the IIS server run-
ning TS Web Access. When a user accesses this link, he must sign in to the server
by providing his user credentials. Afterward, he is forwarded to the default page for
RemoteApp Programs automatically.
Note
The TS Web Access application running on the IIS server uses JScript, which might be a
restricted feature in the Web browser. You can resolve this by changing the browser set-
tings to allow JScript to run or by adding the Web site as a trusted site.
Figure 28-28 Users access RemoteApps on the IIS server running TS Web Access.
Note
The TS Web Access application running on the IIS server uses JScript, which might be a
restricted feature in the Web browser. You can resolve this by changing the browser set-
tings to allow JScript to run or by adding the Web site as a trusted site.
Configuring RemoteApps 969
Chapter 28
Please purchase PDF Split-Merge on www.verypdf.com to remove this watermark.
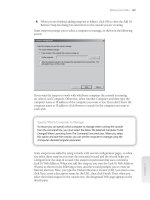
When a user clicks the link for a RemoteApp, the RemoteApp Starting dialog box is dis-
played as shown in the following screen:
The user next sees a warning prompt with details about the remote connection being
established as shown in the following screen:
The preconfi gured resources for the connection are available by default. The user can
change these options as necessary (but cannot include resources restricted in Terminal
Services). Clicking Connect runs the application. The user can then interact with the
program that is running on the terminal server as if it were running locally.
Creating an .RDP File
You can use the RemoteApp Wizard to create a Remote Desktop Protocol (.rdp) fi le for
any application in the RemoteApp Programs list. To do this, follow these steps:
1. Open TS RemoteApp Manager, right-click the program in the RemoteApp
Programs list, and then choose Create .RDP File. Alternatively, to create an .rdp
fi le for multiple programs, press and hold the Ctrl key when you select each
program name, then right-click and choose Create .RDP File.
Chapter 28
970 Chapter 28 Deploying Terminal Services
Please purchase PDF Split-Merge on www.verypdf.com to remove this watermark.
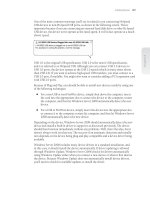
2. When the wizard starts, click Next. On the Specify Package Settings page, shown
in the following screen, enter the location to save the .rdp fi le or click Browse to
specify a new location to save the .rdp fi le. In the Terminal Server Settings area,
as shown in the following screen, click Change to modify the terminal server or
farm name, the Remote Desktop Protocol (RDP) port number, and the Require
Server Authentication setting. Click OK when you are fi nished.
3. In the TS Gateway Settings area, click Change to specify TS Gateway settings.
Click OK when you are fi nished.
4. To digitally sign the .rdp fi le, in the Certifi cate Settings area, click Change. Select
the certifi cate that you want to use, and then click OK.
5. When you are fi nished, click Next. On the Review Settings page, click Finish.
When the wizard is fi nished, the folder where the .rdp fi le was saved opens in a
new window, allowing you to confi rm that the .rdp fi le was created. This is the fi le
you must distribute to users to access the RemoteApps.
Creating a Windows Installer Package
You can use the RemoteApp Wizard to create a Windows Installer package for any
application in the RemoteApp Programs list. To do this, follow these steps:
1. Open TS RemoteApp Manager, right-click the program in the RemoteApp
Programs list, and then select Create Windows Installer Package. Alternatively,
to create a Windows Installer package for multiple programs, press and hold the
Ctrl key when you select each program name, then right-click and select Create
Windows Installer Package. Note that a separate Windows Installer package is
created for each program.
Configuring RemoteApps 971
Chapter 28
Please purchase PDF Split-Merge on www.verypdf.com to remove this watermark.
CAUTION
!
Don’t install Windows Installer packages that were created with this setting enabled on
the terminal server itself. If you do, clients that use the Windows Installer packages might
not be able to start the associated RemoteApp programs.
2. When the wizard starts, click Next. On the Specify Package Settings page, enter
the location to save the installer package. Alternatively, click Browse to select a
new location to save the installer package. In the Terminal Server Settings area,
click Change to modify the terminal server or farm name, the Remote Desktop
Protocol (RDP) port number, and the Require Server Authentication setting. Click
OK when you are fi nished.
3. In the TS Gateway Settings area, click Change to specify TS Gateway settings.
Click OK when you are fi nished.
4. To digitally sign the installer package, in the Certifi cate Settings area, click
Change. Select the certifi cate that you want to use, and then click OK.
5. Click Next to continue. On the Confi gure Distribution Package page, shown in
the following screen, specify where the shortcut icon for the program will appear
on client computers. Shortcut icons can appear on the user’s desktop, a named
submenu of the Start menu, or both. The default submenu is Remote Programs.
CU O
!
Chapter 28
972 Chapter 28 Deploying Terminal Services
Please purchase PDF Split-Merge on www.verypdf.com to remove this watermark.
6. In the Take Over Client Extensions area, confi gure whether to associate the
fi le name extensions on the client computer with the RemoteApp program or
programs. If you do this, all fi le name extensions that are handled by the program
or programs on the terminal server will also be associated on the client computer
with the RemoteApp program or programs. Also, users are not prompted whether
the terminal server should take over fi le extensions for the program or programs.
7. Click Next to continue. On the Review Settings page, review the settings and
then click Finish. When the wizard is fi nished, the folder where the Windows
Installer package was saved opens in a new window, allowing you to confi rm that
the Windows Installer (.msi) packages were created. You must distribute these
packages to users so they can access the RemoteApps.
Confi guring Deployment Settings for All RemoteApps
Deployment settings control how users connect to Terminal Services to access Remote-
Apps. You can confi gure deployment settings using TS RemoteApp Manager and addi-
tional settings through Group Policy. Additional Group Policy settings are located in
both the Computer Confi guration and the User Confi guration node under Administra-
tive Templates\Windows Components\Terminal Services\Remote Desktop Connection
Client.
To confi gure deployment settings for all RemoteApps, follow these steps:
1. Start TS RemoteApp Manager. In the Actions pane or on the Action menu, click
Terminal Server Settings.
2. On the Terminal Server tab, shown in Figure 28-29, under Connection Settings,
accept or modify the server or farm name, the Remote Desktop Protocol (RDP)
port number, and server authentication settings.
Figure 28-29 Configure general deployment settings for the terminal server.
Configuring RemoteApps 973
Chapter 28
Please purchase PDF Split-Merge on www.verypdf.com to remove this watermark.
3. To provide a link to a full terminal server desktop session through TS Web
Access, under Remote Desktop Access, select the Show A Remote Desktop
Connection To This Terminal Server In TS Web Access check box.
4. Under Access To Unlisted Programs, choose either of the following:
Do Not Allow Users To Start Unlisted Programs On Initial Connection
(Recommended) Use this setting to help protect against malicious users,
or a user unintentionally starting a program from an .rdp fi le on initial
connection. This setting does not prevent users from starting unlisted pro-
grams remotely after they connect to the terminal server by using a Remote-
App program.
Allow Users To Start Both Listed And Unlisted Programs On Initial Con-
nection Use this setting to allow users to start any program remotely from
an .rdp fi le on initial connection, not just those programs in the RemoteApp
Programs list.
5. On the TS Gateway tab, shown in Figure 28-30, confi gure the desired TS Gateway
behavior. You can confi gure whether to automatically detect the TS Gateway
server settings, to use the TS Gateway server settings that you specify, or to not
use a TS Gateway server. If you select Automatically Detect TS Gateway Server
Settings, the client tries to use Group Policy settings to determine the behavior of
client connections to TS Gateway.
Figure 28-30 Configure TS Gateway settings.
6. The options on the Common RDP Settings tab control the preconfi gured
resources available when using RemoteApps. Under Devices And Resources,
confi gure which devices and resources on the client computer you want to make
available in the remote session. Under User Experience, choose whether to enable
font smoothing and the desired color depth.
Chapter 28
974 Chapter 28 Deploying Terminal Services
Please purchase PDF Split-Merge on www.verypdf.com to remove this watermark.
7. To confi gure additional RDP settings, such as audio redirection, click the Custom
RDP Settings tab. Type the desired settings into the Custom RDP Settings box. Or,
alternatively, copy the desired settings from an existing .rdp fi le and then paste
them into the Custom RDP Settings box.
8. When you are fi nished, click Apply to save your deployment settings.
Modifying or Removing a RemoteApp Program
After you have added programs to the RemoteApp Programs list, you can easily modify
the properties of a RemoteApp or delete a RemoteApp from the list. To change the prop-
erties of a RemoteApp, open TS RemoteApp Manager, right-click the program in the
RemoteApp Programs list, and then choose Properties. You can then use the Properties
dialog box to confi gure the desired settings.
To delete a program in the RemoteApp Programs list, open TS RemoteApp Manager,
right-click the program in the RemoteApp Programs list, and then choose Remove.
When prompted, click Yes to confi rm the deletion. When you delete a program in the
RemoteApp Programs list, any .rdp fi les or Windows Installer packages that you created
for the RemoteApp are not deleted.
Using Terminal Services Manager
You can use Terminal Services Manager, shown in Figure 28-31, to inspect data about
terminal servers in trusted domains. You can examine users, connections, sessions, or
processes, as well as execute certain administrative commands against the remote ter-
minal servers. Start Terminal Services Manager from the Administrative Tools menu or
by typing tsadmin.exe at the command prompt.
Figure 28-31 Terminal Services Manager.
Using Terminal Services Manager 975
Chapter 28
Please purchase PDF Split-Merge on www.verypdf.com to remove this watermark.
Connecting to Terminal Servers
Unlike previous versions of Terminal Services Manager, the current version does not
automatically enumerate all the terminal servers that are available. By right-clicking
the Terminal Services Manager node in the console tree, you can perform the following
actions:
Connect To Computer
Connect to a terminal server by name or IP address.
Refresh
Refresh the information related to the current servers you are working
with.
Import From TS Session Broker
Allows you to import the farm and server names
from a TS Session Broker that you specify. You must manually refresh the list to
ensure that it is current.
New Group
Allows you to create a new group for tracking a group of related ter-
minal servers.
After a server is listed, you can right-click its entry to perform one of these actions:
Add To Group
Adds the server to a specifi c group so it’s more easily managed.
Remove From Group
Removes the server from a group.
Refresh
Refreshes information about that specifi c server only.
With groups, you can right-click the group entry to perform one of these actions:
Add Computer
Connects to a terminal server by name or IP address and adds it
to the group.
Empty Group
Removes all terminal servers from the group but doesn’t discon-
nect from the servers.
Disconnect All
Disconnects from all terminal servers in the group.
Refresh
Refreshes information about all servers in the group.
Getting Terminal Services Information
In the Terminal Services Manager console, terminal servers are organized by group or
individual servers. When you select a group entry, the details pane on the right will dis-
play information about the related users, sessions, and processes for all servers in the
group. After you expand a group entry, you can select a terminal server, and the details
pane on the right will display information about the related users, sessions, and pro-
cesses only for the selected server.
When you select the Users tab in the right pane, you can view and manage user
sessions. Each user with a current session is shown regardless of whether the ses-
sion is active or inactive. See the following section, “Managing User Sessions in
Terminal Services Manager,” for more information.
Chapter 28
976 Chapter 28 Deploying Terminal Services
Please purchase PDF Split-Merge on www.verypdf.com to remove this watermark.
When you select the Sessions tab in the right pane, you can view and manage user
and listener sessions. If users are permitted multiple sessions, this lets you see the
individual sessions separately from the users who started them.
When you select the Processes tab in the right pane, you can view and manage all
running process on the server. If you right-click a process, you can select End Pro-
cess to stop the process.
Managing User Sessions in Terminal Services Manager
Whenever you select a user entry or session in Terminal Services Manager, you can
right-click the related entry to perform one of the following actions:
Connect
Allows you to connect to a user’s session if you have the appropriate
permissions. After you choose Connect, you are prompted to enter the user’s pass-
word if the user running the session is different from your current user account.
Note that the Connect option is available only if Terminal Services Manager is
running on a remote machine and not locally on the terminal server.
Disconnect
Disconnects an active session. When a session is disconnected, all
the processes in that session continue to run in a disconnected state. This means
that no information is transmitted to the remote client. To disconnect multiple
sessions, simply select all the sessions you want to disconnect, and then choose
Disconnect from the Action menu.
Log Off
Logs the user off and ends any processes the user is currently running.
You can use this option to free resources being used by a session. However, this
can result in the loss of data if the user hasn’t saved her work. This option is avail-
able only when you select the server entry in the left pane and the Users tab in the
right pane.
Remote Control
Allows you to view or interact with a user’s session. When you
select Remote Control, you are prompted to set the shortcut key that can be used
to log off the remote control session. The default shortcut key is Ctrl+Asterisk (*).
By default, when you take remote control of a session, the user is notifi ed and
prompted to give permission. You won’t be able to continue until the user clicks
Yes to accept the request. If you don’t want users to be prompted, you can change
this behavior using the Remote Control tab in the RDP-Tcp Properties dialog box.
Note that the Remote Control option is available only if Terminal Services Man-
ager is running on a remote machine and not locally on the terminal server.
It is important to note that remote control can be enabled or disabled globally
through the Terminal Services Confi guration tool and per user in each user’s
Properties dialog box.
Reset
Resets a user session that is frozen or unresponsive. When you reset a
session, you terminate the session and free up all resources being used by the
session. Unlike logging a user off, this action does not use the normal logoff pro-
cesses. This means that not only could users lose data, but any changes they’ve
made to their profi les or settings could also be lost. Use Reset only when a session
cannot be logged off.
Using Terminal Services Manager 977
Chapter 28
Please purchase PDF Split-Merge on www.verypdf.com to remove this watermark.
Send Message
Sends a console message to the user. To send the same console
message to several users, simply select all the users to whom you want to send a
message, and then choose Send Message from the Action menu.
Status
Displays the status of the user session.
Managing Terminal Services from the Command Line
In addition to the tools in Terminal Services Manager, there are quite a few command-
line tools for working with Terminal Services. These commands can be divided into
two categories:
Gathering information
Controlling user sessions
Gathering Terminal Services Information
Several commands are available for gathering Terminal Services information at an
elevated command prompt including the following:
Query Process [* | ProcessId | UserName | SessionName | /ID:SessionId | Program-
Name] [/Server:ServerName]—Displays information about processes being run in
Terminal Services sessions on the server.
Query Session [SessionName | UserName | SessionId] [/Server:ServerName]—Dis-
plays information about Terminal Services sessions. You can also add /mode,
/fl ow, /connect, and /counter options to get additional information about current
line settings, fl ow control settings, connect settings, and counters, respectively.
Query Termserver [ServerName] [/Domain:domain] [/Address]—Displays the avail-
able application terminal servers on the network. The /Address parameter adds
network and node addresses to the output. Add the /continue option to remove
the pause between screens of information.
Query User [UserName | SessionName | SessionId] [/Server:ServerName]—Displays
information about users logged on to the system.
These commands accept many common parameters, including the following:
ProcessId—The ID of the process on the terminal server that you want to examine
ServerName—The name of the remote terminal server you want to work with
SessionId—The ID of the session on the terminal server that you want to examine
SessionName—The name of the session on the terminal server that you want to
examine
UserName—The name of the user whose sessions or processes you want to
examine
Chapter 28
978 Chapter 28 Deploying Terminal Services
Please purchase PDF Split-Merge on www.verypdf.com to remove this watermark.
These commands are very helpful when you are looking for Terminal Services informa-
tion and you do not have to use parameters to obtain information. If you type query
process at the command line, you get a list of all processes being run in Terminal Ser-
vices sessions on the local terminal server, for example:
USERNAME SESSIONNAME ID PID IMAGE
>wrstanek console 0 3204 explorer.exe
>wrstanek console 0 3372 mshta.exe
>wrstanek console 0 3656 licmgr.exe
If you type query session at the command line, you get a list of all sessions on the local
terminal server, for example:
SESSIONNAME USERNAME ID STATE TYPE DEVICE
>console wrstanek 0 Active wdcon
If you type query user at the command prompt, you get a list of all users who have ses-
sions on the local server, for example:
USERNAME SESSIONNAME ID STATE IDLE TIME LOGON TIME
>wrstanek console 0 Active . 4/18/2008 11:15 AM
tomc rdp-tcp#4 1 Active 1 4/18/2008 12:03 PM
If you type query termserver at the command prompt, you get a list of all known termi-
nal servers in the enterprise:
Known Terminal servers
----------------------
TSSVR02
TSSVR03
TSSVR04
Query Is a Server Command in Windows Server 2008
The Query command is available in Windows Server 2008 but not from a desktop com-
puter. If you are using Windows Vista as your desktop system, however, you can resolve
this dilemma by copying the Query.exe command from a server to your desktop. Type
where query.exe at the command line on the server to locate the command, and then
copy the command to your desktop.
Managing User Sessions from the Command Line
When you want to manage user sessions from the command line, you can use these
commands:
Shadow [SessionName | SessionId] [/Server:ServerName] [/v]—Allows you to take
remote control of a user’s session
Query Is a Server Command in Windows Server 2008
The Query command is available in Windows Server 2008 but not from a desktop com-
puter. If you are using Windows Vista as your desktop system, however, you can resolve
this dilemma by copying the Query.exe command from a server to your desktop. Type
where query.exe at the command line on the server to locate the command, and then
copy the command to your desktop.
Managing Terminal Services from the Command Line 979
Chapter 28
Please purchase PDF Split-Merge on www.verypdf.com to remove this watermark.
TSCon [SessionName | SessionId] [/Password:password] [/v]—Allows you to connect
to a user’s session if you know that user’s password
TSDisCon [SessionName | SessionId] [/Server:ServerName] [/v]—Allows you to dis-
connect a user’s session
Reset Session [SessionName | SessionId] [/Server:ServerName] [/v]—Allows you to
reset a user’s session
Logoff [SessionName | SessionId] [/Server:ServerName] [/v]—Allows you to log off a
user’s session
As you can see, all these commands accept similar parameters. These parameters
include the following:
SessionName—The name of the session on the terminal server that you want to
work with
SessionId—The ID of the session on the terminal server that you want to work with
ServerName—The name of the remote terminal server you want to work with
These commands also allow you to set verbose output using the /V parameter.
Using these commands is fairly straightforward. For example, if you want to disconnect
a user session with the session ID 2 on the remote server TS06, you’d type the com-
mand tsdiscon 2 /server:ts06.
If you are logged on locally to the terminal server, it’s even easier, as all you have to type
is tsdiscon 2.
Other Useful Terminal Services Commands
There are a few other useful commands for working with Terminal Services, including
the following:
Msg [UserName | SessionName | @fi lename | SessionId | *] [/Server:ServerName]
[Message]—Use Msg to send a console message to users by user name, session
name, and session ID. Use the asterisk wildcard (*) to send the same message to
all sessions on a designated server. Use @fi lename to specify a fi le containing a list
of user names, session names, or both. Add /W to wait for acknowledgment and
/Time:numSecondsToWait to set the time delay to wait for acknowledgment of the
message.
TSKill ProcessId | ProcessName [/Server:ServerName] [/ID:SessionId | /a] [/v]—Use
TSKill to end a process using the process ID or process name. A process can be
shut down for a particular session ID using /ID:SessionID or for all sessions run-
ning the process by using the option /a.
Chapter 28
980 Chapter 28 Deploying Terminal Services
Please purchase PDF Split-Merge on www.verypdf.com to remove this watermark.
Confi guring Terminal Services Per-User Settings
When you install Terminal Services, the properties pages of users are updated to
include two additional tabs: Remote Control and Terminal Services Profi le. The settings
on these tabs can be used to confi gure per-user settings for Terminal Services.
Getting Remote Control of a User’s Session
Being able to get remote control of a user’s session is helpful for troubleshooting. Rather
than guess what a user is trying to do when working with an application, you can view
the user’s session and see the mistakes yourself. If allowed, you can also take over a
user’s session and manipulate the session from your desktop while still allowing the
user to view the session from the desktop. By watching the task being performed cor-
rectly, the user should be better able to perform the task independently next time.
By default, remote control is enabled and administrators are allowed to interact with
user sessions. However, this occurs only if the user gives permission for an administra-
tor to do so. Although global remote control settings for all users are set with the Ter-
minal Services Confi guration tool, you can change the settings for individual users as
necessary. To do this, follow these steps:
1. Click Start, All Programs, Administrative Tools, and then Active Directory
Users And Computers. In Active Directory Users And Computers, expand the
organizational unit or container in which the user’s account was created, and
then double-click the account to display its Properties dialog box.
2. As shown in Figure 28-32, select the Remote Control tab. If you want to confi gure
the account so that it cannot be controlled remotely, clear the Enable Remote
Control check box. Otherwise, select the Enable Remote Control check box and
confi gure the way in which remote control works, as follows:
If you want to ensure that permission is required to view or interact with a
user’s account, select the Require User’s Permission check box.
If you want to be able to remotely control a user’s account without explicit
permission, clear the Require User’s Permission check box.
3. Afterward, set the level of control allowed as follows:
If you want only to be able to view the account, select View The User’s
Session.
If you want to be able to view and take control of the account, select Interact
With The Session.
4. Click OK.
Configuring Terminal Services Per-User Settings 981
Chapter 28
Please purchase PDF Split-Merge on www.verypdf.com to remove this watermark.
Figure 28-32 Enable and configure remote control of an individual user’s account.
Setting Up the Terminal Services Profi le for Users
All user accounts have a separate Terminal Services profi le and home directory, which
is used when the users log on to a terminal server. To confi gure these optional settings,
follow these steps:
1. Click Start, All Programs, Administrative Tools, and then Active Directory
Users And Computers. In Active Directory Users And Computers, expand the
organizational unit or container in which the user’s account was created, and
then double-click the account to display its Properties dialog box.
2. As shown in Figure 28-33, select the Terminal Services Profi le tab. Using this tab,
you can set the following fi elds:
Profi le Path—The path to the user’s Terminal Services profi le. Terminal Ser-
vices profi les provide the environment settings for users when they con-
nect to a terminal server. Each time a user logs on to a terminal server, that
user’s profi le determines desktop and Control Panel settings, the availability
of menu options and applications, and so on. Typically, you set the profi le
path to a network share and use the %UserName% environment variable to
set a user-specifi c profi le path.
Terminal Services Home Folder—The directory in which the user should store
fi les when connected to Terminal Services. Assign a specifi c directory for
the user’s fi les as a local path on the user’s system or a connected network
drive. If the directory is available to the network, the user can access the
directory regardless of which computer is used to connect to Terminal
Services.
Chapter 28
982 Chapter 28 Deploying Terminal Services
Please purchase PDF Split-Merge on www.verypdf.com to remove this watermark.
Figure 28-33 Configure the Terminal Services profile for a user as necessary to help
customize an individual environment.
3. The Deny This User Permission To Log On To Terminal Server option controls
whether a user can log on to a terminal server. If you select this check box, a user
who tries to connect to Terminal Services will get an error message stating that
the logon privilege has been disabled.
4. Click OK.
Configuring Terminal Services Per-User Settings 983
Chapter 28
Please purchase PDF Split-Merge on www.verypdf.com to remove this watermark.
Please purchase PDF Split-Merge on www.verypdf.com to remove this watermark.
PART 5
Managing Active
Directory and
Security
CHAPTER 29
Active Directory Architecture . . . . . . . . . . . . 987
CHAPTER 30
Designing and Managing the
Domain Environment . . . . . . . . . . . . . . . . . . 1007
CHAPTER 31
Organizing Active Directory. . . . . . . . . . . . . 1053
CHAPTER 32
Confi guring Active Directory Sites
and Replication . . . . . . . . . . . . . . . . . . . . . . . 1071
CHAPTER 33
Implementing Active Directory
Domain Services . . . . . . . . . . . . . . . . . . . . . . 1107
CHAPTER 34
Deploying Read-Only Domain
Controllers . . . . . . . . . . . . . . . . . . . . . . . . . . . .1141
CHAPTER 35
Managing Users, Groups, and
Computers . . . . . . . . . . . . . . . . . . . . . . . . . . . 1167
CHAPTER 36
Managing Group Policy . . . . . . . . . . . . . . . . 1233
CHAPTER 37
Active Directory Site Administration . . . . . 1283
985
Please purchase PDF Split-Merge on www.verypdf.com to remove this watermark.
Please purchase PDF Split-Merge on www.verypdf.com to remove this watermark.