Tài liệu Windows Server 2008 Inside Out- P24 doc
Bạn đang xem bản rút gọn của tài liệu. Xem và tải ngay bản đầy đủ của tài liệu tại đây (1.47 MB, 50 trang )
7. When you click Next, the wizard determines the available Active Directory sites.
On the Select A Site page, select the site in which you want to locate the domain
controller and then click Next.
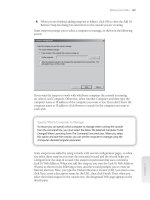
8. When you click Next, the wizard examines the DNS confi guration and attempts
to determine whether any authoritative DNS servers are available. As shown in
Figure 33-4, the number of authoritative DNS servers in the domain will be listed
on the Additional Domain Controller Options page as shown in the fi gure. As
permitted, select additional installation options for the domain controller and
then click Next.
Figure 33-4 Set additional options for the domain controller.
9. If you are installing the DNS Server service as an additional option and the server
doesn’t have static IP addresses for both IPv4 and IPv6, you see a warning prompt
regarding the server’s dynamic IP address or addresses. Click Yes only if you plan
to use the dynamic IP address or addresses despite the possibility that this could
result in an unreliable DNS confi guration. Click No if you plan to change the IP
confi guration before continuing.
Installing Active Directory Domain Services 1117
Chapter 33
Please purchase PDF Split-Merge on www.verypdf.com to remove this watermark.
Note
During installation of the operating system, Windows Setup installs and confi gures IPv4
and IPv6 if it detects networking components. If you’ve confi gured a static IPv4 address
but haven’t confi gured a static IPv6 address, you also see this warning. You can ignore
this warning if your network uses only IPv4 (but keep in mind that you may need to make
changes to DNS records later if your organization starts using IPv6 addresses).
10. If you are installing the DNS Server service as an additional option, the wizard
next attempts to register a delegation for the DNS server with an authoritative
parent zone. If you are integrating with an existing DNS infrastructure, you
should manually create a delegation to the DNS server and then click Yes to
continue. Otherwise, you can ignore this warning and click Yes to continue.
Note
Before continuing, make sure you check for encrypted fi les and folders as discussed
earlier in “Active Directory Installation Options and Issues” on page 1112. If you don’t
do this and there are encrypted fi les and folders present, you will no longer be able to
decrypt them.
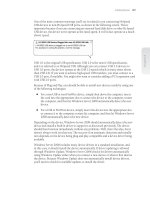
11. If you are performing an advanced installation and are adding a domain
controller to an existing domain, you can specify whether to replicate the
necessary Active Directory data from media or over the network, as shown in
Figure 33-5. When you are installing from media, you must specify the folder
location of the media before continuing.
12. If you are performing a basic installation or you choose to replicate data over the
network, you’ll see the Source Domain Controller page when you click Next. This
page allows you to choose a replication partner for the installation. When you
install a domain controller and do not use backup media, all directory data is
replicated from the replication partner to the domain controller you are installing.
As this can be a considerable amount of data, you typically want to ensure that
both domain controllers are located in the same site or connected over reliable,
high-speed networks.
Note
During installation of the operating system, Windows Setup installs and confi gures IPv4
and IPv6 if it detects networking components. If you’ve confi gured a static IPv4 address
but haven’t confi gured a static IPv6 address, you also see this warning. You can ignore
this warning if your network uses only IPv4 (but keep in mind that you may need to make
changes to DNS records later if your organization starts using IPv6 addresses).
Note
Before continuing, make sure you check for encrypted fi les and folders as discussed
earlier in “Active Directory Installation Options and Issues” on page 1112. If you don’t
do this and there are encrypted fi les and folders present, you will no longer be able to
decrypt them.
Chapter 33
1118 Chapter 33 Implementing Active Directory Domain Services
Please purchase PDF Split-Merge on www.verypdf.com to remove this watermark.
Figure 33-5 Specify whether to replicate over the network or from media.
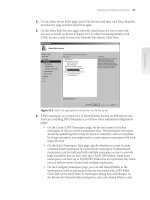
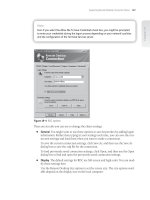
13. On the Location For Database, Log Files, And SYSVOL page, shown in Figure
33-6, select a location to store the Active Directory database folder, log folder, and
SYSVOL. Keep the following in mind when confi guring these locations:
The default location for the database and log folders is a subfolder of
%SystemRoot%\NTDS. As discussed in “Hardware and Confi guration Con-
siderations for Domain Controllers” on page 1108, you’ll get better perfor-
mance if these folders are on two separate volumes, each on a separate disk.
The default location for the SYSVOL folder is %SystemRoot%\Sysvol. In
most cases, you’ll want to accept the default as the replication services store
their database in a subfolder of the %SystemRoot% folder anyway, so by
keeping the folders on the same volume, you reduce the need to move fi les
between drives.
Note
When the domain functional level is Windows 2000 Server or Windows Server 2003, the
File Replication Service (FRS) is used to replicate the SYSVOL. FRS enables interoperability
with Windows 2000 Server and Windows Server 2003 but does not support the latest
replication enhancements. When the domain functional level is Windows Server 2008,
the Distributed File System (DFS) service is used to replicate the SYSVOL and the latest
replication enhancements are available, including replication of changes only within fi les,
bandwidth throttling, and improved replication topology.
Installing Active Directory Domain Services 1119
Chapter 33
Please purchase PDF Split-Merge on www.verypdf.com to remove this watermark.
Figure 33-6 Set the storage locations for Active Directory data.
14. Click Next. Type and confi rm the password that should be used when you want
to start the computer in Directory Services Restore mode. Be sure to track this
password carefully. This special password is used only in Restore mode and is
different from the Administrator account password.
15. Click Next. Review the installation options. Optionally, click Export Settings
to save these settings to an answer fi le that you can use to perform unattended
installation of other domain controllers. When you click Next again, the wizard
will use the options you’ve selected to install and confi gure Active Directory. This
process can take several minutes. Keep the following in mind:
If you specifi ed that the DNS Server service should be installed, the server
will also be confi gured as a DNS server at this time.
If you are installing an additional domain controller in an existing domain,
the domain controller will need to obtain updates of all the directory par-
titions from other domain controllers and will do this by initiating a full
synchronization. The only way to avoid this is to make a media backup of
Active Directory on an existing domain controller, start the Active Directory
Domain Services Installation Wizard in Advanced mode, and then specify
the backup media to use during installation of Active Directory.
16. When the wizard fi nishes confi guring Active Directory, click Finish. You are then
prompted to restart the computer. Click Restart Now to reboot.
Chapter 33
1120 Chapter 33 Implementing Active Directory Domain Services
Please purchase PDF Split-Merge on www.verypdf.com to remove this watermark.
After installing Active Directory, you should verify the installation by doing the follow-
ing (in no particular order):
Examine the log of the installation, which is stored in the Dcpromo.log fi le in the
%SystemRoot%\Debug folder. As shown in the following screen, the log is very
detailed and takes you through every step of the installation process, including
the creation of directory partitions and the securing of the Registry for Active
Directory.
Check for DNS updates in the DNS console shown in the following screen. If you
added a domain controller to an existing domain, DNS is updated to add SRV
records for the server. If you created a new domain, DNS is updated to include a
forward lookup zone for the domain.
Check for updates in Active Directory Users And Computers. For example, check
to make sure the new domain controller is listed in the Domain Controllers OU,
as shown in the following screen.
Installing Active Directory Domain Services 1121
Chapter 33
Please purchase PDF Split-Merge on www.verypdf.com to remove this watermark.
If you created a new domain, the following containers are created and populated
as appropriate:
Builtin contains the built-in accounts for administration, including Admin-
istrators and Account Operators.
Computers contains computer accounts for the domain.
Domain Controllers contains the domain controller accounts and should
have an account for the domain controller you installed.
ForeignSecurityPrinicipals is a container for security principals from other
domain trees.
Users is the default container for user accounts in the domain.
Additionally, if you created a new domain, you also need to confi gure DNS so that name
resolution works appropriately with any existing domains. To enable name resolution
for computers within the new domain, you typically want to create secondary zones
for all existing domains in the new domain and set up zone transfers. To enable name
resolution into the new domain from existing domains, you typically want to create a
secondary zone in existing domains for the new domain and set up zone transfers.
Creating New Domains in New Forests
To create a new domain in a new forest, follow these steps:
1. Start the Active Directory Domain Services Installation Wizard as discussed
previously. If you haven’t installed the AD DS binaries, the wizard installs them.
Additionally, keep in mind that the currently logged on local administrator
account will be created as a user account in the new domain with full
administrator permissions. This means the account will be a member of the
Users, Domain Users, and Domain Admins groups.
2. By default, the wizard uses Basic Installation mode. If you want to set the
NetBIOS name of the domain, select Use Advanced Installation Mode before
clicking Next to continue.
3. f the server doesn’t have an appropriate IP address, you’ll see the Confi gure TCP/
IP page. This page displays a warning about the invalid IP address or improper
network confi guration and you’ll need to correct the issue before you can
continue.
Chapter 33
1122 Chapter 33 Implementing Active Directory Domain Services
Please purchase PDF Split-Merge on www.verypdf.com to remove this watermark.
4. On the Choose A Deployment Confi guration page, select Create A New Domain
In A New Forest as shown in Figure 33-7.
Figure 33-7 Create a new domain in a new forest.
5. Click Next to display the Name Of The Forest Root Domain page. Type the full
DNS name for the new domain. Domain names are not case-sensitive and use the
letters A to Z, the numerals 0 to 9, and the hyphen (-) character. Each component
of the domain name must be separated by a dot (.) and cannot be longer than 63
characters.
6. When you click Next, the wizard will determine whether the name you’ve entered
is already in use on your network. If the name is already in use, you will need to
enter a different name or go back and make a different confi guration selection.
7. After the wizard validates the domain name, it uses the name to generate a default
NetBIOS name. If you are using Advanced Installation mode or the wizard has
detected a confl ict, you will be able to accept the wizard-generated name or type a
new NetBIOS name of up to 15 characters and then click Next to continue.
8. On the Set Forest Functional Level page, choose the desired functional level for
the new Active Directory forest. The forest functional level can be set to Windows
2000, Windows 2003 or Windows 2008. See “Domain Design Considerations” on
page 1059 for a complete discussion on forest functional levels.
9. If you set the forest functional level to Windows 2008, the domain functional
level is set automatically to Windows 2008 and you do not see the Set Domain
Functional Level page. Otherwise, on the Set Domain Functional Level page,
Installing Active Directory Domain Services 1123
Chapter 33
Please purchase PDF Split-Merge on www.verypdf.com to remove this watermark.
choose the desired functional level for the new domain. The domain functional
level can be set to Windows 2000 native, Windows 2003, or Windows 2008.
See “Domain Design Considerations” on page 1059 for a complete discussion on
domain functional levels.
10. When you click Next, the wizard examines the network environment and
attempts to register the domain and the domain controller in DNS. If the wizard
detects that a DNS server is not available, DNS server will be selected as an
additional option on the Additional Domain Controller Options page and the
descriptive text also will recommend that you install the DNS Server service.
Click Next to continue.
Note
If you choose to let the wizard install DNS, the DNS Server service will be installed and
the domain controller will also act as a DNS server. A primary DNS zone will be created as
an Active Directory–integrated zone with the same name as the new domain you are set-
ting up. The wizard will also update the server’s TCP/IP confi guration so that its primary
DNS server is set to itself.
11. If you are installing the DNS Server service as an additional option and the server
doesn’t have static IP addresses for both IPv4 and IPv6, you’ll see a warning
prompt regarding the server’s dynamic IP address or addresses. Click Yes only
if you plan to use the dynamic IP address or addresses despite the possibility
that this could result in an unreliable DNS confi guration. Click No if you plan to
change the IP confi guration before continuing.
Note
During installation of the operating system, Windows Setup installs and confi gures IPv4
and IPv6 if networking components are detected. If you’ve confi gured a static IPv4
address but haven’t confi gured a static IPv6 address, you’ll also see this warning. You can
ignore this warning if your network only uses IPv4 (but keep in mind that you may need
to make changes to DNS records later if your organization starts using IPv6 addresses).
12. If you are installing the DNS Server service as an additional option, the wizard
next attempts to register a delegation for the DNS server with an authoritative
parent zone. If you are integrating with an existing DNS infrastructure, you
should manually create a delegation to the DNS server and then click Yes to
continue. Otherwise, you can ignore this warning and click Yes to continue.
Note
If you choose to let the wizard install DNS, the DNS Server service will be installed and
the domain controller will also act as a DNS server. A primary DNS zone will be created as
an Active Directory–integrated zone with the same name as the new domain you are set-
ting up. The wizard will also update the server’s TCP/IP confi guration so that its primary
DNS server is set to itself.
Note
During installation of the operating system, Windows Setup installs and confi gures IPv4
and IPv6 if networking components are detected. If you’ve confi gured a static IPv4
address but haven’t confi gured a static IPv6 address, you’ll also see this warning. You can
ignore this warning if your network only uses IPv4 (but keep in mind that you may need
to make changes to DNS records later if your organization starts using IPv6 addresses).
Chapter 33
1124 Chapter 33 Implementing Active Directory Domain Services
Please purchase PDF Split-Merge on www.verypdf.com to remove this watermark.
CAUTION
!
Before continuing, make sure you check for encrypted fi les and folders as discussed in
“Active Directory Installation Options and Issues” on page 1112. If you don’t do this and
there are encrypted fi les and folders present, you will no longer be able to decrypt them.
13. The rest of the installation proceeds as previously discussed. Continue with
steps 13–16 and the post-installation checks discussed in the previous section,
“Creating Additional Domain Controllers for an Existing Domain.”
Creating a New Domain or Domain Tree Within an Existing Forest
To create a new domain or domain tree within an existing forest, follow these steps:
1. Start the Active Directory Domain Services Installation Wizard as discussed
previously. If you haven’t installed the AD DS binaries, the wizard installs them.
2. On the initial wizard page, select the Use Advanced Installation Mode check box
before clicking Next to continue. If you don’t use Advanced Installation mode,
you can create new child domains in an existing forest but cannot create a new
domain tree in an existing forest.
3. If the server doesn’t have an appropriate IP address, you see the Confi gure TCP/
IP page. This page displays a warning about the invalid IP address or improper
network confi guration and you’ll need to correct the issue before you can
continue.
4. On the Choose A Deployment Confi guration page, you need to choose one of the
following:
Choose Existing Forest and then choose Create A New Domain In An Exist-
ing Forest
Choose this option to establish the fi rst domain controller in
a domain that is a child domain of an existing domain. By choosing this
option, you are specifying that the necessary parent domain already exists.
For example, you would choose this option if the parent domain cpandl.
com had already been created and you wanted to create the tech.cpandl.
com domain as a child of this domain.
When you click Next, you see the Network Credentials page. In the fi eld
provided, type the full DNS name of any domain in the forest where you
plan to install the domain controller. Preferably, this should be the name
of the forest root domain, such as cpandl.com. If you are logged on to a
domain in this forest and have the appropriate permissions, you can use
your current logged on credentials to perform the installation. Otherwise,
select Alternate Credentials, click Set, type the user name and password
for an enterprise administrator account in the previously specifi ed domain,
and then click OK.
CU O
!
Installing Active Directory Domain Services 1125
Chapter 33
Please purchase PDF Split-Merge on www.verypdf.com to remove this watermark.
Click Next again to display the Name The New Domain page. In the fi eld
provided, type the full DNS name for the parent domain, such as cpandl.
com, or click Browse to search for an existing domain to use. In the next
fi eld, type the single name component of the child domain, such as tech.
Choose Existing Forest, choose Create A New Domain In An Existing For-
est, and then choose Create A New Domain Tree Root Instead Of A New
Child Domain
Choose this option to establish a new domain tree that is
separate from any existing trees in the existing Active Directory forest. By
choosing this option, you specify that there isn’t an existing parent domain
with which you want to associate the new domain. For example, you should
choose this option if the cohowinery.com domain already exists and you
want to establish the cohovineyard.com domain in a new tree in the exist-
ing forest.
When you click Next, you see the Network Credentials page. In the fi eld
provided, type the full DNS name of any domain in the forest where you
plan to install the domain controller. Preferably, this should be the name
of the forest root domain, such as cpandl.com. If you are logged on to a
domain in this forest and have the appropriate permissions, you can use
your current logged on credentials to perform the installation. Otherwise,
select Alternate Credentials, click Set, type the user name and password
for an enterprise administrator account in the previously specifi ed domain,
and then click OK.
Click Next again to display the Name The New Domain Tree Root page.
Type the full DNS name for the new domain. The domain name you use
should not be a subdomain of an existing parent domain in any tree of the
forest.
5. The rest of the installation proceeds as previously discussed. Continue with steps
7–16 and the post-installation checks discussed in “Creating Additional Domain
Controllers for an Existing Domain” on page 1114. Note that you do not have the
option to install from media so the Install From Media page does not appear.
Performing an Active Directory Installation from Media
Whenever you install an additional domain controller in an existing domain, you
should consider whether you want to perform an installation from media rather than
creating the domain controller from scratch. Doing so allows the Active Directory
Domain Services Installation Wizard to get the initial data for the Confi guration,
Schema, and Domain directory partitions and optionally the SYSVOL from backup
media rather than performing a full synchronization over the network.
Not only does this reduce the amount of network traffi c, which is especially impor-
tant when installing domain controllers in remote sites that are connected by low-
bandwidth WAN links, it can also greatly speed up the process of installing an
additional domain controller and getting the directory partition data synchronized.
This means that rather than having to replicate the full data across the network, the
domain controller needs to get only the changes made since the backup media was
Chapter 33
1126 Chapter 33 Implementing Active Directory Domain Services
Please purchase PDF Split-Merge on www.verypdf.com to remove this watermark.
made. This can mean that only several megabytes of replication traffi c are generated
rather than several gigabytes, and on a busy or low-bandwidth network this can be very
important.
Note
Installing Active Directory from media is not designed to be used to restore failed
domain controllers. To restore failed domain controllers, you should use System State
restore as this ensures that all the data that needs to be restored is recovered as neces-
sary, including Registry settings, Sysvol data, and Active Directory data.
In Windows Server 2008, you can create installation media by restoring a System
State backup of another domain controller. This process works the same as it did for
Windows Server 2003. Windows Server 2008 also gives you the option of perform-
ing an installation from media backup. A media backup is preferred to a System State
backup as it only includes directory data. On the other hand, a System State backup of
Windows Server 2008 includes over 50,000 fi les that require 4 GB of space, not includ-
ing the directory data.
Regardless of which technique you want to use, there are a few guidelines that you
should follow when installing Active Directory from backup media:
Always try to use the most recent media backup of Active Directory as possible.
This reduces the number of updates that must replicate to the domain controller,
which in turn minimizes the post-installation replication traffi c.
Always use a backup of a domain controller in the same domain in which the
new domain controller is being created, and always use a backup from another
Windows Server 2008 domain controller.
Always copy the backup to a local drive on the server for which you are installing
Active Directory. You cannot use backup media from Universal Naming Conven-
tion (UNC) paths or mapped drives.
Never use backup media that is older than the tombstone lifetime of the domain.
The default value is 60 days. If you try to use backup media older than 60 days,
the Active Directory installation fails. For more information on tombstone lifetime
and why it is important, see “Extensible Storage Engine,” on page 993.
With these guidelines in mind, you can create an additional domain controller from
backup media by completing the following steps:
1. Open an elevated command prompt window. At the command prompt, type
ntdsutil. This starts the Directory Services Management Tool.
2. At the ntdsutil prompt, type activate instance ntds. This sets Active Directory as
the directory service instance to work with.
Note
Installing Active Directory from media is not designed to be used to restore failed
domain controllers. To restore failed domain controllers, you should use System State
restore as this ensures that all the data that needs to be restored is recovered as neces-
sary, including Registry settings, Sysvol data, and Active Directory data.
Installing Active Directory Domain Services 1127
Chapter 33
Please purchase PDF Split-Merge on www.verypdf.com to remove this watermark.
3. Type ifm to access the install from media prompt and then type one of the
following commands where FolderPath is the full path to the folder in which to
store the Active Directory backup media fi les:
Create Full FolderPath
Creates a full writable installation media backup of
Active Directory. You can use the media to install a writable domain control-
ler or a read-only domain controller.
Create RODC FolderPath
Creates a read-only installation media backup
of Active Directory. You can use the media to install a read-only domain
controller. The backup media does not contain security credentials, such as
passwords.
Create Sysvol Full FolderPath
Creates a full writable installation media
backup of Active Directory and the Sysvol. You can use the media to install
a writable domain controller or a read-only domain controller. The Sysvol
fi les include computer and user scripts as well as group policy settings.
Create Sysvol RODC FolderPath
Creates a read-only installation media
backup of Active Directory and the Sysvol. You can use the media to install
a read-only domain controller.
4. Ntdsutil then creates snapshots of Active Directory partitions. When it is fi nished
creating the snapshots, Ntdsutil mounts the snapshots as necessary and then
defragments the media backup of the Active Directory database. The progress of
the defragmentation is shown as a percent complete.
5. Next, Ntdsutil copies Registry data related to Active Directory. If you are
creating backup media for the Sysvol, Ntdsutil also creates backups of all policy
settings, scripts, and other data stored on the Sysvol. When it fi nishes this
process, Ntsdsutil unmounts any snapshots it was working with. The backup
process should complete successfully. If it doesn’t, note and resolve any issues
that prevented successful creation of the backup media, such as the target disk
running out of space or insuffi cient permissions to copy to the folder path.
6. Type quit at the ifm prompt and type quit at the ntdsutil prompt.
7. Copy the backup media to a local drive on the server for which you are installing
Active Directory.
8. On the server you want to make a domain controller, start the Active Directory
Domain Services Installation Wizard in Advanced Installation mode. Follow
all the same steps as you would if you were adding a domain controller to the
domain without media. After you select additional domain controller installation
options and get past any DNS prompts, you see the Install From Media page,
shown previously in Figure 33-5. On the Install From Media page, select Replicate
From Media Stored At The Following Location, and then type the location of the
backup media fi les or click Browse to fi nd them.
9. You can now complete the rest of the installation as discussed in “Creating
Additional Domain Controllers for an Existing Domain” on page 1114. Continue
with the rest of the steps and perform the post-installation checks as well.
Chapter 33
1128 Chapter 33 Implementing Active Directory Domain Services
Please purchase PDF Split-Merge on www.verypdf.com to remove this watermark.
You can create an additional domain controller using System State backup media by
completing the following steps:
1. Create a System State backup on a domain controller in the domain using
Windows Backup or by typing the following at an elevated command prompt:
wbadmin start systemstatebackup -backupTarget:VolumeName
where VolumeName is the storage location for the backup, such as F:.
2. Restore the System State backup to an alternate location using Windows Backup
or by typing the following at an elevated command prompt:
wbadmin start systemstaterecovery -backupTarget:VolumeName
-recoveryTarget:OtherLocation
where VolumeName is the storage location that contains the System State backup
you want to recover, such as F: and OtherLocation is the alternate folder location in
which the backup should be restored, such as F:\NTDSRestore.
3. Copy the backup media to a local drive on the server for which you are installing
Active Directory.
4. On the server you want to make a domain controller, start the Active Directory
Domain Services Installation Wizard in Advanced Installation mode. Follow
all the same steps as you would if you were adding a domain controller to the
domain without media. After you select additional domain controller installation
options and get past any DNS prompts, you see the Install From Media page,
shown previously in Figure 33-5. On the Install From Media page, select Replicate
From Media Stored At The Following Location, and then type the location of the
backup media fi les or click Browse to fi nd them.
5. You can now complete the rest of the installation as discussed in “Creating
Additional Domain Controllers for an Existing Domain” on page 1114. Continue
with the rest of the steps and perform the post-installation checks as well.
Uninstalling Active Directory
You uninstall Active Directory using the same techniques as you used to install it. Sim-
ply click Start, type dcpromo in the Search box, and then press Enter to start the Active
Directory Domain Services Installation Wizard. When you uninstall Active Directory,
you demote the domain controller and make it a member server in the domain. If you
remove Active Directory from the last domain controller in the domain, the computer
becomes a stand-alone server in a workgroup. You must be a member of the Domain
Admins group to remove an additional domain controller in a domain, and a member of
the Enterprise Admins group to remove the last domain controller from a domain.
Uninstalling Active Directory 1129
Chapter 33
Please purchase PDF Split-Merge on www.verypdf.com to remove this watermark.
If you run the Active Directory Domain Services Installation Wizard on a domain control-
ler that is also a global catalog server, you see the warning prompt shown in the follow-
ing screen:
This prompt appears because you don’t want to remove the last global catalog from the
domain accidentally. If you remove the last global catalog from the domain, users won’t
be able to log on to the domain. A quick way to check to determine the global catalog
servers in a domain is to type the following command at a command prompt:
dsquery server -domain DomainName | dsget server -isgc -dnsname
where DomainName is the name of the domain you want to examine. Consider the fol-
lowing example:
dsquery server -domain cpandl.com | dsget server -isgc -dnsname
Here, you are examining the cpandl.com domain to obtain a list of the global catalog
servers according to their DNS names. The output is shown in two columns, for example:
dnsname isgc
corpsvr15.cpandl.com no
corpsvr17.cpandl.com yes
The fi rst column is the DNS name of each domain controller in the domain. The second
column is a fl ag that indicates whether the domain controller is also a global catalog.
Thus, if the isgc value is set to yes for a domain controller, it is also a global catalog
server.
When the wizard starts, click Next to display the Delete The Domain page, shown in
Figure 33-8. If this is the last domain controller in the domain and you want to per-
manently remove the domain from the forest, select Delete The Domain Because This
Server Is The Last Domain Controller In The Domain check box before you continue.
After you remove the last domain controller in the domain, you can no longer access
any application partition data, domain accounts, or encrypted data. Therefore, before
you uninstall the last domain controller in a domain, you should examine domain
accounts and look for encrypted fi les and folders.
SIDE OUT
Considerations for removing global catalogs
If you run the Active Directory Domain Services Installation Wizard on a domain control-
ler that is also a global catalog server, you see the warning prompt shown in the follow-
ing screen:
This prompt appears because you don’t want to remove the last global catalog from the
domain accidentally. If you remove the last global catalog from the domain, users won’t
be able to log on to the domain. A quick way to check to determine the global catalog
servers in a domain is to type the following command at a command prompt:
dsquery server -domain DomainName | dsget server -isgc -dnsname
where DomainName is the name of the domain you want to examine. Consider the fol-
lowing example:
dsquery server -domain cpandl.com | dsget server -isgc -dnsname
Here, you are examining the cpandl.com domain to obtain a list of the global catalog
servers according to their DNS names. The output is shown in two columns, for example:
dnsname isgc
corpsvr15.cpandl.com no
corpsvr17.cpandl.com yes
The fi rst column is the DNS name of each domain controller in the domain. The second
column is a fl ag that indicates whether the domain controller is also a global catalog.
Thus, if the isgc value is set toc yes for a domain controller, it is also a global catalog
server.
Chapter 33
1130 Chapter 33 Implementing Active Directory Domain Services
Please purchase PDF Split-Merge on www.verypdf.com to remove this watermark.
Figure 33-8 Removing Active Directory from a server.
Note
Because the deleted domain no longer exists, its accounts and cryptographic keys are no
longer applicable, and this results in the deletion of all domain accounts and all certifi -
cates and cryptographic keys from the server. You must decrypt any encrypted data on
the server, including data stored using the Encrypting File System (EFS), before removing
Active Directory or the data will be permanently inaccessible.
When you click Next, you see the Network Credentials page. If you are logged on with
an account that has appropriate permissions for uninstalling Active Directory, you can
use your current logged on credentials. Otherwise, select Alternate Credentials, click
Set, type the user name and password for an account with appropriate forest-wide per-
missions, and then click OK.
When you are ready to continue, click Next. The Active Directory Domain Services
Installation Wizard then examines the Active Directory forest, checking the creden-
tials you provided and attempting to contact a domain controller in the domain listed
previously on the Network Credentials page. Afterward, the wizard checks DNS to see
if any active delegations for the server need to be removed. If the wizard has trouble
with DNS, ensure that the host (A) records that map the domain controllers to their IP
addresses are correct.
Note
Because the deleted domain no longer exists, its accounts and cryptographic keys are no
longer applicable, and this results in the deletion of all domain accounts and all certifi -
cates and cryptographic keys from the server. You must decrypt any encrypted data on
the server, including data stored using the Encrypting File System (EFS), before removing
Active Directory or the data will be permanently inaccessible.
Uninstalling Active Directory 1131
Chapter 33
Please purchase PDF Split-Merge on www.verypdf.com to remove this watermark.
Next, you are prompted to type and confi rm the password for the local Administrator
account on the server. This is necessary because domain controllers don’t have local
accounts but member or stand-alone servers do, so this account will be re-created as
part of the Active Directory removal process. Click Next.
On the Summary page, review your selections. Optionally, click Export Settings to
save these settings to an answer fi le that you can use to perform unattended demotion
of other domain controllers. When you click Next again, the wizard uses the options
you’ve selected to demote the domain controller. This process can take several minutes.
Keep the following in mind:
If there are updates to other domains in the forest that have not been replicated,
the domain controller replicates these updates and then the wizard begins the
demotion process.
If the domain controller is also a DNS server, the DNS data in the ForestDnsZones
and DomainDnsZones partitions are removed. If the domain controller is the last
DNS server in the domain, this results in the last replica of the DNS information
being removed from the domain. All associated DNS records are lost and may
need to be re-created.
At this point, the actions the Active Directory Domain Services Installation Wizard per-
forms depend on whether you are removing an additional domain controller or remov-
ing the last domain controller from a domain. If you are removing an additional domain
controller from a domain, the wizard does the following:
Removes Active Directory and all related services from the server and makes it a
member server in the domain
Changes the computer account type and moves the computer account from the
Domain Controllers container in Active Directory to the Computers container
Transfers any operations master roles from the server to another domain control-
ler in the domain
Updates DNS to remove the domain controller SRV records
Creates a local Security Accounts Manager (SAM) account database and a local
Administrator account
If you are removing the last domain controller from a domain, the wizard verifi es that
there are no child domains of the current domain before continuing. If child domains
are found, removal of Active Directory fails with an error telling you that you can-
not remove Active Directory. When the domain being removed is a child domain, the
wizard notifi es a domain controller in the parent domain that the child domain is
being removed. For a parent domain in its own tree, a domain controller in the forest
root domain is notifi ed. Either way, the domain object is tombstoned, and this change
is then replicated to other domain controllers. The domain object and any related
trust objects are also removed from the forest. As part of removing Active Directory
from the last domain controller in a domain, all domain accounts, all certifi cates, and
Chapter 33
1132 Chapter 33 Implementing Active Directory Domain Services
Please purchase PDF Split-Merge on www.verypdf.com to remove this watermark.
all cryptographic keys are removed from the server. The wizard creates a local SAM
account database and a local Administrator account. It then changes the computer
account type to a stand-alone server and puts the server in a new workgroup.
Creating and Managing Organizational Units (OUs)
Organizational units (OUs) are logical administrative units that can help you limit the
scope of a domain. They can contain many types of objects, including those for comput-
ers, contacts, groups, printers, or users. Because they can also contain other OUs, you
can build a hierarchy of OUs within a domain. You can also use OUs to delegate admin-
istrator privileges on a limited basis.
Creating an OU
You can create OUs in Active Directory Users And Computers. As long as you use an
account that is a member of the Administrators group, you’ll be able to create OUs
anywhere in the domain. The only exception is that you cannot create OUs within the
default containers created by Active Directory.
Note
Note that you can create OUs within the Domain Controllers container. This is possible
because this container is created as an OU. Creating OUs within Domain Controllers is
useful if you want to organize domain controllers.
To create an OU, follow these steps:
1. Click Start, Administrative Tools, and Active Directory Users And Computers.
This starts Active Directory Users And Computers.
2. By default, you are connected to your logon domain. If you want to create OUs in
a different domain, right-click the Active Directory Users And Computers node in
the console tree, and then select Change Domain. In the Change Domain dialog
box, type the name of the domain to which you want to connect, and then click
OK. Alternatively, in the Change Domain dialog box, you can click Browse to
open the Browse For Domain dialog box so that you can fi nd the domain to which
you want to connect.
3. You can now create the OU. If you want to create a top-level OU (that is, an OU
that has the domain container as its parent), right-click the domain node in the
console tree, point to New, and then select Organizational Unit. If you want to
create a lower-level OU, right-click the OU in which you want to create the new
OU, point to New, and then select Organizational Unit.
Note
Note that you can create OUs within the Domain Controllers container. This is possible
because this container is created as an OU. Creating OUs within Domain Controllers is
useful if you want to organize domain controllers.
Creating and Managing Organizational Units (OUs) 1133
Chapter 33
Please purchase PDF Split-Merge on www.verypdf.com to remove this watermark.
4. In the New Object–Organizational Unit dialog box, type a name for the OU, as
shown in Figure 33-9, and then click OK. Although the OU name can be any
string of up to 256 characters, the best OU names are short and descriptive.
Figure 33-9 Specify the name of the OU to create.
All OUs have deletion protection by default. Deletion protection is new in Windows
Server 2008. When you create a new OU, the Protect Container From Accidental Dele-
tion check box is selected automatically. This prevents any user or administrator in the
domain from deleting the OU. To delete a protected OU, you must complete the follow-
ing steps:
1.
In Active Directory Users And Computers, you must enable the Advanced Features
view by selecting Advanced Features on the View menu.
2.
Right-click the OU and then select Properties.
3.
On the Object tab of the Properties dialog box, clear the Protect Object From
Accidental Deletion check box and then click OK.
4.
In Active Directory Users And Computers, right-click the OU and then select
Delete.
5.
When prompted to confi rm, click Yes.
SIDE OUT
Understanding deletion protection for OUs
All OUs have deletion protection by default. Deletion protection is new in Windows
Server 2008. When you create a new OU, the Protect Container From Accidental Dele-
tion check box is selected automatically. This prevents any user or administrator in the
domain from deleting the OU. To delete a protected OU, you must complete the follow-
ing steps:
1.
In Active Directory Users And Computers, you must enable the Advanced Features
view by selecting Advanced Features on the View menu.
2.
Right-click the OU and then select Properties.
3.
On the Object tab of the Properties dialog box, clear the Protect Object From
Accidental Deletion check box and then click OK.
4.
In Active Directory Users And Computers, right-click the OU and then select
Delete.
5.
When prompted to confi rm, click Yes.
Chapter 33
1134 Chapter 33 Implementing Active Directory Domain Services
Please purchase PDF Split-Merge on www.verypdf.com to remove this watermark.
Setting OU Properties
OUs have properties that you can set to add descriptive information. This helps other
administrators know how the OU is used.
To set the properties of an OU, right-click the OU in Active Directory Users And Com-
puters and then select Properties. This displays the OU’s Properties dialog box, as
shown in Figure 33-10.
Figure 33-10 The OU properties dialog box.
In the OU Properties dialog box, you can do the following:
On the General tab, you can enter descriptive information about the OU, includ-
ing a text description and address information.
On the Managed By tab, you can specify the user or contact responsible for man-
aging the OU. This gives a helpful point of contact for questions regarding the
OU.
When Advanced view is enabled, you have the following additional tabs and options:
On the Object tab, you can determine the canonical name of the OU object and
specify whether the OU should be protected from accidental deletion.
On the COM+ tab, you can specify the COM+ partition of which the OU should be
a member (if any).
On the Attribute Editor tab, you can view and set attributes of the OU object.
Creating and Managing Organizational Units (OUs) 1135
Chapter 33
Please purchase PDF Split-Merge on www.verypdf.com to remove this watermark.
Creating or Moving Accounts and Resources for Use
with an OU
After you create an OU, you might want to place accounts and resources in it. In Active
Directory Users And Computers you follow one of these procedures:
You create accounts in the OU. To do so, right-click the OU, point to New, and
then select the type of object to create, such as Computer, Group, or User.
You move existing accounts or resources to an OU. To do so, select the account
or resource in its existing container by clicking and holding the left mouse but-
ton. You can then drag the account or resource to the OU. When you release the
mouse button, the account or resource is moved to the OU. Using Ctrl+click or
Shift+click, you can select and move multiple accounts or resources as well.
Delegating Administration of Domains and OUs
When you create domains and OUs, you’ll often want to be able to delegate control
over them to specifi c individuals. This is useful if you want to give someone limited
administrative privileges for a domain or OU. Before you delegate administration, you
should carefully plan the permissions to grant. Ideally, you want to delegate the permis-
sions that allow a user to perform necessary tasks, while preventing your delegate from
performing tasks he or she should not. Often, fi guring out the tasks that a user with
limited administrative permissions should be able to perform requires talking to the
department or offi ce manager or the individual.
Understanding Delegation of Administration
You delegate control of Active Directory objects to grant users permission to manage
users, groups, computers, OUs, or other objects stored in Active Directory. You can
grant permissions in the following ways:
Grant full control over an OU
Useful when you have local administrators within
departments or at branch offi ces and you want those individuals to be able to
manage all objects in the OU. Among other things, this allows local administra-
tors to create and manage accounts in the OU.
Grant full control over specifi c types of objects in an OU
Useful when you have
local administrators who should only be able to manage specifi c types of objects
in an OU. For example, you might want local administrators to be able to manage
users and groups but not to be able to manage computer accounts.
Grant full control over specifi c types of objects in a domain
Useful when you
want to allow an individual to be able only to manage specifi c types of objects in
a domain. Rather than adding the user as a member of the Administrators group,
you grant the user full control over specifi c objects. For example, you might allow
the user to manage user and group accounts in the domain but not to perform
other administrative tasks.
Chapter 33
1136 Chapter 33 Implementing Active Directory Domain Services
Please purchase PDF Split-Merge on www.verypdf.com to remove this watermark.