Tài liệu MCSE Windows server 2003- P7 pdf
Bạn đang xem bản rút gọn của tài liệu. Xem và tải ngay bản đầy đủ của tài liệu tại đây (2.24 MB, 50 trang )
Questions and Answers
7
-
45
b. Alternate location
c. Single folder
The correct answer is b. Restoring to an alternate location will restore the folder structure and
files that were backed up. You can then compare the contents of the target location with the
original backed-up files to verify the success of the restore procedure.
Page
Lesson 3 Review
7-35
1. Scott Bishop is a power user at a remote site that includes 20 users. The site has a
Windows Server 2003 system providing file and print servers. There is a tape drive
installed on the system. Because there is no local, full-time administrator at the
site, you want to allow Scott to back up and restore the server. However, you want
to minimize the power and the privileges that Scott obtains, limiting his capabili
ties strictly to backup and restore. What is the best practice to provide Scott the
minimum necessary credentials to achieve his task?
Make Scott a member of the Backup Operators group. The Backup Operators group is
assigned, by default, the privilege to back up and restore files and folders.
2. Write the command that will allow you to fully back up the C:\Data\Finance
folder to a file called Backup.bkf in a share called Backup on Server02, with the
backup job name “Backup of Finance Folder.” Then, write the command that will
allow you to perform an incremental backup and append the backup set to the
same file, with the same backup job name.
ntbackup backup "c:\data\finance" /J "Backup of Finance Folder" /F "\\server02
\backup\backup.bkf"
ntbackup backup "c:\data\finance" /J "Backup of Finance Folder" /F "\\server01
\backup\backup.bkf" /a /m incremental
3. A user has deleted a file in a shared folder on a server. The user opens the prop
erties of the folder and does not see a Previous Versions tab. Which of the follow
ing may be true? (Choose all that apply.)
a. The folder is not enabled for Shadow Copy.
b. The volume on the server is not enabled for Shadow Copy.
c. The user doesn’t have permission to view the Shadow Copy cache.
d. The Shadow Copy client is not installed on the user’s machine.
e. The folder is on a FAT volume.
The correct answers are b and d. Shadow Copy is enabled per volume, not per folder. Once
Shadow Copy is enabled, any user with the client installed will see a Previous Versions tab for
a file or folder that has changed. Shadow Copy is supported on FAT and NTFS volumes.
Please purchase PDF Split-Merge on www.verypdf.com to remove this watermark.
Please purchase PDF Split-Merge on www.verypdf.com to remove this watermark.
8 Printers
Exam Objectives in this Chapter:
■
Monitor print queues.
■
Monitor file and print servers. Tools might include Task Manager, Event Viewer,
and System Monitor.
Why This Chapter Matters
An administrator’s to-do list usually teems with items relating to printers. Whether
testing or deploying new printer hardware, troubleshooting print jobs, or securing
and monitoring printer utilization, you are apt to be almost as busy with printers
as with file and folder access.
Microsoft Windows Server 2003 provides a powerful feature set to support enter-
prise print services. This chapter introduces you to the setup and configuration of
printers on Windows Server 2003, the interaction between printers and the
Microsoft Active Directory directory service, connecting clients to network print-
ers, and monitoring and troubleshooting print services. You will learn how to
administer local, network, and Internet printers, and how to configure printers for
maximum flexibility and security.
Lessons in this Chapter:
■
Lesson 1: Installing and Configuring Printers . . . . . . . . . . . . . . . . . . . . . . . . 8-3
■
Lesson 2: Advanced Printer Configuration and Management . . . . . . . . . . . . 8-16
■
Lesson 3: Maintaining, Monitoring, and Troubleshooting Printers. . . . . . . . . 8-29
Before You Begin
This chapter presents the skills and concepts related to administering Windows Server
2003 printers. This training kit presumes you have a minimum of 18 months of experi-
ence and a working knowledge of Active Directory and the Microsoft Management
Console (MMC). However, because many administrators come to Windows Server 2003
from other printer environments including Novell NetWare, and because printer termi-
nology has changed slightly, this chapter’s first lesson reviews fundamentals of printer
configuration. Lesson 2 and Lesson 3 build on those fundamentals to prepare you for
advanced, flexible administration, support, monitoring, and troubleshooting, of print-
ers in a Windows Server 2003 environment.
8-1
Please purchase PDF Split-Merge on www.verypdf.com to remove this watermark.
8-2
Chapter 8 Printers
Although it is advantageous to have a printer and two computers (a Windows Server
2003 computer and a client running Windows XP or Windows 2000 Professional), you
can complete the exercises in this chapter without a printer, and with only one com-
puter. Prepare the following:
■
A Windows Server 2003 (Standard or Enterprise) installed as Server01 and config-
ured as a domain controller in the domain contoso.com
■
A first-level organizational unit (OU) called Security Groups
■
The Active Directory Users And Computers console, or a customized console with
the Active Directory Users And Computers snap-in
Please purchase PDF Split-Merge on www.verypdf.com to remove this watermark.
Lesson 1 Installing and Configuring Printers
8
-
3
Lesson 1: Installing and Configuring Printers
Windows Server 2003 supports powerful, secure, and flexible print services. By using
a Windows Server 2003 computer to manage printers attached locally to the computer
or attached to the network, such printers can be made available to applications running
locally on the Windows Server 2003 computer or to users on any client platform,
including previous versions of Windows, as well as Netware, UNIX, or Apple Macintosh
clients. This lesson will examine the basic concepts, terminology, and skills related to
the setup of printers in Windows Server 2003.
After this lesson, you will be able to
■
Understand the model and terminology used for Windows printing
■
Install a logical printer on a print server for a network attached printer
■
Prepare a print server to host clients including computers running previous versions of
Windows
■
Connect a printer client to a logical printer on a print server
■
Manage print jobs
Estimated lesson time:
15 minutes
Understanding the Windows Server 2003 Printer Model
Windows Server 2003, and previous versions of Windows, support two types of printers:
■
Locally attached printers Printers that are connected to a physical port on a
print server, typically a universal serial bus (USB) or parallel port.
■
Network-attached printers Printers connected to the network instead of a
physical port. A network-attached printer is a node on the network; print servers
can address the printer using a network protocol such as Transmission Control
Protocol/Internet Protocol (TCP/IP).
Each type of printer is represented on the print server as a logical printer. The logical
printer defines the characteristics and behavior of the printer. It contains the driver,
printer settings, print setting defaults and other properties that control the manner in
which a print job is processed and sent to the chosen printer. This virtualization of the
printer by a logical printer allows you to exercise extraordinary creativity and flexibility
in configuring your print services.
Note
In previous versions of Windows and in earlier versions of documentation, the printer
was referred to as the “print device” and the logical printer was referred to as the “printer.”
Please purchase PDF Split-Merge on www.verypdf.com to remove this watermark.
8-4
Chapter 8 Printers
There are two ways to implement printing to network attached printers. One model is
created by installing logical printers on all computers, and connecting those logical
printers directly to the network-attached printer. In this model, there is no print server;
each computer maintains its own settings, print processor, and queue. When users
examine the print queue, they see only the jobs they have sent to the printer. There is
no way for users to know what jobs have been sent to the printer by other users. In
addition, error messages appear only on the computer that is printing the current job.
Finally, all print job processing is performed locally on the user’s computer, rather than
being offloaded to a print server.
Because of these significant drawbacks, the most typical configuration of printers in an
enterprise is a three-part model consisting of the physical printer itself, a logical printer
hosted on a print server, and printer clients connecting to the server’s logical printer.
This lesson focuses exclusively on such a structure, although the concepts and skills
discussed apply to other printer configurations.
Printing with a print server provides the following advantages:
■
The logical printer on the print server defines the printer settings and manages
printer drivers.
■
The logical printer produces a single print queue that appears on all client com-
puters, so users can see where their jobs are in relation to other users’ jobs.
■
Error messages, such as out-of-paper or printer-jam messages, are visible on all cli-
ents, so all users can know the state of the printer.
■
Most applications and most print drivers will offload some, or a significant
amount, of the print-job processing to the server, which increases the responsive-
ness of the client computers. In other words, when users click Print, their jobs are
sent quickly to the print server and users can resume their work while the print
server processes the jobs.
■
Security, auditing, monitoring, and logging functions are centralized.
Installing a Printer on Windows Server 2003
Printers are managed most commonly through the Printers And Faxes folder, which
integrates both printer and fax capabilities. The Add Printer Wizard guides you through
the printer setup. The most critical choices you must make are the following:
■
Local Or Network Printer This page of the Add Printer Wizard is shown in Fig-
ure 8-1. When you set up a printer on a Windows Server 2003 computer, the terms
local printer and network printer have slightly different meanings from what you
might expect. A local printer is a logical printer that supports a printer attached
directly to the server or a stand-alone, network-attached printer. When you direct
the Add Printer Wizard to create a local printer by clicking Local Printer Attached
Please purchase PDF Split-Merge on www.verypdf.com to remove this watermark.
Lesson 1 Installing and Configuring Printers
8
-
5
To This Computer, the server can share the printer to other clients on the network.
A network printer, on the other hand, is a logical printer that that connects to a
printer directly attached to another computer or to a printer managed by another
print server. The user interface can be misleading, so remember that, in the common
print server implementation, the print server will host local printers (whether the
printer hardware is attached to the computer or network-attached), and worksta-
tions will create network printers connecting to the server’s shared logical printer.
Figure 8-1 The Local Or Network Printer page of the Add Printer Wizard
■
Select A Printer Port When you create a local printer on a print server, the Add
Printer Wizard asks you to specify the port to which the printer is attached. If the
port already exists, whether a local port such as LPT1 or a network port specified
by an IP address, select the port from the Use The Following Port drop-down list.
When setting up a logical printer for a network attached printer for which a port
has not been created, click Create A New Port, select Standard TCP/IP Port and
click Next. The Add Standard TCP/IP Printer Port Wizard appears. Clicking Next
prompts you for the IP address or DNS name of the printer. After the port has been
added, you are returned to the Add Printer Wizard.
■
Install Printer Software If Plug and Play does not detect and install the correct
printer automatically, you can select your printer from an extensive list that is cat-
egorized by manufacturer. If the printer does not appear on the list, you can click
Have Disk and install the printer from drivers supplied by the manufacturer.
■
Printer Name and Share Name Although Windows Server 2003 supports long
printer names and share names including spaces and special characters, it is best
practice to keep names short and simple. The entire qualified name including the
server name (for example, \\Server01\PSCRIPT) should be 32 characters or fewer.
Please purchase PDF Split-Merge on www.verypdf.com to remove this watermark.
8-6
Chapter 8 Printers
The share name and the printer name appear, and are used in different places
throughout the Windows user interface. Although the share name is independent
of, and can be different from, the printer name, many enterprises unify the printer
name and the share name to reduce confusion.
Configuring Printer Properties
After installing the logical printer, you can configure numerous properties by opening
the printer’s Properties dialog box, shown in Figure 8-2. The General tab allows you to
configure the printer name, location, and comments, all of which were initially config-
ured based on your responses to prompts in the Add Printer Wizard.
Figure 8-2 The General tab of a printer’s Properties dialog box
The Sharing tab shown in Figure 8-3 allows you to specify whether the logical printer
is shared, and is therefore available to other clients on the network, and whether the
printer is listed in Active Directory, a default setting, for shared printers, that allows
users to easily search for and connect to printers.
Note
You can use the Sharing tab to stop sharing a printer, if you take a printer offline and
want to prevent users from accessing the printer.
Please purchase PDF Split-Merge on www.verypdf.com to remove this watermark.
Lesson 1 Installing and Configuring Printers
8
-
7
Figure 8-3 The Sharing tab of a printer’s Properties dialog box
During printer setup, Windows Server 2003 loads drivers onto the print server that sup-
port that printer for clients running Windows Server 2003, Windows XP, and Windows
2000. Printer drivers are platform-specific. If other platforms will be connecting to the
shared logical printer, install the appropriate drivers on the server, so that Windows cli-
ents will download the driver automatically when they connect. Otherwise, you will be
prompted for the correct drivers on each individual client.
On the Sharing tab of the Properties dialog box, click Additional Drivers to configure
the print server to host drivers for computers running versions of Windows prior to
Windows 2000. When you select a previous version of Windows, the server will
prompt you for the drivers for the appropriate platform and printer. Those drivers will
be available from the printer’s manufacturer, or sometimes on the original CD-ROM of
the previous version of Windows.
By loading drivers on the server for all client platforms, you can centralize and facilitate
driver distribution. Client computers running Windows NT, Windows 2000,
Windows XP, and Windows Server 2003 download the driver when they first connect
to the shared printer. They also verify that they have the current printer driver each
time they print and, if they do not, they download the updated driver. For these client
computers, you need only update printer drivers on the print server. Client computers
running Windows 95 or Windows 98 do not check for updated printer drivers, once
the driver is initially downloaded and installed. You must manually install updated
printer drivers on these clients.
Other printer properties will be discussed later in this chapter.
Please purchase PDF Split-Merge on www.verypdf.com to remove this watermark.
8-8
Chapter 8 Printers
Tip
You can access other servers’ printer folders by browsing the network or by choosing
the Run command from the Start menu and typing \\server_name. You can drag those serv
ers’ Printer and Faxes folders to your own, giving you easy access to manage remote printers.
Connecting Clients to Printers
Printers that have been set up as logical printers on a print server can be shared to
other systems on the network. Those systems will also require logical printers to rep-
resent the network printer.
Configuring a print client can be done in several ways, including the Add Printer Wiz-
ard, which can be started from the Printers And Faxes folder or from the common Win-
dows Print dialog box in almost all Microsoft applications, including Internet Explorer
and Notepad. On the Local or Network Printer page, select A Network Printer Or A
Printer Attached To Another Computer. When prompted for the printer name, you can
search Active Directory, enter the Universal Naming Convention (UNC) (for example,
\\Server\Printersharename) or Uniform Resource Locator (URL) to the printer, or
browse for the printer using the Browser service.
One of the more efficient ways to set up print clients is to search Active Directory for
the printer. In the Specify A Printer page of the Add Printer Wizard, choose Find A
Printer In The Directory and click Next. The Find Printers dialog box appears, as
shown in Figure 8-4, and you can enter search criteria including printer name, location,
model, and features. Wildcards can be used in many of the criteria. Click Find Now and
a result set is displayed. Select the printer and click OK. The Add Printer Wizard then
steps you through remaining configuration options.
Tip
You can save a search by choosing Save Search from the File menu. As an administra
tor, you can create and save custom searches to users’ desktops, allowing them to easily
locate predefined subsets for the printers in your enterprise.
A logical printer includes the drivers, settings, and print queue for the printer on the
selected port. When you double-click a printer in the Printers And Faxes folder, a win-
dow opens that displays the jobs in the printer’s queue. By right-clicking any job, you
can pause, resume, cancel, or restart the job. From the Printer menu, you can also
pause or cancel all printing, access the printer properties, or set the printer as default
or offline. Your ability to perform each of these actions depends, of course, upon the
permissions on the printer’s access control list.
Please purchase PDF Split-Merge on www.verypdf.com to remove this watermark.
Lesson 1 Installing and Configuring Printers
8
-
9
Figure 8-4 The Find Printers dialog box
As an alternative to using the Add Printer Wizard, if you are using Windows Server
2003 or Windows XP with the default Start menu, perform the following steps to con-
figure a print client:
1. Click Start, and then select Search.
2. In the Search Companion pane, click Other Search Options, then Printers, Com-
puters, Or People, and finally A Printer On The Network.
3. The Find Printers dialog box will be displayed, allowing you to search for the
printer using various criteria.
4. After entering the desired criteria, click Find Now.
Practice: Installing and Configuring a Printer
In this practice, you will set up a logical printer on a print server and simulate connect-
ing a client to the shared printer. You will then send a print job to the printer.
You do not need to have a print device connected to Server01 or to the network, nor
are you required to have a second computer to act as a print client. However, if you
have access to these additional components, you are encouraged to implement the
exercises using that extra hardware.
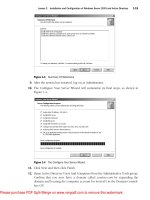
Exercise 1: Add a Local Printer and Configure Print Sharing
In this exercise, you use the Add Printer Wizard to add a logical printer to Server01.
The printer will connect to a network-attached HP LaserJet 8100 that is connected to
Please purchase PDF Split-Merge on www.verypdf.com to remove this watermark.
8-10
Chapter 8 Printers
the network at IP address 10.0.0.51. You do not need an actual printer to complete this
exercise.
1. Log on to Server01 as Administrator.
2. Open the Printers And Faxes folder.
3. Double-click Add Printer. The Add Printer Wizard appears.
4. Click Next. The Local Or Network Printer page appears.
You are prompted for the location of the printer. Although the printer is attached
to the network, the logical printer serving that printer is being added to Server01,
so the printer is referred to as a local printer.
5. Verify that the Local Printer option is selected and that the Automatically Detect
And Install My Plug And Play Printer check box is cleared (because you are con-
figuring a printer for a fictional device), and then click Next.
6. The Select A Printer Port page appears. Click Create A New Port.
7. Select Standard TCP/IP Port from the Type Of Port drop-down list.
The port types that will be available, other than local port, depend on the installed
network protocols. In this case, TCP/IP is installed, so this protocol-based port is
available.
8. Click Next. The Add Standard TCP/IP Printer Port Wizard appears.
9. Click Next.
10. Enter the IP Address: 10.0.0.51 and accept the default port name, IP_10.0.0.51.
11. Click Next.
Because a print device is not actually attached to the network at that address, there
will be a delay while the Wizard attempts to locate and identify the printer. You
will also be prompted to specify the type of network interface.
12. Select Hewlett Packard Jet Direct as the device type.
13. Click Next, and then click Finish. The Add Standard TCP/IP Printer Port Wizard
closes, returning you to the Add Printer Wizard.
The Wizard prompts you for the printer manufacturer and model. You will add an
HP LaserJet 8100 Series PCL printer.
Tip
The printers list is sorted in alphabetical order. If you cannot find a printer name, make
sure that you are looking in the correct location.
Please purchase PDF Split-Merge on www.verypdf.com to remove this watermark.
Lesson 1 Installing and Configuring Printers
8
-
11
14. From the Manufacturer list, click HP; from the Printers list, scroll down the list,
click HP LaserJet 8100 Series PCL; and then click Next.
The Name Your Printer page appears. The default name in the Printer Name field
is the printer model, HP LaserJet 8100 Series PCL. The name you enter should con-
form to naming conventions in your enterprise. For this exercise, enter the name
HPLJ8100.
15. Type HPLJ8100 and Click Next.
The Printer Sharing page appears, prompting you for printer-sharing information.
The share name should also reflect naming conventions in your enterprise. As dis-
cussed earlier, the printer’s UNC (that is, \\Servername\Printersharename) should
not exceed 32 characters.
16. Verify that the Share Name option is selected.
17. In the Share Name text box, type HPLJ8100, and then click Next.
The Location And Comment page appears.
Note
The Add Printer Wizard displays the values you enter for the Location and Comment
text boxes when a user searches the Active Directory for a printer. Entering this information is
optional, but doing so helps users locate the printer.
18. In the Location text box, type USA/NYC/1802Americas/42/B.
19. In the Comment text box, type Black and White Output Laser Printer-High
Volume.
20. Click Next.
The Print Test Page screen appears. A test page that prints successfully would con-
firm that your printer is set up properly.
21. Choose No (because the printer doesn’t exist) and click Next. The Completing The
Add Printer Wizard page appears and summarizes your installation choices.
22. Confirm the summary of your installation choices, and then click Finish.
An icon for the printer appears in the Printers And Faxes window. Notice that
Windows Server 2003 displays an open hand beneath the printer icon. This indi-
cates the printer is shared. Also notice the check mark next to the printer, which
indicates the printer is the default printer for the print server.
23. Keep the Printers And Faxes window open because you will need it to complete
the next exercise.
Please purchase PDF Split-Merge on www.verypdf.com to remove this watermark.
8-12
Chapter 8 Printers
Exercise 2: Connect a Client to a Printer
If you have access to a second computer, you would install on each workstation a
printer that connects to the shared printer on Server01. In this practice, you are
required to have only one computer (Server01), but you can simulate connecting a
printer client to the server’s logical printer.
1. Open the Printers And Faxes folder.
2. Start the Add Printer Wizard and click Next.
3. In the Local Or Network Printer dialog box, select A Network Printer, Or A Printer
Attached To Another Computer and click Next.
4. Confirm that Find A Printer In The Directory is selected and click Next. The Find
Printers dialog box appears.
5. In the Location box, type *NYC* and then click Find Now.
6. Select the printer HPLJ8100 in the results list and click OK.
7. On the Add Printer Wizard’s Default Printer page, select Yes and then click Next.
8. Click Finish.
You will not see a new printer icon in the Printers And Faxes folder because it is
not possible to create a printer client to a logical printer on the same computer. If
you conduct this exercise on a second computer, you will see the icon for the new
printer appear.
Exercise 3: Take a Printer Offline and Print a Test Document
In this exercise, you set the printer you created to offline status. Taking a printer offline
causes documents you send to this printer to be held in the print queue while the print
device is unavailable. Doing this will prevent error messages about unavailable print
devices from occurring in later exercises. Otherwise, Windows Server 2003 will display
error messages when it attempts to send documents to the fictional print device that is
not actually available to the computer.
1. In the Printers And Faxes window, right-click the HPLJ8100 icon.
2. Choose Use Printer Offline. Notice that the icon appears dimmed to reflect that the
printer is not available, and the status appears as Offline.
3. Double-click the HPLJ8100 icon. Notice that the list of documents to be sent to the
print device is empty.
4. Click the Start menu, point to Programs, point to Accessories, and then click
Notepad.
5. In Notepad, type any sample text that you want.
6. Arrange Notepad and the HPLJ8100 window so that you can see the contents of each.
Please purchase PDF Split-Merge on www.verypdf.com to remove this watermark.
Lesson 1 Installing and Configuring Printers
8
-
13
7. From the File menu in Notepad, select Print. The Print dialog box appears, allow-
ing you to select the printer and print options.
The Print dialog box displays the location and comment information you entered
when you created the printer, and it shows HPLJ8100 as the default and selected
printer, and indicates that the printer is offline.
8. Click Print. Notepad briefly displays a message stating that the document is print-
ing on your computer. On a fast computer, you might not see this message.
In the HPLJ8100–Use Printer Offline window, you will see the document waiting
to be sent to the print device. The document is held in the print queue because
you took the printer offline. If the printer were online, the document would be
sent to the print device.
9. Close Notepad, and click No when prompted to save changes to your document.
10. Select the document in the HPLJ8100 window and, from the Printer menu, select
Cancel All Documents. A Printers message box appears, asking if you are sure you
want to cancel all documents for HPLJ8100.
11. Click Yes. The document is removed.
12. Close the HPLJ8100–Use Printer Offline window.
13. Close the Printers And Faxes window.
Lesson Review
The following questions are intended to reinforce key information presented in this
lesson. If you are unable to answer a question, review the lesson materials and try the
question again. You can find answers to the questions in the “Questions and Answers”
section at the end of this chapter.
1. You’re setting up a printer on your Windows Server 2003 computer. The computer
will be used as a print server on your network. You plan to use a print device
that’s currently connected to the network as a stand-alone print device. Which
type of printer should you add to the print server? (Choose all that apply.)
a. Network
b. Shared
c. Local
d. Remote
Please purchase PDF Split-Merge on www.verypdf.com to remove this watermark.
8-14
Chapter 8 Printers
2. You’re installing a printer on a client computer. The printer will connect to a log-
ical printer installed on a Windows Server 2003 print server. What type or types of
information could you provide to set up the printer? (Choose all that apply.)
a. TCP/IP printer port
b. Model of the print device
c. URL to printer on print server
d. UNC path to print share
e. Printer driver
3. One of your printers is not working properly, and you want to prevent users from
sending print jobs to the logical printer serving that device. What should you do?
a. Stop sharing the printer
b. Remove the printer from the Active Directory
c. Change the printer port
d. Rename the share
4. You’re administering a Windows Server 2003 computer configured as a print
server. You want to perform maintenance on a print device connected to the print
server. There are several documents in the print queue. You want to prevent the
documents from being printed to the printer, but you don’t want users to have to
resubmit the documents to the printer. What is the best way to do this?
a. Open the printer’s Properties dialog box, select the Sharing tab, and then
select the Do Not Share This Printer option.
b. Open the printer’s Properties dialog box and select a port that is not associ-
ated with a print device.
c. Open the printer’s queue window, select the first document, and then select
Pause from the Document window. Repeat the process for each document.
d. Open the printer’s queue window, and select the Pause Printing option from
the Printer menu.
Please purchase PDF Split-Merge on www.verypdf.com to remove this watermark.
Lesson 1 Installing and Configuring Printers
8
-
15
Lesson Summary
■
A printer client submits a print job to a print server, which in turn sends the job to
the printer. The printer client and the print server each maintain a logical printer
representing the printer.
■
A local printer is one that supports a printer directly attached to the computer or
attached to the network.
■
A network printer connects to a logical printer maintained by another computer:
a print server.
■
Microsoft Windows clients will download the printer driver automatically from the
logical printer on the print server. Printers can be added using the printer’s Sharing
property page.
Please purchase PDF Split-Merge on www.verypdf.com to remove this watermark.
8-16
Chapter 8 Printers
Lesson 2: Advanced Printer Configuration and Management
In the previous lesson, you learned that the Windows printer model is best leveraged
when a logical printer is created to support a physical device—either directly attached
to the computer or attached to the network—and when that logical printer is shared to
printer clients. That logical printer on the print server becomes a central point of con-
figuration and management. The drivers that you install on the printer are downloaded
automatically by Windows clients, and the settings you configure for the printer are
distributed as the settings for each of the printer’s clients.
This lesson takes this virtualization of printers as logical devices to the next level. After
examining printer properties, including printer security, you will learn how to create
printer pools to provide faster turnaround for client print jobs. You will also learn how
to make better use of your printers by creating more than one logical printer for a
device to configure, manage, or monitor print jobs or printer usage more effectively.
Finally, you will learn how to manage Active Directory printer objects and Internet
printing.
After this lesson, you will be able to
■
Manage and configure printer properties
■
Create a printer pool
■
Configure multiple logical printers to support a single printer
■
Manage and connect to printers using Active Directory and Internet Printing Protocol
(IPP)
Estimated lesson time:
30 minutes
Managing Printer Properties
Printers and print jobs are managed from their properties dialog boxes. These proper-
ties dialog boxes can be accessed from the Printers And Faxes folder. Right-click a
printer and select Properties to configure a printer. Double-click a printer and, in the
print queue, right-click a print job and choose Properties to configure a print job. The
initial properties of a print job are inherited from the properties of the printer itself. But
a print job’s default properties can be modified independently of the printer’s.
Controlling Printer Security
Windows Server 2003 allows you to control printer usage and administration by assign-
ing permissions through the Security tab of the printer’s Properties dialog box. You can
assign permissions to control who can use a printer and who can administer the printer
or documents processed by the printer. A typical printer Security tab of a printer’s
Properties dialog box is shown in Figure 8-5.
Please purchase PDF Split-Merge on www.verypdf.com to remove this watermark.
Lesson 2 Advanced Printer Configuration and Management
8
-
17
Figure 8-5 The Security tab of a printer’s Properties dialog box
You can use a printer’s access control list (ACL) to restrict usage of a printer and to
delegate administration of a printer to users who are not otherwise administrators.
Windows Server 2003 provides three levels of printer permissions: Print, Manage Print-
ers, and Manage Documents.
By default, the Print permission is assigned to the Everyone group. Choosing this per-
mission allows all users to send documents to the printer. To restrict printer usage,
remove this permission and assign Allow Print permission to other groups or individual
users. Alternatively, you can deny Print permission to groups or users. As with file sys-
tem ACLs, denied permissions override allowed permissions. Also, like file system
ACLs, it is best practice to restrict access by assigning allow permissions to a more
restricted group of users rather than granting permissions to a broader group and then
having to manage access by assigning additional deny permissions.
The Manage Documents permission provides the ability to cancel, pause, resume, or
restart a print job. The Creator Owner group is allowed Manage Documents permis-
sion. Because a permission assigned to Creator Owner is inherited by the user that cre-
ates an object, this permission enables a user to cancel, pause, resume, or restart a print
job that he or she has created. The Administrators, Print Operators and Server Opera-
tors groups are also allowed the Manage Documents permission, which means they
can cancel, pause, resume, or restart any document in the print queue. Those three
groups are also assigned the Allow Manage Printers permission, which enables them to
modify printer settings and configuration, including the ACL itself.
Please purchase PDF Split-Merge on www.verypdf.com to remove this watermark.
8-18
Chapter 8 Printers
Tip
If a printer’s security is not a major concern, you can delegate administration of the
printer by assigning a group, such as the <Printer> Users group, Manage Documents, or even
Manage Printers permission.
Assigning Forms to Paper Trays
If a print device has multiple trays that regularly hold different paper sizes, you can
assign a form to a specific tray. A form defines a paper size. When users print a docu-
ment of a particular paper size, Windows Server 2003 automatically routes the print job
to the paper tray that holds the correct form. Examples of forms include Legal, Letter,
A4, Envelope, and Executive.
To assign a form to a paper tray, select the Device Settings tab of the printer’s Proper-
ties dialog box, as shown in Figure 8-6. The number of trays shown in the Form To
Tray Assignment section obviously depends on the type of printer you have installed,
and the number of trays it supports. Further down the Device Settings tree are settings
to indicate the installation state of printer options, such as additional paper trays, paper
handling units, fonts, and printer memory.
Figure 8-6 The Device Settings tab of a printer’s Properties dialog box
Print Job Defaults
The General tab of the printer’s Properties dialog box includes a Printing Preferences
button, and the Advanced tab includes a Printing Defaults button. Both of these but-
tons display a dialog box that lets you control the manner in which jobs are printed by
the logical printer, including page orientation (portrait or landscape), double-sided
Please purchase PDF Split-Merge on www.verypdf.com to remove this watermark.