Tài liệu MCSE Windows server 2003- P11 ppt
Bạn đang xem bản rút gọn của tài liệu. Xem và tải ngay bản đầy đủ của tài liệu tại đây (2.97 MB, 50 trang )
Chapter 12 Monitoring Microsoft Windows Server 2003
12
-
31
■
Use Event Viewer and the Performance console to get an accurate picture of any
immediate bottleneck problems due to device failure, service misconfiguration, or
application incompatibilities. Replace hardware, properly configure services, and
upgrade applications where necessary to improve the component parts of the run-
ning environment.
■
Once the permissions are defined, put Failure Access Auditing in place to find
anyone who is attempting to gain unauthorized resource access, and through what
means.
■
Use Performance Logs And Alerts to baseline the servers once clearly defined bot-
tlenecks have been removed. Continue to monitor for changes in server perfor-
mance against the baseline.
Troubleshooting Lab
Users in the Help Desk group have been creating their own Web pages to publish tech-
nical data for the rest of the group, and have many utilities that they use periodically
in testing applications for functionality and stability. Recently, these users have been
asking for some help in determining why their computers’ performance has recently
declined significantly.
Using the Performance console, take a baseline of the following counters:
■
Cache\Data Map Hits %
■
Cache\Fast Reads/sec
■
Cache\Lazy Write Pages/sec
■
Logical Disk\% Free Space
■
Memory\Available Bytes
■
Memory\ Pool Nonpaged Allocs
■
Memory\ Pool Nonpaged Bytes
■
Memory\ Pool Paged Allocs
■
Memory\ Pool Paged Bytes
■
Processor(_Total)\% Processor Time
■
System\Context Switches/sec
■
System\Processor Queue Length
■
Processor(_Total)\Interrupts/sec
Please purchase PDF Split-Merge on www.verypdf.com to remove this watermark.
12-32
Chapter 12 Monitoring Microsoft Windows Server 2003
Monitor each of the suspect computers for one week of normal activity, recording the
resulting output in a log file unique to each computer. Use a remote computer to col-
lect the monitoring data so as not to skew the results of your baseline.
Analyze the data to determine if there are any obvious bottlenecks. This list of counters
is particularly baselining memory, disk I/O, and processor performance on each of the
computers. Once the bottleneck has been defined, the applications (processes) should
be examined to determine which of them are the heaviest contributors to the problem.
The applications can then be upgraded, if that helps; removed, or resources can be
added to the computers sufficient to perform the required tasks.
Chapter Summary
■
Event Viewer presents data in the form of logs. The Application, System, and Secu-
rity logs are on every Windows Server 2003 server. Domain controllers have two
additional logs relating to Active Directory, and other application servers (such as
DNS) have their own set of log files.
■
The Performance console (perfmon.msc) consists of two snap-ins: System Monitor
and Performance Logs And Alerts. System Monitor shows real-time performance
data based on Object counters, and can display the log data recorded by Perfor-
mance Logs And Alerts either in the form of Counter (interval polling) logs, or
Trace (event-driven) logs.
■
Task Manager is used to view real-time performance data surrounding processes
and applications. Processes can be initiated and ended using Task Manager. Pro-
cesses can also be adjusted up or down in CPU priority, and can be assigned affin-
ity to a particular processor on a multiprocessor computer.
■
WMI is a management system that collects data from computer systems. The con-
trol interface of WMI Control snap-in allows for adjustment of permissions beyond
the default of the local administrator to manage computers across the network.
While WMI is capable of configuring many different types of system behavior
including users, groups, and services, the focus of this chapter is on the ability to
extract data from the WMI Repository using the command line interface to WMI,
WMIC. WMIC is capable of reporting running services, installed applications, and
publishing Event Viewer data to CSV or HTML files for ease of distribution and
analysis.
Please purchase PDF Split-Merge on www.verypdf.com to remove this watermark.
Chapter 12 Monitoring Microsoft Windows Server 2003
12
-
33
Exam Highlights
Before taking the exam, review the key points and terms that are presented below to
help you identify topics you need to review. Return to the lessons for additional prac-
tice and review the “Further Readings” sections in Part 2 for pointers to more informa-
tion about topics covered by the exam objectives.
Key Points
■
Event Viewer does not perform configuration, but collects data from different
reporting providers. Data reported is organized into the appropriate log, and can
be filtered, sorted, and exported for ease of analysis.
■
Task Manager is a tool used only on the local computer, and does not allow con-
figuration of memory, processor, or other settings. Task Manager is exclusively
used to start, stop, prioritize, and set processor affinity for applications.
■
The Performance Logs And Alerts snap-in can do no configuration, only reporting
data through Counter Logs as reported by providers (object counters) on a config-
ured interval, or through Trace Logs as reported by event-driven providers.
■
WMI requires administrative credentials for access to the remote computer for
configuration of settings.
■
WMIC is not an Active Directory Schema Management Tool. WMI maintains its
own schema.
Key Terms
Windows Management Instrumentation (WMI) The Microsoft implementation of
Web-Based Enterprise Management Initiative to establish standards of data in
Enterprise Management
Windows Management Instrumentation Control (WMIC) A command line utility
that interfaces with the WMI Repository (database) for configuration and monitor-
ing management
Task Manager An interface tool for the manipulation of processes
System Monitor A component of the Performance console, as is the Performance
Logs And Alerts snap-in, and should not be confused with System Properties
Please purchase PDF Split-Merge on www.verypdf.com to remove this watermark.
12-34
Chapter 12 Monitoring Microsoft Windows Server 2003
Questions and Answers
Lesson 1 Review
Page
1. On a Domain Controller running DNS, what logs will Event Viewer display by
12-7
default? What are these logs, and what data do they collect?
■
Application Developers of an application can program their software to report configura
tion changes, errors, or other events to this log.
■
System The Windows Server 2003 operating system will report events (service start or
abnormal shutdown, device failures, and so on) to this log. The events reported to this log
are preconfigured.
■
Security Logon and resource access events (audits) are reported to this log. Configura
tion for most of these events is at the discrimination of the system administrator.
■
Directory Service This log contains events related to the Active Directory, such as irrec
oncilable object replication or significant events within the directory.
■
File Replication Service This log contains errors or significant events reported by the
File Replication Service related to the copying of information between domain controllers
during a replication cycle.
■
DNS Server This log contains errors or significant events reported by the DNS server.
2. You have configured your Windows Server 2003 computer to audit all failed object
access, and all files and folders have auditing configured for List Folder / Read
Data Failure. All other Event Viewer and Security log settings are at their default
configurations. What will happen when the number of entries in the Security log
reaches 512 KB?
The default configuration puts the maximum log file size at 512 KB, and allows for the file to
overwrite, so once the file reaches 512 KB, the older data in the log will be overwritten.
3. You do not want data in the Security log to be overwritten, but also do not want
your Windows Server 2003 computer to stop serving the network at any time.
What settings will you configure on your server?
In the properties for the Security log, configure the log to Do Not Overwrite Events (Clear Log
Manually). You will not define the Group Policy that defines the Security Option: Audit: Shut
Down System Immediately If Unable To Log Security Audits, as this will discontinue the server’s
availability to the network if the Security log fills. You will need to schedule a regular period of
Security log analysis as good administrative practice, but you will not need to do so at such a
frequency as to keep the server from shutting down because you did not clear the log soon
enough.
Please purchase PDF Split-Merge on www.verypdf.com to remove this watermark.
Questions and Answers
12
-
35
Page
12-17
Page
12-23
Lesson 2 Review
1. Your goal is to monitor all your Windows Server 2003 servers so that they can be
defragmented on a regular schedule, and as efficiently as possible. The disk
defragmentation program that you use requires at least 20% free disk space on
each volume in order to defragment properly. What should you do?
Configure Performance Logs And Alerts on a workstation (or less-utilized server) to monitor all
the remote servers’ LogicalDisk object, % Free Space counter for each instance on that com
puter. In addition, configure each counter as an Alert with a threshold of Below 20% free space.
Finally, configure each of the Alerts to send a message to the administrator (and any other user
accounts that you want to receive the message).
2. You have been monitoring one of your Windows Server 2003 servers due to poor
performance on the network. The following data is representative of your findings:
❑
Processor: % Processor Time: High
❑
Physical Disk: % Disk Time: Low
❑
Memory: Pages/sec: Low
❑
Processor: Interrupts/sec: High
❑
Process: % Processor Time (for non-service processes): Low
❑
Process: % Processor Time (for system services): Low
What is the most likely explanation for the problem?
It is likely that the Network Interface Card (or another device) is experiencing a problem at the
device level. The high number of interrupts per second would cause the processor to be busy
processing requests for service from the network interface. With all other counters being low,
it is unlikely that an application or any System service is at fault.
3. The server that you are using to monitor the other servers on your network is
overburdened with the task, so you must lighten its load of monitoring. To make
the greatest impact for the monitoring computer’s performance while maintaining
as much monitored data as possible, what should you do?
Increase the polling interval for recording the data from the remote computers. By decreasing
the frequency of the data poll, and perhaps staggering the logging times, the greatest amount
of monitoring data can be maintained while reducing the load on the monitoring computer.
Lesson 3 Review
1. What information can Task Manager provide about the performance of applications?
Task Manager can provide processor, memory usage (including the page file), and basic Input/
Output on a process-by-process basis.
2. Your computer crashes with almost clocklike predictability approximately one
hour after each system startup. You suspect an application with a memory leak
Please purchase PDF Split-Merge on www.verypdf.com to remove this watermark.
12-36
Chapter 12 Monitoring Microsoft Windows Server 2003
that is causing the system to run out of memory. How can you use Task Manager
to determine which application is causing the problem?
Start all applications normally. In Task Manager, select the Memory Usage Delta column (View-
Select Columns), and click on the column header. If you leave the system idle, then memory
usage by any of the processes running on the computer should stabilize. If there is an applica
tion with a memory leak, it should stay at or near the top of the list of processes running on the
computer, and its value for Memory Usage Delta should continue to increase even with no activ
ity on the system.
3. You are running a database application on your computer. Your computer has two
processors. You want the database application to run on the second processor.
How can you use Task Manager to do this?
Right-click the database application in the Applications tab, and then choose Go To Process.
Right-click the process, and set the processor affinity from the shortcut menu.
Page
Lesson 4 Review
12-29
1. You need to get patch and hotfix information from a number of servers on your
network. You would like to do this remotely. How can you use WMI to accom-
plish the task?
Use the OS ASSOC alias with the /node: switch to run the WMIC command on any number of
the computers remotely. Output to a CSV or HTML file for later use is possible as well using the
/output alias and /format switch. For example, if Server01 and Server02 were the target com
puters for WMIC, the command would be /NODE:"SERVER01","SERVER02" OS ASSOC.
2. You want to get a list of all installed applications on 17 computers in the develop-
ment department. You would like to do this remotely. How can you use WMI to
accomplish this?
Type the computer names into a text file (computers.txt, for example). Use the WMIC PRODUCT
alias with the node /node:@ switch to get the list of installed applications on each of the com
puters in the list. Output to a CSV or HTML file for later use is possible as well using the /out-
put alias and /format switch. For example, /NODE:@c:\computers.txt PRODUCT would produce
the desired results.
3. You want to give a small group of engineers the ability to use WMI to get infor-
mation from some of the development servers, but you do not want to give them
administrator privileges on the servers. What can you do to give the engineers
access?
Give each engineer, or a group of all engineers, permission to the WMI namespace using WMI
Control snap-in (Wmimgmt.msc), in the WMI MMC.
Please purchase PDF Split-Merge on www.verypdf.com to remove this watermark.
13 Recovering from System
Failure
Exam Objectives in this Chapter:
■
Perform Automated System Recovery (ASR)
■
Perform server system recovery
Why This Chapter Matters
Although Microsoft Windows Server 2003 offers superior levels of stability and
reliability, power supplies, cooling fans, chip sets and yes, even code, can cause
a computer to fail. And when a server fails in the forest, everyone hears it fall.
Throughout this training kit, you have learned how to implement and support
best practices that will minimize the risk of failure. You have also learned how to
recover from the failure of specific services, drivers, and hardware configurations.
In this chapter, you will learn the remaining skills that are required to recover a
server when the operating system itself is corrupted or inaccessible due to cata-
strophic failure.
Lessons in this Chapter:
■
Lesson 1: Recovering from System Failure . . . . . . . . . . . . . . . . . . . . . . . . . .13-2
Before You Begin
This chapter covers the concepts and skills related to recovering a failed server. To
complete the exercises in this chapter, prepare the following:
■
A computer running Windows Server 2003. The examples use the computer name
Server01. It can be a member server or a domain controller. Backups that are cre-
ated during the exercises will complete more quickly if the computer is a member
server.
■
A second physical disk is required to perform the exercise that demonstrates Auto-
mated System Recovery.
■
If you complete the Automated System Recovery exercise, all data on the disk con-
taining the system volume will be erased. Do not perform the Automated System
Recovery if you want to maintain any data on that disk.
13-1
Please purchase PDF Split-Merge on www.verypdf.com to remove this watermark.
13-2
Chapter 13 Recovering from System Failure
Lesson 1: Recovering from System Failure
In a worst-case scenario, server hardware fails and cannot be recovered. To return to
operations, you must have a complete backup of the server that you can restore to a
new piece of hardware. This complete backup will include data stored on the server,
applications, and the operating system itself. In Chapter 7, you learned how to use the
Backup Utility and the Ntbackup command-line tool to back up data. In this lesson,
you will learn how to use the same utilities to back up the system so that you can
return to operational status quickly in the event of such a worst-case scenario. You will
also learn how to use the Recovery Console to perform surgical repairs of specific
problems including service or driver failures.
After this lesson, you will be able to
■
Back up the System State
■
Prepare an ASR backup set and repair a computer using Automated System Recovery
■
Install and use the Windows Server 2003 Recovery Console
Estimated lesson time:
60 minutes
A Review of Recovery Options
Throughout this book, we have addressed methods used to repair and recover from
specific types of failures:
■
Data loss or corruption: Chapter 7 discussed the backup and restore of data as
well as the Volume Shadow Copy Service, the new feature in Windows Server
2003 that allows users to access or restore previous versions of files in shared fold-
ers on servers.
■
Driver updates resulting in system instability: Chapter 10 introduced the new
driver rollback capability of Windows Server 2003. If a driver has been updated
and the system becomes unstable, that driver and any new settings that were con-
figured can be rolled back to a previously installed version and state. Printer driv-
ers cannot be rolled back. You also learned that it is easy, using Device Manager,
to disable a device that causes instability. If an application or supporting software
contributes to the instability, use Add Or Remove Programs to remove the offend-
ing component.
■
Driver or service installation or update results in the inability to start the system:
Chapter 10 covered the use of the Last Known Good Configuration, which rolls
back the active ControlSet of the system’s registry to the ControlSet that was used
Please purchase PDF Split-Merge on www.verypdf.com to remove this watermark.
Lesson 1 Recovering from System Failure
13
-
3
the last time a user successfully logged on to the system. If you install or update a
service or driver and the system crashes or cannot reboot to the logon screen, the
Last Known Good Configuration effectively takes you back to the version of the
registry that was active before the driver or service was installed. You also learned
about the variety of Safe mode options, which enable the system to start with spe-
cific drivers or services disabled. Safe mode can often allow you to start an other-
wise unbootable computer and, using Device Manager, disable, uninstall, or roll
back a troublesome driver or service.
■
Failure of the disk subsystem: Chapter 11 discussed the steps required to configure
disk redundancy through mirrored (RAID-1) or RAID-5 volumes, and how to
recover from the failure of a single disk within a fault-tolerant volume.
Each of these recovery and repair processes makes the assumption that a system can
be restarted to some extent. When a system cannot be restarted, the System State, Auto-
mated System Recovery, and the Recovery Console can return the system to opera-
tional status.
System State
Windows 2000 and Windows Server 2003 introduced the concept of System State to the
backup process. System State data contains critical elements of a system’s configuration
including:
■
The system’s registry
■
The COM+ Class Registration Database
■
The boot files, which include boot.ini, ntdetect.com, ntldr, bootsect.dos, and
ntbootdd.sys
■
System files that are protected by the Windows File Protection service
In addition, the following are included in the System State when the corresponding ser-
vices have been installed on the system:
■
Certificate Services database on a certificate server
■
Active Directory and the Sysvol folder on a domain controller
■
Cluster service information on a cluster server
■
Internet Information Services (IIS) metabase on a server with IIS installed
Please purchase PDF Split-Merge on www.verypdf.com to remove this watermark.
13-4
Chapter 13 Recovering from System Failure
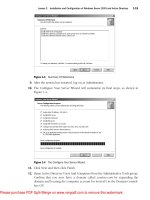
To back up the System State in the Backup Utility, include the System State node as part
of the backup selection. The System State and its components are shown in Figure 13-1.
Figure 13-1 The System State
If you prefer to use the command line, use Ntbackup with the following syntax:
Ntbackup backup systemstate /J "backup job name" ...
Followed by the /F switch to indicate backing up to a file, or appropriate /T, /G, /N,
/P switches to back up to a tape. The switches for the Ntbackup command are
described fully in Chapter 7.
There are several important notes and considerations related to backing up the Sys-
tem State:
■
You cannot back up individual components of the System State. For example, you
cannot back up the COM+ Class Registration Database alone. Because of interde-
pendencies among System State components, you can back up only the collection
of System State components as a whole.
■
You cannot use Ntbackup or the Backup Utility to back up the System State from
a remote machine. You must run Ntbackup or the Backup Utility on the system
that is being backed up. You can, however, direct the backup to a file on a remote
server, which can then transfer the file onto another backup media. Or you can
purchase a third-party backup utility that can remotely back up the System State.
■
The System State contains most elements of a system’s configuration, but may not
include every element required to return the system to full operational capacity. It
is therefore recommended to back up all boot, system, data, and application vol-
umes when you back up the system state. The System State is a critical piece of a
complete backup, but is only one piece.
Please purchase PDF Split-Merge on www.verypdf.com to remove this watermark.
Lesson 1 Recovering from System Failure
13
-
5
■
Performing a system state backup automatically forces the backup type to Copy,
although the interface may not indicate that fact. Take that fact into consideration
when planning whether to include other items in your backup selection.
To restore the System State on a computer that is operational, use the Backup Utility
and, on the Restore And Manage Media tab, click the System State check box. If the
computer is not operational, you will most likely turn to Automated System Recovery
to regain operational status.
System State on a Domain Controller
The System State on a domain controller includes the Microsoft Active Directory direc-
tory service and the Sysvol folder. You can back up the System State on a domain con-
troller just as on any other system, using the Backup Utility or Ntbackup command. As
with all backup media, it is paramount to maintain physical security of the media to
which the Active Directory is backed up.
To restore the System State on a domain controller, you must restart the computer,
press F8 to select startup options, and select Directory Services Restore Mode. This
mode is a variation of the Safe modes described in Chapter 10. In Directory Services
Restore Mode, the domain controller boots but does not start Active Directory services.
You can log on to the computer only as the local Administrator, using the Directory
Services Restore Mode password that was specified when Dcpromo was used to pro-
mote the server to a domain controller.
When in Directory Services Restore Mode, the domain controller does not perform
authentication or Active Directory replication, and the Active Directory database and
supporting files are not subject to file locks. You can therefore restore the System State
using the Backup Utility.
When restoring the System State on a domain controller, you must choose whether to
perform a non-authoritative (normal) or authoritative restore of the Active Directory
and Sysvol folder. After restoring the System State using the Backup Utility, you com-
plete a non-authoritative restore by restarting the domain controller into normal oper-
ational status. Because older data was restored, the domain controller must update its
replica of the Active Directory and Sysvol, which it does automatically through stan-
dard replication mechanisms from its replication partners.
There may be occasions, however, when you do not want the restored domain con-
troller to become consistent with other functioning domain controllers and instead
want all domain controllers to have the same state as the restored replica. If, for example,
objects have been deleted from Active Directory, you can restore one domain controller
Please purchase PDF Split-Merge on www.verypdf.com to remove this watermark.
13-6
Chapter 13 Recovering from System Failure
with a backup set that was created prior to the deletion of the objects. You must then
perform an authoritative restore, which marks selected objects as authoritative and
causes those objects to be replicated from the restored domain controllers to its repli-
cation partners.
To perform an authoritative restore, you must first perform a non-authoritative restore
by using the Backup Utility to restore the System State onto the domain controller.
When the restore is completed and you click Close in the Backup Utility, you are
prompted to restart the computer. When that occurs, you must select No. Do not allow
the domain controller to restart. Then, open a command prompt and use Ntdsutil to
mark the entire restored database or selected objects as authoritative. You can get more
information about Ntdsutil and authoritative restore by typing ntdsutil /? at the com-
mand prompt or by using the online references in the Help And Support Center. The
MCSE Training Kit (Exam 70-294): Planning, Implementing, and Maintaining a
Microsoft Windows Server 2003 Active Directory Infrastructure (Microsoft Press, 2003)
addresses domain controller recovery in detail.
!
Exam Tip
What is most important to remember for the 70-290 exam is that the System
State can only be restored on a domain controller by restarting the domain controller in Direc
tory Services Restore Mode, and that Ntdsutil is used to recover deleted objects in Active
Directory by marking those objects as authoritative, following a normal, or non-authoritative,
restore of the System State with the Backup Utility.
Automated System Recovery
Recovering a failed server has traditionally been a tedious task, involving reinstallation
of the operating system, mounting and cataloging the backup tape, then performing a
full restore. Automated System Recovery makes that process significantly easier. Auto-
mated System Recovery requires you to create an ASR set, consisting of a backup of
critical system files, including the registry, and a floppy disk listing the Windows sys-
tem files that are installed on the computer. If the server ever fails, you simply restart
with the Windows Server 2003 CD-ROM and select the option to perform an Auto-
mated System Recovery. The process uses the list of files on the ASR disk to restore
standard drivers and files from the original Widows Server 2003 CD-ROM, and will
restore remaining files from the ASR backup set.
To create an ASR set, open the Backup Utility from the Accessories program group, or
by clicking Start, then Run, and typing Ntbackup.exe. If the Backup And Restore Wiz-
ard appears, click Advanced Mode. Then, from the Backup Utility’s Welcome tab, or
from the Tools menu, select ASR Wizard. Follow the instructions of the Automated
Please purchase PDF Split-Merge on www.verypdf.com to remove this watermark.
Lesson 1 Recovering from System Failure
13
-
7
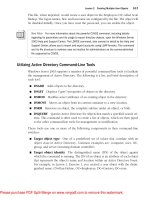
System Recovery Preparation Wizard. It will request a 1.44 megabyte (MB) floppy disk
to create the ASR floppy. The ASR Wizard is shown in Figure 13-2.
Figure 13-2 The Backup Destination page of the ASR Wizard
The backup created by the ASR Wizard includes disk configuration information for
each disk in the computer, a System State backup, and a backup of files including the
driver cache. The backup set is sizable. On a standard installation of Windows Server
2003, the ASR backup size will be more than 1 gigabyte (GB).
The ASR floppy disk is created by the Automated System Recovery Preparation Wizard,
and is specific to the system and the time at which the ASR set was created. You should
label the ASR backup set and floppy disk carefully and keep them together.
The ASR floppy disk contains two catalogs of files on the system: Asr.sif and Asrpnp.sif.
If the system does not have a floppy drive when you create the ASR set, you can
create the floppy disk after running the wizard by copying these two files from the
%Systemroot%\repair folder on the system to another computer that does have a
floppy drive, and copying the files to the floppy disk on that second system. If you lose
the floppy disk, you can restore the two files from the %Systemroot%\repair folder in
the ASR backup set. You must have the ASR floppy disk to perform an Automated Sys-
tem Recovery. If the system does not have a floppy drive you will need to connect one
before performing the restore.
Please purchase PDF Split-Merge on www.verypdf.com to remove this watermark.
13-8
Chapter 13 Recovering from System Failure
Tip
The ASR set contains the files required to start the system. It is not a comprehensive
backup of the entire system. Therefore it is highly recommended to create a complete
backup, including the System State, system volume, applications and, perhaps, user data
when you create your ASR set.
When you perform an Automated System Recovery, you will need
■
The Windows Server 2003 setup CD-ROM
■
The ASR backup set
■
The ASR floppy disk created at the same time as the ASR backup set
Tip
You will also need any mass storage device drivers that are not part of the standard
Windows Server 2003 driver set. To facilitate recovery, you should consider copying those
drivers to the ASR floppy disk.
To restore a system using Automated System Recovery, restart using the Windows
Server 2003 CD-ROM, just as if you were installing the operating system on the com-
puter. If the computer requires a mass storage device driver that is not included with
Windows Server 2003, press F6 when prompted and provide the driver on a floppy
disk. After loading initial drivers, the system will prompt you to press F2 to perform an
Automated System Recovery. Press F2 and follow the instructions on your screen.
Automated System Recover will prompt you for the system’s ASR floppy, which con-
tains two catalogs, or lists, of files required to start the system. Those files will be
loaded from the CD-ROM. Automated System Recovery will restore remaining critical
files, including the system’s registry, from the system’s ASR backup set. There is a
restart during the process, and if the computer requires a vendor-specific mass storage
device driver, you will need to press F6 during this second restart as well. Because
there is a restart, you should either remove the floppy after the initial text-based por-
tion of the restore, or set the restart order so that the system does not attempt to restart
from the floppy drive.
Please purchase PDF Split-Merge on www.verypdf.com to remove this watermark.
Lesson 1 Recovering from System Failure
13
-
9
Recovery Console
The Recovery Console is a text-mode command interpreter that allows you to access to
the hard disk of a computer running Windows Server 2003 for basic troubleshooting
and system maintenance. It is particularly useful when the operating system cannot be
started, as the Recovery Console can be used to run diagnostics, disable drivers and
services, replace files, and perform other targeted recovery procedures.
Installing the Recovery Console
You can start the Recovery Console by booting with the Windows Server 2003 CD-
ROM and, when prompted, pressing R to choose the repair and recover option. How-
ever, when a system is down you will typically want to recover the system as quickly
as possible, and you may not want to waste time hunting down a copy of the CD-ROM
or waiting for the laboriously long restart process. Therefore, it is recommended to pro-
actively install the Recovery Console.
To install the Recovery Console, insert the Windows Server 2003 CD-ROM and type
cd-drive:\i386\winnt32 /cmdcons on the command line. The Setup Wizard will
install the 8 MB console in a hidden folder called Cmdcons, and will modify the
boot.ini file to provide the Recovery Console as a startup option during the boot process.
Removing the Recovery Console
If you ever decide to remove the Recovery Console, you must delete files and folders
that are “super hidden.” From Windows Explorer, choose the Folder Options command
from the Tools menu. Click the View tab, select Show Hidden Files and Folders, clear
Hide Protected Operating System Files, click OK and, if you are prompted with a warn-
ing about displaying protected system files, click Yes.
Then, delete the Cmdcons folder and the Cmldr file, each of which are located in the
root of the system drive. You must next remove the Recovery Console startup option
from Boot.ini. Open System from Control Panel, click the Advanced tab, click the Set-
tings button in the Startup And Recovery frame, then, in the Startup And Recovery dia-
log box, under System startup, select Edit. Boot.ini will display in Notepad. Remove the
entry for the Recovery Console, which will look something like this:
c:\cmdcons\bootsect.dat="Microsoft Windows Recovery Console" /cmdcons
Save the file and close Boot.ini.
Please purchase PDF Split-Merge on www.verypdf.com to remove this watermark.
13-10
Chapter 13 Recovering from System Failure
Using the Recovery Console
After you have installed the Recovery Console, you can boot the system and select
Microsoft Windows Recovery Console from the startup menu. If the console was not
installed or cannot be launched successfully, you can restart using the Windows Server
2003 CD-ROM and, at the Welcome To Setup screen, press R to select Repair. The load-
ing takes significantly longer from the CD-ROM, but the resulting Recovery Console is
identical to that installed on the local system.
Once the Recovery Console has started, as shown in Figure 13-3, you will be prompted
to select the installation of Windows to which you wish to log on. You will then be
asked to enter the Administrator password. You must use the password assigned to the
local Administrator account, which, on a domain controller, is the password configured
on the Directory Services Restore Mode Password page of the Active Directory Instal-
lation Wizard.
Figure 13-3 The Recovery Console
You can type help at the console prompt to list the commands available in the Recov-
ery Console, and help command name for information about a specific command.
Most are familiar commands from the standard command-line environment. Several of
the commands deserve particular attention:
■
Listsvc Displays the services and drivers that are listed in the registry as well as
their startup settings. This is a useful way to discover the short name for a service
or driver before using the Enable and Disable commands.
■
Enable/Disable Controls the startup status of a service or driver. If a service or
driver is preventing the operating system from starting successfully, use the Recov-
ery Console’s Disable command to disable the component, then restart the system
and repair or uninstall the component.
■
Diskpart Provides the opportunity to create and delete partitions using an inter-
face similar to that of the text-based portion of Setup. You can then use the Format
command to configure a file system for a partition.
■
Bootcfg Enables you to manage the startup menu.
Please purchase PDF Split-Merge on www.verypdf.com to remove this watermark.
Lesson 1 Recovering from System Failure
13
-
11
The Recovery Console has several limitations imposed for security purposes. These
limitations can be modified using a combination of policies (located in the Computer
Configuration, Windows Settings, Security Settings, Local Policies, Security Options
node of the Local Computer Policy console) and Recovery Console environment
variables.
■
Directory access You can only view files in the root directory, in %Windir%
and in the \Cmdcons folder. Disable this limitation by setting the policy Allow
Floppy Copy And Access To All Drives And All Folders, and using the command
set AllowAllPaths = true. Be sure to include the space on either side of the equal
sign when typing the set command.
■
File copy You can only copy files to the local hard disk, not from it. Use the pol-
icy mentioned above and the command set AllowRemovableMedia = true. Be
sure to include the space on either side of the equal sign when typing the set
command.
■
Wild cards You cannot use wildcards such as the asterisk to delete files. Imple-
ment the policy mentioned above then, in the Recovery Console, type the com-
mand set AllowWildCards = true. Be sure to include the space on either side of
the equal sign when typing the set command.
Practice: Recovering from System Failure
In this practice, you will back up the System State and create an Automated System
Recovery Set. You will also install and use the Recovery Console to troubleshoot driver
or service failures. Finally, if you have access to a second physical disk drive, you will
be able to perform Automated System Recovery to restore a failed server.
Exercise 1: Back Up the System State
1. Log on to Server01 as Administrator.
2. Open the Backup Utility.
3. If the Backup And Restore Wizard appears, click Advanced Mode.
4. Click the Backup tab and select the check box next to System State. Also click the
System State label so that you can see the components of the System State listed in
the other pane of the dialog box.
5. Type a file name for the backup file, such as C:\SystemState.bkf.
6. Start the backup.
7. When the backup is complete, examine the file size of the System State backup
file. How big is the file?
Please purchase PDF Split-Merge on www.verypdf.com to remove this watermark.
13-12
Chapter 13 Recovering from System Failure
Exercise 2: Create an ASR Set
This exercise requires a blank floppy disk and approximately 1.5 GB of free disk space.
If you have a second physical disk in Server01, direct the backup to that disk so that
you can perform an Automated System Recovery in Exercise 4.
1. Open the Backup Utility. If the Backup And Restore Wizard appears, click
Advanced Mode.
2. Click Automated System Recovery Wizard, or choose ASR Wizard from the Tools
menu.
3. Follow the prompts. Back up to a file called ASRBackup.bkf on the C drive or, if
you have a second physical disk, on that volume.
4. When the backup is complete, examine the file size of ASRBackup.bkf. How big
is it? How does its size compare to that of the System State backup?
Exercise 3: Installing and Using the Recovery Console
1. Insert the Windows Server 2003 CD-ROM.
2. Click Start, Run, and then type the following command in the Open box:
D:\i386\winnt32.exe /cmdcons
where D: is the drive letter for your CD-ROM. The Recovery Console will be
installed on the local hard disk.
3. To simulate a service in need of troubleshooting, open the Services console from
Administrative Tools. Locate the Messenger service. Double-click the service and
choose Automatic as the Startup Type.
4. Restart the server.
5. When the server presents the startup boot menu, select Microsoft Windows Recov-
ery Console.
6. When prompted, type 1 to select the installation of Windows Server 2003.
7. Type the password for the local Administrator account.
8. When the Recovery Console prompt appears (by default, C:\Windows>), type
help to display a list of commands.
9. Type listsvc to display a list of services and drivers. Note that the short name of
many services is not the same as the long name. However, the short name of the
Messenger service is also Messenger. Confirm that its startup is set to Automatic.
Please purchase PDF Split-Merge on www.verypdf.com to remove this watermark.
Lesson 1 Recovering from System Failure
13
-
13
10. Type disable messenger to disable the service. The output of the command indi-
cates the success of the command and the original startup configuration for the
service (in this case, SERVICE_AUTO_START). You should always make note of
this setting, so that once troubleshooting has been completed you can return the
service to its original state.
11. To quit the Recovery Console, type exit and press Enter.
Exercise 4: Restoring a System Using Automated System Recovery
Warning
This exercise requires a second physical disk on which an ASR backup has been
created in Lesson 2. This exercise will delete all data on the physical disk that contains the
system and boot partition. Do not proceed if you have stored any data that you cannot afford
to lose.
1. Power off your computer.
2. Restart the computer and open the computer’s BIOS. Make sure the system is con-
figured to start from the CD-ROM.
3. Insert the Windows Server 2003 installation CD-ROM.
4. Restart Server01. Watch carefully and, when prompted, press a key to start from
the CD-ROM.
5. Early in the text-mode setup phase, setup prompts you to press F2 to run an Auto-
matic System Recovery. Press F2.
6. You will then be prompted to insert the Windows Automated System Recovery
disk into the floppy drive. Insert the floppy disk you created in Exercise 2 and
press any key to continue.
7. Text-mode setup prepares for Automated System Recovery and a minimal version
of the operating system is loaded. This step will take some time to complete.
8. Eventually, a Windows Server 2003 Setup screen will appear.
9. Windows Server 2003 Setup, partitions and formats the disk, copies files, initializes
the Windows configuration and then prepares to restart.
10. Remove the floppy disk from the disk drive and allow the computer to restart.
The installation will continue. When the installation completes, the computer
should be restored to its previous state.
Please purchase PDF Split-Merge on www.verypdf.com to remove this watermark.
13-14
Chapter 13 Recovering from System Failure
Lesson Review
The following questions are intended to reinforce key information presented in this
lesson. If you are unable to answer a question, review the lesson materials and try the
question again. You can find answers to the questions in the “Questions and Answers”
section at the end of this chapter.
1. You’re setting up a backup job on a computer running Windows Server 2003. You
want to back up the registry, startup files, and the COM+ Class Registration data-
base. Which backup option should you select?
a. %Windir%
b. %Systemroot%
c. System State
d. None of the above. You cannot back up the registry.
2. You install a scanner on a computer running Windows Server 2003. When you try
to restart your computer, the operating system will not start. Which of the follow-
ing would be the least invasive recovery method to try first to restore the system
to operation?
a. Automated System Recovery
b. Recovery Console
c. Safe mode
d. Directory Services Restore mode
3. A hard disk on a server running Windows Server 2003 has failed. You replace the
disk, boot the system, initialize the disk, and create an NTFS volume on the new
disk. You now want to restore that data from the last backup job from the old disk.
How should you restore the data?
a. Use the Recovery Console to copy data to the disk.
b. Use the Backup utility to launch the Restore Wizard.
c. Use the ASR backup to restore the data.
d. Use the Last Known Good Configuration option in Safe mode to set up the
new disk.
Please purchase PDF Split-Merge on www.verypdf.com to remove this watermark.